Just an experiment to explore the use of wxPython buttons to start and stop a process ...

# explore WxPython buttons to start and stop a process
# set flag to 'stop' to allow exit

import wx

class MyFrame(wx.Frame):
    def __init__(self, parent, mytitle):
        wx.Frame.__init__(self, parent, -1, mytitle, size=(300, 200))
        self.SetBackgroundColour("yellow")
        self.start_btn = wx.Button(self, -1, label='Start')
        self.start_btn.Bind(wx.EVT_BUTTON, self.start_btnClick)
        self.stop_btn = wx.Button(self, -1, label='Stop')
        self.stop_btn.Bind(wx.EVT_BUTTON, self.stop_btnClick)
        self.label = wx.StaticText(self, -1, "-------")
        
        # layout the widgets in a vertical order
        sizer_v = wx.BoxSizer(wx.VERTICAL)
        # Add(widget, proportion, flag, border)
        sizer_v.Add(self.start_btn, 0, flag=wx.ALL, border=10)
        sizer_v.Add(self.stop_btn, 0, flag=wx.ALL, border=10)
        sizer_v.Add(self.label, 0, flag=wx.ALL, border=10)
        self.SetSizer(sizer_v)        
        
        self.char = '>'
        
    def start_btnClick(self, event):
        self.flag = 'start'
        self.processing()

    def stop_btnClick(self, event):
        self.flag = 'stop'
        self.processing()
    
    def processing(self):
        self.SetTitle(self.flag)
        while True:
            if self.flag == 'stop':
                break
            if self.flag == 'start':
                self.label.SetLabel(self.char)
                # needed to keep other processes going
                wx.GetApp().Yield()   
                wx.Sleep(1)
                self.char  += '>'


app = wx.App(0)
MyFrame(None, 'start and stop').Show()
app.MainLoop()
Thanks for this post--i suspect it will be way popular. Neither the wxPython book (Robin Dunn's "wxPython in Action", Manning publ.) nor the demo code in the wx distro bother with the lower-level mechanics of getting data into the PyGridTableBase instance, which is too bad because a fair amount of the Grid class is unlike the other wxWidget classes, so it's difficult to apply the wxWidget/wxPython conventions to grid widgets.

Just a quick example on how to use the wx.grid.PyGridTableBase with wxPython's wx.grid.Grid. Provides a simple way to create, load and use a spreadsheet like grid:

# exploring wxPython's wx.grid.Grid()
# load grid via a '(row, col): value' dictionary and a table class
# that inherits and applies wx.grid.PyGridTableBase
# snee

import wx
import wx.grid

class MyFrame(wx.Frame):
    def __init__(self, header_list, data_dict):
        wx.Frame.__init__(self, None, wx.ID_ANY,
            title="ACME Inc. Staff Stats", size=(510,200))

        self.grid = wx.grid.Grid(self)
        self.grid.SetRowLabelSize(30)     # sets leading row width
        self.grid.SetDefaultRowSize(20)   # sets all row height
        self.grid.SetColLabelSize(30)     # sets leading col height
        self.grid.SetDefaultColSize(80)  # sets all col width

        # select the cell with a mouse left click
        self.Bind(wx.grid.EVT_GRID_CELL_LEFT_CLICK, self.cell_click)

        # the table takes care of all the grid stuff
        table = MyTable(header_list, data_dict)
        self.grid.SetTable(table, True)
        
        # optional, calculate rows of data needed for fun stats
        self.rows = max(data_dict.keys())[0] + 1

    def cell_click(self, event):
        """cell has been left clicked"""
        row = event.GetRow()
        col = event.GetCol()
        # move the grid's cursor to frame the cell
        self.grid.SetGridCursor(row, col)
        # you can do some fun stats with the numbers
        num = []
        if col > 0:
            #num = []
            for nrow in range(self.rows):
                num.append(float(self.grid.GetCellValue(nrow, col)))
        val = self.grid.GetCellValue(row, col)
        if num:
            sf = "r%dc%d %s  max=%.1f min=%.1f avg=%.1f" % \
               (row, col, val, max(num), min(num), sum(num)/nrow)
        else:
            sf = "r%dc%d %s" % (row, col, val)
        self.SetTitle(sf)


class MyTable(wx.grid.PyGridTableBase):
    def __init__(self, header_list, data_dict):
        wx.grid.PyGridTableBase.__init__(self)
        self.data = data_dict
        # calculate rows and cols needed to fit the data
        self.rows = max(data_dict.keys())[0] + 1
        self.cols = max(data_dict.keys())[1] + 1
        #print self.rows, self.cols  # test

        # label lists have to match row and column numbers
        # default for self.rowLabels = ["1", "2", "3", "4", "5", ...]
        # default for self.colLabels = ["A", "B", "C", "D", "E", ...]
        # however, we have custom column labels
        self.colLabels = header_list

    # these are the five required methods ...
    def GetNumberRows(self):
        """actually sets number of rows"""
        return self.rows

    def GetNumberCols(self):
        """actually sets number of cols"""
        return self.cols

    def IsEmptyCell(self, row, col):
        return self.data.get((row, col)) is not None

    def GetValue(self, row, col):
        """actually sets value of each (row, col)"""
        value = self.data.get((row, col))
        if value is not None:
            return value
        else:
            return ''

    def SetValue(self, row, col, value):
        self.data[(row,col)] = value

    # optional methods ...
    # allows the table to provide the attributes for each cell
    def GetAttr(self, row, col, kind):
        attr = wx.grid.GridCellAttr()
        attr.SetTextColour("black")
        attr.SetBackgroundColour("yellow")
        attr.SetFont(wx.Font(8, wx.SWISS, wx.NORMAL, wx.NORMAL))
        return attr

    def GetColLabelValue(self, col):
        """you need to supply colLabels a list of labels"""
        return self.colLabels[col]
    
    '''not needed, used default row labels here
    def GetRowLabelValue(self, row):
        """you need to supply rowLabels a list of labels"""
        return self.rowLabels[row]
    '''

header_list = ['Name', 'Age', 'Weight', 'Pay', 'Golf', 'Bowl']
# raw data string could be from a csv file ...
# columns are Name, Age, Weight, Pay, Golf avg, Bowling avg
raw_data = """\
Albert, 45, 230, 96000, 67, 210
Curt, 22, 156, 34000, 56, 180
Doris, 19, 112, 27000, 79, 133
Larry, 34, 188, 57500, 49, 189
Lupe, 24, 134, 42000, 83, 224
Mark, 23, 202, 32000, 47, 201
Rita, 22, 96, 23500, 87, 102
Willy, 28, 286, 18000, 58, 134
Zoe, 19, 120, 39000, 63, 156"""

# create a list of lists
data_list = []
for line in raw_data.split('\n'):
    line_list = line.split(',')
    data_list.append(line_list)
    
#print(data_list)  # test

# create a dictionary of (row, col):value pairs
data_dict = {}
for row, item in enumerate(data_list):
    #print row, item
    for col, value in enumerate(item):
        data_dict[(row, col)] = value

#print(data_dict)  # test

app = wx.App(0)
MyFrame(header_list, data_dict).Show()
app.MainLoop()

A code example to show that wxPython does have a very flexible plotting widget. Here we graph the last 300 trading days (about 1 year) of a given company's closing stock values ...

# using wxPython's wx.lib.plot.PlotCanvas()
# to show a line graph of some stock values
# tested with Python25 and wxPython28
# vegaseat

import wx
import wx.lib.plot
import urllib2

class MyFrame(wx.Frame):
    def __init__(self, data_list, start_date, end_date, ticker,
        max_val, min_val):
        wx.Frame.__init__(self, parent=None, id=-1,
            title="line graph of stock values",
            size=(600, 300))

        # set up the plotting canvas
        plot_canvas = wx.lib.plot.PlotCanvas(self)
        # get client usable size of frame
        frame_size = self.GetClientSize()
        # needed for SaveFile() later
        plot_canvas.SetInitialSize(size=frame_size)
        # optional allow scrolling
        plot_canvas.SetShowScrollbars(True)
        # optional drag/draw rubberband area to zoom
        # doubleclick to return to original
        # right click to shrink
        plot_canvas.SetEnableZoom(True)
        # optional
        # set the tick and axis label font size (default is 10 point)
        plot_canvas.SetFontSizeAxis(point=8)
        # set title font size (default is 15 point)
        plot_canvas.SetFontSizeTitle(point=10)

        # connect (x, y) points in data list with a line
        val_line = wx.lib.plot.PolyLine(data_list, colour='blue',
            width=1)
        # assign lines, title and axis labels
        title = "Latest 300 trading days of %s" % ticker
        x_axis = "Starting %s up to %s" % (start_date, end_date)
        y_axis = "value at close ($)"
        gc = wx.lib.plot.PlotGraphics([val_line],
            title, x_axis, y_axis)
        # draw the plot and set x and y axis sizes
        plot_canvas.Draw(gc, xAxis=(1, 300), yAxis=(min_val, max_val))

        # optional save graph to an image file
        plot_canvas.SaveFile(fileName='stock1.jpg')


ticker = "MSFT"

sf = 'http://ichart.finance.yahoo.com/table.csv?s=%s' % ticker
url = urllib2.urlopen(sf)
# read 17000 bytes or about the last 300+ days
data = url.readlines(17000)
data_lines = [line.rstrip().split(',') for line in data]

end_date = data_lines[1][0]
start_date = data_lines[301][0]
# look at the latest 300 trading days
# and build a list of (day, close_value)
data_list = []
temp_list = []
for day, line in enumerate(reversed(data_lines[1:301])):
    #print(line)  # test
    close_value = float(line[4])
    data_list.append((day+1, close_value))
    temp_list.append(close_value)
max_val = max(temp_list) + 3
min_val = min(temp_list) - 3

print(len(data_lines), start_date, end_date, max_val, min_val)  # test

app = wx.App(0)
caption = "Line graph of stock values"
frame = MyFrame(data_list, start_date, end_date, ticker, max_val,
    min_val)
frame.Center()
frame.Show()
app.MainLoop()
commented: nice code! +8

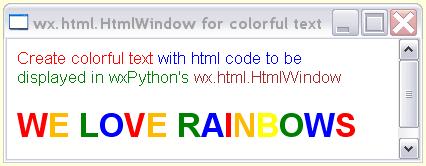
You can create rather colorful text using html code and wxPython's wx.html.HtmlWindow widget. Here we use a small function to help us generate html code ...

# use wxPython's wx.html.HtmlWindow to create colorful text
# tested with Python25 and wxPython28  by  vegaseat

import wx
import wx.html

def do_html(text, color='black', size=3):
    """create a line of html code for text with color and size"""
    sf = "<FONT color=%s size=%d>%s</FONT>"
    return sf % (color, size, text)


# build up simple HTML code ...
# text between <B> and </B> is bold
# <BR> inserts a line break (new line)
html = ""
html += do_html("Create colorful text ", "red")
html += do_html("with html code to be", "blue")
html += '<BR>'
html += do_html("displayed in wxPython's ", "green")
html += do_html("wx.html.HtmlWindow", "brown")
html += '<BR><BR>'
orange = "#FFBA00"  # gives a better orange color
color_list = ['red', orange, 'yellow', 'green', 'blue']
ix = 0
for c in 'WE LOVE RAINBOWS':
    # make character c bold
    c = "<B>" + c + "</B>"
    if ix >= len(color_list):
        ix = 0
    html += do_html(c, color_list[ix], 7)
    ix += 1


# set up the GUI window/frame ...
app = wx.App(0)
mytitle =  "wx.html.HtmlWindow for colorful text"
width = 420
height = 160
# make parent None
frame = wx.Frame(None, id=-1, size=(width, height), title=mytitle)
# create an html label/window
htmlwin = wx.html.HtmlWindow(parent=frame, id=-1)
# display the html code
htmlwin.SetPage(html)
frame.Show(True)
frame.Center()
app.MainLoop()

Its time to explore wxPython's wx.Timer() and wx.StopWatch() widgets. The stopwatch works in the background to track the length of a process ...

# explore wxPython
# wx.Timer() one_shot and wx.StopWatch() example
# a one_shot delays for a set time
# tested with Python25 and wxPython28 by vegaseat

import wx

class MyFrame(wx.Frame):
    def __init__(self, parent, mytitle, mysize):
        wx.Frame.__init__(self, parent, wx.ID_ANY, mytitle, size=mysize)
        self.SetBackgroundColour('red')
        self.watch = wx.StopWatch()

        self.timer = wx.Timer(self)
        # interval = 2000ms (2 seconds)
        # default is oneShot=False, timer keeps restarting
        self.timer.Start(2000, oneShot=True)
        self.watch.Start()
        self.SetTitle("stopwatch started")
        # bind EVT_TIMER event to self.onTimer() action
        self.Bind(wx.EVT_TIMER, self.onTimer)

    def onTimer(self, event):
        # establish new color
        self.SetBackgroundColour('green')
        # clear old color, set to new color
        self.ClearBackground()
        # pause/stop the stopwatch and get its time
        self.watch.Pause()
        time = self.watch.Time()
        s = "stopwatch stopped at %s milliseconds" % time
        self.SetTitle(s)


app = wx.App(0)
# create a MyFrame instance and show the frame
MyFrame(None, '---', (500, 100)).Show()
app.MainLoop()

Just testing wxPython's wx.TextCtrl widget used as an edit field for input and output of text based data:

# testing wxPython's
# wx.TextCtrl(parent, id, value, pos, size, style)
# a widget used for text data input or output
# note:
# style=wx.TE_PROCESS_ENTER is needed for Linux to
# respond to the enter key event!!!
# snee

import wx

class MyFrame(wx.Frame):
    def __init__(self, parent, mytitle, mysize):
        wx.Frame.__init__(self, parent, wx.ID_ANY, mytitle, size=mysize)
        self.SetBackgroundColour("yellow")

        s = "Enter name below:"
        edit_label = wx.StaticText(self, wx.ID_ANY, s)
        # create a single line edit input area
        self.edit = wx.TextCtrl(self, wx.ID_ANY, value="",
            style=wx.TE_PROCESS_ENTER)
        # put the cursor in edit
        self.edit.SetFocus()
        # respond to enter key when focus is on edit
        self.edit.Bind(wx.EVT_TEXT_ENTER, self.onEnter)

        # create a scrolled multiline text output area
        self.text_out = wx.TextCtrl(self, wx.ID_ANY, value="",
            style=wx.TE_MULTILINE|wx.HSCROLL|wx.TE_READONLY)
        
        # use a box sizer for vertical widget layout
        sizer = wx.BoxSizer(wx.VERTICAL)
        sizer.Add(edit_label, 0, wx.LEFT|wx.TOP|wx.EXPAND, border=10)
        sizer.Add(self.edit, 0, wx.ALL|wx.EXPAND, border=10)
        sizer.Add(self.text_out, 2, wx.ALL|wx.EXPAND, border=10)
        self.SetSizer(sizer)

    def onEnter(self, event):
        """the Enter key has been pressed, do something"""
        # GetValue() gives a string
        name = self.edit.GetValue()
        s = "You entered the name: " + name + '\n'
        # text output, either method works
        #self.text_out.AppendText(s)
        self.text_out.WriteText(s)
        # clear edit input space
        self.edit.Clear()


app = wx.App(0)
# create a MyFrame instance and show the frame
MyFrame(None, 'testing wx.TextCtrl()', (300, 480)).Show()
app.MainLoop()

Notice the special requirement for Linux users.

commented: Useful test. Thanks also for linux users :) +2

This simple wxPython slide show uses the wx.PaintDC surface as a canvas that can be cleared between pictures ...

# create a simple image slide show using the
# wx.PaintDC surface as a canvas and
# DrawBitmap(bitmap, x, y, bool transparent)
# vegaseat

import wx
import os

class ShowPic(wx.Frame):

    def __init__(self, parent):
        wx.Frame.__init__(self, parent, wx.ID_ANY, 'MyFrame', 
            size=(773,632))
        self.panel = wx.Panel(self)
        
        # seconds per slide
        self.delay = 2
        # number of loops per slide show
        self.loops = 2 
        
        # list of image files you have in the working directory
        self.images = ["Pic1.png", "Pic2.png", "Pic3.png"]

        # create a list of bitmap image objects
        self.image_list = []
        for image_file in self.images:
            if os.path.exists(image_file):
                print(image_file)  # test
                self.image_list.append(wx.Bitmap(image_file))
            else:
                self.SetTitle("No pictures found!")

        # bind the panel to the paint event
        wx.EVT_PAINT(self.panel, self.onPaint)

    def onPaint(self, event=None):
        # this is the wxPython drawing surface/canvas
        dc = wx.PaintDC(self.panel)
        while self.loops:
            self.loops -= 1
            for ix, bmp in enumerate(self.image_list):
                # clear the canvas
                dc.Clear()
                # optionally show image name
                self.SetTitle(self.images[ix])
                # draw the image
                dc.DrawBitmap(bmp, 10, 10, True)
                # wait self.delay seconds to show next slide
                wx.Sleep(self.delay)


if __name__=='__main__':
    app = wx.App(0)
    frame = ShowPic(parent=None)
    frame.Show()
    app.MainLoop()

This code shows you how to create a drawing on a wxPython canvas and save the drawing to a standard image file ...

# use a drawing bitmap and wx.MemoryDC to create a canvas you can
# draw on and optionally save the drawing to an image file
# vegaseat

import wx

class MyFrame(wx.Frame):
    def __init__(self, parent, title):
        wx.Frame.__init__(self, parent, wx.ID_ANY, title, size=(400, 150))
        # create a bitmp for display and optional saving
        self.show_bmp = wx.StaticBitmap(self)
        # get the width and height for the blank bitmap
        w, h = self.GetClientSize()
        # create a blank bitmap as a drawing background
        draw_bmp = wx.EmptyBitmap(w, h)
        # put the canvas on top of draw_bmp
        canvas = wx.MemoryDC(draw_bmp)
        # fill the canvas white
        canvas.SetBrush(wx.Brush('white'))
        canvas.Clear()

        # now draw something on the canvas ...
        # set line colour and thickness (pixels)
        canvas.SetPen(wx.Pen("blue", 15))
        # DrawLine(x1, y1, x2, y2) from point (x1,y1) to (x2,y2)
        canvas.DrawLine(50, 60, 340, 60)

        # this also shows your drawing
        self.show_bmp.SetBitmap(draw_bmp)

        # optioally save the created image
        # get the image object
        myimage = self.show_bmp.GetBitmap()
        myimage.SaveFile("myimage.jpg", wx.BITMAP_TYPE_JPEG)


app = wx.App(0)
MyFrame(None, 'draw a line using wx.MemoryDC').Show(True)
app.MainLoop()

I modified the code in the previous post to join two images into one:

# use a drawing bitmap and wx.MemoryDC to create a canvas you can
# draw on and optionally save the drawing to an image file
# here we draw two images side by side and save the combined image
# vegaseat code modified by sneek

import wx

class MyFrame(wx.Frame):
    def __init__(self, parent, title, mysize):
        wx.Frame.__init__(self, parent, -1, title, size=mysize)
        # create a bitmp for display and optional saving
        self.show_bmp = wx.StaticBitmap(self)
        # get the width and height for the blank bitmap
        w, h = self.GetClientSize()
        # create a blank bitmap as a drawing background
        # should be large enough to fit the 2 images side by side
        draw_bmp = wx.EmptyBitmap(w, h)

        # put a canvas on top of draw_bmp
        canvas = wx.MemoryDC(draw_bmp)

        # fill the canvas white
        canvas.SetBrush(wx.Brush('white'))
        canvas.Clear()

        # pick 2 image files you have in the working folder
        # (can be a .jpg, .png, .gif, .bmp image files)
        # note that filenames are case sensitive in Linux
        image1 = wx.Bitmap("Duck_right.jpg")
        image2 = wx.Bitmap("Duck_left.jpg")

        # draw the 2 images side by side
        canvas.DrawBitmap(image1, 0, 0)
        canvas.DrawBitmap(image2, w/2, 0)

        # this also shows your drawing
        self.show_bmp.SetBitmap(draw_bmp)

        # get the image object
        myimage = self.show_bmp.GetBitmap()
        # save it to a file
        myimage.SaveFile("joined_pic1.jpg", wx.BITMAP_TYPE_JPEG)


app = wx.App(0)
# make width w large enough to have the 2 images next to each other
w = 610
# make height h large enough to fit the max height of the 2 images
h = 210
mysize = (w, h)
MyFrame(None, 'join two images and save', mysize).Show(True)
app.MainLoop()

Here is an example of a simple text editor using wxPython ...

# the start of a small text editor with file load and save menu
# the wx.TextCtrl() has already some advanced features:
# you can select text, right click to cut, copy and paste etc.

import os
import wx

# pick unique ID values
ID_ABOUT = 101
ID_LOAD = 102
ID_SAVE = 103
ID_EXIT = 110

class MyFrame(wx.Frame):
    def __init__(self, parent, id, title):
        wx.Frame.__init__(self, parent, wx.ID_ANY, title,
            size=(500, 300))
        self.edit = wx.TextCtrl(self, 1, style=wx.TE_MULTILINE)
        # statusBar at the bottom of the window
        self.CreateStatusBar()

        # set up the menu
        filemenu= wx.Menu()
        filemenu.Append(ID_ABOUT, "&About",
            " Information about this program")
        filemenu.Append(ID_LOAD,"File&Load", " Load a text file")
        # the optional & allows you to use alt/s
        # " Save a text file" shows in the status bar on mouse over
        filemenu.Append(ID_SAVE,"File&Save", " Save a text file")
        # put in a separator line
        filemenu.AppendSeparator()
        filemenu.Append(ID_EXIT,"E&xit"," Terminate the program")

        # create the menubar
        menuBar = wx.MenuBar()
        # adding the "filemenu" to the MenuBar
        menuBar.Append(filemenu,"&File")
        # adding the MenuBar to the Frame content
        self.SetMenuBar(menuBar)
        # attach the menu-event ID_ABOUT to the method self.onAbout
        wx.EVT_MENU(self, ID_ABOUT, self.onAbout)
        # attach the menu-event ID_OPEN to the method self.onOpen
        wx.EVT_MENU(self, ID_LOAD, self.onLoad)
        # attach the menu-event ID_SAVE to the method self.onSave
        wx.EVT_MENU(self, ID_SAVE, self.onSave)
        # attach the menu-event ID_EXIT to the method self.onExit
        wx.EVT_MENU(self, ID_EXIT, self.onExit)
        # display the frame
        self.Show(True)

    def onAbout(self, event):
        """ the about box """
        about = wx.MessageDialog( self, " A very simple editor \n"
            " using the wxPython GUI toolkit", "About Simple Editor", wx.OK)
        about.ShowModal()
        about.Destroy()

    def onLoad(self, event):
        """ open a file """
        self.dirname = ''
        mask = "Text (.txt)|*.txt|Python (.py)|*.py|All (.*)|*.*"
        dlg = wx.FileDialog(self, "Choose a file to load",
            self.dirname, "", wildcard=mask, style=wx.OPEN)
        if dlg.ShowModal() == wx.ID_OK:
            self.filename = dlg.GetFilename()
            self.dirname = dlg.GetDirectory()
            filepath = os.path.join(self.dirname, self.filename)
            fin = open(filepath, 'r')
            self.edit.SetValue(fin.read())
            fin.close()
        dlg.Destroy()

    def onSave(self, event):
        """ save a file """
        self.dirname = ''
        mask = "Text (.txt)|*.txt|Python (.py)|*.py|All (.*)|*.*"
        dlg = wx.FileDialog(self, "Choose or create a file to save to",
            self.dirname, self.filename, wildcard=mask,
            style=wx.OVERWRITE_PROMPT|wx.SAVE)
        if dlg.ShowModal() == wx.ID_OK:
            self.filename = dlg.GetFilename()
            self.dirname = dlg.GetDirectory()
            filepath = os.path.join(self.dirname, self.filename)
            fout = open(filepath, 'w')
            fout.write(self.edit.GetValue())
            fout.close()
        dlg.Destroy()

    def onExit(self, e):
        self.Close(True)


app = wx.App(0)
frame = MyFrame(None, -1, "A Simple Editor (click on File for menu)")
app.MainLoop()

An example of how to make your program skin capable, using a configuration file and images to draw the interface.

File program.py

#!/usr/bin/env python
# -*- coding: utf-8 -*-

# program.py
# Thanks to http://zetcode.com/wxpython/

#Load necessary modules
import os
import sys
import wx
import ConfigParser
#Read configuration and assign to global variables
cfg = ConfigParser.ConfigParser()
cfg.read('config.ini')
shapefile = cfg.get('principal', 'shape')
transparentcolor = cfg.get('principal', 'transparentcolor')
backgroundfile = cfg.get('principal', 'background')
backgroundx = cfg.getint('principal', 'backgroundx')
backgroundy = cfg.getint('principal', 'backgroundy')
button1file = cfg.get('principal', 'button1')
button1x = cfg.getint('principal', 'button1x')
button1y = cfg.getint('principal', 'button1y')
button1soundfile = cfg.get('principal', 'button1sound')
buttonquitfile = cfg.get('principal', 'buttonquit')
buttonquitx = cfg.getint('principal', 'buttonquitx')
buttonquity = cfg.getint('principal', 'buttonquity')
buttonquitsoundfile = cfg.get('principal', 'buttonquitsound')

class Principal(wx.Frame):
    def __init__(self, parent, id, title):
        wx.Frame.__init__(self, parent, id, title, style=wx.FRAME_SHAPED | wx.SIMPLE_BORDER | wx.FRAME_NO_TASKBAR)
        self.shape = wx.Bitmap(shapefile, wx.BITMAP_TYPE_ANY)
        self.background = wx.Bitmap(backgroundfile, wx.BITMAP_TYPE_ANY)
        self.button1 = wx.Bitmap(button1file, wx.BITMAP_TYPE_ANY)
        self.button1sound = wx.Sound(button1soundfile)
        self.buttonquit = wx.Bitmap(buttonquitfile, wx.BITMAP_TYPE_ANY)
        self.buttonquitsound = wx.Sound(buttonquitsoundfile)

        w = self.shape.GetWidth()
        h = self.shape.GetHeight()
        self.SetClientSize((w, h))

        if wx.Platform == '__WXGTK__':
            self.Bind(wx.EVT_WINDOW_CREATE, self.SetPrincipalShape)
        else: self.SetPrincipalShape()

        self.Bind(wx.EVT_PAINT, self.OnPaint)
        self.Bind(wx.EVT_LEFT_DOWN, self.OnLeftDown)
        self.Bind(wx.EVT_MOTION, self.OnMouseMove)

        self.backgroundRegion = wx.RegionFromBitmap(self.background)
        self.button1Region = wx.RegionFromBitmap(self.button1)
        self.button1fRegion = wx.RegionFromBitmap(self.button1)
        self.buttonquitRegion = wx.RegionFromBitmap(self.buttonquit)
        self.buttonquitfRegion = wx.RegionFromBitmap(self.buttonquit)

        self.button1Region.IntersectRegion(self.button1fRegion)
        self.button1Region.Offset(button1x, button1y)
        self.buttonquitRegion.IntersectRegion(self.buttonquitfRegion)
        self.buttonquitRegion.Offset(buttonquitx, buttonquity)
		
        dc = wx.ClientDC(self)
        dc.DrawBitmap(self.shape, 0, 0, True)
        self.Center()
        self.Show(True)

    def SetPrincipalShape(self, *event):
        region = wx.RegionFromBitmapColour(self.shape, transparentcolor, 0)
        self.SetShape(region)

    def OnLeftDown(self, event):
        pos = event.GetPosition()
        if self.buttonquitRegion.ContainsPoint(pos):
			self.buttonquitsound.Play(wx.SOUND_ASYNC)
			self.Close()
			
        if self.button1Region.ContainsPoint(pos):
			self.button1sound.Play(wx.SOUND_ASYNC)
			
        x, y = self.ClientToScreen(event.GetPosition())
        ox, oy = self.GetPosition()
        dx = x - ox
        dy = y - oy
        self.delta = ((dx, dy))

    def OnMouseMove(self, event):
        if event.Dragging() and event.LeftIsDown():
            x, y = self.ClientToScreen(event.GetPosition())
            fp = (x - self.delta[0], y - self.delta[1])
            self.Move(fp)

    def OnPaint(self, event):
        self.dc = wx.PaintDC(self)

        self.dc.DrawBitmap(self.background, backgroundx, backgroundy, True)
        self.dc.DrawBitmap(self.button1, button1x, button1y, True)
        self.dc.DrawBitmap(self.buttonquit, buttonquitx, buttonquity, True)

if __name__ == '__main__':
	app = wx.App()
	Principal(None, -1, '')
	app.MainLoop()

File config.ini

[principal]
shape = shape.png
transparentcolor = #000000
background = background.png
backgroundx = 0
backgroundy = 0
button1 = button1.png
button1x = 0
button1y = 136
button1sound = button.wav
buttonquit = quit.png
buttonquitx = 216
buttonquity = 236
buttonquitsound = button.wav

You'll need some files:
-shape.png
-background.png
-button1.png
-quit.png
-button.wav
File button.wav not attached, you'll have to provide one.

If you distribute your code and have a number of small images to go along with the code, it might be best to embed the images in your code as shown in this example ...

# playing with wxPython's
# wx.BitmapButton(parent, id, bitmap, pos, size, style)
# for a small image it is best to embed as base64 encoded string
# vegaseat

import wx
import cStringIO
import base64

class MyFrame(wx.Frame):
    def __init__(self, parent, mytitle, data_stream):
        wx.Frame.__init__(self, parent, -1, mytitle, size=(400, 300))

        # convert data_stream to a bitmap
        bmp = wx.BitmapFromImage(wx.ImageFromStream(data_stream))
        # create a BitmapButton
        self.button = wx.BitmapButton(self, wx.ID_ANY, bitmap=bmp,
            pos=(10, 20),
            size=(bmp.GetWidth()+15, bmp.GetHeight()+15))

"""
# the base64 image string has been created with this short
# program, the resulting string is then copied and pasted
import base64
jpg_file = "Btn_next.jpg"
jpg2base64string = base64.encodestring(open(jpg_file,"rb").read())
print "Btn_next_jpg_b64='''\\\n" + jpg2base64string + "'''"
"""

Btn_next_jpg_b64='''\
/9j/4AAQSkZJRgABAQAAAQABAAD/2wBDAAYEBQYFBAYGBQYHBwYIChAKCgkJChQODwwQFxQYGBcU
FhYaHSUfGhsjHBYWICwgIyYnKSopGR8tMC0oMCUoKSj/2wBDAQcHBwoIChMKChMoGhYaKCgoKCgo
KCgoKCgoKCgoKCgoKCgoKCgoKCgoKCgoKCgoKCgoKCgoKCgoKCgoKCgoKCj/wAARCAA7ADsDASIA
AhEBAxEB/8QAHAAAAgIDAQEAAAAAAAAAAAAABggFBwECBAAJ/8QAOhAAAQMDAgMFAwsDBQAAAAAA
AQIDBAAFEQYhEjFBBxNRYYEUInEVIzJCQ1JikaGx0QhT8HKCssHS/8QAGQEAAwEBAQAAAAAAAAAA
AAAAAQIDBQQA/8QAIREAAgMAAgICAwAAAAAAAAAAAAECAxEEEiExE0EiUYH/2gAMAwEAAhEDEQA/
AGoNAGs+0iBZJKoFvSJ10TspKSe7ZP4z4+X7VwduOul6WtDNutjoTebgCEKHNlofSc8j0HqelUvp
qKMAqJUonJJ558/E08Y6cvIudaxFhfLt/vjnFKnvNoV9kwO7SPLbf8zUpDsbjuFKypXPKlVxWZkJ
4eHbb86nLpqCNpyHElz0q9kefEda0/Z5SVcRHUe7v/3V8SRiylK2WM7YsOfCAVHkPo64BJH+fGpq
36geZIRcU8Sf7iRuPiBXVAfZlxm3mHEOsuDiStJyFDxBrE2A283lIAUKGJjQdlXmt/wnWXW3kJW2
oKSoZBFbEjPKhC0TFWyeI7x+YdVg5+qroaL+LzHrUXHqzZ416vjv2Jl2iX5WpO1a+SiviYjvGGwM
7BDfu7fE8Sv91EVmkMxmkuSHUNtjAJWcDeqht0xQuTrrqvfdcKlb9Sc1akF1L2iLsdjhyP8A8lUy
eE7qvklmh3a7/aUY4rjDB83k/wA1ydpl2t8/SkdqHOivuJmpUUNOBRCe7XvgelVUEJHRNZAxyx6U
JWasBVwVXNT0KtCa2naTfDaQZFsWr5yMTgpP3kZ5H9PHxDD6fvsC+W5uZbZAeZUN+hSeqSOhpT+l
F/Zk1ehfUvWV7uGAQJSnN2lJ8CnIyfDH6c69GT9A5XHitsReupWgWu8SOnTn/n8VN2K5tybRFdcc
SFlHCcnnjbPrjNDd6mJVBXlW4GaB/ld5glttXuJJx+dUa0zqrnTNyi/YuuvLWuxawvcBScGNMcSn
b6vFlJ9QQfWpzRGq37e06wgRnGnuHvG347byTwnY4WCBjPOrP/qm0YtE2PquE3xMPpTHmAfVWNkL
PkRt8UppcW3VwpHu54c7EVJG1OL+hirbe2nwCuBZ1Z8bdH/8VnW3sj2k25DUGCw8iahHHHioZJSU
LJSSgDOcDY+FVXp2/hPClSjR+m4w7hpsxX3Vcftbb3dgEcSQhaT73T6QpmtXg5k5QnrbwjNNWF27
PpLiy3EQfnHcbqxzCR1P7eu9sQVRrXCbiwkJaZbGAlP7nzoKi3NtppDbYShCRgJSMAfCt3bykJ2X
TRj1OXkznc/0goul4wwoFfr4ef70QaS0qLlp2HMdWUKeClcPlxHH6YqrbM3I1RqGLaYSlcbqsuLH
JtsfSUfTl54HWmdiR2YsVmOwgIZZQG0J8EgYA/IUJy8j8bi9k2zW6QY1zgyIM9hD8WQ2W3GljZST
zFKT2sditz026/NsrTtyseeJKkJ4nYw8FJG5A+9v504NeO9SRqtafNxtpyOslpW3hnP69amrdfHY
+zmccqcjtE7PtKXa2S502yRTMQgqDzQLSifMoIz65pPNSwY8S89xHb4GiAeHiJ646/CimTcE/ZJo
1IkJHvkbVMaWh3zWlw9k07DXIwcOPqylpr/Uvp8OZ86sjsS7O9K3tC5F2tDct1tOR3rrhTzHNPFg
+opiIEGLbYjcW3xmYsZsYQ0ygISn4AbUewvwRBTs00JE0XbCkO+1XJ8AyZRTw8X4UjokfyaMsjqQ
DW1YpPZVfj4R/9k=
'''

# convert to jpg image bytes
jpg_bytes = base64.b64decode(Btn_next_jpg_b64)
# convert image bytes to data stream
data_stream = cStringIO.StringIO(jpg_bytes)

app = wx.App(0)
caption = 'wx.BitmapButton() with b64 image'
MyFrame(None, caption, data_stream).Show()
app.MainLoop()

Whoops! Accidentally double posted this one again! Sorry!

Sometimes you want a button that toggles between two different actions:

# wxToggleButton2.py
# testing wxPython's
# wx.ToggleButton(parent, id, label, pos, size, style)
# snee

import wx

class MyFrame(wx.Frame):
    def __init__(self, parent, mytitle, mysize):
        wx.Frame.__init__(self, parent, -1, mytitle, size=mysize)
        # use panel so position of button behaves
        panel = wx.Panel(self, wx.ID_ANY)

        self.tbtn = wx.ToggleButton(panel, id=-1, label='Toggle Off',
            pos=(20, 25))
        # bind mouse click event to an action
        self.tbtn.Bind(wx.EVT_TOGGLEBUTTON, self.onToggle)

    def onToggle(self, event):
        # self.tbtn.GetValue() toggles between True or False
        if self.tbtn.GetValue():
            self.tbtn.SetLabel('Toggle On')
        else:
            self.tbtn.SetLabel('Toggle Off')


app = wx.App(0)
MyFrame(None, 'wx.ToggleButton test', (300, 100)).Show()
app.MainLoop()

A more modern approach to creating a background with a wallpaper (tiled image) effect that allows for resizing of the frame ...

# create a wallpaper effect using a wx.ClientDC() canvas on a panel
# basically a tiled image, allow canvas to be resized
# tested with Python25 and wxPython28  by  vegaseat

import wx

class CanvasPanel(wx.Panel):
    """ create a panel with a canvas to draw on"""
    def __init__(self, parent):
        wx.Panel.__init__(self, parent, wx.ID_ANY)
        # pick a .jpg, .png, .gif, or .bmp wallpaper image file you
        # have in the working folder or give full path
        image_file = 'BG_Egypt.jpg'
        self.bmp = wx.Bitmap(image_file)

        # this 50ms delay is needed to allow image loading first
        # may have to increase delay for very large images
        wx.FutureCall(50, self.make_canvas)
        # react to a resize event and redraw image
        wx.EVT_SIZE(self, self.make_canvas)
        # now put a button on the panel, on top of the wallpaper
        self.btn = wx.Button(self, -1, label='Button1', pos=(10, 5))

    def make_canvas(self, event=None):
        # create the paint canvas
        dc = wx.ClientDC(self)
        # forms a wall-papered background
        # formed from repeating image tiles
        brush_bmp = wx.BrushFromBitmap(self.bmp)
        dc.SetBrush(brush_bmp)
        # draw a rectangle to fill the canvas area
        w, h = self.GetClientSize()
        dc.DrawRectangle(0, 0, w, h)


app = wx.App(0)
frame = wx.Frame(None, wx.ID_ANY, size=(500, 400))
CanvasPanel(frame)
frame.Show(True)
app.MainLoop()

Showing you the approach to a simple notebook ...

# experiments with wxPython's wx.Notebook() widget
# wx.Notebook(parent, id, pos, size, style, name)
# tab position style=wx.NB_TOP is default
# others are wx.NB_BOTTOM, wx.NB_LEFT or wx.NB_RIGHT

import wx

class MyPanel(wx.Panel):
    """each panel instance gives the notbook page content and colour"""
    def __init__(self, parent, bgcolor, toolbar=False):
        wx.Panel.__init__(self, parent, wx.ID_ANY)
        self.SetBackgroundColour(bgcolor)


app = wx.App(0)

# create an instance of a frame, no parent
caption = "testing simple wx.Notebook()"
frame = wx.Frame(None, -1, caption, size=(400,300))
# create an instance of a notebook, parent is the frame
notebook = wx.Notebook(frame, -1)
# create an instance of MyPanel
# each panel instance has the content and colour of a notebook page
panel1 = MyPanel(notebook, "yellow")
panel2 = MyPanel(notebook, "green")
panel3 = MyPanel(notebook, "red")
# now create the notebook pages
# add the panel content and title to each page
notebook.AddPage(panel1, "Page1")
notebook.AddPage(panel2, "Page2")
notebook.AddPage(panel3, "Page3")

frame.Show(True)
app.MainLoop()

Putting a toolbar on one of the notebook pages (a wx.Panel) is mildly tricky ...

# experiments with wxPython's wx.Notebook() widget
# wx.Notebook(parent, id, pos, size, style, name)
# tab position style=wx.NB_TOP is default
# others are wx.NB_BOTTOM, wx.NB_LEFT or wx.NB_RIGHT
# insert a toolbar on one of the notebook pages
# tested with Python25 and wxPython28  by  vegaseat

import wx

class MyPanel(wx.Panel):
    """each panel instance gives the notbook page content and colour"""
    def __init__(self, parent, bgcolor, toolbar=False):
        wx.Panel.__init__(self, parent, -1, pos=(0, 0))
        self.SetBackgroundColour(bgcolor)
        if toolbar:
            self.create_toolbar()
    
    def create_toolbar(self):
        # by default ToolBar is horizontal at the top of the panel
        toolbar = wx.ToolBar(self, -1)
        toolbar.SetToolBitmapSize(size=(24,24))
        toolbar.AddSimpleTool(wx.ID_ABOUT, 
            self.getBMP(wx.ART_INFORMATION),
            "About")
        toolbar.AddSimpleTool(wx.ID_OPEN,
            self.getBMP(wx.ART_FILE_OPEN),
            "Load")
        toolbar.AddSimpleTool(wx.ID_SAVE, 
            self.getBMP(wx.ART_FILE_SAVE),
            "Save")
        toolbar.AddSeparator()
        toolbar.AddSimpleTool(wx.ID_EXIT, 
            self.getBMP(wx.ART_QUIT),
            "Exit")
        toolbar.Realize()
        frame.SetToolBar(toolbar)

        # bind a toolbar icon click event to a test action
        self.Bind(wx.EVT_TOOL, self.action, id=wx.ID_ABOUT)

    def getBMP(self, pic_id):
        """get the bitmap image from the wxPython art provider"""
        return wx.ArtProvider.GetBitmap(pic_id, wx.ART_TOOLBAR, 
            wx.Size(24, 24))

    def action(self, e):
        """ test a simple about box """
        about = wx.MessageDialog( self, 
            " Test of a simple about box \n"
            " using the wxPython GUI toolkit", 
            "Just a test", wx.OK)
        about.ShowModal()
        about.Destroy()        


app = wx.App(0)

# create an instance of a frame, no parent
caption = "wx.Notebook page with toolbar"
frame = wx.Frame(None, -1, caption, size=(400,300))
# create a dummy toolbar and hide it
wx.ToolBar(frame, -1).Hide()
# create a statusBar at the bottom of the frame (optional)
frame.CreateStatusBar()
frame.SetStatusText(" The about icon is active")
# create an instance of a notebook, parent is the frame
notebook = wx.Notebook(frame, -1, size=frame.ClientSize)
# create an instance of MyPanel
# each panel instance has the content and colour of a notebook page
panel1 = MyPanel(notebook, "yellow", toolbar=True)
panel2 = MyPanel(notebook, "green")
panel3 = MyPanel(notebook, "red")
# now create the notebook pages
# add the panel content and title to each page
notebook.AddPage(panel1, "Page1")
notebook.AddPage(panel2, "Page2")
notebook.AddPage(panel3, "Page3")

frame.Show(True)
app.MainLoop()

Just one example of using wxPython for data entry ...

# a simple example of a data entry using wxPython

import wx

class MyFrame(wx.Frame):
    def __init__(self, parent, mytitle, mysize):
        wx.Frame.__init__(self, parent, -1, mytitle, size=mysize)
        self.SetBackgroundColour("yellow")

        # use a static box as a label, put the data entry inside
        sbox1 = wx.StaticBox(self, -1, "Enter your name", 
            size=(370, 50))
        sizer_box1 = wx.StaticBoxSizer(sbox1, wx.VERTICAL)            
        self.edit1 = wx.TextCtrl(self, -1, value="", size=(350, 20))
        sizer_box1.Add(self.edit1, flag=wx.ALL|wx.EXPAND, border=5)

        # use a static box as a label, put the data entry inside
        sbox2 = wx.StaticBox(self, -1, "Enter your occupation", 
            size=(370, 50))
        sizer_box2 = wx.StaticBoxSizer(sbox2, wx.VERTICAL)            
        self.edit2 = wx.TextCtrl(self, -1, value="", size=(350, 20))
        sizer_box2.Add(self.edit2, flag=wx.ALL|wx.EXPAND, border=5)

        self.button1 = wx.Button(self, -1, label='Process Data')
        # bind mouse event to an action
        self.button1.Bind(wx.EVT_BUTTON, self.button1Click)        

        # create an output widget
        self.label1 = wx.StaticText(self, -1, "", size=(350, -1))

        # final layout manager is a vertical box sizer
        sizer_v = wx.BoxSizer(wx.VERTICAL)
        flag = wx.ALL|wx.EXPAND
        sizer_v.Add(sizer_box1, proportion=0, flag=flag, border=5)
        sizer_v.Add(sizer_box2, proportion=0, flag=flag, border=5)
        sizer_v.Add(self.button1, proportion=0, flag=flag, border=10)
        sizer_v.Add(self.label1, proportion=1, flag=flag, border=10)    
        self.SetSizer(sizer_v)
        
    def button1Click(self, event):
        """button1 has been clicked (left mouse button)"""
        self.name = self.edit1.GetValue()
        self.occupation = self.edit2.GetValue()
        # display result in the label
        s1 = "name = %s\n" % self.name
        s2 = "occcupation = %s" % self.occupation
        self.label1.SetLabel(s1+s2)        


app = wx.App(0)
frame = MyFrame(None, 'data entry', (420, 280))
frame.Center()
frame.Show()
app.MainLoop()

Just an experiment with box sizers and panels to get a desired layout ...

# use a wx.BoxSizer() for multisizer widget layout
# wx.VERTICAL = stacked vertically
# wx.HORIZONTAL = stacked horizontally
# add widget with Add() --> has options ...
# proportion=0 no vertical stretch with frame stretch in sizer_v
# proportion=1 stretch with frame stretch
# proportion=2 fill remaining space proportional (eg. 1:2)
# proportion=3 fill remaining space proportional (eg. 1:3)
# border=n  use a n pixel wide border
# wx.ALL puts the specified border on all sides
# (also has wx.LEFT wx.RIGHT wx.TOP and wx.BOTTOM)
# flag=wx.EXPAND --> expand to fit frame
# flag=wx.SHAPED --> change size preserving original aspect ratio

import wx

class MyFrame(wx.Frame):
   def __init__(self, parent, mytitle, mysize):
        wx.Frame.__init__(self, parent, -1, mytitle, size=mysize)

        panel1 = wx.Panel(self, -1, style=wx.SUNKEN_BORDER)
        panel2 = wx.Panel(self, -1, style=wx.SUNKEN_BORDER)
        panel3 = wx.Panel(self, -1, style=wx.SUNKEN_BORDER)

        panel1.SetBackgroundColour("blue")
        panel2.SetBackgroundColour("red")
        panel3.SetBackgroundColour("green")

        # use two different BoxSizer() to layout the controls
        # in this case the vertical sizer will be the main sizer
        sizer_v = wx.BoxSizer(wx.VERTICAL)
        sizer_h = wx.BoxSizer(wx.HORIZONTAL)
        # add widgets to horizontal sizer
        # proportions are set to fill space ratio 1:2
        # keeps ratio on frame stretch
        sizer_h.Add(panel1, proportion=1, flag=wx.EXPAND)
        sizer_h.Add(panel2, proportion=2, flag=wx.EXPAND)
        # now add to vertical sizer in order
        sizer_v.Add(panel3, proportion=1, flag=wx.EXPAND)
        sizer_v.Add(sizer_h, proportion=3, flag=wx.EXPAND)

        # set the main sizer only
        self.SetSizer(sizer_v)


app = wx.App(0)
# create a MyFrame instance and show the frame
MyFrame(None, "Multi BoxSizer() Test", (300, 250)).Show()
app.MainLoop()

This shows you how to add transparency to the wx.PaintDC canvas ...

# a simple wx drawing surface (canvas) using wx.PaintDC
# draw two overlapping circles
# transparency added with wx.GCDC
# tested with Python26 and wxPython28  by vegaseat

import wx

def on_paint(event):
    dc = wx.PaintDC(event.GetEventObject())
    dc.Clear()
    # wx.GCDC gives realistic transparency
    gcdc = wx.GCDC(dc)

    # set pen (border) colour
    # wx.Pen(colour, width=1, style=wx.SOLID)
    gcdc.SetPen(wx.Pen('red', 1))
    
    # alpha tranparency value 0 to 255
    # play with alpha to see the effect
    alpha = 175
    # rgb for red
    r, g, b = 255, 0, 0    
    brushcolour1 = wx.Colour(r, g, b, alpha)
    # rgb for yellow
    r, g, b = 255, 255, 0   
    brushcolour2 = wx.Colour(r, g, b, alpha)    

    # set fill colour and draw circle1
    gcdc.SetBrush(wx.Brush(brushcolour1))
    # DrawCircle(x, y, r)
    # center coordinates (x, y) and radius r
    gcdc.DrawCircle(120, 120, 100)

    # set fill colour and draw circle2
    gcdc.SetBrush(wx.Brush(brushcolour2))
    # DrawCircle(x, y, r)
    # center coordinates (x, y) and radius r
    gcdc.DrawCircle(280, 120, 100)    


app = wx.App(0)

frame = wx.Frame(None, -1, "wx canvas with circles", size=(410, 280))
frame.SetBackgroundColour('white')
# create the canvas
wx.EVT_PAINT(frame, on_paint)
# center the frame and show it
frame.Center(True)
frame.Show(True)

app.MainLoop()

Since many days I was looking for simple text editor program using wxPython and didn't get to find anywhere but finally I found here. This is really a great thread to get information regarding to wxPython.

... and you are spamming what in your signature? Stop it, it's rude!

Just experimented putting red text in a listbox:

# load, sort, clear and add to wxPython's
# wx.ListBox(parent, id, pos, size, choices, style, name)
# choices is a list of strings
#
# style -->
# wx.LB_SINGLE  single-selection list (default)
# wx.LB_MULTIPLE  multiple-selection list, the user can toggle
#   multiple items on and off
# wx.LB_EXTENDED  extended-selection list, the user can select multiple
#  items using the SHIFT key, the mouse or special key combinations
# wx.LB_HSCROLL  create horizontal scrollbar if contents are too wide
#  (Windows only)
# wx.LB_ALWAYS_SB  always show a vertical scrollbar
# wx.LB_NEEDED_SB  Only create a vertical scrollbar if needed (default)
# wx.LB_SORT  The listbox contents are sorted in alphabetical order
# source from:  Sneekula 2008

import wx

class MyFrame(wx.Frame):
    def __init__(self, parent, mytitle, name_list):
        wx.Frame.__init__(self, parent, wx.ID_ANY, mytitle)
        self.SetBackgroundColour("brown")
        self.name_list = list(name_list)

        self.listbox = wx.ListBox(self, wx.ID_ANY, choices=[],
            style=wx.LB_EXTENDED)
        self.listbox.Bind(wx.EVT_LISTBOX, self.listboxClick)
        # optional text color for the list box
        self.listbox.SetForegroundColour("red")

        # create buttons
        self.load_button = wx.Button(self, wx.ID_ANY, "load ListBox")
        self.clear_button = wx.Button(self, wx.ID_ANY, "clear ListBox")
        self.sort_button = wx.Button(self, wx.ID_ANY, "sort ListBox")
        self.add_button = wx.Button(self, wx.ID_ANY, "add to ListBox")
        # bind mouse event to an action
        self.load_button.Bind(wx.EVT_BUTTON, self.load_buttonClick)
        self.clear_button.Bind(wx.EVT_BUTTON, self.clear_buttonClick)
        self.sort_button.Bind(wx.EVT_BUTTON, self.sort_buttonClick)
        self.add_button.Bind(wx.EVT_BUTTON, self.add_buttonClick)
        # create an output widget
        s1 = "load the list box ...\n"
        s2 = "to select a single item left click on the item\n"
        s3 = "to select a range of items shift click items\n"
        s4 = "to select multiple items ctrl click on items"
        self.text_out = wx.TextCtrl(self, wx.ID_ANY,
            value=(s1+s2+s3+s4), size=(300, 95),
            style=wx.TE_MULTILINE|wx.HSCROLL|wx.TE_READONLY)

        sizer = wx.GridBagSizer(vgap=5, hgap=5)
        # pos=(row, column)  span=(rowspan, columnspan)
        # wx.ALL puts the specified border on all sides
        sizer.Add(self.load_button, pos=(0, 0), flag=wx.ALL, border=5)
        sizer.Add(self.add_button, pos=(0, 1), flag=wx.ALL, border=5)
        # listbox spans 6 rows and 2 columns
        sizer.Add(self.listbox, pos=(1, 0), span=(6, 2),
            flag=wx.ALL|wx.EXPAND, border=5)
        sizer.Add(self.clear_button, pos=(7, 1), flag=wx.ALL, border=5)
        sizer.Add(self.sort_button, pos=(7, 0), flag=wx.ALL, border=5)
        sizer.Add(self.text_out, pos=(8, 0), span=(2, 2),
            flag=wx.ALL, border=5)
        self.SetSizer(sizer)

        # size the frame so all the widgets fit
        self.Fit()

    def add_buttonClick(self, event):
        """add another item to the listbox"""
        text = wx.GetTextFromUser('Enter new item', 'Add to listbox')
        if text != '':
            self.listbox.Append(text)

    def load_buttonClick(self, event):
        """load the name list into the bistbox"""
        # use self.listbox.Set(self.name_list) or ...
        for name in self.name_list:
            self.listbox.Append(name)

    def clear_buttonClick(self, event):
        """clear all items from the listbox"""
        self.listbox.Clear()
        self.text_out.ChangeValue("")

    def sort_buttonClick(self, event):
        """sort the items in the listbox"""
        # GetItems() is new in wxPython2.8
        # puts the listbox items into a list
        name_list = self.listbox.GetItems()
        name_list.sort()
        # Set() clears and reloads the listbox
        self.listbox.Set(name_list)

    def listboxClick(self, event):
        """display the selected ListBox item(s)"""
        """
        # for single item select use this ...
        selected_item = self.listbox.GetStringSelection()
        s = "You selected " + selected_item
        self.label.SetLabel(s)
        """
        name_list = self.listbox.GetItems()
        # for multiple and single item select use this ...
        pos_tuple = self.listbox.GetSelections()
        selected_list = []
        for pos in pos_tuple:
            selected_list.append(name_list[pos])
        s = "You selected " + str(selected_list)
        self.text_out.ChangeValue(s)


name_list = [
"Erich",
"Udo",
"Jens",
"Bjorn",
"Heidrun",
"Klaus",
"Ulla",
"Volger",
"Helmut",
"Freja",
"Larry",
"Andreas",
"Harry"
]

app = wx.App(0)
# create the MyFrame instance and then show the frame
MyFrame(None, 'wx.ListBox ops', name_list).Show()
app.MainLoop()

Oh darn, those accidental duplicate posts in DaniWeb!

To get individual lines coloured, you need to use the wx.ListCtrl():

# exploring wxPython's
# wx.ListCtrl(parent, id, pos, size, style)
# a fancier list box with a lot of mix-in options
# some of the styles =
# wx.LC_REPORT  report mode
# wx.LC_HRULES  draws horizontal rules between rows in report mode
# wx.LC_VRULES  draws vertical rules between columns in report mode
# some methods =
# InsertColumn(col, heading, format=wx.LIST_FORMAT_LEFT, width=-1)
# Original Source: zoe
# explore SetItemTextColour(item, colour) to colour individual lines

import wx

class MyFrame(wx.Frame):
    def __init__(self, parent, data):
        # use default size and position
        wx.Frame.__init__(self, parent, wx.ID_ANY,
            'Test the wx.ListCtrl()',
            size=(400, 220))
        self.SetBackgroundColour("yellow")
        # make data available to the instance
        self.data = data

        # create the list control
        self.lc = wx.ListCtrl(self, wx.ID_ANY, size=(-1, 120),
             style=wx.LC_REPORT|wx.SUNKEN_BORDER|wx.LC_HRULES)
        # select an item (left mouse click on it) and bind to an action
        self.lc.Bind(wx.EVT_LIST_ITEM_SELECTED,self.onAction)
        
        self.loadList()

        # set text color of items/lines 1, 3, 5 in list to red
        # needs style wx.LC_REPORT
        # do this after the list is loaded
        self.lc.SetItemTextColour(1, 'red')
        self.lc.SetItemTextColour(3, 'red')
        self.lc.SetItemTextColour(5, 'red')

        # create an output widget
        self.label = wx.StaticText(self, wx.ID_ANY, "Select a name")

        # use a vertical boxsizer for the widget placement
        sizer_v = wx.BoxSizer(wx.VERTICAL)
        sizer_v.Add(self.lc, 1, flag=wx.ALL|wx.EXPAND, border=10)
        sizer_v.Add(self.label, 0, flag=wx.ALL|wx.EXPAND, border=10)
        self.SetSizer(sizer_v)

    def loadList(self):
        # first the columns with header titles
        self.lc.InsertColumn(col=0,heading="Name",width=200)
        #self.lc.SetColumnWidth(0, 200)
        self.lc.InsertColumn(col=1,heading="Age",format=wx.LIST_FORMAT_RIGHT)
        self.lc.InsertColumn(col=2,heading="Weight",format=wx.LIST_FORMAT_RIGHT)

        # now each data row
        for key, val in self.data.items():
            # set max_rows, change if need be
            max_rows = 1000
            # also sets/updates row index starting at 0
            index = self.lc.InsertStringItem(max_rows, val[0])
            self.lc.SetStringItem(index, 1, val[1])
            self.lc.SetStringItem(index, 2, val[2])
            # needed by GetItemData()
            self.lc.SetItemData(index, key)

    def onAction(self, event):
        """ some action code"""
        # -1 --> get the first item that matches the specified flags
        # wx.LIST_NEXT_ALL  search for subsequent item by index
        # wx.LIST_STATE_SELECTED  get the selected item
        ix_selected = self.lc.GetNextItem(item=-1,
            geometry=wx.LIST_NEXT_ALL,
            state=wx.LIST_STATE_SELECTED)
        # get the value of the key in dictionary self.data
        data_value = self.data[self.lc.GetItemData(ix_selected)]
        # pick the name (first item in the value tuple)
        name = ' --> ' + data_value[0]
        self.label.SetLabel(str(data_value) + name)
        # testing --> index and name only
        ix = self.lc.GetFirstSelected()
        print ix, self.lc.GetItemText(ix)


# data to load the listctrl in the form of a dictionary
# the header is ('Name', 'Age', 'Weight')
data = {
1 : ('Heidi Kalumpa', '36', '127'),
2 : ('Frank Maruco', '27', '234'),
3 : ('Larry Pestraus', '19', '315'),
4 : ('Serge Romanowski', '59', '147'),
5 : ('Carolus Arm', '94', '102'),
6 : ('Michel Sargnagel', '21', '175')
}

app = wx.App(0)
# create a MyFrame instance and show the frame
MyFrame(None, data).Show()
app.MainLoop()

The wx.StyledTextCtrl allows for line numbering, code folding and syntax highlighting. Here is a simple example of this somewhat complex widget ...

# wxstc_basics1.py
# styled text using wxPython's
# wx.StyledTextCtrl(parent, id, pos, size, style, name)
# used the scintilla programming editor for guidance
# set up for line numbers, folding and Python code highlighting
# tested with Python26 and wxPython28 by vegaseat

import  wx
import  wx.stc  as  stc
import  keyword

if wx.Platform == '__WXMSW__':
    # for windows OS
    faces = { 
        'times': 'Times New Roman',
        'mono' : 'Courier New',
        'helv' : 'Courier New',
        # temporary switch
        #'helv' : 'Arial',
        'other': 'Comic Sans MS',
        'size' : 10,
        'size2': 8,
        }
else:
    faces = { 
        'times': 'Times',
        'mono' : 'Courier',
        'helv' : 'Helvetica',
        'other': 'new century schoolbook',
        'size' : 12,
        'size2': 10,
        }

class MySTC(stc.StyledTextCtrl):
    """
    set up for folding and Python code highlighting
    """
    def __init__(self, parent):
        stc.StyledTextCtrl.__init__(self, parent, wx.ID_ANY)

        self.CmdKeyAssign(ord('B'), stc.STC_SCMOD_CTRL, stc.STC_CMD_ZOOMIN)
        self.CmdKeyAssign(ord('N'), stc.STC_SCMOD_CTRL, stc.STC_CMD_ZOOMOUT)

        # use Python code highlighting
        self.SetLexer(stc.STC_LEX_PYTHON)
        self.SetKeyWords(0, " ".join(keyword.kwlist))

        self.SetProperty("fold", "1")
        #self.SetProperty("tab.timmy.whinge.level", "1")
        self.SetMargins(0, 0)

        self.SetViewWhiteSpace(False)
        #self.SetBufferedDraw(False)
        #self.SetViewEOL(True)
        #self.SetEOLMode(stc.STC_EOL_CRLF)
        #self.SetUseAntiAliasing(True)
        
        self.SetEdgeMode(stc.STC_EDGE_BACKGROUND)
        self.SetEdgeColumn(78)

        # setup a margin to hold fold markers
        #self.SetFoldFlags(16)
        self.SetMarginType(2, stc.STC_MARGIN_SYMBOL)
        self.SetMarginMask(2, stc.STC_MASK_FOLDERS)
        self.SetMarginSensitive(2, True)
        self.SetMarginWidth(2, 12)
        
        # fold markers use square headers
        self.MarkerDefine(stc.STC_MARKNUM_FOLDEROPEN, 
            stc.STC_MARK_BOXMINUS, "white", "#808080")
        self.MarkerDefine(stc.STC_MARKNUM_FOLDER,
            stc.STC_MARK_BOXPLUS, "white", "#808080")
        self.MarkerDefine(stc.STC_MARKNUM_FOLDERSUB,
            stc.STC_MARK_VLINE, "white", "#808080")
        self.MarkerDefine(stc.STC_MARKNUM_FOLDERTAIL,
            stc.STC_MARK_LCORNER, "white", "#808080")
        self.MarkerDefine(stc.STC_MARKNUM_FOLDEREND,
            stc.STC_MARK_BOXPLUSCONNECTED, "white", "#808080")
        self.MarkerDefine(stc.STC_MARKNUM_FOLDEROPENMID,
            stc.STC_MARK_BOXMINUSCONNECTED, "white", "#808080")
        self.MarkerDefine(stc.STC_MARKNUM_FOLDERMIDTAIL,
            stc.STC_MARK_TCORNER, "white", "#808080")
        
        self.Bind(stc.EVT_STC_UPDATEUI, self.onUpdateUI)
        self.Bind(stc.EVT_STC_MARGINCLICK, self.onMarginClick)
        self.Bind(wx.EVT_KEY_DOWN, self.onKeyPressed)

        # make some general styles ...
        # the lexer defines what each style is used for 

        # global default styles for all languages
        self.StyleSetSpec(stc.STC_STYLE_DEFAULT,
            "face:%(helv)s,size:%(size)d" % faces)
        # reset all to be like the default
        self.StyleClearAll()  

        # global default styles for all languages
        self.StyleSetSpec(stc.STC_STYLE_DEFAULT,
            "face:%(helv)s,size:%(size)d" % faces)
        self.StyleSetSpec(stc.STC_STYLE_LINENUMBER,
            "back:#C0C0C0,face:%(helv)s,size:%(size2)d" % faces)
        self.StyleSetSpec(stc.STC_STYLE_CONTROLCHAR,
            "face:%(other)s" % faces)
        self.StyleSetSpec(stc.STC_STYLE_BRACELIGHT,
            "fore:#FFFFFF,back:#0000FF,bold")
        self.StyleSetSpec(stc.STC_STYLE_BRACEBAD,
            "fore:#000000,back:#FF0000,bold")

        # make the Python styles ...
        # Default 
        self.StyleSetSpec(stc.STC_P_DEFAULT,
            "fore:#000000,face:%(helv)s,size:%(size)d" % faces)
        # Comments
        self.StyleSetSpec(stc.STC_P_COMMENTLINE,
            "fore:#007F00,face:%(other)s,size:%(size)d" % faces)
        # Number
        self.StyleSetSpec(stc.STC_P_NUMBER,
            "fore:#007F7F,size:%(size)d" % faces)
        # String
        self.StyleSetSpec(stc.STC_P_STRING,
            "fore:#7F007F,face:%(helv)s,size:%(size)d" % faces)
        # Single quoted string
        self.StyleSetSpec(stc.STC_P_CHARACTER,
            "fore:#7F007F,face:%(helv)s,size:%(size)d" % faces)
        # Keyword
        self.StyleSetSpec(stc.STC_P_WORD,
            "fore:#00007F,bold,size:%(size)d" % faces)
        # Triple quotes
        self.StyleSetSpec(stc.STC_P_TRIPLE,
            "fore:#7F0000,size:%(size)d" % faces)
        # Triple double quotes
        self.StyleSetSpec(stc.STC_P_TRIPLEDOUBLE,
            "fore:#7F0000,size:%(size)d" % faces)
        # Class name definition
        self.StyleSetSpec(stc.STC_P_CLASSNAME,
            "fore:#0000FF,bold,underline,size:%(size)d" % faces)
        # Function or method name definition
        self.StyleSetSpec(stc.STC_P_DEFNAME,
            "fore:#007F7F,bold,size:%(size)d" % faces)
        # Operators
        self.StyleSetSpec(stc.STC_P_OPERATOR,
            "bold,size:%(size)d" % faces)
        # Identifiers
        self.StyleSetSpec(stc.STC_P_IDENTIFIER,
            "fore:#000000,face:%(helv)s,size:%(size)d" % faces)
        # Comment-blocks
        self.StyleSetSpec(stc.STC_P_COMMENTBLOCK,
            "fore:#7F7F7F,size:%(size)d" % faces)
        # End of line where string is not closed
        self.StyleSetSpec(stc.STC_P_STRINGEOL,
            "fore:#000000,face:%(mono)s,back:#E0C0E0,eol,size:%(size)d"\
                % faces)

        self.SetCaretForeground("BLUE")
        
        # register some images for use in the AutoComplete box
        self.RegisterImage(1, 
            wx.ArtProvider.GetBitmap(wx.ART_TIP, size=(16,16)))
        self.RegisterImage(2, 
            wx.ArtProvider.GetBitmap(wx.ART_NEW, size=(16,16)))
        self.RegisterImage(3, 
            wx.ArtProvider.GetBitmap(wx.ART_COPY, size=(16,16)))

    def onKeyPressed(self, event):
        if self.CallTipActive():
            self.CallTipCancel()
        key = event.GetKeyCode()
        if key == 32 and event.ControlDown():
            pos = self.GetCurrentPos()
            # tips
            if event.ShiftDown():
                self.CallTipSetBackground("yellow")
                self.CallTipShow(pos, 
                    'lots of of text: blah, blah, blah\n\n'
                    'show some suff, maybe parameters..\n\n'
                    'fubar(param1, param2)')
            # code completion
            else:
                '''
                lst = []
                for x in range(50000):
                    lst.append('%05d' % x)
                st = " ".join(lst)
                print len(st)
                self.AutoCompShow(0, st)
                '''
                kw = keyword.kwlist[:]
                kw.append("zzzzzz?2")
                kw.append("aaaaa?2")
                kw.append("__init__?3")
                kw.append("zzaaaaa?2")
                kw.append("zzbaaaa?2")
                kw.append("this_is_a_longer_value")
                #kw.append("this_is_a_much_much_longer_value")

                # Python sorts are case sensitive
                kw.sort()
                # so this needs to match  
                self.AutoCompSetIgnoreCase(False)  

                # images are specified with a appended "?type"
                for i in range(len(kw)):
                    if kw[i] in keyword.kwlist:
                        kw[i] = kw[i] + "?1"

                self.AutoCompShow(0, " ".join(kw))
        else:
            event.Skip()

    def onUpdateUI(self, evt):
        # check for matching braces
        braceAtCaret = -1
        braceOpposite = -1
        charBefore = None
        caretPos = self.GetCurrentPos()

        if caretPos > 0:
            charBefore = self.GetCharAt(caretPos - 1)
            styleBefore = self.GetStyleAt(caretPos - 1)

        # check before
        if charBefore and chr(charBefore) in "[]{}()"\
                and styleBefore == stc.STC_P_OPERATOR:
            braceAtCaret = caretPos - 1

        # check after
        if braceAtCaret < 0:
            charAfter = self.GetCharAt(caretPos)
            styleAfter = self.GetStyleAt(caretPos)

            if charAfter and chr(charAfter) in "[]{}()"\
                    and styleAfter == stc.STC_P_OPERATOR:
                braceAtCaret = caretPos

        if braceAtCaret >= 0:
            braceOpposite = self.BraceMatch(braceAtCaret)

        if braceAtCaret != -1  and braceOpposite == -1:
            self.BraceBadLight(braceAtCaret)
        else:
            self.BraceHighlight(braceAtCaret, braceOpposite)
            #pt = self.PointFromPosition(braceOpposite)
            #self.Refresh(True, wxRect(pt.x, pt.y, 5,5))
            #print pt
            #self.Refresh(False)

    def onMarginClick(self, evt):
        # fold and unfold as needed
        if evt.GetMargin() == 2:
            if evt.GetShift() and evt.GetControl():
                self.foldAll()
            else:
                lineClicked = self.LineFromPosition(evt.GetPosition())

                if self.GetFoldLevel(lineClicked) &\
                        stc.STC_FOLDLEVELHEADERFLAG:
                    if evt.GetShift():
                        self.SetFoldexpanded(lineClicked, True)
                        self.expand(lineClicked, True, True, 1)
                    elif evt.GetControl():
                        if self.GetFoldexpanded(lineClicked):
                            self.SetFoldexpanded(lineClicked, False)
                            self.expand(lineClicked, False, True, 0)
                        else:
                            self.SetFoldexpanded(lineClicked, True)
                            self.expand(lineClicked, True, True, 100)
                    else:
                        self.ToggleFold(lineClicked)

    def foldAll(self):
        lineCount = self.GetLineCount()
        expanding = True
        # find out if folding or unfolding
        for lineNum in range(lineCount):
            if self.GetFoldLevel(lineNum) &\
                    stc.STC_FOLDLEVELHEADERFLAG:
                expanding = not self.GetFoldexpanded(lineNum)
                break;
        lineNum = 0
        while lineNum < lineCount:
            level = self.GetFoldLevel(lineNum)
            if level & stc.STC_FOLDLEVELHEADERFLAG and \
               (level & stc.STC_FOLDLEVELNUMBERMASK) ==\
                    stc.STC_FOLDLEVELBASE:
                if expanding:
                    self.SetFoldexpanded(lineNum, True)
                    lineNum = self.expand(lineNum, True)
                    lineNum = lineNum - 1
                else:
                    lastChild = self.GetLastChild(lineNum, -1)
                    self.SetFoldexpanded(lineNum, False)
                    if lastChild > lineNum:
                        self.HideLines(lineNum+1, lastChild)
            lineNum = lineNum + 1

    def expand(self, line, doexpand, force=False, visLevels=0, level=-1):
        lastChild = self.GetLastChild(line, level)
        line = line + 1
        while line <= lastChild:
            if force:
                if visLevels > 0:
                    self.ShowLines(line, line)
                else:
                    self.HideLines(line, line)
            else:
                if doexpand:
                    self.ShowLines(line, line)
            if level == -1:
                level = self.GetFoldLevel(line)
            if level & stc.STC_FOLDLEVELHEADERFLAG:
                if force:
                    if visLevels > 1:
                        self.SetFoldexpanded(line, True)
                    else:
                        self.SetFoldexpanded(line, False)
                    line = self.expand(line, doexpand, force, visLevels-1)
                else:
                    if doexpand and self.GetFoldexpanded(line):
                        line = self.expand(line, True, force, visLevels-1)
                    else:
                        line = self.expand(line, False, force, visLevels-1)
            else:
                line = line + 1;
        return line


class MyFrame(wx.Frame):
    def __init__(self, parent, mytitle, mysize):
        wx.Frame.__init__(self, parent, wx.ID_ANY, mytitle, size=mysize)
        
        stc_edit = MySTC(self)
        
        # open a Python code file you have in the working folder
        # or give full path name
        py_file = "wxstc_basics1.py"
        stc_edit.SetText(open(py_file).read())
        stc_edit.EmptyUndoBuffer()
        stc_edit.Colourise(0, -1)
        
        # line numbers in the margin
        stc_edit.SetMarginType(1, stc.STC_MARGIN_NUMBER)
        stc_edit.SetMarginWidth(1, 25)


app = wx.App(0)
# create a MyFrame instance and show the frame
mytitle = 'wx.StyledTextCtrl (rightclick for menu)'
MyFrame(None, mytitle, (800, 500)).Show()
app.MainLoop()

I would like to suggest to change this class little:

Add import in beginning:

import sys

and define MyFrame:

class MyFrame(wx.Frame):
    def __init__(self, parent, mytitle, mysize, filename=None):
        wx.Frame.__init__(self, parent, wx.ID_ANY, mytitle, size=mysize)
        
        stc_edit = MySTC(self)
        
        # open a Python code file you have in the working folder
        # or give full path name
        if not filename:    self.filename=sys.argv[0]
        else:               self.filename = filename
        stc_edit.SetText(open(self.filename).read())
        stc_edit.EmptyUndoBuffer()
        stc_edit.Colourise(0, -1)
        
        # line numbers in the margin
        stc_edit.SetMarginType(1, stc.STC_MARGIN_NUMBER)
        stc_edit.SetMarginWidth(1, 25)

Then it is not sensitive to filename the program is using, and it is possible to set the filename from programme.

@tonyjv
Kind of poor to use commandline arguments in a GUI environment. If you want to swell the code given, it would be best to use wxPython's excellent wx.FileDialog widget.

It is not using command line, only prevent hard coding of programs name by reading it from argv[0] instead of literal string.

Be a part of the DaniWeb community

We're a friendly, industry-focused community of developers, IT pros, digital marketers, and technology enthusiasts meeting, networking, learning, and sharing knowledge.