usmanmalik57 0 Light Poster

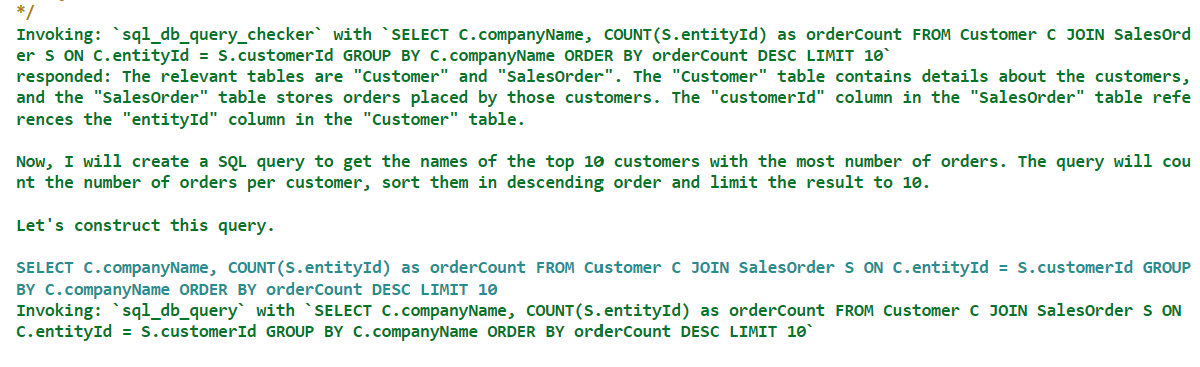
In previous articles, I explained how to use natural language to interact with PDF documents and SQL databases, using the Python LangChain module and OpenAI API.

In this article, you will learn how to use LangChain and OpenAI API to create a question-answering application that allows you to retrieve information from YouTube videos. So, let's begin without ado.

Importing and Installing Required Libraries

Before diving into the code, let's set up our environment with the necessary libraries.

We will use the Langchain module to access the vector databases and execute queries on large language models to retrieve information about YouTube videos. We will also employ the YouTube Transcript API for fetching video transcripts, the Pytube library for downloading YouTube videos, and the FAISS vector index for efficient similarity search in large datasets.

The following script installs these modules and libraries.


!pip install -qU langchain
!pip install -qU langchain-community
!pip install -qU langchain-openai
!pip install -qU youtube-transcript-api
!pip install -qU pytube
!pip install -qU faiss-cpu

The script below imports the required libraries into our Python application.


from langchain_community.document_loaders import YoutubeLoader
from langchain_openai import ChatOpenAI
from langchain_core.prompts import ChatPromptTemplate
from langchain_core.output_parsers import StrOutputParser
from langchain.text_splitter import RecursiveCharacterTextSplitter
from langchain_openai import OpenAIEmbeddings
from langchain_community.vectorstores import FAISS
from langchain.chains.combine_documents import create_stuff_documents_chain
from langchain.chains import create_retrieval_chain
from langchain_core.documents import Document
from langchain.chains import create_history_aware_retriever
from langchain_core.prompts import MessagesPlaceholder
from langchain_core.messages import HumanMessage, AIMessage
import os
Creating Text Documents from YouTube Videos

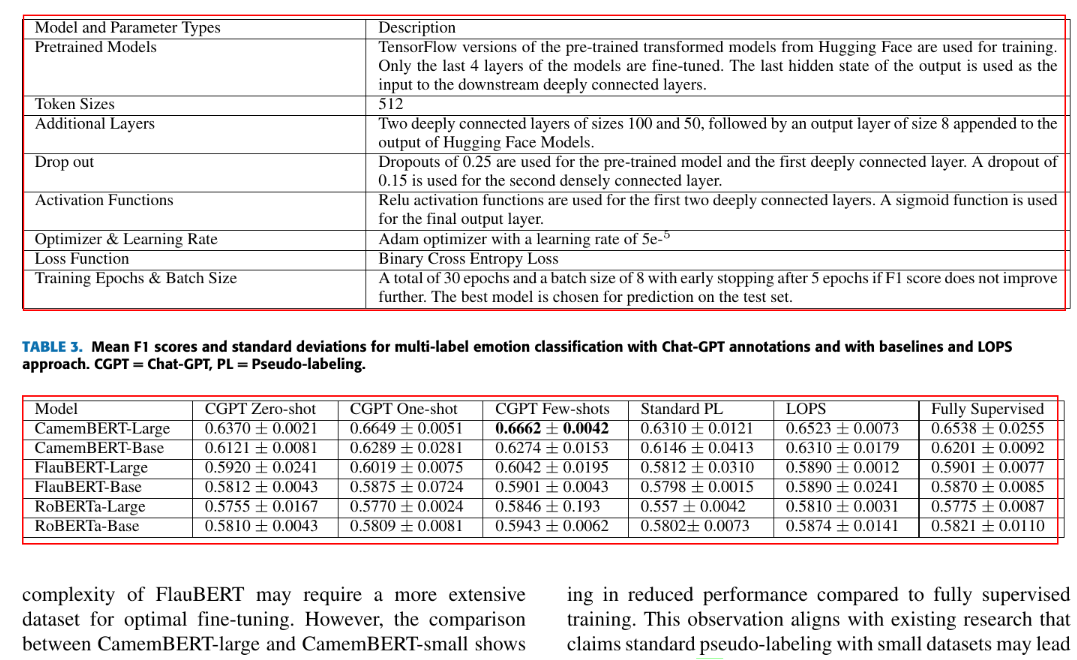
The first step involves converting …

usmanmalik57 0 Light Poster

The advent of large language models (LLM) has replaced complex scripts with natural language for automating various tasks. You can now use LLM to interact with your databases using natural language, which makes life easier for people who do not have sufficient SQL knowledge.

In this article, you will learn how to retrieve information from SQL databases using natural language. For this purpose, you will use the Python LangChain library. The LangChain agents convert natural language questions into SQL queries and return the response in natural language.

Using natural language queries, you will learn how to interact with PostgreSQL, MySQL, and SQLite databases. You will retrieve information from the sample Northwind database. You can download the Northwind database samples for PostgreSQL, MySQL, and SQLite from Github. This article assumes you imported the Northwind database into the corresponding servers.

So, let's begin with ado.

Installing and Importing Required Libraries

To connect your Python application with PostgreSQL and MySQL, you must install the PostGreSQL and MySQL connectors. Execute the following script to download these connectors.

# connector for PostgreSQL
!pip install psycopg2

# connector for MySQL
!pip install mysql-connector-python
Defining the LLM and Agent

As previously said, I will use LangChain agents to execute natural language queries on various databases. To do so, we need a large language model (LLM) and database objects.

The following script imports the GPT-4 LLM via LangChain.


openai_key = os.environ.get('OPENAI_KEY2')

llm = ChatOpenAI(
    openai_api_key = openai_key ,
    model = 'gpt-4',
    temperature = 0.5 …
usmanmalik57 0 Light Poster

In my previous article, I explained how I developed a simple chatbot using LangChain and Chat-GPT that can answer queries related to Paris Olympics ticket prices.

However, one major drawback with that chatbot is that it can only generate a single response based on user queries. It can not answer follow-up questions. In short, the chatbot has no memory where it can store previous conversations and answer questions based on the information in the past conversation.

In this article, I will explain how to add memory to this chatbot and execute conversations where the chatbot can respond to queries considering the past conversation.

So, let's begin without further ado.

Installing and Importing Required Libraries

The following script installs the required libraries for this article.

!pip install -U langchain
!pip install langchain-openai
!pip install pypdf
!pip install faiss-cpu

The script below imports required libraries.


from langchain_openai import ChatOpenAI
from langchain_core.prompts import ChatPromptTemplate
from langchain_core.output_parsers import StrOutputParser
from langchain_community.document_loaders import PyPDFLoader
from langchain.text_splitter import RecursiveCharacterTextSplitter
from langchain_openai import OpenAIEmbeddings
from langchain_community.vectorstores import FAISS
from langchain.chains.combine_documents import create_stuff_documents_chain
from langchain.chains import create_retrieval_chain
from langchain_core.documents import Document
from langchain.chains import create_history_aware_retriever
from langchain_core.prompts import MessagesPlaceholder
from langchain_core.messages import HumanMessage, AIMessage
import os

Paris Olympics Chatbot for Generating a Single Response

Let me briefly review how we developed a chatbot capable of generating a single response and its associated problems.

The following script creates an object of the ChatOpenAI llm with the GPT-4 model, a model that powers Chat-GPT.

openai_key = os.environ.get('OPENAI_KEY2') …
Prosigns commented: Thank you for sharing this. I have gone through your post and discussions. It helped me in my work I was stuck at. I am prosignshouston here +0
usmanmalik57 0 Light Poster

I was searching for Paris Olympics ticket prices for tennis games recently. The official website directs you to a PDF document containing ticket prices and venues for all the games. However, I found the PDF document to be very hard to navigate. To make things easier, I developed a chatbot to search this PDF document and answer my queries in natural language. And this is what I am going to share in this article.

I used the OpenAI API to create document embeddings (convert documents to numeric values) and the Python LangChain library as the orchestration framework to develop this chatbot.

So, let's begin without ado.

Installing and Importing Required Libraries

The following script installs the libraries required to run scripts in this article.


!pip install -U langchain
!pip install langchain-openai
!pip install pypdf
!pip install faiss-cpu

The script below imports required libraries.


from langchain_openai import ChatOpenAI
from langchain_core.prompts import ChatPromptTemplate
from langchain_core.output_parsers import StrOutputParser
from langchain_community.document_loaders import PyPDFLoader
from langchain.text_splitter import RecursiveCharacterTextSplitter
from langchain_openai import OpenAIEmbeddings
from langchain_community.vectorstores import FAISS
from langchain.chains.combine_documents import create_stuff_documents_chain
from langchain.chains import create_retrieval_chain
from langchain_core.documents import Document
import os

Generate Default Responses from Chat-GPT

Let's first generate some responses from Chat-GPT without augmenting its knowledge base with information about the Paris Olympics ticket price.

In a Python application, you will use the OpenAI API key to generate Chat-GPT responses. You can retrieve your API key by signing up for OpenAI API.

You can save your API …

usmanmalik57 0 Light Poster

On March 4, 2024, Anthropic launched the Claude 3 family of large language models. Anthropic claimed that its Claude 3 Opus model outperforms GPT-4 on various benchmarks.

Intrigued by Anthropic's claim, I performed a simple test to compare the performances of Claude 3 Opus, Google Gemini Pro, and OpenAI's GPT-4 for zero-shot text classification. This article explains the experiment and the results obtained, along with my personal observations.

Note: I have already compared the performance of Google Gemini Pro and Chat-GPT on another dataset, in one of my previous articles. This article adds Claude 3 Opus to the list of compared models. In addition, the tests are performed on a significantly more difficult dataset.

So, let's begin without an ado.

Importing and Installing Required Libraries

The following script installs the corresponding APIs for importing Claude 3 Opus, Google Gemini Pro, and OpenAI GPT-4 models.


!pip install anthropic
!pip install --upgrade google-cloud-aiplatform
!pip install openai

The script below imports the required libraries.


import os
import pandas as pd
from sklearn.model_selection import train_test_split
from sklearn.metrics import accuracy_score

import anthropic
from openai import OpenAI
import vertexai
from vertexai.preview.generative_models import GenerativeModel, Part
Importing and Preprocessing the Dataset

We will use LLMs to make zero-shot predictions on the US Airline Sentiment dataset, which you can download from Kaggle.

The dataset consists of tweets regarding various US airlines. The tweets are manually annotated for positive, negative, or neutral sentiments. The text column contains the tweet …

usmanmalik57 0 Light Poster

In the rapidly evolving field of Natural Language Processing (NLP), open-source large language models (LLMs) are becoming increasingly popular as they are free to use. Among these, the Mistral family of models stands out as a state-of-the-art model that is freely accessible to the public.

Comparable in performance to the renowned GPT 3.5, Mistral 7b enables users to perform various NLP tasks, such as text generation, text classification, and more, without any cost.

While GPT 3.5 can be used for free in a browser, utilizing its functions in a Python application via OpenAI API incurs charges. This is where open-source Large Language Models (LLMs) like Mistral 7b become game-changers.

This article will explore leveraging the Mistral 7b Instruct model (seven billion parameters) to execute seven common NLP tasks within your Python applications using the HuggingFace library. So, let’s dive in without further ado.

Importing and Installing Required Libraries

The following script installs the libraries required to run scripts in this article.


!pip install git+https://github.com/huggingface/transformers
!pip3 install -q -U bitsandbytes==0.42.0
!pip3 install -q -U accelerate==0.27.1

Since I am using Google Colab to run the scripts in this article, the rest of the libraries are pre-installed in the environment.

The following script imports the required libraries.


from transformers import AutoModelForCausalLM, AutoTokenizer, logging
from transformers import BitsAndBytesConfig
import torch
Importing and Configuring the Mistral 7b Instruct Model

Mistral 7b is a large model with seven billion parameters. We will quantize it by reducing its weight precisions to four …

usmanmalik57 0 Light Poster

In a previous article, I explained how to fine-tune Google's Gemma model for text classification. In this article, I will explain how you can improve performance of a pretrained large language model (LLM) using retrieval augmented generation (RAG) technique. So, let's begin without ado.

What is Retrieval Augmented Generation (RAG)

Retrieval Augmented Generation (RAG) enhances a language model's knowledge by integrating external information into the response generation process. By dynamically pulling relevant information from a vast corpus of data, RAG enables models to produce more informed, accurate, and contextually rich responses, bridging the gap between raw computational power and real-world knowledge.

RAG works in the following four steps:

  1. Store data containing external knowledge into a vector database.
  2. Convert the input query into corresponding vector embeddings and retrieve the text from the database having the highest similarity with the input query.
  3. Formulate the query and the information retrieved from the vector database.
  4. Pass the formulated query to an LLM and generate a response.

You will see how to perform the above steps in this tutorial.

RAG with Google Gemma from HuggingFace

We will first import the required libraries and then import our dataset from Kaggle. The dataset consists of Warren Buffet letters to investors from 1977 to 2021.

Next, we will split our dataset into chunks using the Pythhon LangChain module. Subsequently, we will import an embedding model from HuggingFace and create a dataset containing vector embeddings for the text chunks.

After that, we will …

usmanmalik57 0 Light Poster

On February 21, 2024, Google released Gemma, a family of state-of-the-art open-source large language models (LLMs). As per initial results, its 7b (seven billion parameter) version is known to perform better than Meta's Llama 2, the previous state-of-the-art open-source LLM.

As always, my first test with any new open-source LLM is the text classification task. In this tutorial, I will show you how you can fine-tune the Google Gemma LLM for text classification tasks in Python. So, let's begin without ado.

Installing and Importing Required Libraries

The following script installs libraries required to run scripts in this article.

!pip3 install -q -U bitsandbytes==0.42.0
!pip3 install -q -U peft==0.8.2
!pip3 install -q -U trl==0.7.10
!pip3 install -q -U accelerate==0.27.1
!pip3 install -q -U datasets==2.17.0
!pip3 install -q -U transformers==4.38.0
!pip3 install -q -U datasets
!pip install huggingface-hub

The script below imports the required libraries into your Python application.


import os
import transformers
import torch
from google.colab import userdata
from datasets import load_dataset
from trl import SFTTrainer
from peft import LoraConfig
from transformers import AutoTokenizer, AutoModelForCausalLM
from transformers import BitsAndBytesConfig, GemmaTokenizer
import pandas as pd
from datasets import Dataset

Finally, you must run the following script and enter your Hugging Face user access token.

!huggingface-cli login

Google Gemma is a new model, and you must agree to its terms of use before importing it from Hugging Face. You can agree to its terms of use on the Hugging Face Gemma model card.

Testing Google Gemma …
usmanmalik57 0 Light Poster

In a previous article, I explained how to extract tabular data from PDF image documents using Multimodal Google Gemini Pro. However, there are a couple of disadvantages with Google Gemini Pro. First, Google Gemini Pro is not free, and second, it needs complex prompt engineering to retrieve table, columns, and row pixel coordinates.

To solve the problems above, in this article, you will see how to extract tables from PDF image documents using Microsoft's Table Transformer from the Hugging Face library. You will see how to detect tables, rows, and columns within a table, extract cell values from tables using an OCR, and save the table as CSV. So, let's begin without ado.

Installing and Importing Required Libraries

The first step is to install various libraries you will need to run scripts in this article.

!pip install transformers
!sudo apt install tesseract-ocr
!pip install pytesseract
!pip install easyocr
!sudo apt-get install -y poppler-utils
!pip install pdf2image
!wget "https://fonts.google.com/download?family=Roboto" -O roboto.zip
!unzip roboto.zip -d ./roboto

The following script imports the required libraries into your application.


from transformers import AutoImageProcessor, TableTransformerForObjectDetection
import torch
from PIL import Image, ImageDraw, ImageFont
import matplotlib.pyplot as plt
import csv
import numpy as np
import pandas as pd
from pdf2image import convert_from_path
from tqdm.auto import tqdm
import pytesseract
import easyocr

Table Detection with Table Transformer

The Table Transformer has two sub-models: table-transformer-detection, and table-structure-recognition-v1.1-all model. As a first step, we will detect tables within a PDF document using the table-transformer-detection model.

Importing …
tinstaafl 1,176 Posting Maven

Here's a free course that also has video transcripts in Chinese

Click Here

learnerya commented: ok,very thanks +0
usmanmalik57 0 Light Poster

In my previous article, I explained how to convert PDF image to CSV using Multimodal Google Gemini Pro. To do so, I wrote a Python script that passes text command to Google Gemino Pro for extracting tables from PDF images and storing them in a CSV file.

In this article, I will build upon that script and develop a web application that allows users to upload images and submit text queries via a web browser to extract tables from PDF images. We will use the Python Streamlit library to develop web data applications.

So, let's begin without ado.

Installing Required Libraries

You must install the google-cloud-aiplatform library to access the Google Gemini Pro model. For Streamlit data application, you will need to install the streamlit library. The following script installs these libraries:


google-cloud-aiplatform
streamlit
Creating Google Gemini Pro Connector

I will divide the code into two Python files: geminiconnector.py and main.py. The geminiconnector.py library will contain the logic to connect to the Google Gemini Pro model and make API calls.

Code for geminiconnector.py

import os
from vertexai.preview.generative_models import GenerativeModel, Part
os.environ['GOOGLE_APPLICATION_CREDENTIALS'] = r"PATH_TO_JSON_API_FILE"

model = GenerativeModel("gemini-pro-vision")
config={
    "max_output_tokens": 2048,
    "temperature": 0,
    "top_p": 1,
    "top_k": 32
}


def generate(img, prompt):

    input = img + [prompt]

    responses = model.generate_content(    
        input,
        generation_config= config,
        stream=True,
    )
    full_response = ""

    for response in responses:
        full_response += response.text

    return full_response

I have already explained the details for the above code in my previous article. Therefore I will not delve …

learnerya 0 Newbie Poster

I am a first-year university student from China. My major is Computer Science and Technology. I have been self-learning C++and data structures and algorithms recently. May I ask how I can learn them well? Is anyone interested in being my teacher or learning with friends? (Machine translation, my English is not very good, I can understand some)

catherine_11 0 Newbie Poster

Integrating ChatGPT with third-party applications in Python involves utilizing OpenAI's API. Begin by obtaining API credentials, then craft Python scripts to send requests and process responses. Adhere to OpenAI's documentation for optimal integration, ensuring secure and efficient interaction with the ChatGPT model.

habi_2 0 Newbie Poster

how to use the best_model.pt

usmanmalik57 0 Light Poster

In this article, you will learn to use Google Gemini Pro, a state-of-the-art multimodal generative model, to extract information from PDF and convert it to CSV files. You will use a simple text prompt to tell Google Gemini Pro about the information you want to extract. This is a valuable skill for data analysis, reporting, and automation.

You will use Python language to call the Google Vertex AI API functions and extract information from PDF converted to JPEG images.

So, let's begin without ado.

Importing and Installing Required Libraries

I ran my code on Google Colab, where I only needed to install the Google Cloud APIs. You can install the Google Cloud API via the following script installs.

pip install --upgrade google-cloud-aiplatform

Note: You must create an account with Google Cloud Vertex AI and get your API keys before running the scripts in this tutorial. When you sign up for the Google cloud platform, you will get free credits worth $300.

The following script imports the required libraries into our application.


import base64
import glob
import csv
import os
import re
from vertexai.preview.generative_models import GenerativeModel, Part

Defining Helping Functions for Image Reading

Before using Google Gemini Pro to extract information from PDF tables, you must convert your PDF files to image formats, e.g. JPG, PNG, etc. Google Gemini Pro can only accept images as input, not PDF files. You can use any tool that can convert PDF files to JPG images, such as

EdwardMatthew 0 Newbie Poster

It's fantastic, I have read this article and it is super amazing. thankyou for the knowledge.

usmanmalik57 0 Light Poster

In this article, we will compare two state-of-the-art large language models for zero-shot text classification: Google Gemini Pro and OpenAI GPT-4.

Zero-shot text classification is a task where a model is trained on a set of labeled examples but can then classify new examples from previously unseen classes. This is useful for situations where the labeled data is small, or the output classes are dynamic and unpredictable.

We will use the IMDB movie review dataset as an example and try to classify the reviews into positive or negative sentiments without using any labeled data. We will use the results to compare the speed, accuracy, and price of Google Gemini Pro and OpenAI GPT-4. By the end of this tutorial, you will know which model to select for your custom use cases.

Importing and Installing Required Libraries

The first step is to install the required libraries. I ran my code on Google Colab. Therefore, I only needed to install the Google Cloud and OpenAI APIs. The following script installs these libraries.

Note: It is important to mention that you must create an account with OpenAI and Google Cloud Vertex AI and get your API keys before running the scripts in this tutorial. OpenAI and Gemini Pro are paid LLMs, but you can get free credits for testing when you sign up.

pip install --upgrade google-cloud-aiplatform
pip install openai

The rest of the libraries come pre-installed with Google Colab.
The following script imports the libraries you …

Aravind_11 0 Newbie Poster

Thank you very much for this informative example! I have a question regarding the line "bert = TFAutoModel.from_pretrained(model_name, from_pt = True)". Since we are using Tensorflow here, shouldn't we leave out "from_pt = True" ?

usmanmalik57 0 Light Poster

I recently tackled a challenging research task involving multimodal data for a classification problem using TensorFlow Keras. One of the trickiest aspects was figuring out how to load multimodal data in batches from storage efficiently.

While TensorFlow Keras offers helpful functions for batch-loading images from various sources, the documentation and online resources don't explicitly cover how to load images in combination with other data types like CSV files.

However, with some experimentation, I discovered a solution to this problem. In this article, I'll demonstrate how to create custom data loaders capable of batch-loading data from multiple sources, such as image directories and CSV files.

We will solve a multimodal classification problem with images and corresponding texts as inputs. We will train a Keras model that classifies this multimodal input into one of the three predefined categories. This is called multi-class classification.

So, let's begin without ado.

Importing Required Libraries

We will extract text and image features using Transformer models from the Huggingface library. The following script installs the Huggingface transformers library.


! pip install accelerate -U
! pip install datasets transformers[sentencepiece]

The script below imports the libraries required to execute scripts in this article. I did not have to install these libraries since I used a Google Colab notebook.

import pandas as pd
import os
import numpy as np

import tensorflow as tf

from transformers import AutoTokenizer, TFBertModel
from transformers import AutoImageProcessor, TFViTModel


from keras.utils import Sequence
from keras.preprocessing.sequence import pad_sequences
from keras.layers import Input, …
Abdul_116 0 Newbie Poster

Fascinating to see sentiment analysis being applied to understand Pakistani consumers on High Street Pakistan! As online shopping thrives, it'd be interesting to compare brand opinions on both platforms - how do traditional High Street stores fare against online giants in terms of sentiment? Could data augmentation help bridge the data gap for local businesses lacking online reviews?

usmanmalik57 0 Light Poster

In a previous tutorial, I covered how to predict future stock prices using a deep learning model with 1D CNN layers. This method is effective for basic time series forecasting.

Recently, I've enhanced this model by not just considering past closing prices but also factors like Open, High, Low, Volume, and Adjusted Volume. Furthermore, instead of using 1-D CNN layers, I used transformer encoder to capture contextual information between various stock prices in a time series. This improved the model significantly, cutting the error between the actual and predicted stock prices by more than 50%.

In this tutorial, I will show you how to create a multivariate stock price prediction model using a transformer encoder in TensorFlow Keras. By the end of this article, you'll learn to shape your data for multivariate time series analysis and use a transformer encoder to make a stock price prediction model.

Importing Required Libraries and Datasets

You need to install the following library to access the TensorFlow Keras TransformerEncoder layer.

!pip install keras-nlp

Since I used Google Colab to run scripts in this article, I did not have to install any other library. The following script imports the required libraries into our application.


import yfinance as yf
import datetime
import seaborn as sns
import matplotlib.pyplot as plt
from sklearn.model_selection import train_test_split
from sklearn.preprocessing import MinMaxScaler
import numpy as np
import pandas as pd
from datetime import datetime, timedelta
import tensorflow as tf
from keras.models import Model
from …
usmanmalik57 0 Light Poster

In this article, you will learn how to track faces within a video using the Python DeepFace library. Additionally, you'll discover how to include portions of the video background in face tracking by implementing custom methods that utilize the DeepFace library's extract_faces() method for face extraction.

I explained how to extract faces from videos using the Python DeepFace library in [one of my previous articles. However, I recently encountered a couple of issues when working with DeepFace's extract_faces() method:

  1. This method does not allow the extraction of portions of the face background. It also sometimes ignores the boundary features of a face, such as ears, hair, etc.
  2. Videos created by stitching together faces extracted by DeepFace are often jittery, as the extracted frames frequently miss some boundary facial features.

In this article, I provide solutions to these two problems.

It is pertinent to mention that OpenCV library provides functionalities for video tracking. However, they use very naive methods, which are less accurate than deep learning methods provided by the DeepFace library. Hence, I preferred DeepFace over OpenCV.

Installing and Importing Required Libraries

The following script installs the DeepFace and MoviePy libraries. The DeepFace library will be used to extract faces from videos. You will use the MoviePy library to create a modified video that contains facial regions by stitching together individual image frames.

! pip install deepface
! pip install moviepy

The script imports the Python libraries required to run the code in …

usmanmalik57 0 Light Poster

Yes, that's an option, but while you are developing Python applications where you have to process multiple videos, I don't think ffmpeg is scalable enough. Thanks for your feedback r though :)

Reverend Jim 4,780 Hi, I'm Jim, one of DaniWeb's moderators. Moderator Featured Poster

Since the underlying tool is ffmpeg, why bother with all the code and overhead? You can just use ffmpeg directly with the -r option.

Aside from this I enjoyed the article (and the others you have posted).

usmanmalik57 0 Light Poster

A video is a series of images, or frames, shown in rapid succession. Its frame rate, measured in frames per second (FPS), dictates the display speed. For instance, a 30 FPS video shows 30 frames each second. The frame count and frame rate determine a video's detail, smoothness, file size, and the processing power needed for playback or editing.

Higher frame rates and more frames result in finer detail and smoother motion but at the cost of larger file sizes and greater processing requirements. Conversely, lower frame rates and fewer frames reduce detail and smoothness but save on storage and processing needs.

In this article, you will see how to reduce the frame rate per second for a video, and total number of frames in a video using the Python programming language.

But before that, let's see why you would want to reduce the number of frames and frame rate of a video.

Why Reduce the Number of Frames and the Frame Rate of a Video?

Reducing the number of frames and frame rate of a video can be beneficial for several reasons:

Storage Efficiency: Videos with fewer frames and lower frame rates take up less disk space, which is helpful when storage capacity is limited or for easier online sharing.

Bandwidth Conservation: Such videos use less network bandwidth, making them suitable for streaming over slow or unstable internet connections.

Performance Optimization: They require fewer computational resources, ideal for low-end devices or resource-intensive processes like deep learning algorithms.

Let's now …

AndreRet 526 Senior Poster

As always, precise and in detail, great tutorial!

usmanmalik57 0 Light Poster
Introduction

Loss functions are the driving force behind all machine learning algorithms. They quantify how well our models are performing by calculating the difference between the predicted and actual outcomes. The goal of every machine learning algorithm is to minimize this loss function, thereby improving the model’s accuracy.

Various libraries, such as PyTorch, TensorFlow, and Keras, provide a plethora of built-in loss functions like Mean Squared Error (MSE), Cross-Entropy, and many more. These built-in functions cover a wide range of tasks and are sufficient for many standard machine learning problems.

However, there are scenarios where these built-in loss functions may not suffice. This could be due to the unique nature of the problem at hand, or the need for a specific optimization strategy. In such cases, we need to design our own custom loss functions.

This article will guide you through the process of creating custom loss functions in PyTorch. So, Let’s get started!

Understanding Loss Functions

A loss function, alternatively referred to as a cost function, measures the degree of deviation between predicted outcomes and actual results. It serves as a metric to assess the effectiveness of an algorithm in modeling a given dataset. When predictions significantly diverge from actual values, the loss function yields a higher value. Conversely, a lower value is produced when predictions are relatively accurate.

In machine learning, the ultimate goal is to minimize this loss function. This process is known as optimization. By minimizing the loss, we are essentially fine-tuning our model to …

AndreRet 526 Senior Poster

My upvote received, your articles in AI is very inspiring and to the point, thank you!

usmanmalik57 0 Light Poster

As a researcher, I have often found myself buried under a mountain of research articles, each promising insights and breakthroughs crucial for my work. The sheer volume of information is overwhelming, and the time it takes to extract the relevant data can be daunting.

However, extracting meaningful information from research papers has become increasingly easier with the advent of large language models. Nevertheless, interacting with large language models, particularly for querying custom data, can be tricky since it requires intricate code.

Fortunately, with the introduction of the Python Langchain module, you can query complex language models such as OpenAI's GPT-4 in just a few lines of code, offering a lifeline to those of us who need to sift through extensive research quickly and efficiently.

This article will explore how the Python Langchain module can be leveraged to extract information from research papers, saving precious time and allowing us to focus on innovation and analysis. You can employ the process explained in this article to extract information from any other PDF document.

Downloading and Importing Required Libraries

Before diving into automated information extraction, we must set up our environment with the necessary tools. Langchain, OpenAI, PyPDF2, faiss-cpu, and rich are the libraries that will form the backbone of our extraction process. Each serves a unique purpose:

  • Langchain: Facilitates the access and chaining of language models and vector space models to perform complex tasks.

  • OpenAI: Provides access to OpenAI’s powerful language models.

  • PyPDF2: A library …

fileformatcom commented: Great job, love you article +0
peol 0 Newbie Poster

Attentional Convolutional Network. Facial expression recognition has been an active research area over the past few decades, and it is still challenging due to the high intra-class variation.