In a previous article, I showed you how to analyze sentiments using Chat-GPT and data augmentation techniques. Following that, some readers reached out, asking for a breakdown of fine-tuning a Chat-GPT model.
In this article, I will guide you through fine-tuning your Chat-GPT model using your own data. First, I'll walk you through converting data from your CSV files into the required JSON format for fine-tuning. Once your data is prepared, I'll explain the Chat-GPT fine-tuning process using these formatted JSON files.
To illustrate, I'll be fine-tuning a text classification model for toxic comment classification, which involves categorizing comments into multiple labels. Let's dive right in and explore the world of fine-tuning text classification models with Chat-GPT.
Why Fine Tune Chat-GPT?
Fine-tuning Chat-GPT amplifies its capabilities for several compelling reasons:
Precision: Fine-tuning provides more accurate and contextually relevant responses than prompts alone.
Expanded Training: It allows training on a larger dataset, enhancing the model's adaptability to diverse tasks.
Efficiency: Shorter prompts save tokens, ensuring streamlined communication and efficient interactions.
Speed: Fine-tuned models respond swiftly, crucial for real-time applications, enhancing user experience significantly.
In essence, fine-tuning optimizes Chat-GPT's performance, delivering precise, efficient, and rapid results.
How to Fine-Tune a Chat-GPT Model
As per OpenAI’s official documentation, fine-tuning an OpenAI model (including Chat-GPT) involves the following three steps:
- Prepare and upload training data
- Train a new fine-tuned model
- Use your fine-tuned model
Let’s see each of these three steps in detail with the help of a real-world example.
Prepare and Upload Training Data
Like any other fine-tuning process, you require data. For Chat-GPT fine-tuning, you need to format your data in a particular format. OpenAI’s official documentation provides the following format as an example.

As an example, in this article, I will show you how to convert your data from a CSV file to JSON format. It is important to note that each dictionary in the above JSON file spans a single line.
Importing the Dataset
You can download the train.csv file for the Toxic Comments Dataset from Kaggle. Download the CSV file and import it in your code:
import pandas as pd

dataset = pd.read_csv(r"D:\Datasets\toxic comments.csv")
print(dataset.shape)
dataset.head()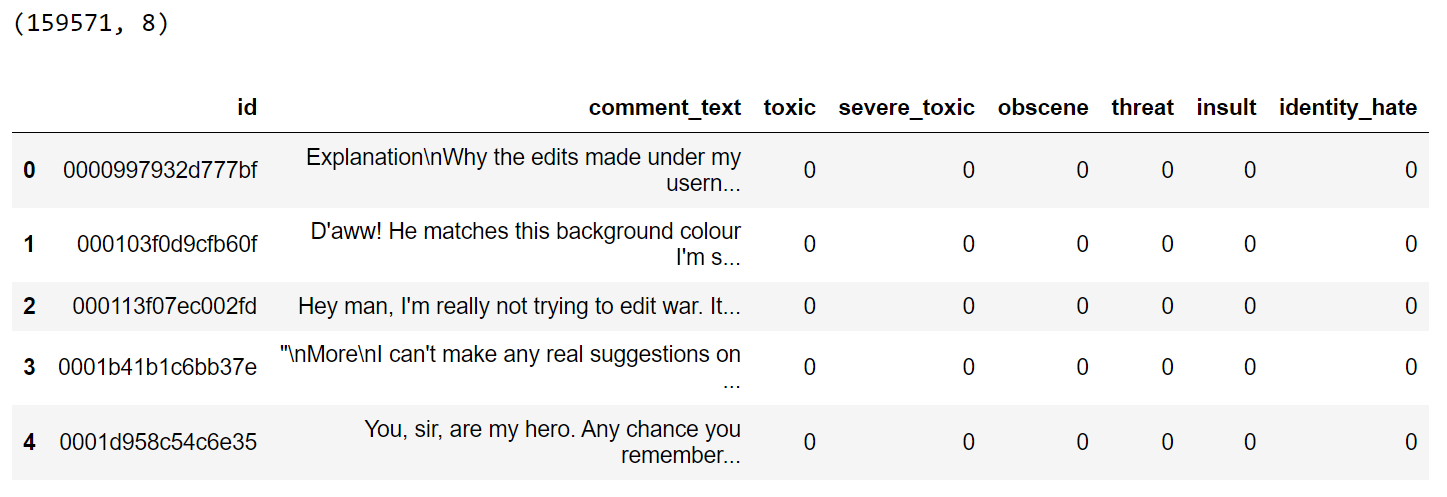
Our dataset comprises approximately 160k records, but a significant portion lacks assigned labels for the text comments. To enable effective multi-label classification, we'll exclude these rows.
dataset = dataset[~(dataset[['toxic',
                             'severe_toxic',
                             'obscene',
                             'threat',
                             'insult',
                             'identity_hate']].eq(0).all(axis=1))]
print(dataset.shape)
dataset.head()
The filtered dataset will now contain 16225 rows.
You can fine-tune your Chat-GPT model on all these rows. However, it can cost you more. Refer to the pricing page for more information.
In the context of this article, we'll focus on fine-tuning our model using a set of 400 training records. Additionally, we'll allocate 100 records each for both the validation and test sets. You can fine-tune with more or less number of records if you want.
train_set = dataset[:400]
validation_set = dataset[400:500]
test_set = dataset[500:600]

train_set.to_csv(r'D:\Datasets\toxic_comment\train.csv', index=False)
validation_set.to_csv(r'D:\Datasets\toxic_comment\val.csv', index=False)
test_set.to_csv(r'D:\Datasets\toxic_comment\test.csv', index=False)
The above script will create CSV files for training, validation, and test datasets.
Converting CSV to Fine Tuning Compliant JSON Format
As I mentioned, Chat-GPT expects training data in a specific format for fine-tuning. I wrote a helper function that converts the data in our CSV files to the Chat-GPT fine-tuning compliant format.
import csv
import json

# Read the CSV file and create JSONL format
def create_jsonl_from_csv(input_csv_file, output_jsonl_file):
    with open(input_csv_file, 'r', encoding='utf-8') as csv_file:
        csv_reader = csv.DictReader(csv_file)
        labels_list = ['toxic', 'severe_toxic', 'obscene', 'threat', 'insult', 'identity_hate']

        with open(output_jsonl_file, 'w', encoding='utf-8') as jsonl_file:
            for row in csv_reader:
                text = row['comment_text'].strip()
                user_message = f"Assign labels to this comment from the following labels list. Comment: {text}. labels list: {str(labels_list)}"
                assistant_message = []
                for label in labels_list:
                    if int(row[label]) == 1:
                        assistant_message.append(label)

                json_entry = {
                    "messages": [
                        {"role": "system", "content": "John is a linguistic expert"},
                        {"role": "user", "content": user_message},
                        {"role": "assistant", "content": ",".join(assistant_message)}
                    ]
                }
                # Write each JSON entry as a separate line in the output file
                jsonl_file.write(json.dumps(json_entry, ensure_ascii=False) + '\n')
The create_jsonl_from_csv() function in the above code transforms data from a CSV file into a specific JSON format. Here's how it works:
Step 1: The function takes two parameters: input_csv_file (the path to the input CSV file) and output_jsonl_file (the path to the output JSONL file).
Step 2: Inside the function, the input CSV file is opened, and its contents are read as a dictionary using csv.DictReader.
Step 3: We define a list named labels_list which contains the output labels: : ['toxic', 'severe_toxic', 'obscene', 'threat', 'insult', 'identity_hate'].
Step 4: For each row in the CSV file, the function extracts the comment text from the comment_text column.
Step 5: Next, we construct a message from the user. This message asks the Chat-GPT assistant to assign labels to the comment from the given list of labels. This is basically the prompt for the Chat-GPT fine-tuning model.
Step 6: The function also prepares the corresponding output response for the assistant. It goes through the labels list and checks if the corresponding values in the CSV row are 1. If yes, it adds the label to the assistant's message.
Step 7: The system's role, and the user's and assistant's messages are structured into a specific JSON format, with roles ("system", "user", and "assistant") and their corresponding content. This is the desired JSON format for fine-tuning.
Step 8: Each JSON entry, representing a conversation, is written as a separate line in the output JSONL file. JSONL is a format where each line is a valid JSON object.
Using the create_jsonl_from_csv() function, we can now convert our CSV files into JSON format.
train_csv = r'D:\Datasets\toxic_comment\train.csv'
train_json = r'D:\Datasets\toxic_comment\train.json'
create_jsonl_from_csv(train_csv, train_json)

test_csv = r'D:\Datasets\toxic_comment\test.csv'
test_json = r'D:\Datasets\toxic_comment\test.json'
create_jsonl_from_csv(test_csv, test_json)

val_csv = r'D:\Datasets\toxic_comment\val.csv'
val_json = r'D:\Datasets\toxic_comment\val.json'
create_jsonl_from_csv(val_csv, val_json)
Note: You don't really need to convert test.csv file to JSON format as we only need this file for making predictions after fine-tuning our Chat-GPT model.
Train a new fine-tuned model
We are now ready to fine-tune Chat-GPT using our training data.
The first step is to import the openai module and set its API key.
import openai

openai.api_key = "your api key here"
Next, you need to create training files for fine-tuning. You can do so via the open.File.create() function. You have to pass your JSON files to this method.
def create_training_file(file_path):
    file = openai.File.create(
        file=open(file_path, "rb"),
        purpose='fine-tune'
    )
    return file
The following script uploads the training file to OpenAI’s servers.
train_file_path = r'D:\Datasets\toxic_comment\train.json'
training_file = create_training_file(train_file_path)
In the same way, you can upload the validation file.
val_file_path = r'D:\Datasets\toxic_comment\val.json'
val_file = create_training_file(val_file_path)
You are now ready to fine-tune your Chat-GPT model. To do so, you can use the openai.FineTuningJob.Create() method. You must pass the IDs of your training and validation files, and the model name (gpt-3.5-turbo) to the method.
fine_tuning_job = openai.FineTuningJob.create(training_file = training_file['id'],
validation_file = val_file['id'] ,
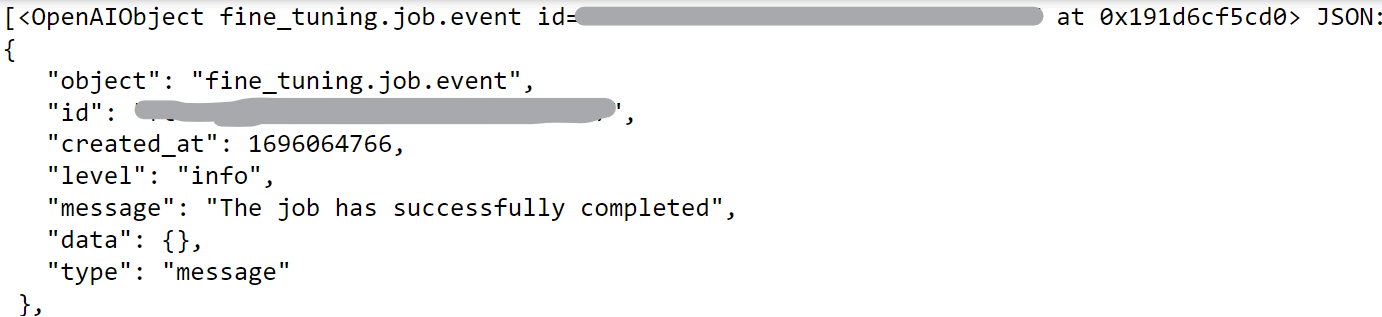
model="gpt-3.5-turbo")The fine-tuning process will start, which can take quite a bit of time. You can see the events associated with your fine-tuning job using the openai.FineTuningJob.list_events() method.
openai.FineTuningJob.list_events( id = fine_tuning_job['id'])['data']Once the fine-tuning is completed, you will see the following event: “The job has successfully completed”. You will also receive a notification in your email account associated with OpenAI.
Using a Fine-Tuned Model
To use a fine-tuned model, you need its model ID, which you will receive in your email. Another option to retrieve a model's ID is via the fine-tuning job ID, as shown in the following script:
fine_tuned_model = openai.FineTuningJob.retrieve(fine_tuning_job['id'])['fine_tuned_model']With your fine-tuned model’s job ID, you can call your fine-tuned model using the openai.ChatCompletion.create() method.
Let’s now run a simple test to call our fine-tuned model. The text here is taken from the test dataset. So apologies for any inconvenience.
text = "fremantle suck ass dipshit support a real team that has actually won a premiership u prick"
labels_list = ['toxic', 'severe_toxic', 'obscene', 'threat', 'insult', 'identity_hate']

user_message = """Assign labels to this comment from the following labels list. Comment: {}. labels list: {}""".format(text, str(labels_list))

completion = openai.ChatCompletion.create(
  model = fine_tuned_model,
  temperature = 0.0,
  messages = [
    {"role": "system", "content": "John is a linguistic expert."},
    {"role": "user", "content": user_message }
  ]
)
print(completion.choices[0].message['content'])
Here is the output: toxic,obscene,insult.
Matching the above output with the ground truth labels revealed a 100% correct prediction.
To test all the comments in the test set, I wrote the make_predictions() method, which accepts a list of text strings as a parameter and returns the corresponding list of predicted labels.
def make_predictions(texts):

    all_predictions = []
    labels_list = ['toxic', 'severe_toxic', 'obscene', 'threat', 'insult', 'identity_hate']
    for text in texts:
        user_message = """Assign labels to this comment from the following labels list. Comment: {}. labels list: {}""".format(text, str(labels_list))

        completion = openai.ChatCompletion.create(
          model = fine_tuned_model,
          temperature = 0.0,
          messages = [
            {"role": "system", "content": "John is a linguistic expert."},
            {"role": "user", "content": user_message }
          ]
        )
        predictions = completion.choices[0].message['content']
        all_predictions.append(predictions)


    return all_predictions
Let’s make predictions on the test set using the above method.
test_set = pd.read_csv(r"D:\Datasets\toxic_comment\test.csv")
comments = test_set["comment_text"].values
labels = test_set.drop(['id', 'comment_text'], axis = 1).values
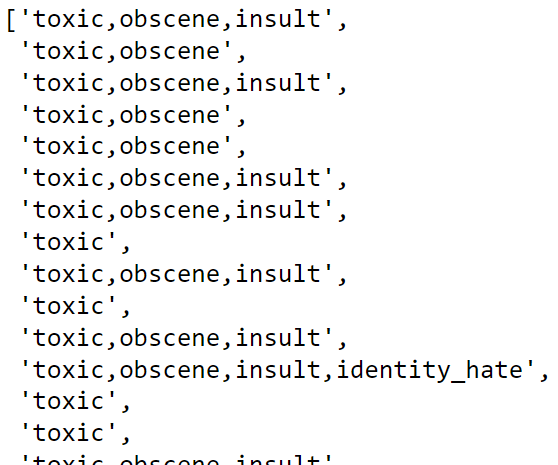
predictions = make_predictions(comments)
predictionsThe predictions will be a list of comma-separated label values.
To compare the output with the input labels, we need to convert the predictions to binary values. The following script does that:
def prediction_to_binary(predictions):

    label_map = {
    'toxic': 0,
    'severe_toxic': 1,
    'obscene': 2,
    'threat': 3,
    'insult': 4,
    'identity_hate': 5
    }

    binary_vectors = []

    for prediction in predictions:
        labels = prediction.split(',')
        binary_vector = [0] * 6  # Initialize a list of zeros for each label
        for label in labels:
            label_index = label_map[label.strip()]  # Get the index of the current label
            binary_vector[label_index] = 1  # Set the corresponding index to 1
        binary_vectors.append(binary_vector)

    return binary_vectors

y_pred = prediction_to_binary(predictions)
Finally, you can use the following script to print the classification report for your model.
from sklearn.metrics import classification_report

print(classification_report(y_pred, labels))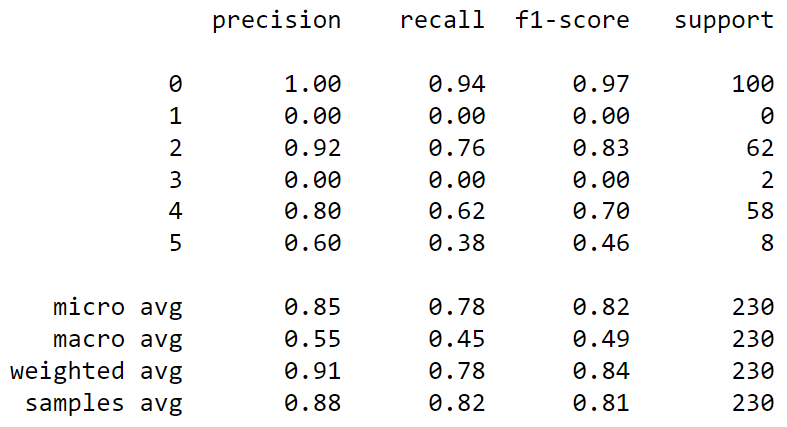
Conclusion
In this article, you saw how to fine-tune a Chat-GPT model from scratch using data from CSV files. You saw how to preprocess a CSV file to convert the data into Chat-GPT compliant JSON format. You also saw how to fine-tune a model and evaluate its performance on your test set.
With the knowledge gained in this tutorial, you should now be able to fine-tune your Chat-GPT models to perform various tasks, particularly text classification.
If you have any questions or feedback, please leave it in the comment section and I will try to be as responsive as possible.