Chatbots are software applications that can interact with humans using natural language. They can be used for various purposes, such as customer service, entertainment, education, and more. Chatbots can be built using different techniques like rule-based systems, machine learning, or deep learning. In this article, I will focus on the latter approach and show you how to build a chatbot using transformers in the TensorFlow Keras library.
Transformers are a type of neural network architecture that can handle sequential data, such as text, speech, or images. They are based on the concept of attention, which allows them to focus on the most relevant parts of the input and output sequences. Transformers lie at the foundation of many state-of-the-art natural language applications such as Chat-GPT, Bard, Bing, etc.
In this article, we will use a transformer model to create a question-answering chatbot. This article's code is inspired by the Keras official tutorial on neural machine translation. However, you can modify this code for any other sequence-to-sequence task such as chatbot development, as you will see in this article,
We will use a dataset of 3,725 conversations from Kaggle, which contains questions and answers on various topics.
So, let's begin without ado.
Importing Required Libraries
Before we start, we need to import some libraries that we will use throughout the article.
import pandas as pd
import random
import string
import re
import numpy as np
import tensorflow as tf
import keras
from keras import layers
from keras.layers import TextVectorization
Importing the Dataset
We will use the pandas library to load the dataset from a CSV file into a dataframe. We will also print the shape and the first five rows of the dataframe to get a glimpse of the data. Here is the code to import the dataset and print its first five rows.
## link to the dataset
## https://www.kaggle.com/datasets/kreeshrajani/3k-conversations-dataset-for-chatbot


conversations = pd.read_csv("/content/Conversation.csv")
print(conversations.shape)
conversations.head()
Output:
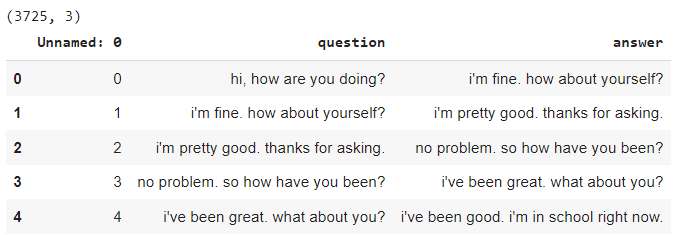
The output shows that the dataframe has question and answer columns.
Next, we will add the [start] and [end] tokens to the answers to indicate the start and end of the sequences. I will explain the importance of this step later in the article.
text_pairs = []

for index, row in conversations.iterrows():
    question = row['question']
    answer =  "[start] " + row['answer'] + " [end]"
    text_pairs.append((question, answer))

for _ in range(5):
    print(random.choice(text_pairs))
Output:

We will divide the dataset into train, validation, and test sets with a 70, 15, and 15 ratio.
random.shuffle(text_pairs)
num_val_samples = int(0.15 * len(text_pairs))
num_train_samples = len(text_pairs) - 2 * num_val_samples
train_pairs = text_pairs[:num_train_samples]
val_pairs = text_pairs[num_train_samples : num_train_samples + num_val_samples]
test_pairs = text_pairs[num_train_samples + num_val_samples :]
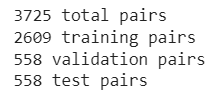
print(f"{len(text_pairs)} total pairs")
print(f"{len(train_pairs)} training pairs")
print(f"{len(val_pairs)} validation pairs")
print(f"{len(test_pairs)} test pairs")
Output:
Preprocessing Texts
Before we can feed the text data to a Keras model, We need to perform some preprocessing steps to make our data suitable for the transformer architecture in Keras. The preprocessing steps include:
- standardizing the text by converting it to lowercase and removing punctuation marks.
- vectorizing the text by mapping each word to a unique integer index.
- Padding or truncating the sequences to a fixed length.
We will use the Keras TextVectorization layer to perform the steps above. This layer can take raw text as input and output numerical vectors that the model can use.
We will create two instances of this layer: one for the questions and one for the answers. We will also specify some parameters for the layer, such as the maximum number of tokens in the vocabulary, the output mode, the output sequence length, and the custom standardization function. Here is the code to create the TextVectorization layers and the custom standardization function:
strip_chars = string.punctuation
strip_chars = strip_chars.replace("[", "")
strip_chars = strip_chars.replace("]", "")

vocab_size = 2500
sequence_length = 100
batch_size = 64

def custom_standardization(input_string):
    lowercase = tf.strings.lower(input_string)
    return tf.strings.regex_replace(lowercase, "[%s]" % re.escape(strip_chars), "")

question_vectorizer = TextVectorization(
    max_tokens=vocab_size,
    output_mode="int",
    output_sequence_length=sequence_length,
)

answer_vectorizer = TextVectorization(
    max_tokens=vocab_size,
    output_mode="int",
    output_sequence_length=sequence_length + 1,
    standardize=custom_standardization
)

question_texts = [pair[0] for pair in train_pairs]
answer_texts = [pair[1] for pair in train_pairs]

question_vectorizer.adapt(question_texts)
answer_vectorizer.adapt(answer_texts)
The custom_standardization() function in the above script takes an input string and returns a standardized string. It converts the string to lowercase and removes any punctuation marks, except for the square brackets we use to mark the start and end tokens.
The question_vectorizer and the answer_vectorizer have the same parameters, except for the output sequence length, which is one more for the answer_vectorizer to account for the end token.
Next, we adapt the vectorization layers to the corresponding question and answer in the training set using the adapt() function. Adaptation builds the vocabulary and the mapping from words to indices.
After adapting vectorization layers, we can check the vocabulary size and the vocabulary itself. The vocabulary is a list of words the layer can recognize and map to indices. The first index is reserved for the padding token, which is used to fill the sequences that are shorter than the output sequence length. The second index is reserved for the unknown token, which replaces the words that are not in the vocabulary. The rest of the indices are assigned to the words in the vocabulary.
Here is the code to check the vocabulary size and the vocabulary for the question_vectorizer:
print(len(question_vectorizer.get_vocabulary()))
question_vectorizer.get_vocabulary()
Output:

The output shows that we have 2072 unique words in all the input questions.
We can also use a text vectorization layer to convert raw text into a numerical vector. For example, we can take a question from the dataset and pass it to the question_vectorizer. The layer will standardize the text, split it into words, and map each word to its corresponding index. Here is the code to vectorize an example text:
example_text = tf.constant("well, they do put their party before their nation.")
example_text_tokens = question_vectorizer(example_text)
example_text_tokens
Output
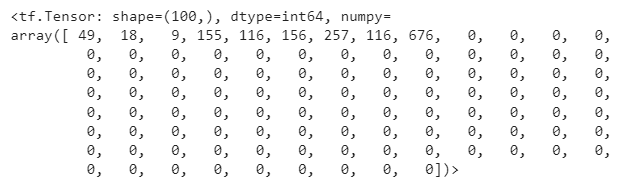
The above output shows that the text is converted into a vector of length 100, the output sequence length we specified. The vector contains the indices of the words in the text, followed by zeros to pad the sequence.
We can also reverse the process and convert the vector back into text by using the question vocabulary, which you can retrieve via the get_vocabulary() method of the question_vectorizer. Here is the code to do that:
question_vocab = np.array(question_vectorizer.get_vocabulary())
tokens = question_vocab[example_text_tokens.numpy()]
' '.join(tokens)
Output:
well they do put their party before their nation
We can do the same for the answers using the answer_vectorizer. Here is the code to vectorize and de-vectorize an example answer:
example_text = tf.constant("[start] yes. i think when you get old, you begin to smell. [end]")
example_text_tokens = answer_vectorizer(example_text)
print(example_text_tokens)

answer_vocab = np.array(answer_vectorizer.get_vocabulary())
tokens = answer_vocab[example_text_tokens.numpy()]
print(' '.join(tokens))
Output:
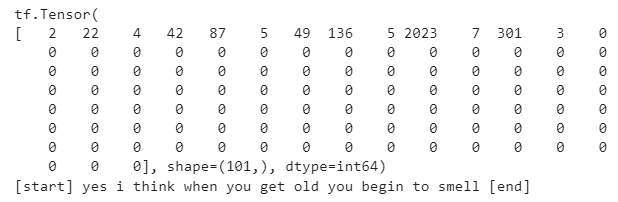
As we can see, the answer is converted into a vector of length 101, which is one more than the question vectorizer. The vector contains the indices of the words in the answer, including the start and end tokens, followed by zeros to pad the sequence. The text is also reconstructed from the vector, with the square brackets around the start and end tokens.
After preprocessing the text data, we need to format and create the dataset that we will use to train and test our chatbot. The dataset should have the following structure:
The inputs should be a dictionary with two keys: encoder_inputs and decoder_inputs. The encoder_inputs key contains the vectorized questions, and the decoder_inputs contain the vectorized answers with [start] and [end] tokens.
The targets are the vectorized answers without the [start] token.
The format_dataset() function in the following script formats the dataset.
def format_dataset(question, answers):
    questions = question_vectorizer(question)
    answers = answer_vectorizer(answers)
    return (
        {
            "encoder_inputs": questions,
            "decoder_inputs": answers[:, :-1],
        },
        answers[:, 1:],
    )
Next, we will define the make_dataset() function, which takes a list of question-answer pairs as input and returns a tf.data.Dataset object. The tf.data.Dataset API is a convenient way to create and manipulate datasets in TensorFlow. It allows us to perform various operations on the data, such as batching, shuffling, caching, prefetching, and mapping. Here is the code for the make_dataset function.
def make_dataset(pairs):
    questions, answers = zip(*pairs)
    questions = list(questions)
    answers = list(answers)
    dataset = tf.data.Dataset.from_tensor_slices((questions, answers))
    dataset = dataset.batch(batch_size)
    dataset = dataset.map(format_dataset)
    return dataset.shuffle(2048).prefetch(16).cache()
We use the make_dataset function to create two datasets: train_ds, and val_ds.
These datasets correspond to the train_pairs and val_pairs we created earlier by splitting the data. Here is the code to create the datasets:
train_ds = make_dataset(train_pairs)
val_ds = make_dataset(val_pairs)
To check the structure and content of the datasets, we can use the take() method to get a sample batch of elements from each dataset. We can also print the text of the inputs and the targets. Here is the code to do that:
for item in train_ds.take(1):

    print(f"Encoder input text: {question_vocab[item[0]['encoder_inputs'][0].numpy()]}")


    print(f"Decoder input text: {answer_vocab[item[0]['decoder_inputs'][0].numpy()]}")

    print(f"Decoder outputs: {answer_vocab[item[1][0].numpy()]}")
Output:
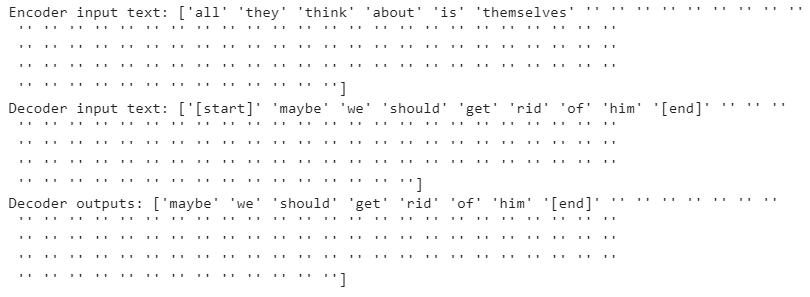
You can see from the above output that the encoder input text is a question from the dataset, the decoder input text is the corresponding answer with the start and end tokens, and the decoder output text is the same answer without the start token. We can also see that the text is vectorized, and padded or truncated to the output sequence length.
Finally, we can print the shape of the inputs and the targets using the following code:
for inputs, targets in train_ds.take(1):
    print(f'inputs["encoder_inputs"].shape: {inputs["encoder_inputs"].shape}')
    print(f'inputs["decoder_inputs"].shape: {inputs["decoder_inputs"].shape}')
    print(f"targets.shape: {targets.shape}")
Output:
inputs["encoder_inputs"].shape: (64, 100)
inputs["decoder_inputs"].shape: (64, 100)
targets.shape: (64, 100)
The output shows that inputs to the encoder and decoders, and the decoder outputs will be a batch of 64 records where each record has a sequence length of 100.
We are now ready to build our transformer model.
The Transformers Model
In the previous section, we formatted and created the dataset that we will use to train and test our chatbot. In this section, we will build the transformer model using Keras.
The transformer model consists of two main components: an encoder and a decoder. The encoder takes the input sequence, such as a question, and produces its contextualized representation. The decoder takes the encoder output and the output sequence, such as an answer, and generates the next token of the output sequence. The encoder and the decoder are composed of multiple layers, each with a similar structure.
The layers are:
- An attention layer, which computes the relevance of each part of the input or output sequence to the current token.
- A feed-forward layer, which applies a non-linear transformation to the attention output.
- A residual connection, which adds the input of the layer to its output.
- A layer normalization, which normalizes the output of the layer.
Here is an image of the transformer model from the seminal paper on attention mechanism:
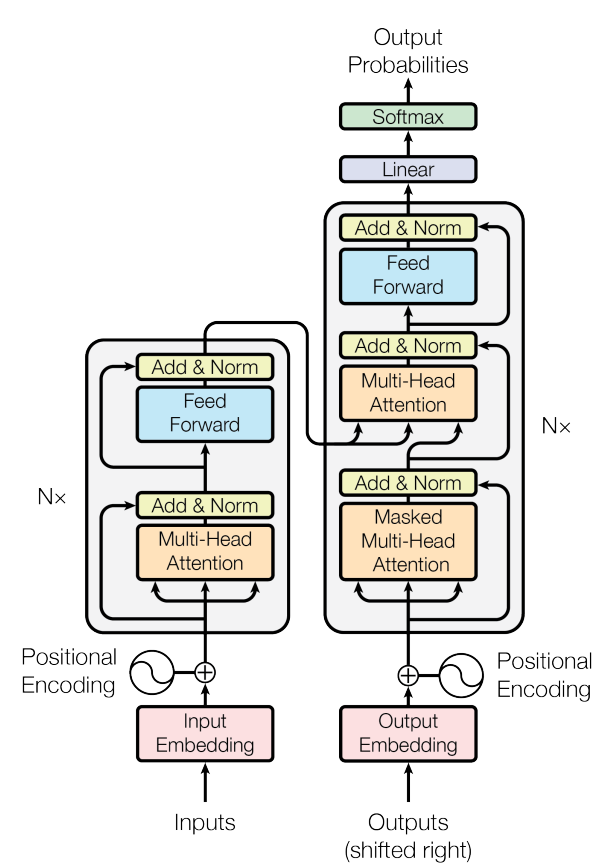
The left part in the above image is the encoder, while the right part is the decoder.
Let's define an encoder first.
Transformer Encoder
The Transformer encoder consists of the following parts:
-
A multi-head attention layer that performs self-attention, which is a mechanism to learn the relevance of each input token to the others.
-
A normalization layer that applies a normalization operation to each input token. This layer helps stabilize the training and reduce the input variance.
-
A Dense layer that applies a linear transformation to the output of the attention layer, followed by a non-linear activation function, such as
ReLU. This layer increases the encoder's expressiveness and capacity, allowing it to learn complex and non-linear mappings from the input to the output.
The following script defines the transformer encoder for our chatbot model.
class TransformerEncoder(layers.Layer):
    def __init__(self, embed_dim, dense_dim, num_heads, **kwargs):
        super().__init__(**kwargs)
        self.embed_dim = embed_dim
        self.dense_dim = dense_dim
        self.num_heads = num_heads
        self.attention = layers.MultiHeadAttention(
            num_heads=num_heads, key_dim=embed_dim
        )
        self.dense_proj = keras.Sequential(
            [
                layers.Dense(dense_dim, activation="relu"),
                layers.Dense(embed_dim),
            ]
        )
        self.layernorm_1 = layers.LayerNormalization()
        self.layernorm_2 = layers.LayerNormalization()
        self.supports_masking = True

    def call(self, inputs, mask=None):
        attention_output = self.attention(query=inputs, value=inputs, key=inputs)
        proj_input = self.layernorm_1(inputs + attention_output)
        proj_output = self.dense_proj(proj_input)
        return self.layernorm_2(proj_input + proj_output)
Positional Embeddings
A positional embedding layer is a neural network component that adds information about the position of each token in a sequence, such as a sentence or a paragraph, to the token embeddings. This helps the model learn the input's order and structure, which is important for tasks such as text generation or machine translation.
The positional embedding layer consists of the following parts:
-
A token embedding layer that maps each token, such as a word or a character, to a vector of a fixed size specified by the
output_dimargument. -
A position embedding layer that maps each position, such as the first, second, or third token in a sequence, to a vector of the same size as the token embeddings. This layer learns the relative importance and role of the position of each item in the sequence.
-
An addition operation that adds the token embeddings and the position embeddings element-wise. This is the output of the positional embedding layer, which can be fed to other layers, such as a Transformer encoder or decoder.
The positional embedding layer also supports masking, which means it can ignore the padded tokens in the input. This is specified by the mask argument. The masking is done by the compute_mask() method. The masking helps the model to focus on the relevant tokens and avoid unnecessary computations.
The following script creates a PositionalEmbedding layer for our model.
class PositionalEmbedding(layers.Layer):
    def __init__(self, sequence_length, vocab_size, embed_dim, **kwargs):
        super().__init__(**kwargs)
        self.token_embeddings = layers.Embedding(
            input_dim=vocab_size, output_dim=embed_dim
        )
        self.position_embeddings = layers.Embedding(
            input_dim=sequence_length, output_dim=embed_dim
        )
        self.sequence_length = sequence_length
        self.vocab_size = vocab_size
        self.embed_dim = embed_dim

    def call(self, inputs):
        length = tf.shape(inputs)[-1]
        positions = tf.range(start=0, limit=length, delta=1)
        # print(positions)
        embedded_tokens = self.token_embeddings(inputs)
        # print(f"tokens_embeddings: {embedded_tokens.shape}")
        embedded_positions = self.position_embeddings(positions)
        # print(f"position_embeddings: {embedded_positions.shape}")
        return embedded_tokens + embedded_positions


    def compute_mask(self, inputs, mask=None):
        return tf.math.not_equal(inputs, 0)
Transformer Decoder
A Transformer decoder generates an output sequence based on the input decoder sequence and the encoder representation.
The Transformer decoder consists of the following parts:
-
A multi-head self-attention layer that performs self-attention on the decoder input sequence. The multi-head self-attention layer also uses a causal mask, a triangular matrix that prevents the attention from looking ahead at the future tokens and ensures that the output token only depends on the previous tokens. The
use_causal_maskargument specifies the causal mask, which should be set to True. -
A normalization layer that applies a normalization operation to each output token.
-
A multi-head cross-attention layer that performs cross-attention on the output sequence and the encoder representation, which is a mechanism to learn the relevance of each output token to the input tokens.
-
An Add layer that adds the output sequence and the cross-attention output element-wise.
-
A Dense layer that applies a linear transformation to the output of the cross-attention layer.
The following script defines our transformer encoder.
class TransformerDecoder(layers.Layer):
    def __init__(self, embed_dim, latent_dim, num_heads, **kwargs):
        super().__init__(**kwargs)
        self.embed_dim = embed_dim
        self.latent_dim = latent_dim
        self.num_heads = num_heads
        self.attention_1 = layers.MultiHeadAttention(
            num_heads=num_heads, key_dim=embed_dim
        )
        self.attention_2 = layers.MultiHeadAttention(
            num_heads=num_heads, key_dim=embed_dim
        )
        self.dense_proj = keras.Sequential(
            [
                layers.Dense(latent_dim, activation="relu"),
                layers.Dense(embed_dim),
            ]
        )
        self.layernorm_1 = layers.LayerNormalization()
        self.layernorm_2 = layers.LayerNormalization()
        self.layernorm_3 = layers.LayerNormalization()
        self.add = layers.Add()  # instead of `+` to preserve mask
        self.supports_masking = True

    def call(self, inputs, encoder_outputs, mask=None):
        attention_output_1 = self.attention_1(
            query=inputs, value=inputs, key=inputs, use_causal_mask=True
        )
        out_1 = self.layernorm_1(self.add([inputs, attention_output_1]))

        attention_output_2 = self.attention_2(
            query=out_1,
            value=encoder_outputs,
            key=encoder_outputs,
        )
        out_2 = self.layernorm_2(self.add([out_1, attention_output_2]))

        proj_output = self.dense_proj(out_2)
        return self.layernorm_3(self.add([out_2, proj_output]))
Putting it Together: Training the Chatbot Transformer
Now that we have defined the transformer encoder, positional embedding, and transformer decoder, we can combine everything to define a transformer model for question-answering chatbot.
Let me briefly explain what happens in the transformer with the help of an example.
Suppose we have the following inputs and outputs for encoder and decoder:
Encoder input: ["Hello", "how", "are", "you"]
Decoder input: ["[start]", "I", "am", "fine", and "you", "[end]"]
Decoder output: ["I", "am", "fine", and "you", "[end]"]
The transformer works in an auto-regressive manner. The encoder input remains the same for generating an answer. The decoder input and decoder output changes at every time step.
In the first time step, the decoder will take the encoder output of the text ["Hello", "how", "are", "you"], and the [start] token from the decoder input. The output will be a vector of vocabulary size. The index with the highest probability is selected and converted to text. During training, we will know that given the encoder output and the ['start'] token in the decoder input, the decoder output should be the token ['I'].
At the second time-step, the encoder output remains the same, but the decoder input is updated to ["[start]", "I"]. The decoder output will be the next token, i.e. "am".
The decoder input at the third time step is updated to ["[start]", "I", "am"]. This process continues for all items in the decoder input sequence.
We will not have information about all the decoder outputs during the inference. Instead, we will predict a token at time step t and append this token to the decoder input at time step t+1. This process continues until the ["end"] token is predicted, which marks the end of the predicted sentence.
The following script puts everything together and creates a complete encoder-decoder transformer model in Keras.
embed_dim = 256
latent_dim = 2048
num_heads = 8

encoder_inputs = keras.Input(shape=(None,), dtype="int64", name="encoder_inputs")
x = PositionalEmbedding(sequence_length, vocab_size, embed_dim)(encoder_inputs)
encoder_outputs = TransformerEncoder(embed_dim, latent_dim, num_heads)(x)
encoder = keras.Model(encoder_inputs, encoder_outputs)

decoder_inputs = keras.Input(shape=(None,), dtype="int64", name="decoder_inputs")
encoded_seq_inputs = keras.Input(shape=(None, embed_dim), name="decoder_state_inputs")
x = PositionalEmbedding(sequence_length, vocab_size, embed_dim)(decoder_inputs)
x = TransformerDecoder(embed_dim, latent_dim, num_heads)(x, encoded_seq_inputs)
x = layers.Dropout(0.5)(x)
decoder_outputs = layers.Dense(vocab_size, activation="softmax")(x)
decoder = keras.Model([decoder_inputs, encoded_seq_inputs], decoder_outputs)

decoder_outputs = decoder([decoder_inputs, encoder_outputs])
transformer = keras.Model(
    [encoder_inputs, decoder_inputs], decoder_outputs, name="transformer"
)


transformer.compile(
    "rmsprop", loss="sparse_categorical_crossentropy", metrics=["accuracy"]
)


tf.keras.utils.plot_model(transformer, show_shapes=True)
Output:
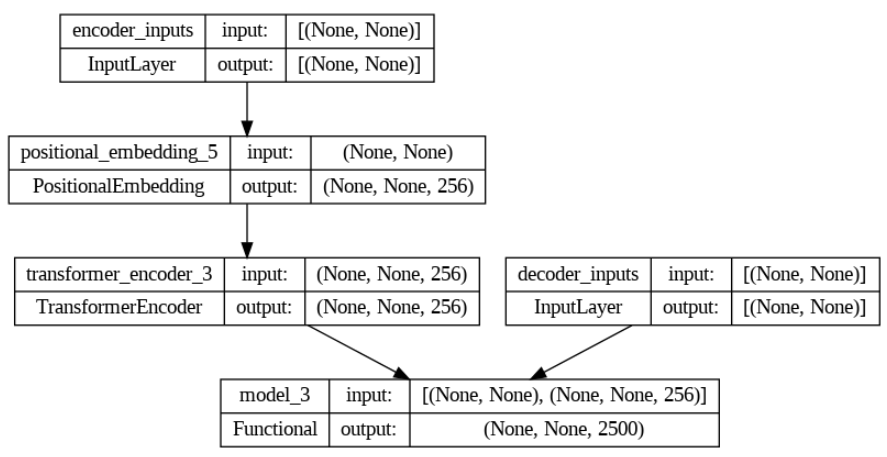
The above output shows the complete architecture of our chatbot model.
We will train our model for 50 epochs.
epochs = 50

transformer.fit(train_ds, epochs=epochs, validation_data=val_ds)
Output:
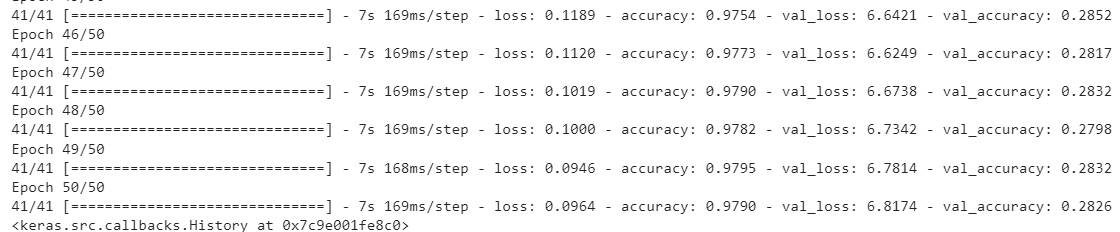
We achieved an accuracy of 97.90% on the training set and an accuracy of 28.26% on the validation. The accuracy is very low on the validation set since we have a very small dataset. Typically, transformer architecture works better when you have at least half a million records. But for learning purposes, you can use a smaller dataset.
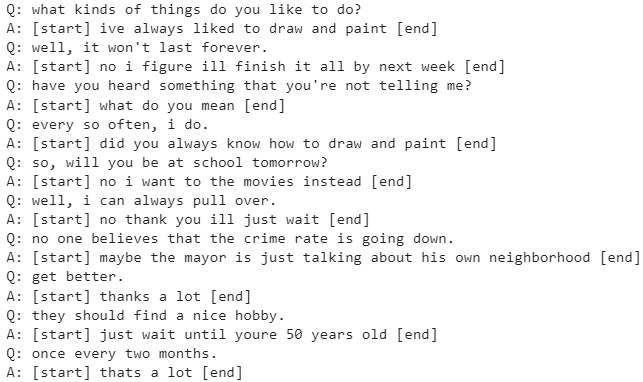
Testing the Chatbot
Finally, you can test the chatbot you created using the following code. You can see the answers generated for various questions in the training set. The answers will surely not be accurate for the testg set since we had a very low accuracy on the validation set due to a very small dataset for training.
answer_index_lookup = dict(zip(range(len(answer_vocab)), answer_vocab))

max_decoded_sentence_length = 100


def decode_sequence(input_sentence):
    tokenized_input_sentence = question_vectorizer([input_sentence])
    decoded_sentence = "[start]"
    for i in range(max_decoded_sentence_length):
        tokenized_target_sentence = answer_vectorizer([decoded_sentence])[:, :-1]
        predictions = transformer([tokenized_input_sentence, tokenized_target_sentence])

        sampled_token_index = np.argmax(predictions[0, i, :])
        sampled_token = answer_index_lookup[sampled_token_index]
        decoded_sentence += " " + sampled_token

        if sampled_token == "[end]":
            break
    return decoded_sentence


test_eng_texts = [pair[0] for pair in train_pairs]
for _ in range(10):
    question = random.choice(test_eng_texts)
    print(f"Q: {question}")
    answer = decode_sequence(question)
    print(f"A: {answer}")
Output:
Conclusion
In this article, you learned how to create a simple chatbot using the transformer architecture. Transformer architecture is the backbone of many state-of-the-art large language models such as Chat-GPT, Bing, Bard, etc. With the knowledge gained in this tutorial, you can create any application involving sequence-to-sequence modeling using transformers in Keras.