Introduction
The Android platform provides many different types of menus to be added to an Android app. In this tutorial, we will learn how to add Contextual Menus to our app.
Goals
At the end of the tutorial, you would have learned:
- How to add a floating contextual menu.
- How to add a contextual menu in action mode.
Tools Required
- Android Studio. The version used in this tutorial is Bumblebee 2021.1.1 Patch 3.
Prerequisite Knowledge
- Basic Android.
- Menu XML resource.
Project Setup
To follow along with the tutorial, perform the steps below:
-
Create a new Android project with the default Empty Activity.
-
Give the default TextView an
android:idofhelloandandroid:textSizeof32sp. -
Your activity_main.xml should look like the code below.
<?xml version="1.0" encoding="utf-8"?> <androidx.constraintlayout.widget.ConstraintLayout xmlns:android="http://schemas.android.com/apk/res/android" xmlns:app="http://schemas.android.com/apk/res-auto" xmlns:tools="http://schemas.android.com/tools" android:layout_width="match_parent" android:layout_height="match_parent" tools:context=".MainActivity"> <TextView android:id="@+id/hello" android:layout_width="wrap_content" android:layout_height="wrap_content" android:text="@string/hello_world" android:textSize="32sp" app:layout_constraintBottom_toBottomOf="parent" app:layout_constraintLeft_toLeftOf="parent" app:layout_constraintRight_toRightOf="parent" app:layout_constraintTop_toTopOf="parent" /> </androidx.constraintlayout.widget.ConstraintLayout> -
Add the string resources below into your strings.xml file.
<string name="shuffle">Shuffle</string> <string name="reset">Reset</string> <string name="insert_random">Insert Random</string> <string name="hello_world">Hello World!</string> -
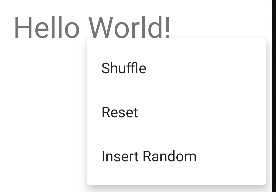
Add a menu XML resource called contextual.xml under res/menu. This will represent a menu with 3 options, Shuffle, Reset, and Insert Random. Later on, these actions will be performed on the default TextView.
 <?xml version="1.0" encoding="utf-8"?>
 <menu xmlns:android="http://schemas.android.com/apk/res/android">

    <item
        android:id="@+id/shuffle"
        android:title="@string/shuffle" />
    <item
        android:id="@+id/reset"
        android:title="@string/reset" />
    <item
        android:id="@+id/insert_random"
        android:title="@string/insert_random" />
 </menu>
Contextual Menu modes
A Contextual Menu can operate in two different modes:
-
floating contextual menu: a floating menu appears on the screen after long-clicking a View. The floating menu uses this View as an anchor.
-
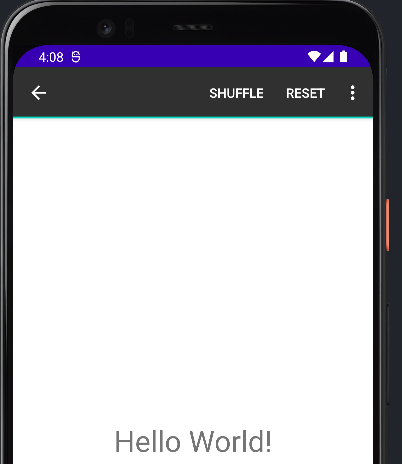
contextual action mode menu: the menu appears in the Action Bar instead, showing menu items as actions.
Add a floating contextual menu
To add a floating contextual menu, follow the steps below:
-
In MainActivity’s
onCreate(), retrieve the default TextView.val textView = findViewById<TextView>(R.id.hello) -
Next, we will have to register this View for a contextual menu by calling
registerForContextMenu()and passing in this same View.//Contextual floating menu registerForContextMenu(textView) -
Now, we need to override MainActivity’s
onCreateContextMenu()method, and inflate the menu resource file contextual.xml here.override fun onCreateContextMenu( menu: ContextMenu?, v: View?, menuInfo: ContextMenu.ContextMenuInfo? ) { super.onCreateContextMenu(menu, v, menuInfo) menuInflater.inflate(R.menu.contextual, menu) } -
The floating contextual menu should be working if you run the app now, but let us add some behaviors to the menu items to make them useful. We can listen for the floating contextual menu’s item clicks in
onContextItemSelected().override fun onContextItemSelected(item: MenuItem): Boolean { super.onContextItemSelected(item) return handleContextMenuItem(item) } -
Because we will reuse the logic to handle the menu items later on in the tutorial, we will extract this logic into a different function called
handleContextMenuItem(). This function will shuffle, reset, or insert a random alphabet character at a random index to Textview.private fun handleContextMenuItem(item: MenuItem): Boolean { val textView = findViewById<TextView>(R.id.hello) val text = textView.text return when(item.itemId){ R.id.shuffle -> { textView.text = text .asSequence() .shuffled() .joinToString(separator = "") { "$it" } true } R.id.reset -> { textView.text = getString(R.string.hello_world) true } R.id.insert_random -> { textView.text = StringBuilder(text) .insert( text.indices.random(), alphabet.random() ) true } else -> false } } -
Also, add the companion object below for the alphabet constant.
companion object { //Don't want chars 91->96 private val alphabet = CharRange('A', 'Z').plus(CharRange('a', 'z')) }
We are now done with the floating contextual menu. The app should behave similarly to the animation below.

Add a contextual menu in action mode
In this section, we will learn how to add a contextual menu in action mode.
-
Comment out
registerForContextMenu(textView)inonCreate()as we will not be using the floating action menu anymore. -
Implement the ActionMode.Callback interface. This callback allows you to inflate, listen to click and destroy events, etc.
private val actionModeCallback = object : ActionMode.Callback { override fun onCreateActionMode(mode: ActionMode, menu: Menu): Boolean { menuInflater.inflate(R.menu.contextual, menu) return true } override fun onActionItemClicked(mode: ActionMode, item: MenuItem): Boolean { return handleContextMenuItem(item) } override fun onPrepareActionMode(mode: ActionMode, menu: Menu) = false override fun onDestroyActionMode(mode: ActionMode) {} } -
In
onCreateActionMode(), we inflate the menu XML resource as done previously inonCreateContextMenu. Because actionModeCallback is declared inside the MainActivity scope, we have access to themenuInflaterin the callback as well. If your implementation of ActionMode.Callback is outside of MainActivity, then you can access a MenuInflater from the ActionMode parameter instead. -
Back in
onCreate(), we can bind the TextView’s OnLongClickListener to invoke a function calledstartActionMode().//Contextual action menu textView.setOnLongClickListener { startActionMode(actionModeCallback) true }
When we run the app now, we should get a contextual menu in Action Bar instead of a floating contextual menu.
Solution Code
MainActivity.kt
class MainActivity : AppCompatActivity() {
private val actionModeCallback = object : ActionMode.Callback {
override fun onCreateActionMode(mode: ActionMode, menu: Menu): Boolean {
menuInflater.inflate(R.menu.contextual, menu)
return true
}
override fun onActionItemClicked(mode: ActionMode, item: MenuItem): Boolean {
return handleContextMenuItem(item)
}
override fun onPrepareActionMode(mode: ActionMode, menu: Menu) = false
override fun onDestroyActionMode(mode: ActionMode) {}
}
override fun onCreate(savedInstanceState: Bundle?) {
super.onCreate(savedInstanceState)
setContentView(R.layout.activity_main)
val textView = findViewById<TextView>(R.id.hello)
//Contextual floating menu
//registerForContextMenu(textView)
//Contextual action menu
textView.setOnLongClickListener {
startActionMode(actionModeCallback)
true
}
}
 override fun onCreateContextMenu(
    menu: ContextMenu?,
    v: View?,
    menuInfo: ContextMenu.ContextMenuInfo?
 ) {
    super.onCreateContextMenu(menu, v, menuInfo)
    menuInflater.inflate(R.menu.contextual, menu)
 }
 override fun onContextItemSelected(item: MenuItem): Boolean {
    super.onContextItemSelected(item)
    return handleContextMenuItem(item)
 }
 private fun handleContextMenuItem(item: MenuItem): Boolean {
    val textView = findViewById<TextView>(R.id.hello)
    val text = textView.text

    return when(item.itemId){
        R.id.shuffle -> {
            textView.text = text
                .asSequence()
                .shuffled()
                .joinToString(separator = "") {
                    "$it"
                }
            true
        }
        R.id.reset -> {
            textView.text = getString(R.string.hello_world)
            true
        }
        R.id.insert_random -> {
            textView.text = StringBuilder(text)
                .insert(
                    text.indices.random(),
                    alphabet.random()
                )
            true
        }
        else -> false
    }
 }
 companion object {
    //Don't want chars 91->96
    private val alphabet = CharRange('A', 'Z').plus(CharRange('a', 'z'))
 }
}activity_main.xml
<?xml version="1.0" encoding="utf-8"?>
<androidx.constraintlayout.widget.ConstraintLayout xmlns:android="http://schemas.android.com/apk/res/android"
   xmlns:app="http://schemas.android.com/apk/res-auto"
   xmlns:tools="http://schemas.android.com/tools"
   android:layout_width="match_parent"
   android:layout_height="match_parent"
   tools:context=".MainActivity">

   <TextView
       android:id="@+id/hello"
       android:layout_width="wrap_content"
       android:layout_height="wrap_content"
       android:text="@string/hello_world"
       android:textSize="32sp"
       app:layout_constraintBottom_toBottomOf="parent"
       app:layout_constraintLeft_toLeftOf="parent"
       app:layout_constraintRight_toRightOf="parent"
       app:layout_constraintTop_toTopOf="parent" />

</androidx.constraintlayout.widget.ConstraintLayout>
contextual.xml
<?xml version="1.0" encoding="utf-8"?>
<menu xmlns:android="http://schemas.android.com/apk/res/android">

   <item
       android:id="@+id/shuffle"
       android:title="@string/shuffle" />
   <item
       android:id="@+id/reset"
       android:title="@string/reset" />
   <item
       android:id="@+id/insert_random"
       android:title="@string/insert_random" />
</menu>

**strings.xml**

<resources>
   <string name="app_name">Daniweb Android Contextual Menu</string>
   <string name="shuffle">Shuffle</string>
   <string name="reset">Reset</string>
   <string name="insert_random">Insert Random</string>
   <string name="hello_world">Hello World!</string>
</resources>
Summary
We have learned how to create a floating contextual menu as well as a contextual menu in action mode. The full project code can be found at https://github.com/dmitrilc/DaniwebAndroidContextualMenus.