Introduction
On the android platform, widgets provide a quick way to interact with your Apps. They are extremely useful at providing quick information without the user launching the app Activities themselves. Common use cases for homescreen widgets are weather, email, or banking information.
In this tutorial, we will learn how to create a widget for our Android app.
Goals
At the end of the tutorial, you would have learned:
- How to create a homescreen widget.
Tools Required
- Android Studio. The version used in this tutorial is Android Studio Chipmunk 2021.2.1.
Prerequisite Knowledge
- Intermediate Android.
Project Setup
To follow along with the tutorial, perform the steps below:
- Create a new Android project with the default Empty Activity.
Steps to create a Widget
There are three basic things that we would need to create a widget:
- An AppWidgetProviderInfo object. We can just declare the configuration for this object in an XML file.
- An XML file that contains the layout for the widget. A layout for a widget is a lot different than a layout for Activity/Fragment because you are only able to use the View and ViewGroups defined in RemoteViews[https://developer.android.com/reference/android/widget/RemoteViews].
- An implementation of AppWidgetProvider. An AppWidgetProvider is just a BroadcastReceiver, so you can intercept Intents in this class. We will also need to define this implementation in the manifest.
The Android Studio IDE supports creating all of these files, add string resources, Material 3 styles AND declaring the widget in the manifest in one button click. We will learn how to create the essential files manually in this tutorial. After you know how to create widgets manually, then it would just be faster to let the IDE generate most of the boilerplate code by right-clicking on res/xml -> New -> Widget -> AppWidget.
Create the AppWidgetProviderInfo XML
-
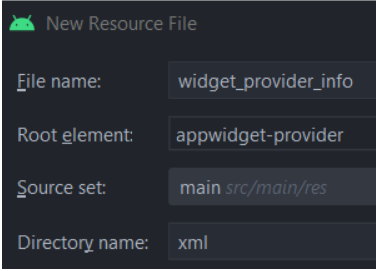
Create a new XML file called widget_provider_info under res/xml. The root element must be
<appwidget-provider>.
-
After the file has been created, copy and paste the code below into widget_provider_info.xml. These attributes are enough for this tutorial, but more attributes can be found here(https://developer.android.com/reference/android/appwidget/AppWidgetProviderInfo).
 <?xml version="1.0" encoding="utf-8"?>
 <appwidget-provider xmlns:android="http://schemas.android.com/apk/res/android"
    android:minWidth="50dp"
    android:minHeight="50dp"
    android:initialLayout="@layout/widget"
    android:resizeMode="horizontal|vertical">
 </appwidget-provider>
Create the Widget layout
The file above will display a compile error because the file widget.xml is missing from the layout directory. Create the widget.xml in the layout directory with RelativeLayout> as the root element.
<?xml version="1.0" encoding="utf-8"?>
<RelativeLayout xmlns:android="http://schemas.android.com/apk/res/android"
   android:layout_width="wrap_content"
   android:layout_height="wrap_content"
   android:background="@color/white">

   <TextView
       android:id="@+id/widget_textView"
       android:layout_width="wrap_content"
       android:layout_height="wrap_content"
       android:layout_alignParentStart="true"
       android:text="@string/widget_textView"
       android:textSize="32sp" />
</RelativeLayout>
This layout contains exactly one element, which is a TextView. Remember that all of the elements used here are supported by RemoteViews.
Make sure to add the string resource below to strings.xml as well.
<string name="widget_textView">Hello World!</string>Implements AppWidgetProvider
Next, we will have to create an implementation of AppWidgetProvider. Create a new class called Widget, which overrides AppWidgetProvider.
class Widget : AppWidgetProvider() {
   override fun onReceive(context: Context?, intent: Intent?) {
       super.onReceive(context, intent)
   }

   override fun onUpdate(
       context: Context?,
       appWidgetManager: AppWidgetManager?,
       appWidgetIds: IntArray?
   ) {
       super.onUpdate(context, appWidgetManager, appWidgetIds)
   }

   override fun onAppWidgetOptionsChanged(
       context: Context?,
       appWidgetManager: AppWidgetManager?,
       appWidgetId: Int,
       newOptions: Bundle?
   ) {
       super.onAppWidgetOptionsChanged(context, appWidgetManager, appWidgetId, newOptions)
   }

   override fun onDeleted(context: Context?, appWidgetIds: IntArray?) {
       super.onDeleted(context, appWidgetIds)
   }

   override fun onEnabled(context: Context?) {
       super.onEnabled(context)
   }

   override fun onDisabled(context: Context?) {
       super.onDisabled(context)
   }

   override fun onRestored(context: Context?, oldWidgetIds: IntArray?, newWidgetIds: IntArray?) {
       super.onRestored(context, oldWidgetIds, newWidgetIds)
   }
}
There are no abstract functions that we need to override at all. Our Widget still receives a broadcast if one matches the Intent declared in the manifest (later on in the tutorial), but it is not taking any action yet, unless you want to do something with it. We will not cover how to respond to broadcasts in this tutorial as that topic is quite lengthy and deserves an entire tutorial by itself. One of the most important thing to keep in mind for the base class AppWidgetProvider is that only the function onReceive() contains any code, and its main functionality is to filter out the Intent received and call its appropriate onX functions (as shown in code). All of the other functions in AppWidgetProvider are empty.
Since AppWidgetProvider is also a BroadcastReceiver, we will also need to declare it in the manifest.
<receiver android:name=".Widget"
   android:exported="false">
   <intent-filter>
       <action android:name="android.appwidget.action.APPWIDGET_UPDATE" />
   </intent-filter>
   <meta-data android:name="android.appwidget.provider"
       android:resource="@xml/widget_provider_info" />
</receiver>
Run the App
We should have everything we need to run the App and create our own widget. The app should behave similar to the animation below.
Solution Code
Widget.kt
class Widget : AppWidgetProvider() {
   override fun onReceive(context: Context?, intent: Intent?) {
       super.onReceive(context, intent)
   }

   override fun onUpdate(
       context: Context?,
       appWidgetManager: AppWidgetManager?,
       appWidgetIds: IntArray?
   ) {
       super.onUpdate(context, appWidgetManager, appWidgetIds)
   }

   override fun onAppWidgetOptionsChanged(
       context: Context?,
       appWidgetManager: AppWidgetManager?,
       appWidgetId: Int,
       newOptions: Bundle?
   ) {
       super.onAppWidgetOptionsChanged(context, appWidgetManager, appWidgetId, newOptions)
   }

   override fun onDeleted(context: Context?, appWidgetIds: IntArray?) {
       super.onDeleted(context, appWidgetIds)
   }

   override fun onEnabled(context: Context?) {
       super.onEnabled(context)
   }

   override fun onDisabled(context: Context?) {
       super.onDisabled(context)
   }

   override fun onRestored(context: Context?, oldWidgetIds: IntArray?, newWidgetIds: IntArray?) {
       super.onRestored(context, oldWidgetIds, newWidgetIds)
   }
}
widget.xml
<?xml version="1.0" encoding="utf-8"?>
<RelativeLayout xmlns:android="http://schemas.android.com/apk/res/android"
   android:layout_width="wrap_content"
   android:layout_height="wrap_content"
   android:background="@color/white">

   <TextView
       android:id="@+id/widget_textView"
       android:layout_width="wrap_content"
       android:layout_height="wrap_content"
       android:layout_alignParentStart="true"
       android:text="@string/widget_textView"
       android:textSize="32sp" />
</RelativeLayout>
strings.xml
<resources>
   <string name="app_name">Daniweb Android Create Launcher Widget</string>
   <string name="widget_textView">Hello World!</string>
</resources>
widget_provider_info.xml
<?xml version="1.0" encoding="utf-8"?>
<appwidget-provider xmlns:android="http://schemas.android.com/apk/res/android"
   android:minWidth="50dp"
   android:minHeight="50dp"
   android:initialLayout="@layout/widget"
   android:resizeMode="horizontal|vertical">
</appwidget-provider>
AndroidManifest.xml
<?xml version="1.0" encoding="utf-8"?>
<manifest xmlns:android="http://schemas.android.com/apk/res/android"
   xmlns:tools="http://schemas.android.com/tools"
   package="com.example.daniwebandroidcreatelauncherwidget">

   <application
       android:allowBackup="true"
       android:dataExtractionRules="@xml/data_extraction_rules"
       android:fullBackupContent="@xml/backup_rules"
       android:icon="@mipmap/ic_launcher"
       android:label="@string/app_name"
       android:roundIcon="@mipmap/ic_launcher_round"
       android:supportsRtl="true"
       android:theme="@style/Theme.DaniwebAndroidCreateLauncherWidget"
       tools:targetApi="31">

       <receiver android:name=".Widget"
           android:exported="false">
           <intent-filter>
               <action android:name="android.appwidget.action.APPWIDGET_UPDATE" />
           </intent-filter>
           <meta-data android:name="android.appwidget.provider"
               android:resource="@xml/widget_provider_info" />
       </receiver>

       <activity
           android:name=".MainActivity"
           android:exported="true">
           <intent-filter>
               <action android:name="android.intent.action.MAIN" />

               <category android:name="android.intent.category.LAUNCHER" />
           </intent-filter>
       </activity>
   </application>

</manifest>
Summary
We have learned how to create widgets in this tutorial. The full project code can be found at https://github.com/dmitrilc/DaniwebAndroidCreateLauncherWidget.