This tutorial will teach you how to create a transparent navigation bar for your website, similar to the navigation at the Microsoft Vista website .
1) Start by creating a new image in Photoshop with a height and width of 700*70px.
2) Filling the first layer with a dark background makes working on semitransparent layers much easier. After you have done this, create a new layer and grab the rounded rectangle tool. Set the radius to 60px and draw a rounded rectangle like this one:
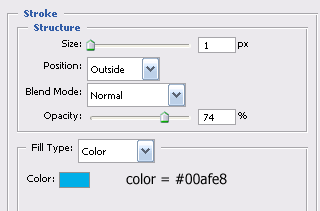
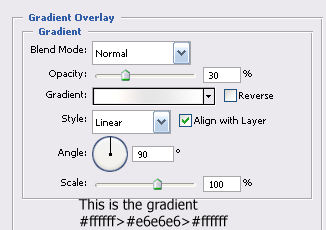
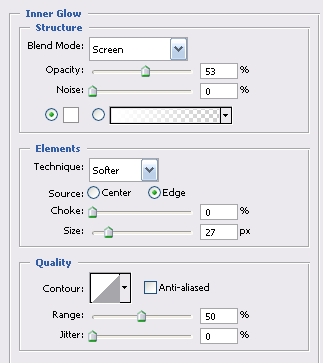
3) Go into this layer’s blending options (layer>layer style>blending options) and use the following settings:
4) Click on OK and move to the layer pallet where you should set the fill of this layer to 0% and end up with something looking like this:
5) Now you have the main bar but you still need to give it a bit more of a transparent look. Create a new layer and grab the Elliptical Marquee tool. This is where you should put your cursor to start dragging out the marquee:
This is where you should have placed your cursor when you have finished the marquee:
6) You need to cut across this selection with another one so that when you fill it, the black background isn’t filled as well. To take a cut away from one selection using another you need to hold down the alt key. Start a rectangular marquee across the top of the image. This is what it looks like just before you take your finger off the mouse button:
7) You now need to fill the selection in white using the Paint Bucket tool and drag the layer opacity down to about 11% before deselecting the selection using selection>deselect. 8) You will now have to follow steps 5 – 7 twice more on two new layers, until you have something resembling this:
9) Now you will have to split this up so that you can put different buttons on it, and to make this easier you should create guides along the width at: 150px, 283px, 416px, 550px using view>new guide. 10) Then grab the eraser tool (e) and select the layer with the original navigation bar on it from the layers pallet. Set the eraser to 1px wide and rasterize the selected layer by right clicking on it and selecting rasterize layer. 11) Now zoom in (ctrl+) and erase the layer along the guides to create a blue line which is the stroke that you set earlier:
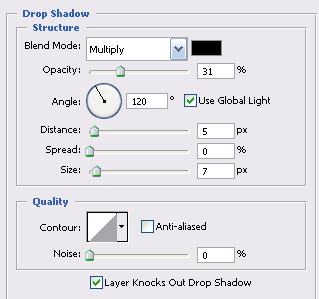
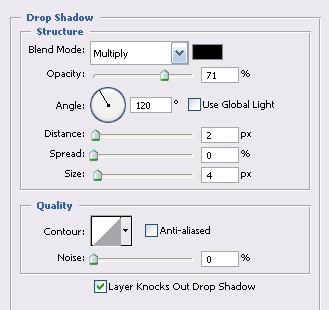
12) All that remains is to add the text for the buttons. Create 5 new layers and write your text for each button, one per layer. In this tutorial the font used is Tahoma at 24pt in white. 13) Align the text to ensure they are all in line by using the guides, and clear the old guides by clicking view>clear guides. 14) Now your text is aligned, add a shadow to each piece of button text by first opening the blending option for the layer and entering the following shadow settings:
15) Click OK and then add these settings to each layer by right clicking on this layer and selecting copy layer styles. Right click on each of the other text layers and select paste layer styles. 16) Finally, you can replace your background layer with an image or a pattern of your choosing. You should end up with something that looks not unlike this:
Note that if you choose to save this navigation bar without an opaque background like the image above has, then you have to save it as a 24 bit PNG file which gives you alpha channel transparency. What this means is that you can place it above an image on a website and you will still be able to see the image behind it. Here is that same navigation bar but saved as a PNG file without a background: