This tutorial will enable you to create a tabbed navigation bar to use on your website.
1) Open PhotoShop and create a new document with the size 670*70px.
2) Grab the rounded rectangle tool and draw a rectangle on the canvas, you will need to set the radius to 5px.
3) Next you need to add some color to this rectangle, so open the blending options for this layer by double clicking on the layer in the layer pallet.
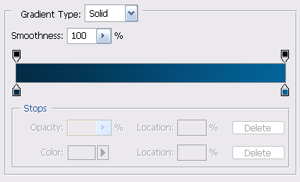
4) You will need to add a gradient overlay by clicking on the check box and going into the gradient overlay settings. Double click the picture of the gradient and set the color on the left to #032c45 and the color on the right to #036399.
5) Click OK and return to the main gradient settings. The blend mode should be set to normal, and check the box called reverse. The gradient should be at 100% opacity and set to linear at 90° with the gradient set to align with layer. Click OK to the blending option box and your canvas should now look like this:
6) Now you need to create something for the tabs to be hanging from. So first create a new layer using layer>new>layer and call this layer pole. Select the rectangle tool and draw a rectangle that is as wide as the canvas and about one third the height of the rounded rectangle you have just created.
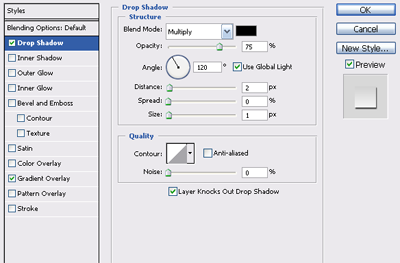
7) Next, open the blending options for this layer and set a drop shadow with the following settings:Blend Mode – Multiply
Color - #000000
Angle - 120°
Use Global Light – Checked
Distance – 5px
Spread - 0%
Size – 7px
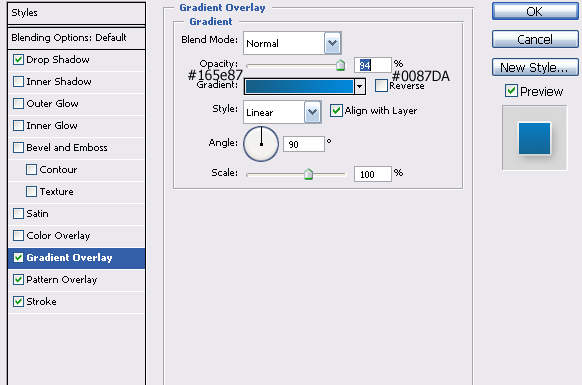
Now set a gradient with the following settings:Blend Mode – Normal
Opacity – 91%
Double click on the gradient box and use the following colors:Left - #909090
Middle - #bcbcbc
Left - #909090
Style – Linear
Align With Layer – Checked
Angle - 90°
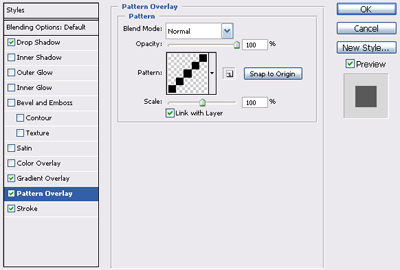
Next set a pattern overlay with the following settings:Blend Mode – Normal
Opacity – 100%
You will also need to make a pattern that is a diagonal line (leave this pattern out if you do not know how to do this) and the pattern created should be 5px*5px with just a black line drawn with a 1px pencil. It should look like this:
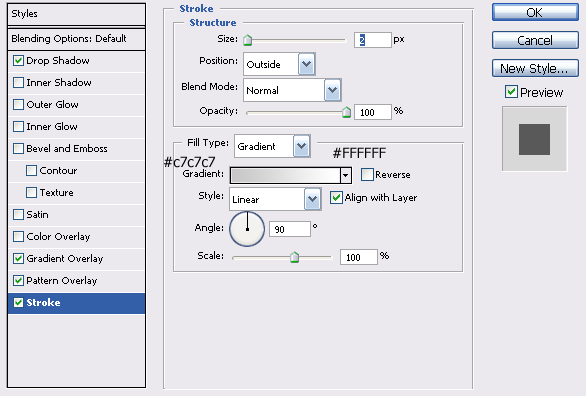
Now set a stroke with the following settings:Size – 1px
Position – Outside
Blend Mode – Normal
Opacity - 100%
Stroke color #474747
8) The canvas should now look like this:
9) OK, now you have the background for your navigation, so it is time to start making the tabs themselves. First, create a new layer and then drag the layer under your pole layer in the layer pallet and select the rounded rectangle tool. Call this layer tab_1 and draw the rectangle onto the canvas. You must make sure that the rectangle does not start too far under the ‘pole’ because if it does the gradient you are about to add will not have the correct effect. It should look like this:
10) Next go into the blending options for this layer by right clicking on the layer in the layer pallet. The correct settings are as follows:
You will need to use the colors as specified below:
11) Now click OK and you should see your tab has formed on the canvas. Duplicate this layer (right click on layer in layer pallet>duplicate layer) and repeat this three times, using the move tool to move them into position. They should be equally spread apart on the canvas and look something like this:
12) So now you have your tabs, but you still have to put some text on them. You can use any text you like for the tabs, using the text tool (t) to create 4 pieces of text on different layers. For reference, the font used in this tutorial is Tahoma, 18pt, Bold in white. Position your layers on the tabs, using guides by clicking view>new guide if you wish. 13) With the text aligned correctly on the canvas you now need to add some style to your text. Right click on any of the four layers in the layer pallet and using the blending options apply the following settings:
14) Click OK, and you will now have the right style of text for just one layer. Right click and select copy layer styles, then right click again on each of the other layers and select paste layer styles. Your finished tabbed navigation bar should look something like this: