
A quality power supply unit is a ‘must’ in a modern, high performance PC system. Cheap, generic units don’t supply stable enough voltages for highly demanding components, and introduce greater risk of failure which can put expensive PC components at risk.
Choosing the unit to use can be a nightmare, as there are many, many alternatives to choose from. Thermaltake have introduced a new design in power supply which will suit even the most demanding of situations. Worried because you’ve not had enough power connectors to fit all of your components? Puzzled over where to tuck the unused cables so that they are out of the way? Worried in case the components attached to a particular power ‘line’ are going to cause too much power drain and impact on performance?
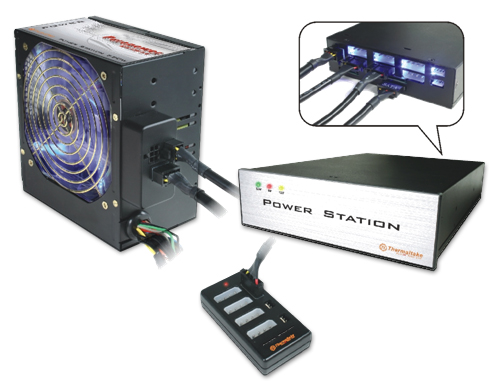
The Thermaltake Purepower Power Station 520W could well be the solution you seek, no matter what the requirements of your system are. It is a modular power supply system which provides for all the needs of modern PCs. Let’s look at it in detail.
[img]http://tosh.customer.netspace.net.au/Review/enlarged-1.jpg[/img]
Packaging and contents
The Power Station is a meaty package, comprising the power supply unit itself, a 5.25 drive bay P.S.I. surge unit, a small mini-P.S.T. unit and a wide assortment of cables. There’s no need for it to be in a larger than needed package to look impressive, and thankfully Thermaltake haven’t done so. The entire system fits into a 265mm x 235mm x 140mm package,. Inside the power unit and the 5.25 P.S.T. unit are separately bubble-wrapped for protection, and there are two separate boxes containing the various cables and the mini-P.S.T. unit. A small but quite adequate illustrated user guide is included, along with screws to attach the power supply to the system chassis and the P.S.T. unit to a drive bay, as well as adhesive Velcro fasteners to attach the mini-P.S.T. unit at a suitable point inside the PC case.
[img]http://tosh.customer.netspace.net.au/Review/enlarged-4.jpg[/img]
Specifications and first impressions
Full specifications are included on Thermaltake’s product page http://www.thermaltake.com/purepower/woo7374PST/w007374.htm so I’ll not replicate them here. Suffice to say that the Purepower series of PSUs has received many accolades over time, and has specifications to reflect the regard in which it is held. We purchase reputable power supply units to ensure adequate and stable current is delivered to our equipment, and the Thermaltake Purepower series is certainly one of the ‘reputable’ choices to make.
The 120 mm cooling fan operates between 1300rpm and 2000 rpm, speed is automatically controlled to suit unit temperature, and the fan is rated at a noise level of 17dBA at 1300 rpm. That makes it a relatively quiet unit. I’m pleased to see the fan located on the underside of the unit where it should be to assist with controlling airflow away from the processor area, and the rear of the unit is a mesh grille which provides exhaust ventilation from one side to the other.
The P.S.T. unit is the size of an optical drive, so you might be in for problems if you try to use the Purepower Power Station with a mini sized case or an older case which lacks depth. Cases suitable for systems with lots of drives installed or systems with high performance components are generally 44cm to 50 cm or thereabouts deep, however, and the Power Station will be well suited to those.
Detailed information
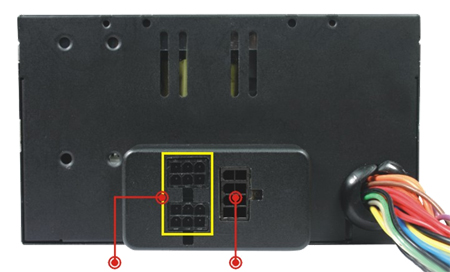
There are two cables only protruding from the power supply unit – the 24 pin ATX 2 cable and the 4 pin 12v cable for connection to the motherboard. There is no 24 pin to 20 pin adaptor included for older motherboards, but closer inspection reveals that the additional 4 pins for ATX 2 are a clip-on unit which can be detached for use with a 20 pin motherboard connection. Both cables are attractively sheathed in black braided cable sleeving.
On the rear of the unit are 3 power connection sockets. An 8 pin socket provides power to the P.S.T. unit and a pair of 6 pin sockets (outlined in yellow in the accompanying image) provide direct power to PCI-E display cards that require their own direct power line.
[img]http://tosh.customer.netspace.net.au/Review/21-450272.jpg[/img]
Included cables are as follows:
8 pin PSU to P.S.T. connection – 50cm
4 pin molex .P.S.T. to mini- P.S.T. – 85cm
2 of 6 pin PSU to PCI-E display card – 45cm
2 of 4 pin molex to 3 x 4 pin molex device connectors – 50cm (80cm overall)
2 of 4 pin molex to single 4 pin molex device connectors – 30cm
4 of 4 pin floppy to single 4 pin floppy device connector – 30cm
4 of SATA to SATA power connector – 40cm
With the ATX power cables themselves 56cm in length that a fair amount of cabling if you need to use it all, and there’s no doubt that you’ll be tucking some cabling away out of the line of airflow. All modular cables are neatly and efficiently sheathed in black plastic so it won’t be too onerous a task. Routing power cables around and behind drive bays should help keep things neat inside.
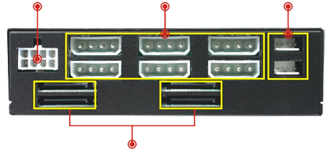
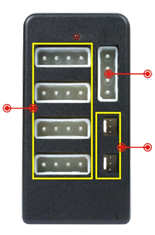
The 120mm PSU fan and the molex connections on rear of the P.S.T. unit are fitted with blue LEDs, making the unit well suited to use in windowed cases. The P.S.T. unit has accommodation for 6 molex power cables, 2 floppy power cables and 4 SATA power cables. One of the molex outlets will need to be dedicated to the mini P.S.T. unit, which itself provides a further 4 molex outlets and 2 x 3-pin fan power outlets. The mini P.S.T. unit being located some distance away from the PSU, is not suitable for connected devices which draw a heavy amount of power. It is designed for use with low power drain items such as additional case fans and case lighting.
[img]http://tosh.customer.netspace.net.au/Review/22-330150.jpg[/img][img]http://tosh.customer.netspace.net.au/Review/23-155235.jpg[/img]
Installation
By good fortune I had a Thermaltake Xaser V case siting here ready for some components to be fitted to it after I’d found it selling cheaply at a local vendor. With 5 case fans, rheostats, and front lighted display this particular case has enough power requirements and wire tangle to test out a forensic scientist seeking to untangle a binful of shreeded documents, so it’s a good test for the Power Station. We’ve a ‘chunky’ gaming system with SLI display cards to put in it, so let’s see how the power unit copes with it all.
A quick visual inspection made me wonder if the upper section was a bit cramped for the power unit. The fan grille slightly protruding underneath the unit indeed proved a little troublesome, but a squeeze and a slight paint scrape had ii in there soon enough.
In went the P.S.T. unit to the upper drive bay and immediately another slight problem became evident. The Xaser case has a top fan and USB connectors etc, and the gear in the case top left too little room for connecting cables. If your case has similar features you won’t be able to use the P.S.T. unit in the uppermost drive bay! In a server layout where lots of drives are installed you’d be mounting the P.S.T. unit midway in the drive racks anyway, so this isn’t really a problem.
First step is to connect the power supply to the P.S.T. unit. The cable is a lengthy one, and the distance is rather short in this configuration. Pull the loop of connecting cable down behind the motherboard tray and tape it there out of the way and Bingo! There’s virtually no cable at all to add to the mess.
[img]http://tosh.customer.netspace.net.au/Review/enlarged2-1.jpg[/img]
Next comes connecting the 12v and ATX2 connectors to the motherboard, and again a bit of length in the cables is a boon. It’s quite an easy job to run the cables across the top of the case, tuck them into the case’s framework and route them straight down to the connectors so that they’re neither touching against heatsink nor obstructing airflow.
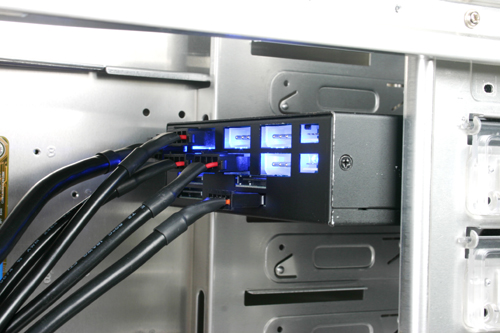
With 5 case fans and lighting to accommodate, the mini-P.S.T. unit is a welcome thing indeed, and the lengthy connecting cable makes running power down to the floor of the case easy. All of the case fans are powered via molex connectors, so having 4 sockets available in the bottom of the case is very welcome. Piggy-backing some connectors together saw me use 2 connectors for fans, one for case front lighting and there’s another left ready for internal case lighting. (Dealing with the clutter of fan leads is a story of its own, of course, but his nothing to do with the power supply unit!) With cabling properly wrapped, the mini-P.S.T. unit shouldn't provide much clutter in the bottom of the case.
[img]http://tosh.customer.netspace.net.au/Review/enlarged3-1.jpg[/img]
That leaves the drives to connect, and an extra power lead to the motherboard. With SLI cards fitted, the motherboard needs an additional power lead, and we strike our first real problem. The single connector cables are too short! A quick calculation and we find that we won’t be needing both of the 3x connector leads, so one of them is stretched out to its full 80 cm, fed around the case frame and dedicated to the job, with the extra connectors tucked away out of the road. Very neat!
Fit the drives, attach power cables and tuck any resultant loops of cable away in the various gaps in the drive bays, and we’re left with everything connected up, and a virtually clutter free system case!
I’m impressed to say the least. Keeping things neat with the Power Station is considerably easier than using a power supply with lots of connectors coming from it!
Testing performance
Like most manufacturers, Thermaltake specify a tolerance of +/- 5% and monitoring showed the voltage levels actually delivered to be very slightly under for both 12v and 5v, and very slightly over for 3.3v. Time to give the system a good workout and see how the voltage levels hold up under a bit of heavy work.
The Asus Probe software bundled with the motherboard, together with other software reporting tools was used to constantly monitor the system whilst it was given some work to do. Various activities were conducted over a period of several hours, and the voltage levels were both graphed and periodically logged.
All three voltage levels displayed a fluctuation of between 0.04% and 0.06% whilst performing office computing tasks, and with the system simultaneously running 3D applications and burning a DVD 12v still displayed a fluctuation of less than 1%, whilst the other voltage levels remained constant. The tiny fluctuations in the 12v level are exaggerated in this graphic depiction from AsusProbe.
[img]http://tosh.customer.netspace.net.au/Review/asusprobe.jpg[/img]
Can’t complain about that!
Conclusions
With the ease of installation and the stability of the unit only price was left as a potential 'negative'. But I was easily able to find the unit available in retail at only about 8% higher cost than other comparable 'cable management' power supply units. ($AU205.00) compares well with the ($AU189.00) asking price for the lower wattage Antec Neopower.
Not an option, really, for those few people without a spare 5.25" drive bay for the P.S.T. unit, but for everyone else with a recent PC system it's highly recommended!
Yes, I'll back up the judgement. There's one staying in my own system for sure. As well as all of the above points in its favour, you can hardly even hear it running!