A similar table, this time we use PyQT's QTableView and QAbstractTableModel which allows the items in the table to be sorted by simply clicking on the header titles:

# use PyQT's QTableView and QAbstractTableModel
# to present tabular data
# allow sorting by clicking on the header title
# tested with Python 3.1.1 and PyQT 4.5.2
# ene

import operator
from PyQt4.QtCore import *
from PyQt4.QtGui import *

class MyWindow(QWidget):
    def __init__(self, data_list, header, *args):
        QWidget.__init__(self, *args)
        # setGeometry(x_pos, y_pos, width, height)
        self.setGeometry(300, 200, 420, 250)
        self.setWindowTitle("Exploring PyQT's QTableView")

        table_model = MyTableModel(self, data_list, header)
        table_view = QTableView()
        table_view.setModel(table_model)
        # enable sorting
        table_view.setSortingEnabled(True)

        layout = QVBoxLayout(self)
        layout.addWidget(table_view)
        self.setLayout(layout)


class MyTableModel(QAbstractTableModel):
    def __init__(self, parent, mylist, header, *args):
        QAbstractTableModel.__init__(self, parent, *args)
        self.mylist = mylist
        self.header = header

    def rowCount(self, parent):
        return len(self.mylist)

    def columnCount(self, parent):
        return len(self.mylist[0])

    def data(self, index, role):
        if not index.isValid():
            return QVariant()
        elif role != Qt.DisplayRole:
            return QVariant()
        return QVariant(self.mylist[index.row()][index.column()])

    def headerData(self, col, orientation, role):
        if orientation == Qt.Horizontal and role == Qt.DisplayRole:
            return QVariant(self.header[col])
        return QVariant()

    def sort(self, col, order):
        """sort table by given column number col"""
        self.emit(SIGNAL("layoutAboutToBeChanged()"))
        self.mylist = sorted(self.mylist,
            key=operator.itemgetter(col))
        if order == Qt.DescendingOrder:
            self.mylist.reverse()
        self.emit(SIGNAL("layoutChanged()"))


header = ['First Name', 'Last Name', 'Age', 'Weight']
# a list of (name, age, weight) tuples
data_list = [
('Heidi', 'Kalumpa', '36', '127'),
('Frank', 'Maruco', '27', '234'),
('Larry', 'Pestraus', '19', '315'),
('Serge', 'Romanowski', '59', '147'),
('Carolus', 'Arm', '94', '102'),
('Michel', 'Sargnagel', '21', '175')
]

app = QApplication([])
win = MyWindow(data_list, header)
win.show()
app.exec_()

Not sure what is going on with the code tags??? Ah, it fixed itself!

Want to add font and color to PyQT's label text? Here is one way to do just that ...

# adding font and color to PyQT's QLabel widget text
# vegaseat 

from PyQt4.QtCore import *
from PyQt4.QtGui import *

class MyForm(QWidget):
    def __init__(self):
        QWidget.__init__(self)
        # setGeometry(x_pos, y_pos, width, height)
        self.setGeometry(100, 150, 320, 100)
        self.setWindowTitle("font and color")

        text = " QLabel text with font and color "
        label = QLabel(text)

        # QFont(family, pointSize, weight, italic)
        # weight QFont.Light=25, QFont.Normal=50, QFont.Bold=75
        # pointSize=12, weight=50, italic=False by default
        font = QFont("Times", 32, QFont.Bold, True)
        label.setFont(font)

        # set the foreground and background colors of the label
        fg = "QLabel {color:red}"
        bg = "QLabel {background-color:yellow}"
        label.setStyleSheet( fg+bg )
        
        # use grid layout
        grid = QGridLayout()
        # addWidget(widget, row, column, rowSpan=1, columnSpan=1)
        grid.addWidget(label)
        self.setLayout(grid)


app =  QApplication([])
form = MyForm()
form.show()
app.exec_()

Well, PyGame is out for Python 3.1, so I downloaded/installed the Windows installer and gave it a quick test ...

# experiments with module pygame 
# bounce a red ball whose image is stored in this code
# pygame from: http://www.pygame.org/
# win binary installed: pygame-1.9.1.win32-py3.1.msi
# tested with Python 3.1.1 and Pygame 1.9.1 
# vegaseat   14sep2009

import pygame as pg
import base64

"""
# use this Python3 program to create a base64 encoded image string
# (base64 encoding produces a readable string from a binary image)
# then copy and paste the result into your pygame program ...
import base64
gif_file = "ball_r.gif"
gif_bytes = open(gif_file, 'rb').read()
b64_bytes = base64.encodebytes(gif_bytes)
# decode <class 'bytes'> bytestring to string
b64_str = b64_bytes.decode("utf8")
print( "gif64='''\\\n" + b64_str + "'''" )
"""

gif64='''\
R0lGODlhQABAAPcAACEBAY8DA9wQILcED1ECAqMECOsaL8oKGTgBAXADA5kEBeQVJ8EIFK0EC+wg
NS8BAWUCAtMOH0gCAoQDAykBAZkEBNwSJsEGEFsCAq0ECOwdNdMMGkABAXoDA6MEBuUXLsoJFbcE
DPIgNQAAAJ0FBAAAAAAAAAAAAAAABQAAAAAAAAAAAPEGCt0FBQQAAAAAAF4CBAkAAN8FBVUCAgAA
AgAAAAAAAAAAAAEBgAAAAQUAAwIC7gAAKt0FBQUBZgAAAAAABgAAAAAAAAAAAAsAAN4FBQQAAAAA
AOgPDmoCAu8GBlUCAmoDBwgAAOsFBVUCAvIGRfIGDfMHz/IGOhgGZXUDA+sFBVUCAugMoQoCwuEH
0VYCNgACBQAAAAUAAAAAAAACAwAAAAAAAAAAAF2IVdsGDAgFygz4PwssCD0CHwpqGQAAAAII4AAA
AAAAHQAAAF4CAwAAHgAAFbEEBAIL6gAABgICygAANPMLavIGBvIGBvIGBvMHofQH2vIGJvIGBgAB
AAAAAAAAAAAAAAID4AAAAAAAHQAAAAECZAAAAAAAAAAAAEtDBQV1BQnOCQRXBD9CBAAAAArVCgRX
BA1KBESeCA7PCQRXBBsoBRGdherW9lpaWgaQBgeUBwnSCQI2AgsfAkflDAAEAAAAAAvvCwEOAQ/k
CgRXBE0CAt0FBQQAAAAAAAAAAAAAAAAAAAAAABsKDPJECAQFAAAAAOsv9XKC9vz7/1tb9GwsEAgA
APKbDFUCAvmMp/QL7PzqFPZdCiL4DID6Dvb9EWD5DQIBQwgC3N8FCVUCAgMO7wvkPQUEJwAAAAaF
KgIF3ArkDgRXBAscN0j2SQUEKgAAAAvtZAdu4Av0DwRXBLa6jBEKBOz47FpaWgv3DA356Av3Dwv3
Cw8q0Ah/9A31+QVYYusx3+EH4QuVCwAAAAeFLh4EASDmmwRXBAvcigADAwzm5gVYWAAAKAAAAAEB
kAAAAAETAQAAAAAAAAAAAIoEAwAAAAAAAAAAAA0BSgIC7gAAIwAAACH5BAAAAAAALAAAAABAAEAA
Bwj/AAEAoDCwIEGCAgUiNMgwYcGEBxVKjEixocOLDiNKvEgBAQcJBDBgSAABAgYCHBA8WPgQo8uK
MFu2JPiAAwYICTpMmFBgw4cPCyxsYJAhQAKUDzIyjOmyKUuCCAhA0FmhggcFAwyI0MBVhAOvIj4c
KJBAAgKWTSeq1YiwLYKRE6wquFoBBFcDGvDqzavhqwEQEwggWLs0rVKHURPEvco4AIO9kPnu3QqY
QFLDbB9mpiABwoS5jCsoqBACr+TTkfFuZZCAQ2GNL5U+GClarty5H1DrTq1BxIIKBNAqpVBx49vF
c0V7qL1ht/PIXC9AGMw0tkAOEALMHX2VO2ne4J2L/4iQYDDGmAuxB/CwfHv7qxaey4/sQEB5zYYH
IvD83vvcABfMJ+BkB0y3EXoAzLZeaO4pMJoAdw0o4HgQXCYTRwRM0N5tVnWYQXggyicCA8EdRhEH
HTDmnnIOVtCchCFGVoFrsDn0QHa29dehAgvA6KMGCyRgYVsFZUjXdsmxN9oAPsZ4mggXSHChQAgk
wOJyOi63gQNNNjmBeWwRoB2Woq3oII9OpqmbCAeUmFGVtzEo13IFmKbmnXkZ0AF1DxmZpHIqjlZa
l3iOSMBFN9bW3YZkVsAAoYQmQFxBKMY555l0QYjnplzNmGBSGHx2aYdkzrUAp5tCeWhHCrK3o4qh
ef+QG6R4CoABTXBi6t9tCnxIa5dfDoQiY/1tpxxpv+KpQQYcJCWBhor6F1oFTKLa5YgpASAmrJZu
GGCyMDqwgWAAYFAVdw5ime5/dlmr7AIYnGXuoq8mN1oFB0ToroRBCgRBtEjWW9dW+6YZVgL+Hksm
rPfmWzCMHyAMwL9XphvtcgyI8LCTQEpa7nr21ruhXeCqaQEGAomJLrfuAViyhBqMO9CzKu44Z20h
vOykCCG4BsCw6DZ4cwMbD+hABggMliuDWB7J3qxFgxhsghSvXObNPOosH5AQLGRkzeqGHF/U4pHY
FgdW0tXdn8ltQLDWqYkQgM8CJXqlyKM9SjZvQQ7/qa2GQavdYQVEw71mCFKytLR3a7v3wd6n5bXn
cEaOqm6HYxuuF5slPrW4pdsFQDLkeu35VEKVG0vvch+S3tsAh1oEVXZKkmppfJp3vBJHDklgZeC7
6m24Bp6qBdFAfjKtOuQOXLCqTGjduF60ozYXNYUWym7QfiCvXlsDWtd3X41T/kw73h4E8GLBIlhw
33DHV4Q24GaK5muM4OEl7vgW5QfAfou5WFVGtzXe5IUBBjrPawozmwQsyF7tydxzDLAXvvgmAJZZ
oP8y0hnkoKsC9wuPvrSigQu0RjjwQ1BEErOYI31HX6ihoGo0AIIAmGWB5NsgleBile5QK4Z86YoG
Wj5QGfNskEgqNEhHpEKVDoXgAyLQGFd64wADLOAAHijLWXBYGB02pSZSyclO8LUAoAjlAkU5ikq8
yLskMuUgHgGJSBJAkpOkZCVu5CIbL6KSBxgxLWvco0sCAgA7
'''

# encode string to <class 'bytes'>, needed for Python3
# comment out if you are using Python2
gif64 = gif64.encode("utf8")

# convert back to a binary image to save to a file in the working directory
ball = base64.b64decode(gif64)
fout = open("ball_r.gif","wb")
fout.write(ball)
fout.close()

# initialize pygame
pg.init()

# now you can use the gif file you just saved
image_file = "ball_r.gif"

# image moves [x, y] at a time
im_dir = [2, 1]

# pygame uses an RGB color tuple
black = (0,0,0)
# screen width and height
sw = 600
sh = 480
# create a screen
screen = pg.display.set_mode((sw, sh))
# give the screen a title
pg.display.set_caption('bouncing ball (press escape to exit)')

# load the ball image file
image = pg.image.load(image_file).convert()
# get the rectangle that the image occupies
im_rect = image.get_rect()

# the event loop also loops the animation code
while True:
    pg.event.pump()
    keyinput = pg.key.get_pressed()
    # exit on corner 'x' click or escape key press
    if keyinput[pg.K_ESCAPE] or pg.event.peek(pg.QUIT):
        raise SystemExit

    # set the move
    im_rect = im_rect.move(im_dir)
    # detect the boundaries and change directions
    # left/right boundaries are 0 to sreen width
    if im_rect.left < 0 or im_rect.right > sw:
        im_dir[0] = -im_dir[0]
    # top/bottom boundaries are 0 to screen height
    if im_rect.top < 0 or im_rect.bottom > sh:
        im_dir[1] = -im_dir[1]
    # this erases the old sreen with black
    screen.fill(black)
    # put the image on the screen
    screen.blit(image, im_rect)
    # update screen
    pg.display.flip()

Here is a simple Pygame example showing an approach to a resizable window ...

# create a resizable pygame window
# tested with Python 3.1.1 and Pygame 1.9.1 
# vegaseat

import pygame as pg

def create_window(width, height):
    """create a width x height resizable window/frame"""
    win = pg.display.set_mode((width, height), pg.RESIZABLE)
    # optional fill bg red, default is black
    win.fill((255, 0, 0))
    # optional title info
    sf = "size x=%s  y=%s" % (width, height)
    pg.display.set_caption(sf)
    
    # any extra code here ...
    # draw a white circle
    white = (255, 255, 255)
    # center can be fixed or calculated for resize
    center = (150, 150)
    radius = 100
    pg.draw.circle(win, white, center, radius)
    
    pg.display.flip()
    return win


pg.init()

width = 300
height = 200
win = create_window(width, height)

# event loop and exit conditions (windows titlebar x click)
while True:
    for event in pg.event.get():
        if event.type == pg.VIDEORESIZE:
            width, height = event.size
            # redraw win in new size
            win = create_window(width, height)
            print(win.get_size())  # test
        if event.type == pg.QUIT:
            raise SystemExit

Yes Gloria, Tkinter has a combo box, but it's called an option menu. Here is an example:

# using Tkinter's Optionmenu() as a combobox

try:
    # Python2
    import Tkinter as tk
except ImportError:
    # Python3
    import tkinter as tk

def select():
    sf = "value is %s" % var.get()
    root.title(sf)
    # optional
    color = var.get()
    root['bg'] = color


root = tk.Tk()
# use width x height + x_offset + y_offset (no spaces!)
root.geometry("%dx%d+%d+%d" % (330, 80, 200, 150))
root.title("tk.Optionmenu as combobox")

var = tk.StringVar(root)
# initial value
var.set('red')

choices = ['red', 'green', 'blue', 'yellow','white', 'magenta']
option = tk.OptionMenu(root, var, *choices)
option.pack(side='left', padx=10, pady=10)

button = tk.Button(root, text="check value slected", command=select)
button.pack(side='left', padx=20, pady=10)

root.mainloop()

Talking about Gloria, I thought I better post that here, in case someone is looking for a Tkinter GUI toolkit progressbar ...

# explore the ttk.Progressbar of the Tkinter module ttk
# ttk is included with Python 3.1.1
# vegaseat

import tkinter as tk
from tkinter import ttk

def click(event):
    # can be a float
    increment = 3.4
    pbar.step(increment)


root = tk.Tk()
root.title('ttk.Progressbar')

pbar = ttk.Progressbar(root, length=300)
pbar.pack(padx=5, pady=5)

btn = tk.Button(root, text="Click to advance progress bar")
# bind to left mouse button click
btn.bind("<Button-1>", click)
btn.pack(pady=10)

root.mainloop()

There is the Visual Python specialized GUI toolkit, used mostly for 3D modeling. You can draw an object and then drag it in space with the cursor with the right mouse button pressed. Objects can also be animated. Here is a short sample ...

# draw cones in space
# press the right mouse button and use cursor to rotate the object
# experiments with visual Python (VPython) from: http://vpython.org/
# used VPython-Win-Py2.6-5.12.exe for Python26
# needs and comes with numpy
"""
cone(pos=(0,0,0), axis=(1,0,0), radius=1, color=(0,0,0))
color (red, green, blue) color values 0.0 to 1.0 
default is white = (1,1,1)
"""

import visual as vs

vs.scene.width = 500
vs.scene.height = 500
vs.scene.title = "draw 3 cones (drag with right mouse button)"

# avoid autoscale (autoscale default=True)
vs.scene.autoscale = False

# axis x=8 points right
cone1 = vs.cone(pos=(0,0,0), axis=(8,0,0), radius=4)
cone1.color = vs.color.green

# axis x=-8 points left
cone2 = vs.cone(pos=(0,0,0), axis=(-8,0,0), radius=4)
cone2.color = vs.color.red

# pos y=-6 is below center and axis y=2.4 points up from there
cone3 = vs.cone(pos=(0,-6,0), axis=(0,2.4,0), radius=4)
cone3.color = (0.0, 0.9, 1.0)

There is another Python version called IronPython that uses Python syntax. It runs independent from the normal CPython version and allows access to the large GUI libraries of .NET and Mono. Here is an example:

# create a window with a button and click event using ironpython
# ironpython gives access to the Windows .NET or Linux Mono libraries
# download ironpython from:
# http://www.codeplex.com/ironpython
# tutorial at:
# http://www.zetcode.com/tutorials/ironpythontutorial/
#
# to distinguish the filename from normal Python use prefix ip_
# if you save this file as "ip_buttonWin1.py"
# compile it with something like:
# C:\IronPython 2.6\ipy.exe "ip_buttonWin1.py"
#
# clr -> Common Language Runtime

import clr

clr.AddReference("System.Windows.Forms")
clr.AddReference("System.Drawing")

from System.Windows.Forms import Application, Form, Button, ToolTip
from System.Drawing import Size, Point

class IForm(Form):

    def __init__(self):
        # set form title, position, size
        self.Text = 'Button'
        self.CenterToScreen()
        self.Size = Size(300, 150)

        btn = Button()
        btn.Parent = self
        btn.Text = "Quit"
        btn.Location = Point(50, 50)
        # click on the button to call OnClick()
        btn.Click += self.OnClick
        # mouse over button calls OnEnter()
        btn.MouseEnter += self.OnEnter

        # optional tooltip
        tooltip = ToolTip()
        # tooltip for the button
        tooltip.SetToolTip(btn, "Don't be a Quitter")

    def OnClick(self, sender, args):
        self.Close()

    def OnEnter(self, sender, args):
        #print sender, type(sender)
        self.Text = "mouse entered button area"


Application.Run(IForm())

Since i have a Windows XP machine I installed
IronPython-2.6.msi
and for the .NET framework (free from MicroSoft)
NetFx20SP1_x86.exe

See the details in file Readme.html that comes with the installation.

commented: useful +10

Here we use the Python Image Library (PIL) and Tkinter to display the images inside a folder as thumbnails ...

# explore Tkinter and PIL to create a list of photos
# that can be displayed as thumbnails
# tested with Python25  by  vegaseat

import Tkinter as tk
from PIL import ImageTk, Image
import glob
import random

# make sure you have a folder with some jpeg pictures
folder = "./Pics_jpg"
# create a list of .jpg images that are in this folder
pic_list = glob.glob(folder+'/*.jpg')

root = tk.Tk()
root.title(folder)

label_list = []
photo_list = []
for pathname in pic_list:
    image = Image.open(pathname)
    # create a thumbnail of each image
    # width=100  height=150
    image.thumbnail((100, 150), Image.ANTIALIAS)
    # convert to something Tkinter can handle
    photo = ImageTk.PhotoImage(image)
    # the photo list is needed for labels to retain photos!
    photo_list.append(photo)
    label_list.append(tk.Label(image=photo))

# optionally random shuffle the label_list
#random.shuffle(label_list)

# display the thumbnails in rows of pics_per_row pictures
pics_per_row = 4
row = col = 0
for label in label_list:
    label.grid(row=row, column=col)
    col += 1
    if col >= pics_per_row:
        col = 0
        row += 1

root.mainloop()

If you also have GIF images in that folder and want to display them too use:
pic_list = glob.glob(folder+'/*.jpg') + glob.glob(folder+'/*.gif')

When I started with python I used Tkinter as it came with the implementation (Windows version of python).

Later I was looking for something more powerful (or so I thought) and selected wx. For many years I used wx and was reasonably happy with it. But when I started using Linux (Mint) and running the software I developed both on Windows and Linux I found that wx looked different and in some cases behaved different on Linux and Windows. A case in point is the wx.Choice widget which on Windows leaves the entry box empty until you select an item from the list (the behaviour I wanted) but on Linux the entry box displayed the first item in the list, even though it was not selected! And because this was financial software led to some very undesirable consequences when uses thought they had already selected an item from the Choice widget.

After researching this for a while I found too many cases where there needed to be code changes between a Linux and Windows version using wx - not important if you don't write for both platforms, but a pain otherwise.

I returned to Tkinter and am still using it. It is simpler and in its basic implementation has fewer bells and whistles, but in some ways I prefer that and build my own widgets from basic components. Now at least my applications work the same and the layout for both Windows and Linux is almost the same.

I have never been that comfortable with grids as supplied by a particular gui, and back in my VB days I built my own grid box using a matrix of labels. So I decided to transfer that design to python using Tkinter labels. I find that way I can add features when I need them (many grid widgets are too complicated for my simple use) and can make them operate the way I wish. I find an array of labels works well for me.

commented: thanks for the insight +9

Creating a simple shadow effect around a Tkinter frame ...

# create a frame with a shadow effect border
# using overlapping frames
# vegaseat

try:
    # Python2
    import Tkinter as tk
except ImportError:
    # Python3
    import tkinter as tk

root = tk.Tk()
w = 320
h = 220
x = 150
y = 100
# use width x height + x_offset + y_offset (no spaces!)
root.geometry("%dx%d+%d+%d" % (w, h, x, y))
root.title("shadow effect border")

frame1 = tk.Frame(root, bg='grey', width=w-30, height=h-30)
frame1.place(x=20, y=20)

frame2 = tk.Frame(root, bg='yellow', width=w-30, height=h-30)
frame2.place(x=10, y=10)

root.mainloop()

Ah, the ever so popular Tkinter GUI toolkit. This is the code to get size (width x height) and position (x + y coordinates of the upper left corner of the window in the display screen) information of the Tkinter root window ...

# show width and height of Tkinter's root window
# vegaseat

try:
    # Python2
    import Tkinter as tk
except ImportError:
    # Python3
    import tkinter as tk

root = tk.Tk()
w = 460
h = 320
x = 150
y = 100
# use width x height + x_offset + y_offset (no spaces!)
root.geometry("%dx%d+%d+%d" % (w, h, x, y))

# update is needed
root.update()
geo = root.geometry()
print(geo)                    # 460x320+150+100
width = root.winfo_width()    # 460
print(width)
height = root.winfo_height()  # 320
print(height)

root.mainloop()

Here is typical code that I use with the py2exe module to convert Tkinter programs to an executable package for Windows computers ...

"""
Simple py2exe version used for Tkinter programs.
Run this program to create a windows exe file with py2exe.
Run it in a folder that als contains your source code file.

It will create 2 folders named build and dist.

The build folder is temporary info and can be deleted.

Distribute whatever is in the dist folder.

Your library.zip file contains your optimized byte code, and all
needed modules.  This file together with the Python interpreter
(eg. Python25.dll) should accompany the created executable file.
Note that you might be able to share this large library file with
other Python/Tkinter based .exe files.

The MSVCR71.dll can be distributed and is often already in the
Windows/system32 folder.

w9xpopen.exe is needed for os.popen() only, can be deleted otherwise.
"""

from distutils.core import setup
import py2exe
import sys

sys.argv.append("py2exe")
sys.argv.append("-q")

# insert your own source code filename below ...
code_file = 'Tk_ParResist1.pyw'

# replace windows with console for a console program
setup(windows = [{"script": code_file}])

Should work with Python26 if you installed the proper py2exe module. Since Python26 uses a different C compiler, msvcr71.dll changes to msvcr90.dll and of course the interpreter is Python26.dll.

One way to display a colorful message with the ever so popular PyQT GUI toolkit (works with Python2 and Python3) ...

# show a colorful splash message for a set time then quit
# tested with PyQT45  by  vegaseat

from PyQt4.QtCore import *
from PyQt4.QtGui import *

def do_html(text, color='black', size=3):
    """create a line of html code for text with color and size"""
    sf = "<FONT color=%s size=%d>%s</FONT>"
    return sf % (color, size, text)

# build up simple HTML code ...
# text between <B> and </B> is bold
# <BR> inserts a line break (new line)
html = ""
html += '<BR>'
orange = "#FFBA00"  # gives a better orange color
color_list = ['red', orange, 'yellow', 'green', 'blue']
ix = 0
for c in 'WE LOVE RAINBOWS':
    # make character c bold
    c = "<B>" + c + "</B>"
    if ix >= len(color_list):
        ix = 0
    html += do_html(c, color_list[ix], 7)
    ix += 1
html += '<BR>'

# create a QT GUI application
app = QApplication([])
label = QLabel(html)
# show label without frame
# comment line out if you want a frame
label.setWindowFlags(Qt.SplashScreen)
label.show()
# show for x milliseconds, then quit
x = 5000
QTimer.singleShot(x, app.quit)
app.exec_()

The Text widget of the Tkinter GUI toolkit is the start of a simple text editor. Here we explore how to get the line (row) and column numbers of the text insertion point ...

# explore Tkinter's Text widget
# get the line and column values of the text insertion point
# vegaseat

import Tkinter as tk

def get_position(event):
    """get the line and column number of the text insertion point"""
    line, column = text.index('insert').split('.')
    s = "line=%s  column=%s" % (line, column)
    root.title(s)


root= tk.Tk()
root.title('start typing')
text = tk.Text(root, width=40, height=10)
text.bind("<KeyRelease>", get_position)
text.pack()
# start cursor in text area
text.focus()

root.mainloop()

Here is modified (also added needed delay) and commented code from the pygame tutorial that shows how to load one image onto rectangle object and move the object:

# use pygame to bounce/move loaded image around the screen

import sys, pygame

pygame.init()

size = width, height = 320, 240
# this determines the move direction/speed in pixels
# speed[0] left or right
# speed[1] up or down
speed = [2, 2]
# color uses r, g, b tuple
black = 0, 0, 0
# white works better here
white = 255, 255, 255

# create the window
screen = pygame.display.set_mode(size)
# give the window a title
pygame.display.set_caption("watch the beach ball bounce")

# make sure the image file is in the working directory
# or give full path name
ball = pygame.image.load("ball.bmp")
# create rectangle object you can move
# it is used to put the image on
ballrect = ball.get_rect()

while True:
    for event in pygame.event.get():
        # window corner x will exit
        if event.type == pygame.QUIT:
            sys.exit()
    # move the rectangle object
    ballrect = ballrect.move(speed)
    # change direction if left or right boundry is reached
    if ballrect.left < 0 or ballrect.right > width:
        speed[0] = -speed[0]
    # change direction if top or bottom boundry is reached
    if ballrect.top < 0 or ballrect.bottom > height:
        speed[1] = -speed[1]
    # clear the screen with white background
    screen.fill(white)
    # put the image on the rectangle object
    screen.blit(ball, ballrect)
    # update screen
    pygame.display.flip()
    # small time delay
    milliseconds = 20
    pygame.time.delay(milliseconds)

The image used here is attached below, just download it into your working directory. Also click on Toggle Plain Text, select code and copy it to your IDE's editor, save it to the same working directory your image is in, then run it from the IDE. I use PyScripter (Windows) IDE, but you can use IDLE or something.

A simple way to add color highlighted text to the Tkinter Text() widget ...

# multiple color text with Tkinter using widget Text() and tags
# vegaseat

try:
    # Python2
    import Tkinter as tk
except ImportError:
    # Python3
    import tkinter as tk

def color_text(edit, tag, word, fg_color='black', bg_color='white'):
    # add a space to the end of the word
    word = word + " "
    edit.insert('end', word)
    end_index = edit.index('end')
    begin_index = "%s-%sc" % (end_index, len(word) + 1)
    edit.tag_add(tag, begin_index, end_index)
    edit.tag_config(tag, foreground=fg_color, background=bg_color)


root = tk.Tk()
root.geometry("600x200")

edit = tk.Text(root)
edit.pack()

text = "Up the hill went Jack and Jill, down fell Jill and cried!"
# create a list of single words
word_list = text.split()
#print( word_list )  # test

# pick word to be colored
myword1 = 'Jack'
myword2 = 'Jill'
# create a list of unique tags
tags = ["tg" + str(k) for k in range(len(word_list))]
for ix, word in enumerate(word_list):
    # word[:len(myword)] for word ending with a punctuation mark
    if word[:len(myword1)] == myword1:
        color_text(edit, tags[ix], word, 'blue')
    elif word[:len(myword2)] == myword2:
        color_text(edit, tags[ix], word, 'red', 'yellow')
    else:
        color_text(edit, tags[ix], word)

root.mainloop()

Tkinter can be used to write programs that use pop-up dialogs for input and output. The nice thing is that the input dialogs can restrict data input to integer, float or string input with options for initial, min and max values. Here is a small example ...

# use Tkinter popup dialogs for input and output
# see:
# http://www-acc.kek.jp/WWW-ACC-exp/KEKB/control/Activity/Python/
#   TkIntro/introduction/intro08.htm
# simple dialogs are:
# askfloat, askinteger, and askstring
# messagebox dialogs are:
# showinfo, showwarning, showerror, askquestion, askokcancel,
# askyesno, askretrycancel
# vegaseat

try:
    # Python2
    import Tkinter as tk
    import tkSimpleDialog as tksd
    import tktkMessageBox as tkmb
except ImportError:
    # Python3
    import tkinter as tk
    import tkinter.simpledialog as tksd
    import tkinter.messagebox as tkmb

def get_data():
    # tksd.askfloat(title, prompt [,options])
    miles = tksd.askfloat('Miles', 'Enter miles driven')
    # give minvalue to avoid division by zero errors
    gal = tksd.askfloat('Petrol', 'Enter gallon of petrol consumed',
        minvalue=0.1)
    str_result = "Your milage is %0.2f miles/gallon" % (miles/gal)
    # tkmb.showinfo(title, message [, options])
    tkmb.showinfo('Result:', str_result)

root = tk.Tk()
str_var = tk.StringVar()

tk.Button(root, text="Get data", command=get_data).pack(pady=5)

root.mainloop()

Just testing out some of the many PyQT GUI toolkit widgets:

# explore PyQT QLineEdit, QPushButton, QLabel, QMessageBox,
# QHBoxLayout, QWidget, QMainWindow
# tested with Python 3.1.1 and PyQT 4.6.2.2
# ene

# easy import
from PyQt4.QtCore import *
from PyQt4.QtGui import *

class MyWindow(QMainWindow):
    def __init__(self, parent= None):
        QMainWindow.__init__(self, parent)
        # setGeometry(x_pos, y_pos, width, height)
        self.setGeometry(100, 150, 320, 100)
        self.setWindowTitle("Explore QLineEdit")
        self.create_widgets()

    def create_widgets(self):
        self.label = QLabel("Say hello:")
        self.edit = QLineEdit()
        self.button = QPushButton("Push Me!")
        # connect signal to button
        #QObject.connect(self.button, SIGNAL("clicked()"), self.on_click)
        # newer connect style used with PyQT 4.5+
        self.button.clicked.connect(self.on_click)

        # use horizontal layout
        h_box = QHBoxLayout()
        h_box.addWidget(self.label)
        h_box.addWidget(self.edit)
        h_box.addWidget(self.button)
        # create central widget, add layout and set
        central_widget = QWidget()
        central_widget.setLayout(h_box)
        self.setCentralWidget(central_widget)

    def on_click(self):
        """the button has been clicked"""
        msg = "Good day %s" % self.edit.displayText()
        QMessageBox.information(self, "Title", msg, QMessageBox.Ok)


# test potential module
if __name__ == "__main__":
    app = QApplication([])
    window = MyWindow()
    window.show()
    app.exec_()

A Tkinter resizing example that shows two frames on a frame that in this case respond differently to the resizing of the main window ...

# experiments with Tkinter resizing
# two frames on a frame, keep one frame height fairly constant
# vegaseat

try:
    # Python2
    import Tkinter as tk
except ImportError:
    # Python3
    import tkinter as tk

class MyApp(tk.Frame):
    def __init__(self, master=None):
        tk.Frame.__init__(self, master, bg='yellow')
        self.prepare_resizing()
        # set the title, self.top is from prepare_resizing()
        # and is actually the master in this case
        self.top.title("Two Frames (resize the window)")
        self.make_widgets()

    def prepare_resizing(self):
        """ needed for stretch/resize """
        self.grid(sticky='nswe')
        self.top = root.winfo_toplevel()
        self.top.rowconfigure(0, weight=1)
        self.top.columnconfigure(0, weight=1)
        # there are two rows in this example
        # set row ratios
        self.rowconfigure(0, weight=1)
        # make weight for row 1 very high to keep row 0 constant
        self.rowconfigure(1, weight=1000)
        # there is only one column in this example
        self.columnconfigure(0, weight=1)

    def make_widgets(self):
        # put frame1 in row 0 to keep it fixed in height
        frame1 = tk.Frame(self, bg='brown', width=400, height=50)
        frame1.grid(row=0, column=0, sticky='nesw')
        # needed for width and height
        frame1.grid_propagate(0)
        # need for button to stick 'w'
        frame1.columnconfigure(0, weight=1)

        # put frame2 in row 1 to make it resize
        frame2 = tk.Frame(self, bg='green', width=400, height=200)
        frame2.grid(row=1, column=0, sticky='nesw')
        # needed for width and height
        frame2.grid_propagate(0)
        # need for button to stick 'e'
        frame2.columnconfigure(0, weight=1)

        b1 = tk.Button(frame1, text="Frame1 Button1")
        # this grid is inside frame1
        b1.grid(row=0, column=0, padx=5, pady=10, sticky='w')

        b2 = tk.Button(frame2, text="Frame2 Button2")
        b2.grid(row=0, column=0, padx=5, pady=10, sticky='e')


root = tk.Tk()
app = MyApp(master=root)
root.mainloop()

Experiment with the row weight ratios here to see the response. If you have more than one column you can do the same with column weights. The Tkinter syntax is not very intuitive in this case, so study it carefully.

Using the Tkinter GUI toolkit, the question of how to detect which button has been clicked comes up often. There are several solutions. The first solution is to use the bind() method that passes an event ...

# using the bind event to detect the widget clicked
# vegaseat

from Tkinter import *

def click(event):
    """detects the text/label of the button clicked via event"""
    if event.widget.cget("text") == "one":
        root.title("Button one has been clicked")
    elif event.widget.cget("text") == "two":
        root.title("Button two has been clicked")    

root = Tk()

b1 = Button(text="one")
# bind passes an event to function click
b1.bind("<Button-1>", click)
b1.pack(padx=150)

b2 = Button(text="two")
b2.bind("<Button-1>", click)
b2.pack()

root.mainloop()

Other solutions rely on passing an argument to the function used with the button command. Usually the command only accepts a reference to the function. Here are three different ways to get past this obstacle ...

# using lambda to pass command arguments
# vegaseat

from Tkinter import *

def click(s):
    """called with lambda"""
    if s == "one":
        root.title("Button one has been clicked")
    else:
        root.title("Button two has been clicked")


root = Tk()

b1 = Button( text="one", command=lambda: click("one") )
b1.pack(padx=150)

b2 = Button( text="two", command=lambda: click("two") )
b2.pack()

root.mainloop()

... another ...

# using a closure to pass command arguments
# vegaseat

from Tkinter import *

def click(s):
    """a typical closure, a function within a function"""
    def inner_click():
        if s == "one":
            root.title("Button one has been clicked")
        else:
            root.title("Button two has been clicked")
    return inner_click

root = Tk()

b1 = Button( text="one", command=click("one") )
b1.pack(padx=150)

b2 = Button( text="two", command=click("two") )
b2.pack()

root.mainloop()

... and another ...

# using a partial function to pass command arguments
# vegaseat

from Tkinter import *
# need Python25 or higher
from functools import partial

def click(s):
    """called with a partial function"""
    if s == "one":
        root.title("Button one has been clicked")
    else:
        root.title("Button two has been clicked")


root = Tk()

b1 = Button( text="one", command=partial(click, "one") )
b1.pack(padx=150)

b2 = Button( text="two", command=partial(click, "two") )
b2.pack()

root.mainloop()

So take your pick.

Here is code for a GUI program in IronPython,
which is a cross-platform (and of course cross-browser) implementation of CPython that has the exact same syntax. With IronPython you can use .NET with Python.
This is not a question. It's a code snippet for a GUI program.

Pretty neat alternative to wxPython.
You must get IronPython to run the code below.

import clr #without that, you can't use .NET
clr.AddReference("System.Windows.Forms") #So you Forms

class HelloWorldForm(Form): #a Form

    def __init__(self):
        self.Text = 'Hello World'#Text means title of window

form = HelloWorldForm()
Application.Run(form) #Runs application

Adding a button is easy:

import clr
clr.AddReference("System.Windows.Forms")

from System.Windows.Forms import Application, Form

class HelloWorldForm(Form):

    def __init__(self):
        self.Text = 'Hello World'

        self.button1 = Button()
        self.Controls.Add(self.button1)

form = HelloWorldForm()
Application.Run(form)

Editor's Note: For an explanation of the Common Language Runtime (CLR) see
http://en.wikipedia.org/wiki/Common_Language_Runtime
You can download IronPython from
http://www.ironpython.net/
Also see the previous post on IronPython at
http://www.daniweb.com/forums/post997343.html#post997343

"Invent Your Own Computer Games with Python" is a free e-Book that teaches you how to program in the Python programming language. Each chapter gives you the complete source code for a new game, and then teaches the programming concepts from the example. Many examples are written with the GUI toolkit module pygame, see:
http://inventwithpython.com/

Editor's note:
Thanks snee, this chapter in the e-Book has a very nice introduction to pygame programming ...
http://inventwithpython.com/chapter16.html

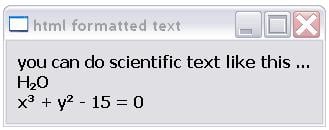
In ene's earlier post she mentioned that the PyQt label can display hmtl code. This can be used to display scientific text that has sub and superscripts ...

# PyQT's QLabel widget can display html formatted text
# tested with Python 3.1.1 and PyQT 4.6.1

from PyQt4.QtCore import *
from PyQt4.QtGui import *

class MyForm(QWidget):
    def __init__(self, html_code):
        QWidget.__init__(self)
        # setGeometry(x_pos, y_pos, width, height)
        # 1, 1 --> widget will expand to fit lable size
        self.setGeometry(100, 150, 1, 1)
        self.setWindowTitle("html formatted text")

        label = QLabel(html_code)

        # use the grid layout manager
        grid = QGridLayout()
        # addWidget(widget, row, column, rowSpan=1, columnSpan=1)
        grid.addWidget(label, 0, 0)
        self.setLayout(grid)

# <H3> and </H3> tags set text size
html_code = """\
<H3>
you can do scientific text like this ...
<BR>
H<sub>2</sub>O
<BR>
x<sup>3</sup> + y<sup>2</sup> - 15 = 0
</H3>
"""

app =  QApplication([])
form = MyForm(html_code)
form.show()
app.exec_()

If you want to pass arguments to an action function during a button click with the PyQt GUI toolkit, you can use a similar arrangement utilized with the Tkinter GUI toolkit ...

# pqt_Button_lambda1.py
# exploring PyQT's QPushButton button widget
# pass each button's argument using lambda
# vegaseat

from PyQt4.QtCore import *
from PyQt4.QtGui import *

class MyForm(QWidget):
    def __init__(self):
        QWidget.__init__(self)

        # create the widgets
        self.button1 = QPushButton("button1")
        self.button2 = QPushButton("button2")
        s = '<>'*10
        self.label = QLabel(s)        

        # use grid layout for the widgets
        grid = QGridLayout()        
        grid.addWidget(self.button1, 0, 0)
        grid.addWidget(self.button2, 1, 0)
        grid.addWidget(self.label, 2, 0)
        self.setLayout(grid)

        # connect the buttons to an action with arg passing
        action1 = lambda: self.onclick("button1 clicked")
        self.connect(self.button1, SIGNAL("clicked()"), action1)
        action2 = lambda: self.onclick("button2 clicked")
        self.connect(self.button2, SIGNAL("clicked()"), action2)

    def onclick(self, s):
        self.label.setText(s)


app =  QApplication([])
form = MyForm()
form.show()
app.exec_()

Tkinter ref: http://www.daniweb.com/forums/post1077620.html#post1077620

Here is another example of IronPython that uses the Windows .NET library (or possibly Linux Mono library) as a GUI toolkit.

# IronPython GUI mortgage calculator
# forms and components originally created with IronPythonStudio
# then modified to run as a single program file
# tested with IronPython 2.6

import clr

clr.AddReference("System.Windows.Forms")
clr.AddReference("System.Drawing")

import System
from System.Windows.Forms import *
from System.ComponentModel import *
from System.Drawing import *

class Form1(System.Windows.Forms.Form):
    def __init__(self):
        self.InitializeComponent()

    def Dispose(self, disposing):
        super(type(self), self).Dispose(disposing)

    def InitializeComponent(self):
        self._label1 = System.Windows.Forms.Label()
        self._label2 = System.Windows.Forms.Label()
        self._label3 = System.Windows.Forms.Label()
        self._textBox1 = System.Windows.Forms.TextBox()
        self._textBox2 = System.Windows.Forms.TextBox()
        self._textBox3 = System.Windows.Forms.TextBox()
        self._button1 = System.Windows.Forms.Button()
        self._label4 = System.Windows.Forms.Label()
        self.SuspendLayout()
        #
        # label1
        #
        self._label1.AutoSize = True
        self._label1.BackColor = System.Drawing.Color.FromArgb(255, 255, 128)
        self._label1.Font = System.Drawing.Font('Arial', 9.75,
            System.Drawing.FontStyle.Regular,
            System.Drawing.GraphicsUnit.Point, 0)
        self._label1.Location = System.Drawing.Point(12, 9)
        self._label1.Name = 'label1'
        self._label1.Size = System.Drawing.Size(124, 16)
        self._label1.TabIndex = 0
        self._label1.Text = 'Enter total loan      '
        #
        # label2
        #
        self._label2.AutoSize = True
        self._label2.BackColor = System.Drawing.Color.FromArgb(255, 255, 128)
        self._label2.Font = System.Drawing.Font('Arial', 9.75,
            System.Drawing.FontStyle.Regular,
            System.Drawing.GraphicsUnit.Point, 0)
        self._label2.Location = System.Drawing.Point(12, 39)
        self._label2.Name = 'label2'
        self._label2.Size = System.Drawing.Size(124, 16)
        self._label2.TabIndex = 1
        self._label2.Text = 'Enter interest (%)   '
        #
        # label3
        #
        self._label3.AutoSize = True
        self._label3.BackColor = System.Drawing.Color.FromArgb(255, 255, 128)
        self._label3.Font = System.Drawing.Font('Arial', 9.75,
            System.Drawing.FontStyle.Regular,
            System.Drawing.GraphicsUnit.Point, 0)
        self._label3.Location = System.Drawing.Point(12, 68)
        self._label3.Name = 'label3'
        self._label3.Size = System.Drawing.Size(124, 16)
        self._label3.TabIndex = 2
        self._label3.Text = 'Enter years to pay '
        #
        # textBox1
        #
        self._textBox1.Location = System.Drawing.Point(150, 9)
        self._textBox1.Name = 'textBox1'
        self._textBox1.Size = System.Drawing.Size(149, 22)
        self._textBox1.TabIndex = 3
        self._textBox1.Text = '100000'
        #
        # textBox2
        #
        self._textBox2.Location = System.Drawing.Point(150, 39)
        self._textBox2.Name = 'textBox2'
        self._textBox2.Size = System.Drawing.Size(149, 22)
        self._textBox2.TabIndex = 4
        self._textBox2.Text = '5.5'
        #
        # textBox3
        #
        self._textBox3.Location = System.Drawing.Point(150, 68)
        self._textBox3.Name = 'textBox3'
        self._textBox3.Size = System.Drawing.Size(149, 22)
        self._textBox3.TabIndex = 5
        self._textBox3.Text = '30'
        #
        # button1
        #
        self._button1.BackColor = System.Drawing.Color.FromArgb(192, 255, 255)
        self._button1.Location = System.Drawing.Point(12, 107)
        self._button1.Name = 'button1'
        self._button1.Size = System.Drawing.Size(284, 28)
        self._button1.TabIndex = 6
        self._button1.Text = 'Perform Mortgage Calcuations'
        self._button1.UseVisualStyleBackColor = False
        self._button1.Click += self._button1_Click
        #
        # label4
        #
        self._label4.AutoSize = False  # True
        self._label4.BackColor = System.Drawing.Color.FromArgb(192, 255, 192)
        self._label4.Font = System.Drawing.Font('Courier New', 9.75,
            System.Drawing.FontStyle.Regular,
            System.Drawing.GraphicsUnit.Point, 0)
        self._label4.Location = System.Drawing.Point(12, 152)
        self._label4.Name = 'label4'
        self._label4.Size = System.Drawing.Size(280, 96)
        self._label4.TabIndex = 7
        self._label4.Text = 'Change the values to your needs'
        #
        # Form1
        #
        self.BackColor = System.Drawing.Color.Green
        self.ClientSize = System.Drawing.Size(314, 266)
        self.Controls.Add(self._label4)
        self.Controls.Add(self._button1)
        self.Controls.Add(self._textBox3)
        self.Controls.Add(self._textBox2)
        self.Controls.Add(self._textBox1)
        self.Controls.Add(self._label3)
        self.Controls.Add(self._label2)
        self.Controls.Add(self._label1)
        self.Font = System.Drawing.Font('Arial', 9.75,
            System.Drawing.FontStyle.Regular,
            System.Drawing.GraphicsUnit.Point, 0)
        self.Name = 'Form1'
        self.Text = 'Mortgage Calculator'
        self.Load += self._Form1_Load
        self.ResumeLayout(False)
        self.PerformLayout()

    def _Form1_Load(self, sender, e):
        pass

    def _button1_Click(self, sender, e):
        principal = float(self._textBox1.Text)
        interestPerc = float(self._textBox2.Text)
        interestRate = interestPerc/(100.0 * 12)
        years = float(self._textBox3.Text)
        paymentNum = years * 12

        paymentVal = principal*(interestRate/(1-(1+interestRate)\
            **(-paymentNum)))

        fstr = "Principal Loan: %s\n" % principal
        fstr += "Interest (%s)  : %0.2f\n" % ('%', interestPerc)
        fstr += "Years to pay  : %s\n" % years
        fstr += "Months to pay : %s\n" % paymentNum
        fstr += "Monthly pay   : %0.2f\n" % paymentVal
        fstr += "Total pay     : %0.2f\n" % (paymentVal*paymentNum)
        self._label4.Text = fstr


Application.EnableVisualStyles()
Application.Run(Form1())

Putting the lyrics to the 99BoB song into a PyQT listbox is simple and much fun ...

# add '99 bottles of beer' lyrics to a PyQT list box
# tested with PyQT 4.5.2 and Python 3.1.1
# just for the fun of it         vegaseat

from PyQt4.QtCore import *
from PyQt4.QtGui import *

class MyWindow(QWidget):
    def __init__(self):
        QWidget.__init__(self)
        # setGeometry(x_pos, y_pos, width, height)
        self.setGeometry(100, 150, 280, 360)
        self.setWindowTitle("99 Bottles of Beer")
        self.count = 1

        layout = QVBoxLayout(self)
        self.list = QListWidget(self)
        layout.addWidget(self.list)

        s = 'show 99 bottles of beer lyrics'
        self.button = QPushButton(s, self)
        layout.addWidget(self.button)

        # old connect style for PyQt < 4.5
        #self.connect(self.button, SIGNAL('clicked()'), self.showSong)
        # new connect style for PyQt 4.5+
        self.button.clicked.connect(self.showSong)

    def showSong(self):
        bottle = "\n%s bottle"
        beer = "s of beer on the wall!"
        take = "!\nTake one down, pass it around,"
        for k in range(99, 0, -1):
            # an exercise in slicing
            s1 = ((bottle % k + beer[k==1:])*2)[:-13]
            s2 = bottle % (k-1 or "No")
            s3 = beer[k==2:-1] + "!"
            self.list.addItem(s1 + take + s2 + s3)


app = QApplication([])
window = MyWindow()
window.show()
app.exec_()

Putting the lyrics to the 99BoB song into a PyQT listbox is simple and much fun ...

I am getting a lot of double posting lately. sorry!

I could not resist and take vegaseat's 99 bottles of beer PyQT program and rewrite it for the .NET GUI toolkit using IronPython. The .NET listbox does not take multiline items so the code had to be modified a little:

# add '99 bottles of beer' lyrics to a .NET list box
# tested with IronPython 2.6

import clr

clr.AddReference("System.Windows.Forms")
clr.AddReference("System.Drawing")

import System
from System.Windows.Forms import *
#from System.ComponentModel import *
from System.Drawing import *

class Form1(System.Windows.Forms.Form):
    def __init__(self):
        self.InitializeComponent()

    def Dispose(self, disposing):
        super(type(self), self).Dispose(disposing)

    def InitializeComponent(self):
        self.listBox = System.Windows.Forms.ListBox()
        self.button = System.Windows.Forms.Button()
        self.SuspendLayout()
        #
        # listBox
        #
        self.listBox.BackColor = System.Drawing.Color.FromArgb(255, 255, 192)
        self.listBox.FormattingEnabled = True
        self.listBox.Items.AddRange(System.Array[System.Object](('', )))
        self.listBox.Location = System.Drawing.Point(12, 12)
        self.listBox.Name = 'listBox'
        self.listBox.Size = System.Drawing.Size(248, 277)
        self.listBox.TabIndex = 0
        #
        # button
        #
        self.button.BackColor = System.Drawing.Color.White
        self.button.Location = System.Drawing.Point(12, 295)
        self.button.Name = 'button'
        self.button.Size = System.Drawing.Size(248, 23)
        self.button.TabIndex = 1
        self.button.Text = "show song '99 bottles of beer' lyrics"
        self.button.UseVisualStyleBackColor = True
        self.button.Click += self._button_Click
        #
        # Form1
        #
        self.BackColor = System.Drawing.Color.Green
        self.ClientSize = System.Drawing.Size(272, 326)
        self.Controls.Add(self.button)
        self.Controls.Add(self.listBox)
        self.Location = System.Drawing.Point(100, 150)
        self.Name = 'Form1'
        self.Text = '99 Bottles of Beer'
        self.ResumeLayout(False)

    def _button_Click(self, sender, e):
        """the .NET list box does not take multiline items"""
        bottle = "%s bottle"
        beer = "s of beer on the wall!"
        take = "Take one down, pass it around,"
        for k in range(99, 0, -1):
            # an exercise in slicing
            s1 = bottle % k + beer[k==1:]
            s2 = (bottle % k + beer[k==1:])[:-13] + "!"
            s3 = bottle % (k-1 or "No")
            s4 = beer[k==2:-1] + "!"
            self.listBox.Items.Add(s1)
            self.listBox.Items.Add(s2)
            self.listBox.Items.Add(take)
            self.listBox.Items.Add(s3+s4)
            self.listBox.Items.Add(" ")


Application.Run(Form1())

An IronPython GUI program using the Windows .NET library. This code explores some of the listbox operations:

# use of IronPython to test a .NET listbox
# load, sort, select, clear

import clr

clr.AddReference("System.Windows.Forms")
clr.AddReference("System.Drawing")

import System
from System.Windows.Forms import *
from System.Drawing import *

class Form1(System.Windows.Forms.Form):
    def __init__(self):
        self.InitializeComponent()

    def Dispose(self, disposing):
        super(type(self), self).Dispose(disposing)

    def InitializeComponent(self):
        self.listBox = System.Windows.Forms.ListBox()
        self.button1 = System.Windows.Forms.Button()
        self.button2 = System.Windows.Forms.Button()
        self.button3 = System.Windows.Forms.Button()
        self.SuspendLayout()
        #
        # listBox
        #
        self.listBox.FormattingEnabled = True
        self.listBox.ItemHeight = 16
        self.listBox.Items.AddRange(System.Array[System.Object](('', )))
        self.listBox.Location = System.Drawing.Point(12, 12)
        self.listBox.Name = 'listBox'
        self.listBox.Size = System.Drawing.Size(152, 244)
        self.listBox.TabIndex = 0
        self.listBox.SelectedIndexChanged += self.listBox_SelectedIndexChanged
        #
        # button1
        #
        self.button1.BackColor = System.Drawing.Color.AliceBlue
        self.button1.Location = System.Drawing.Point(181, 12)
        self.button1.Name = 'button'
        self.button1.Size = System.Drawing.Size(99, 23)
        self.button1.TabIndex = 1
        self.button1.Text = 'Load Listbox'
        self.button1.UseVisualStyleBackColor = False
        self.button1.Click += self.button1_Click
        #
        # button2
        #
        self.button2.BackColor = System.Drawing.Color.AliceBlue
        self.button2.Location = System.Drawing.Point(181, 41)
        self.button2.Name = 'button2'
        self.button2.Size = System.Drawing.Size(99, 23)
        self.button2.TabIndex = 2
        self.button2.Text = 'Sort Listbox'
        self.button2.UseVisualStyleBackColor = True
        self.button2.Click += self.button2_Click
        #
        # button3
        #
        self.button3.BackColor = System.Drawing.Color.AliceBlue
        self.button3.Location = System.Drawing.Point(181, 70)
        self.button3.Name = 'button3'
        self.button3.Size = System.Drawing.Size(99, 23)
        self.button3.TabIndex = 3
        self.button3.Text = 'Clear Listbox'
        self.button3.UseVisualStyleBackColor = False
        self.button3.Click += self.button3_Click
        #
        # Form1
        #
        self.BackColor = System.Drawing.Color.Navy
        self.ClientSize = System.Drawing.Size(292, 266)
        self.Controls.Add(self.button1)
        self.Controls.Add(self.button2)
        self.Controls.Add(self.button3)
        self.Controls.Add(self.listBox)
        self.Font = System.Drawing.Font('Arial', 9.75,
            System.Drawing.FontStyle.Regular,
            System.Drawing.GraphicsUnit.Point, 0)
        self.Name = 'Form1'
        self.Text = 'ListBox operations'
        self.ResumeLayout(False)

    def listBox_SelectedIndexChanged(self, sender, e):
        """get the selected listbox item"""
        # put the selected item text into the form1 caption
        if self.listBox.SelectedIndex != -1:
            self.Text = self.listBox.SelectedItems[0].ToString()

    def button1_Click(self, sender, e):
        """load the listbox"""
        self.listBox.Items.Clear()
        name_list = [
        "Sharon",
        "Jean",
        "Larry",
        "Barry",
        "Heidi",
        "Tom",
        "Monica",
        "Abby",
        "Dean",
        "Ethel",
        "Barbara",
        "Olaf",
        "Harry"
        ]
        for item in name_list:
            print(item)  # test
            self.listBox.Items.Add(item)

    def button2_Click(self, sender, e):
        """sort the lisbox items"""
        self.listBox.Sorted = True

    def button3_Click(self, sender, e):
        """clear the listbox items and reset sort"""
        self.listBox.Items.Clear()
        self.listBox.Sorted = False


Application.Run(Form1())

If you are interested, you can download IronPython from
http://ironpython.codeplex.com/Release/ProjectReleases.aspx?ReleaseId=12482

Be a part of the DaniWeb community

We're a friendly, industry-focused community of developers, IT pros, digital marketers, and technology enthusiasts meeting, networking, learning, and sharing knowledge.