Introduction
Among the many ways to create your own View, extending an existing View is the simplest option. This is because you are inheriting pre-made attributes, drawing, and accessibility features.
In this tutorial, we will learn how to create our own custom View by extending an existing View class from the Android framework.
Goals
At the end of the tutorial, you would have learned:
- How to extend an Android View.
Tools Required
- Android Studio. The version used in this tutorial is Bumblebee 2021.1.1 Patch 3.
Prerequisite Knowledge
- Basic Android.
Project Setup
To follow along with the tutorial, perform the steps below:
- Create a new Android project with the default Empty Activity.
- Remove the default TextView from activity_main.xml.
Extend a View in Kotlin/Java
The first thing that we need to do in order to extend a framework View is to declare it in source code.
The class that we want to extend for this tutorial is the Switch class (android.widget.Switch), so follow the steps below to extend Switch.
-
Create a new class called MySwitch using the code below.
class MySwitch(context: Context) : Switch(context) -
The compiler will complain that you should use SwitchCompat instead, which is what you should actually do in real code. It does not really matter which Switch class to use for this tutorial, so you can simply suppress the warning by adding the
@SuppressLint("UseSwitchCompatOrMaterialCode")annotation to MySwitch.@SuppressLint("UseSwitchCompatOrMaterialCode") class MySwitch(context: Context) : Switch(context) -
The code may look correct for now, but if we try to use MySwitch now, the program will crash. This is because at the minimum, we need to call the super(Switch) constructor that takes both a Context and an AttributeSet. Modify MySwitch to call the super constructor with both
contextandattrs(AttributeSet).@SuppressLint("UseSwitchCompatOrMaterialCode") class MySwitch(context: Context, attrs: AttributeSet) : Switch(context, attrs)
Use MySwitch in a layout file
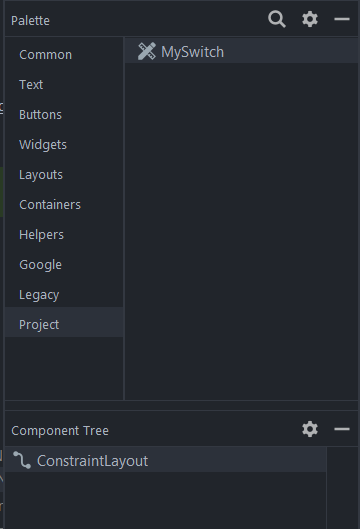
To be able to use MySwitch in an xml file, we can use its FQCN as the XML element tag. There are two ways to add MySwitch to an XML, creating it by hand or with the Palette in the Design surface. Assuming that we want to add MySwitch via the Palette, follow the steps below.
-
Open activity_main.xml in the Design surface.
-
Under Palette, find Project.
-
Under Project, drag MySwitch under ConstraintLayout.
-
And then simply constraint MySwitch to the center of the screen.
-
activity_main.xml should now look like the code below.
<androidx.constraintlayout.widget.ConstraintLayout xmlns:android="http://schemas.android.com/apk/res/android" xmlns:app="http://schemas.android.com/apk/res-auto" xmlns:tools="http://schemas.android.com/tools" android:layout_width="match_parent" android:layout_height="match_parent" tools:context=".MainActivity"> <com.example.daniwebandroidnativeextendingframeworkview.MySwitch android:id="@+id/mySwitch" android:layout_width="wrap_content" android:layout_height="wrap_content" app:layout_constraintBottom_toBottomOf="parent" app:layout_constraintEnd_toEndOf="parent" app:layout_constraintHorizontal_bias="0.5" app:layout_constraintStart_toStartOf="parent" app:layout_constraintTop_toTopOf="parent" /> </androidx.constraintlayout.widget.ConstraintLayout>
Even though we have not provided any custom behavior for the switch, this is basically all you need to do to extend a framework View.
Add Custom Attributes
Now that we have our custom View, we can also add custom attributes and access them as well. Follow the steps below to add a custom attribute.
-
Create a new file called attrs.xml under values.
-
Add a
<declare-stylable>element inside of<resources>with thenameofMySwitch.<?xml version="1.0" encoding="utf-8"?> <resources> <declare-styleable name="MySwitch"> </declare-styleable> </resources> -
Your custom attributes will go inside of the
<declare-stylable>element. -
Each custom attribute is created using the
<attr>element. You can provide it any name you like. Anameis required.
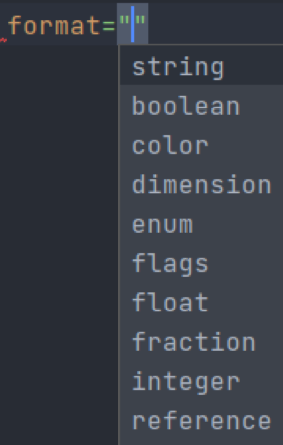
Add a newcustomAttributelike the code below.<attr name="customAttribute" format="string"/> -
There does not seem to be any documentation available for the type of the
format, but you should be fine to use any of the suggested types in the screenshot below.
Use the custom attribute in XML
To use the custom attribute in XML, we can just use the xmlns:app="http://schemas.android.com/apk/res-auto" namespace. In the MySwitch element in activity_main.xml, add the customAttribute like below.
<com.example.daniwebandroidnativeextendingframeworkview.MySwitch
android:id="@+id/mySwitch"
android:layout_width="wrap_content"
android:layout_height="wrap_content"
app:customAttribute="test"
app:layout_constraintBottom_toBottomOf="parent"
app:layout_constraintEnd_toEndOf="parent"
app:layout_constraintHorizontal_bias="0.5"
app:layout_constraintStart_toStartOf="parent"
app:layout_constraintTop_toTopOf="parent" />Now, you can access the value of the attribute in the MySwitch like below.
init {
context.theme.obtainStyledAttributes(
attrs,
R.styleable.MySwitch,
0, 0
).use {
it.getString(R.styleable.MySwitch_customAttribute)
}
}Keep in mind that the TypedArray object must be closed after accessing. Fortunately, it implements AutoClosable, so we can just open it with the use function.
Solution Code
MySwitch.kt
 @SuppressLint("UseSwitchCompatOrMaterialCode")
class MySwitch(context: Context, attrs: AttributeSet) : Switch(context, attrs){
init {
context.theme.obtainStyledAttributes(
attrs,
R.styleable.MySwitch,
0, 0
).use {
it.getString(R.styleable.MySwitch_customAttribute)
}
}
}activity_main.xml
<?xml version="1.0" encoding="utf-8"?>
<androidx.constraintlayout.widget.ConstraintLayout xmlns:android="http://schemas.android.com/apk/res/android"
xmlns:app="http://schemas.android.com/apk/res-auto"
xmlns:tools="http://schemas.android.com/tools"
android:layout_width="match_parent"
android:layout_height="match_parent"
tools:context=".MainActivity">
<com.example.daniwebandroidnativeextendingframeworkview.MySwitch
   android:id="@+id/mySwitch"
   android:layout_width="wrap_content"
   android:layout_height="wrap_content"
   app:customAttribute="test"
   app:layout_constraintBottom_toBottomOf="parent"
   app:layout_constraintEnd_toEndOf="parent"
   app:layout_constraintHorizontal_bias="0.5"
   app:layout_constraintStart_toStartOf="parent"
   app:layout_constraintTop_toTopOf="parent" />
</androidx.constraintlayout.widget.ConstraintLayout>attrs.xml
<?xml version="1.0" encoding="utf-8"?>
<resources>
   <declare-styleable name="MySwitch">
       <attr name="customAttribute" format="string"/>
   </declare-styleable>
</resources>
Summary
We have learned how to extend an existing Android View in this tutorial. The full project code can be found at https://github.com/dmitrilc/DaniwebAndroidNativeExtendingFrameworkView