Building your first DYNAMIC Database application. This is Part One of a four part tutorial on how to install and use your database, Part Two will teach you how to build successful connections and Part Three will teach you how to build database interaction and management of your databases.
There are tons of questions here on VB6 on how to connect to a database, how to add, delete, edit, search data within your database tables etc.
This tutorial has been created to serve as a learning curve or to add more knowledge to your current code writing skills.
This tutorial will lead you to an intermediate level in database design, manipulating data and database management if you have followed all the steps in creating the application.
Part One: Create and Setup your database. This tutorial does not cover Microsoft SQL. It does cover MySql which is Freeware/Open Source and the most used database in the world, and Microsoft Access. To read more on the usability of MySql, read more from this link by MySql.com
MySql – Windows Users only. (If I get enough requests from MAC OS X users, I will post Part1 covering the installation and setup procedures for you. Part2 and Part3 will be the same principals as is currently used in Windows)
Requirements:An Internet connection (Only to download the xampp application, not for testing)
MySql Database installed in your server or computers root folder. It's also useful to have phpMyAdmin, a graphical interface to MySQL. Both components are open source software that you can use for developing, testing, and deploying successful applications–and they are free!
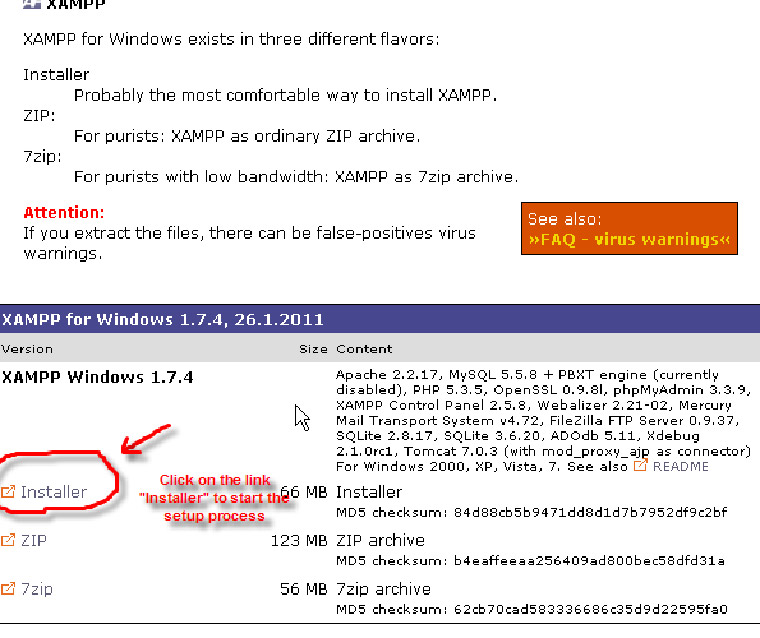
A MySql Control Panel Application – xAmpp is probably the most used and widely acknowledged application which has the control panel (phpMyAdmin) to manage your databases, Xampp to handle the security and more for your installation, MySql Database. Although mostly used for Web Development, the database management and design principles remain the same, especially dealing with sql queries. xAmpp can be downloaded from here . Select the download option as per picture1 below.
Also download the MyFirstDatabase.Sql text file attached below. This will be used to create your first database tables, fields and users.
Another recommended control panel is MySql Control Center which might be better to use if you are a beginner in database design, although phpMyAdmin is easier to grasp than MySqlcc. MySqlcc can be dowmloaded from here .
You can install each one independently, but the quickest and easiest way is to use an all-in-one solution. The one chosen for this tutorial is XAMPP
Picture1. Downloading xAmpp Installing XAMPP (on your computer or the local network computer/server)
Installing and configuring XAMPP is usually quick and trouble-free, but things do sometimes go wrong. If you run into problems with the installation, the best place to get help is in the XAMPP forum .
BEFORE you start, make sure that you have administration privileges.
1. Close all applications on your computer, and double-click the EXE file you downloaded. A dialog box asks you where you want to install XAMPP. The default is C:\. If you select the default, the installer extracts all the necessary files to a new folder called C:\xampp. When expanded, the files occupy approximately 275MB. Your C:\ folder is the most appropriate place to install XAMPP. It is easily accessed and does not have to go through plenty of Windows authentications, especially in Vista or Windows 7.
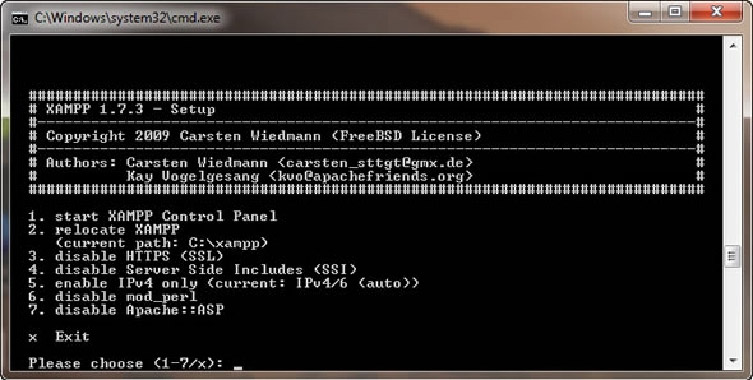
2. When all the files have been extracted, the installer opens a Windows Command Prompt window in certain cases, where you are asked to respond to a series of simple questions about installation options. Type y for “yes” or n for “no”, depending on your preference, and press Enter. This command prompt does not seem to appear in Windows XP, no problem, the setup wizard is started automatically, better for you.
3. After you have set the options, you should see a message telling you that XAMPP is ready. This is followed by a screen with a short menu (see Figure 1). Type 1 and press Enter to start the XAMPP Control Panel. Then type x and press Enter to close the Command Prompt window. Windows XP users are taken directly to the XAMPP Control Panel.
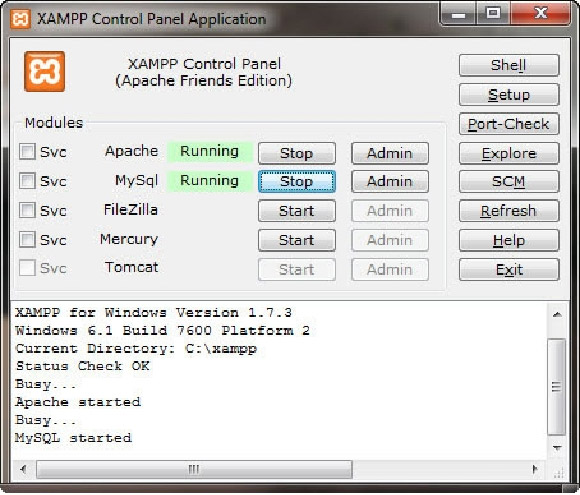
Figure 1. The final stage of the XAMPP installation process involves setting options in the Command Prompt window using Vista and Win7.Starting the servers – Step 2 of the installation To start the MySQL “server”, launch the XAMPP Control Panel from the Windows Start menu (if it's not already open), and click the Start button alongside MySQL. Confirmation that it has started successfully is displayed alongside, and the button caption on the Start button changes to Stop (see Figure 2). Do not worry if Apache Server is also running, ignore it. If a security alert from your anti virus pops up asking whether to keep blocking the program XAMPP, MySql or Apache, choose Unblock for all programs.
Figure 2. The XAMPP Control Panel confirms that MySQL is running.
In the case of any errors, or the MySql server does not want to run, check the following –If MySql fails to start, make sure you are logged in using an Administrator account. Selecting the “Run as Administrator” option normally does not give you sufficient privileges to start the server. (Note: Server means your own computer, a local network computer or an internet based “computer”, which will be used from here on.)
The error log for MySQL is located in the C:\xampp\mysql\data folder. It's in a file that uses the same name as your computer followed by an .err file name extension. To open it, double-click its icon, and select Notepad when prompted to select a program to use.
If you want to enable MySQL to start automatically, select the Svc check box alongside MySql. This will ensure that every time you start your server; the service is started, ensuring interaction without manually starting the service.
Add security to your database/root folder
1. Launch your internet browser (you do not need to be online for this) and type http://localhost/ into the address bar.
2. If everything has been correctly installed, you should see a web page offering a choice of languages. Select the language you want to use (Not in Windows XP, only in Vista and Windows 7).
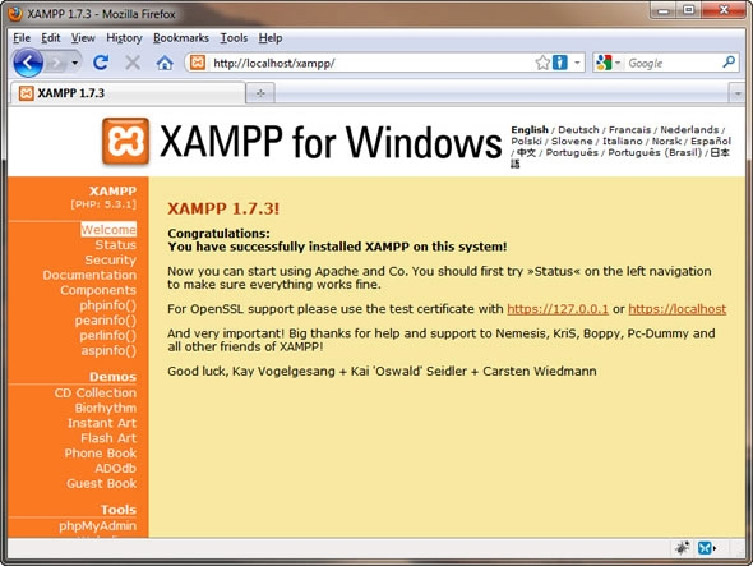
3. The menu on the left of the welcome screen access to all parts of XAMPP, including security configuration options. See figure 3.
Figure 3. The XAMPP welcome screen will appear if your installation was successful.
4. Click on the “Security” label in the menu on the left. This will open a new browser window or tab with a report on the current security status of your installation. Scroll down below the status report, and click on the following link http://localhost/security/xamppsecurity.php (Do not worry about the php extensions used in web development; it all serves the purpose to secure your database and to interact with it.
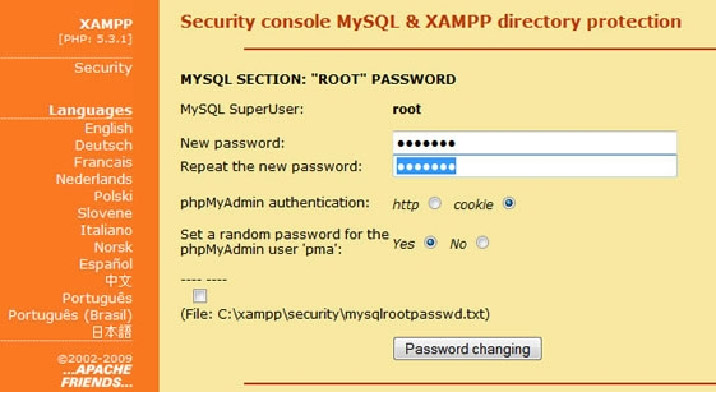
5. This displays the security console which will prompt you to create a password for the MySQL superuser, root. (Superuser is the status given to the person that can change ANYTHING within the database, not just tables – See figure 4. Note that even if you are the only person using the computer, it's good practice to password protect the MySQL database)
Figure 4. Set your SuperUser’s (You) MySQL root password.
6. Type your password in both fields. It can contain special characters,but should not have any spaces!!!! Make sure you make a note of the password somewhere. If it is lost, you will have to go through some serious command prompt to reset it!!!!
7. Immediately below the password fields is a pair of radio buttons that determine how phpMyAdmin (your control panel) connects to MySQL as the root superuser. The default is to store it in a cookie. This is fine for a local development environment.
8. You are also asked whether to set a random password for the pma user. Select the “Yes” option.
9. If you are worried about forgetting the root password, you can select the check box just above the Password Changing button to store it in a plain text file (mysqlrootpassword.txt). This does however create a security risk because anyone with access to your server can get the password, so, use at your own risk.
10. Click on the Password Changing button to save all your security settings.
Testing your MySql installation
After installing XAMPP and securing the database, it's a good idea to test the installation:
1. Close the XAMPP security window or tab to return to the welcome screen (see Figure 3 above).
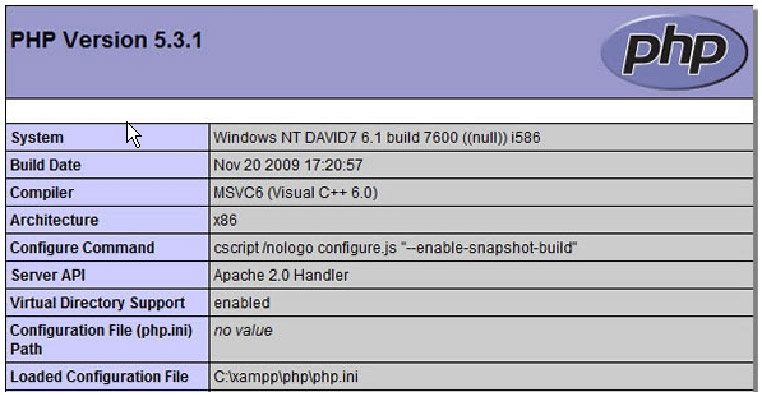
2. Click the phpinfo() label in the menu on the left of the screen.
If MySql has been installed successfully you will see a page showing detailed information about PHP setup being successful (see Figure 5). Again, do not worry that it is the php page you see, It just means that the MySql setup was also successful, which is what you want to interact with and create databases.
Figure 5. If you see this, your installation was successful.Testing MySQL and phpMyAdmin
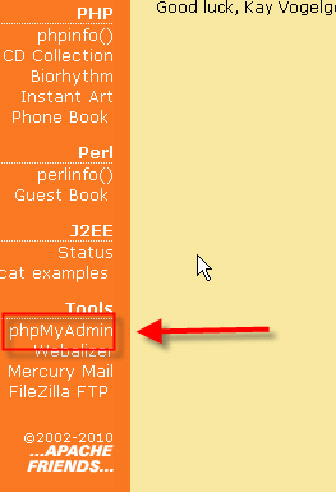
1. Click on the “phpMyAdmin” link in the Tools section of the menu on the left of the XAMPP welcome screen as in figure 6.
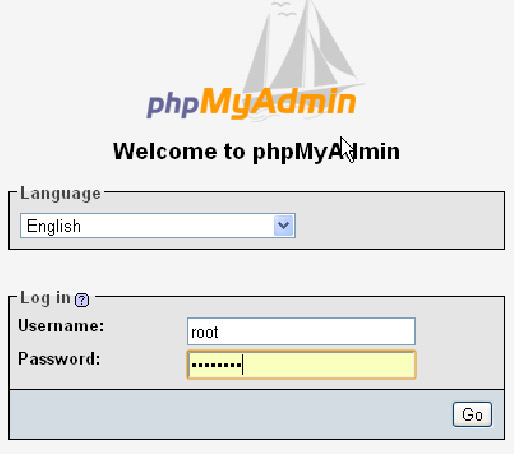
2. This will load the login page for phpMyAdmin as in Figure 7. Typeroot as the username, and then type the root password that you have created earlier on.
3. Click on Go to Login.
Figure 7. Log into phpMyAdmin and click Go
If your Login was successful, you will see the phpMyAdmin Main page as in Figure 8. Congratulations, all went well! Figure 8. Login successful, phpMyAdmin working!Creating your first MySQL database and user account (with limited access)
Some notes first...
MySQL is not a single database on its own but rather a database management system that will manage as many databases as you have added to it. You create individual databases within MySQL which will run in its own entity as a database. This is what gives MySQL its power, you can have multiple databases which is all saved under one folder in either your desktop PC, server or web host server. These are normally found under C:/MySql/Data, or in our case, using XAMPP, C:/xampp/mysql/Data.
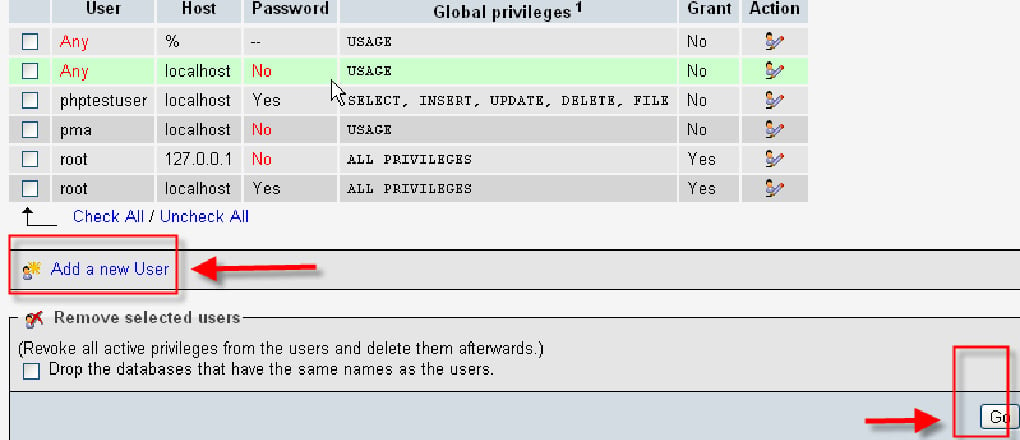
The superuser, “root”, has complete control over all databases and files, so it's necessary to set up user accounts with restricted privileges to prevent unauthorized users gaining access to other people's data or messing up your databases.
In the following section, we’ll use the phpMyAdmin front end to MySQL to create a database, import sample data from a text file, and create a MySQL user account. The instructions assume that you have installed XAMPP on Windows successfully.
1. The first and most important step is to verify that your server (php) and the MySQL server are running (See above if you are unsure – "Starting the servers – Step 2" of the installation) . Again, do not worry about the use of php, it is the most user friendly management panel there is.
2. Secondly, start your phpMyAdmin Main Page. In most cases, you can do this by typing http://localhost/phpmyadmin/ into your browser address bar. You do not need to be online to be able to run the control panel; the server is running from your desktop PC.
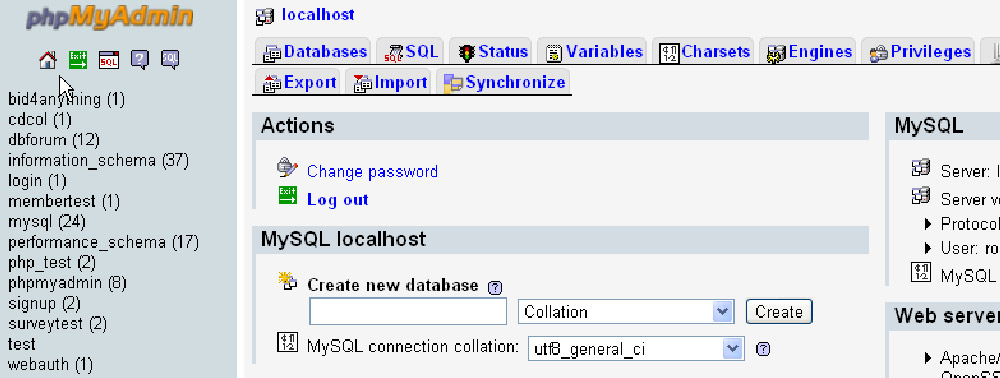
3. Type root as the username, and then your MySQL root password you created to Login to display your Control Panel. (See Figure 9)
Figure 9. Your Control Panel after Login
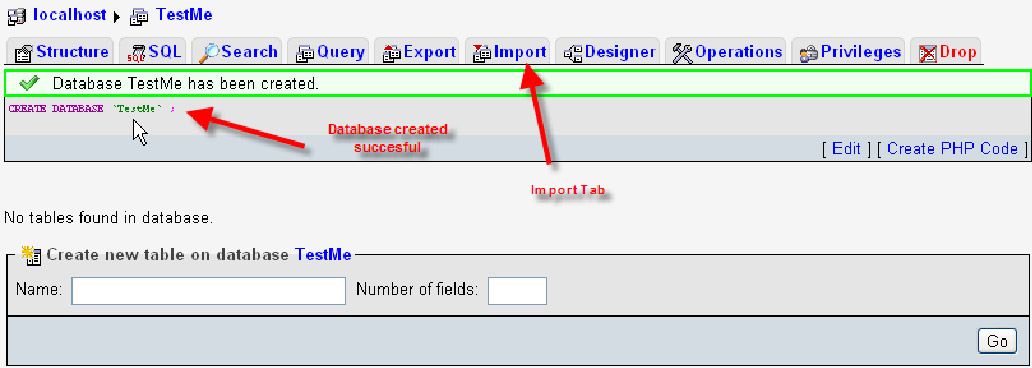
4. TypeMyFirstDatabase in the text box that is labelled “Create New Database”. Leave all the other settings and text as is and click “Create”. For this sample we will create the tables and fields as well as some data by using a text file called MyFirstDatabase.sql. This is the file you have downloaded here from Daniweb. In Part 2 we will cover more intricate interactions with the database.
It is important to remember that when choosing names for your Databases, Tables or fields, refrain from using spaces (for example, My Name) or hyphens; use only alphanumeric and underscore characters (for example, My_Name). Although phpMyAdmin accepts spaces and hyphens, they require special actions and are likely to cause problems later on in your database.
It's also a good idea to use lowercase throughout, because the Windows version of MySQL automatically converts names to lowercase and treats them as case-insensitive (for example My_Name will be saved and used as my_name).
phpMyAdmin will always show you the results of an action after “Go or Save” was selected, shown at the top of your control panel, as in Figure 10. Click on the Import tab at the top of the page, as in Figure 10.
Figure 10. Success on database creation, import tab next
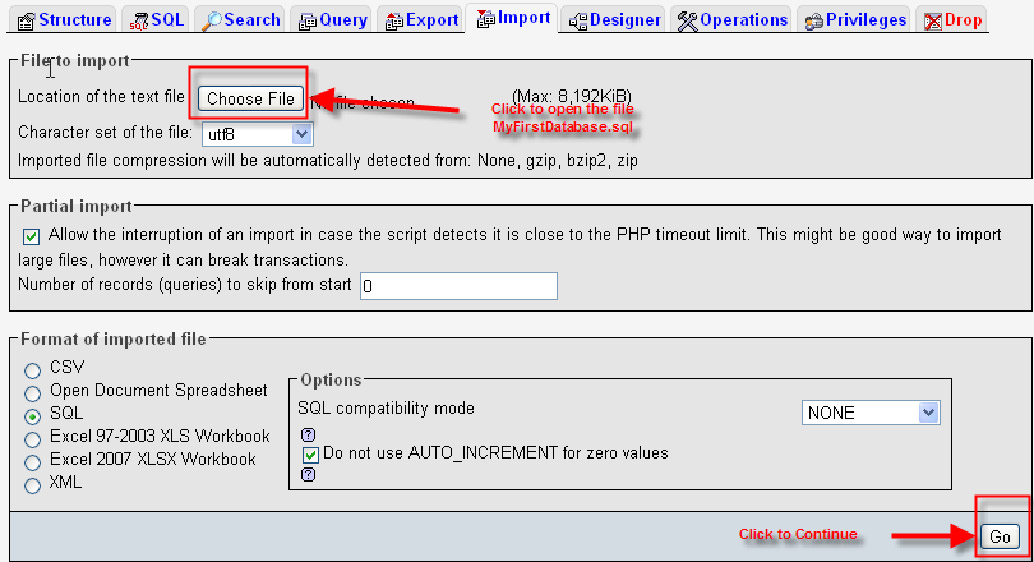
5. In the File To Import section that was loaded, click on the “Choose File” alongside the “Location Of The Text File” text box and select “MyFirstDatabase.sql” from the folder you have saved it to. (It is available at the bottom of this Part 1 tutorial as a zip file) 6. Click on “Go” at the bottom of the page. This imports all the sample data from the text file into the database, creating the tables AND fields on the go. Figure 11. Select file and select GoCreating your MySQL user account with privileges
Please note that the root superuser should be used only for administrative tasks inside phpMyAdmin, because it has the power to delete all of your data AND databases! After your data or database has been deleted, you cannot restore it! There is no equivalent of the Windows Recycle Bin or Mac Trash in MySQL.
1. Click the icon that looks like a little house at the top left of the phpMyAdmin screen, above the databases list to return to the original control panel screen.
2. Click the Privileges tab at the top of the Main page.
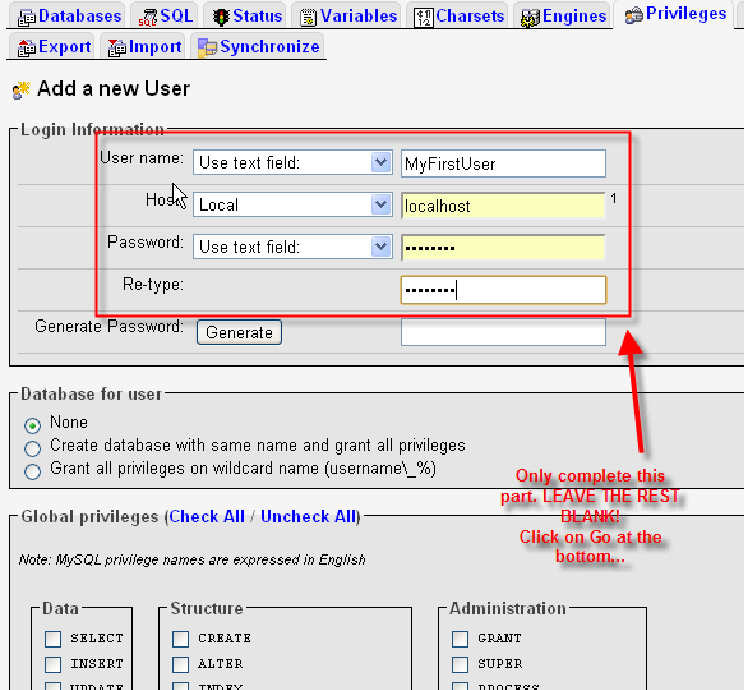
3. Click Add A New User (See Figure 12).
4. In the User Name text box, type MyFirstUser.
5. Select Local as the Host. This enters localhost in the text box alongside, restricting the user to your local test environment.
6. Type a password in the Password field, and retype it in the field immediately below (Make a note of your password!).
7. Leave the rest of the page unchanged, and click Go at the bottom of the page.
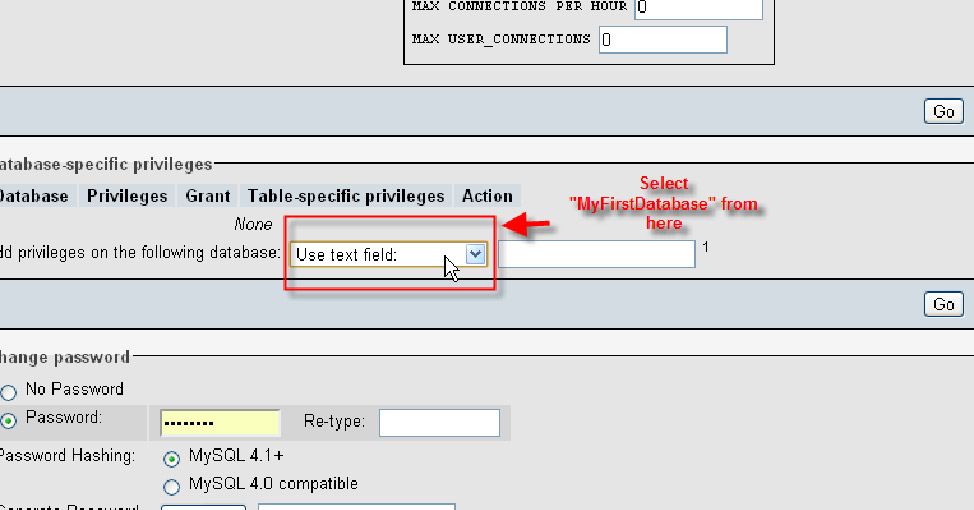
Have a look at the top of the screen; you will notice the report that the new user has been added successfully. The “Global” privileges section gives the user account the same privileges on all databases that you add to MYSQL. For the purposes of this tutorial, you're going to limit the user to the MyFirstDatabase database.
8. Scroll down to the Database-specific Privileges section and select the MyFirstDatabase database (see Figure 13). Figure 13. Selecting a specific database for a specific user
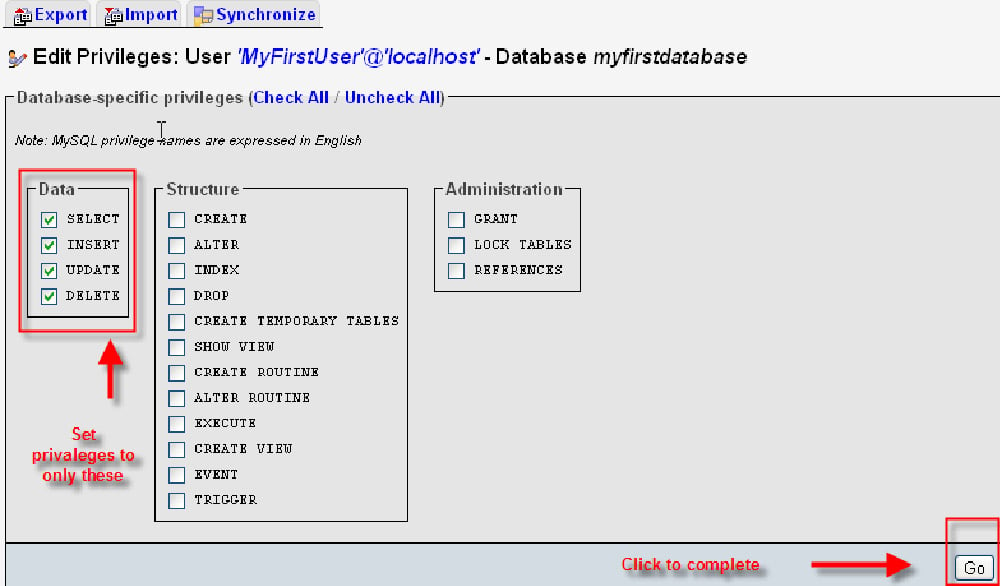
9. Click on “Go” 10. On the next page you can set the user's privileges for the selected database. For most applications, only four privileges are normally required: SELECT, INSERT, UPDATE, and DELETE. Select them and click “Go” (see Figure 14). The top of your control panel will show that the user has been updated. Click on the “HOUSE ICON” to complete this tutorial part of MYSQL.
In Part 2 we will discuss Microsoft Access, its connections, creating a database from VB6, Data Access Objects, Active Data Objects Controls and code.
In Part 3 of this tutorial we will be covering Database connections using vb6, Connections to a server and the basic interaction with MYSQL or Microsoft Access.