In my previous article, I explained how to convert PDF image to CSV using Multimodal Google Gemini Pro. To do so, I wrote a Python script that passes text command to Google Gemino Pro for extracting tables from PDF images and storing them in a CSV file.
In this article, I will build upon that script and develop a web application that allows users to upload images and submit text queries via a web browser to extract tables from PDF images. We will use the Python Streamlit library to develop web data applications.
So, let's begin without ado.
Installing Required Libraries
You must install the google-cloud-aiplatform library to access the Google Gemini Pro model. For Streamlit data application, you will need to install the streamlit library. The following script installs these libraries:
google-cloud-aiplatform
streamlit
Creating Google Gemini Pro Connector
I will divide the code into two Python files: geminiconnector.py and main.py. The geminiconnector.py library will contain the logic to connect to the Google Gemini Pro model and make API calls.
Code for geminiconnector.py
import os
from vertexai.preview.generative_models import GenerativeModel, Part
os.environ['GOOGLE_APPLICATION_CREDENTIALS'] = r"PATH_TO_JSON_API_FILE"

model = GenerativeModel("gemini-pro-vision")
config={
    "max_output_tokens": 2048,
    "temperature": 0,
    "top_p": 1,
    "top_k": 32
}


def generate(img, prompt):

    input = img + [prompt]

    responses = model.generate_content(
        input,
        generation_config= config,
        stream=True,
    )
    full_response = ""

    for response in responses:
        full_response += response.text

    return full_response
I have already explained the details for the above code in my previous article. Therefore I will not delve into the details of this code here.
Creating Web GUI for the PDF Image Table Extractor
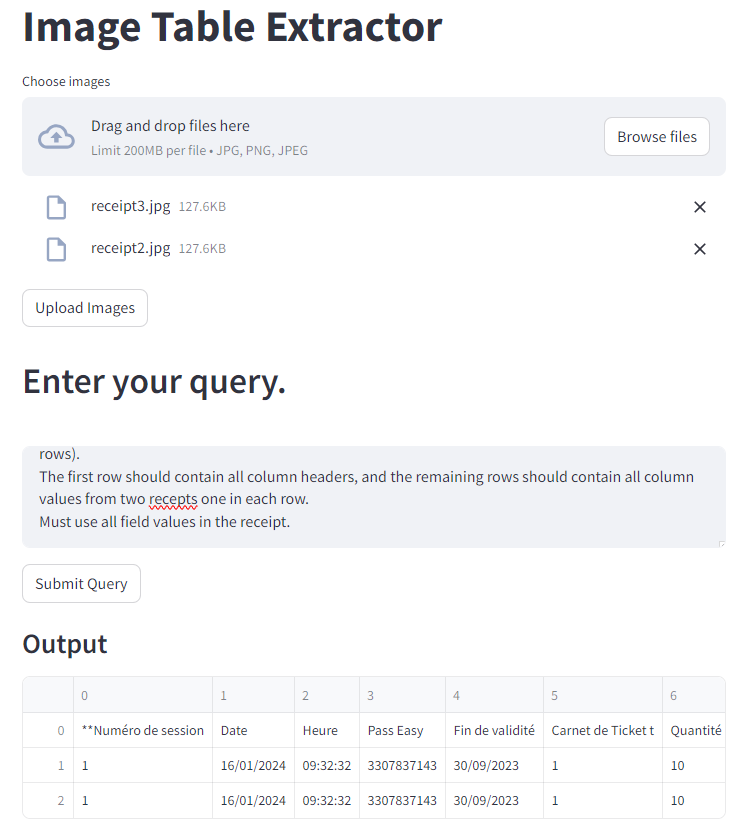
We will develop the following GUI, allowing users to upload images from their local drive. The user must then click the Upload Images button to upload the images stored in a temporary directory. Next, the user enters a text query in a text field and presses the "Submit Query" button. The response is stored in a Pandas dataframe and displayed in the output.
The code for the above GUI is implemented in the main.py file. I will break down the code into multiple code snippets for improved readability.
Import Required Libraries
The following script imports required libraries for the main.py file.
from geminiconnector import generate
from vertexai.preview.generative_models import Part
import streamlit as st
import pandas as pd
import os
import base64
import glob
import re
import csv
Creating an Image Uploader
The first step is to create an image uploader. You can use the st.uploader() method, as shown in the following script.
st.write("# Image Table Extractor")
uploaded_files = st.file_uploader("Choose images", accept_multiple_files=True, type=['jpg', 'png'])
Next, we will define the save_uploaded_files function that accepts the directory for storing images and image files as parameters. The following script also defines the path for storing images.
def save_uploaded_files(directory, uploaded_files):

    if not os.path.exists(directory):
        os.makedirs(directory)

    for uploaded_file in uploaded_files:
        file_path = os.path.join(directory, uploaded_file.name)

        with open(file_path, "wb") as f:
            f.write(uploaded_file.getbuffer())

local_dir = "tempdir"
Next, we will define the Upload Images button using the st.button() method, which, when clicked, uploads images to the local directory.
if st.button('Upload Images'):
    if uploaded_files:

        save_uploaded_files(local_dir, uploaded_files)
        st.success(f'Images have been Uploaded.')

    else:
        st.error('Please upload at least one image.')
Defining Image Preprocessing Functions
Like the previous article, we will define two image processing functions: get_jpg_file_paths() and read_image(). The former returns the file paths of all the files in a directory, while the latter converts images to Google Gemini Pro compliant format.
def get_jpg_file_paths(directory):

    jpg_file_paths = glob.glob(os.path.join(directory, '**', '*.jpg'), recursive=True)
    return [os.path.abspath(path) for path in jpg_file_paths]


def read_image(img_paths):

    imgs_b64 = []
    for img in img_paths:
        with open(img, "rb") as f: # open the image file in binary mode
            img_data = f.read() # read the image data as bytes
            img_b64 = base64.b64encode(img_data) # encode the bytes as base64
            img_b64 = img_b64.decode() # convert the base64 bytes to a string
            img_b64 = Part.from_data(data=img_b64, mime_type="image/jpeg")

            imgs_b64.append(img_b64)

    return imgs_b64
Creating Query Submitter and Result Generator
To capture user queries, we will define a text area using the st.write() method as shown below:
st.write("## Enter your query.")
user_input = st.text_area("query",
                          height=100,
                          label_visibility = "hidden")
Before generating a response from the Google Gemini Pro model, we will define the process_line() function that handles the unique patterns in the response, such as the currency symbols and the decimal separators.
def process_line(line):

    lines = full_response.strip().split('\n')

    special_patterns = re.compile(r'\d+,\d+\s[€%]')

    temp_replacement = "TEMP_CURRENCY"

    currency_matches = special_patterns.findall(line)

    for match in currency_matches:
        line = line.replace(match, temp_replacement, 1)

    parts = line.split(',')

    for i, part in enumerate(parts):
        if temp_replacement in part:
            parts[i] = currency_matches.pop(0)

    return parts
Finally, we will create a Submit Query button, which, when clicked, passes the user input prompt and the input images to the generate() function from the geminiconnector.py file.
The response is split into multiple lines. Each line is formatted using the process_line() function and appended to the data list. The pd.DataFrame constructor converts the data list to a Pandas dataframe, which is displayed on the web page using the st.write() method.
And this is it! You have successfully developed your PDF image table extractor. I used the following prompt to extract tables from the PDF image. I intentionally made spelling mistakes to see if the model returned the desired results.
"""I have the above receipts. Return a response that contains information from the receipts in a comma-separated file format where row fields are table columns,
whereas row values are column values. The output should contain (header + number of recept rows).
The first row should contain all column headers, and the remaining rows should contain all column values from two recepts one in each row.
Must use all field values in the receipt. """
You can modify the above prompt to get different information from your PDF file.
Conclusion
In this article, you saw how to create a PDF image table extractor using multimodal Google Gemini Pro and Python Streamlit library. Using Google Gemini Pro is exceptionally straightforward. I encourage you to develop your Streamlit web applications using Google Gemini Pro or other multimodal large language models. It is easy and fun to use and can solve highly complex tasks requiring image and text inputs.