Introduction
In Android development, Espresso can be combined with Junit to create powerful UI automation tests. In this tutorial, we will learn how to create Espresso tests.
Goals
At the end of the tutorial, you would have learned:
- How to create Espresso tests.
Tools Required
- Android Studio. The version used in this tutorial is Arctic Fox 2020.3.1 Patch 4.
Prerequisite Knowledge
- Basic Android.
Project Setup
To follow along with the tutorial, perform the steps below:
-
Create a new Android project with the default Empty Activity.
-
Replace the content of
activity_main.xmlwith the layout XML below.<?xml version="1.0" encoding="utf-8"?> <androidx.constraintlayout.widget.ConstraintLayout xmlns:android="http://schemas.android.com/apk/res/android" xmlns:app="http://schemas.android.com/apk/res-auto" xmlns:tools="http://schemas.android.com/tools" android:layout_width="match_parent" android:layout_height="match_parent" tools:context=".MainActivity"> <EditText android:id="@+id/editText_plaintTextInput" android:layout_width="match_parent" android:layout_height="wrap_content" android:layout_marginStart="16dp" android:layout_marginEnd="16dp" android:hint="@string/input_text_here" android:inputType="text" app:layout_constraintBottom_toTopOf="@id/button_submit" app:layout_constraintEnd_toEndOf="parent" app:layout_constraintStart_toStartOf="parent" app:layout_constraintTop_toTopOf="parent" /> <Button android:id="@+id/button_submit" android:layout_width="wrap_content" android:layout_height="wrap_content" android:text="@string/button" app:layout_constraintBottom_toTopOf="@id/textView_finalText" app:layout_constraintEnd_toEndOf="parent" app:layout_constraintHorizontal_bias="0.5" app:layout_constraintStart_toStartOf="parent" app:layout_constraintTop_toBottomOf="@id/editText_plaintTextInput" /> <TextView android:id="@+id/textView_finalText" android:layout_width="wrap_content" android:layout_height="wrap_content" android:hint="@string/no_value" app:layout_constraintBottom_toBottomOf="parent" app:layout_constraintEnd_toEndOf="parent" app:layout_constraintHorizontal_bias="0.5" app:layout_constraintStart_toStartOf="parent" app:layout_constraintTop_toBottomOf="@id/button_submit" /> </androidx.constraintlayout.widget.ConstraintLayout> -
Replace
strings.xmlwith the xml below.<resources> <string name="app_name">Daniweb Espresso Test</string> <string name="button">SUBMIT</string> <string name="no_value">No Value</string> <string name="input_text_here">Input text here</string> </resources>
Getting familiar with the demo app
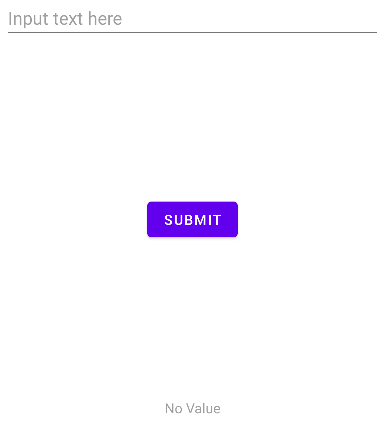
Even though all of the boilerplate code has been provided for this tutorial, let us quickly go over the state of the demo app right now.
First, launch the app, and we can see that there are three elements in our application:
- An EditText element for users to input plain text. It provides a hint of “Input text here” to let the user know that they should provide some text value here.
- A Button element for submitting the text. The actual button action is not yet implemented. Once implemented, we would want the text value(
android:text) of EditText to be set as the TextView text value as well. - A TextView element for displaying the text value submitted from the EditText element. If the TextView
android:textvalue is empty, it will display “No Value”.
The Espresso library
When Espresso is mentioned together with modern Android development, it can mean two things:
- The
androidx.test.espressopackage. This package includes the core classes of the library. Other subpackages of Espresso can be used if you need support for more complicated workflows. For example, if you need to test WebView, you would need theandroidx.test.espresso.web.*packages. - The
androidx.test.espresso.Espressoclass. This class is the main entry point for Espresso tests.
The Espresso Test
The flow of an Espresso test is quite simple. They are:
- Start the test by using one of the static methods from the Espresso class. For this tutorial, we will use the
Espresso.onView()method. - Providing a Hamcrest matcher object to
onView()(or other entry points such asonData()). You can obtain pre-made Matcher objects from theViewMatchersclass(androidx.test.espresso.matcher.ViewMatchers). onView()will return a ViewInteraction object. Via this ViewInteraction object, we can call the methodperform()to perform actions on the underlying View. The methodperform()takes a varargs of ViewAction objects. Each ViewAction object represents an action to perform. You can obtain pre-implemented ViewAction objects from the ViewActions class(androidx.test.espresso.action.ViewActions).- The call to
perform()will return the same ViewInteraction object, which we can then call its instance methodcheck()to provide assertions to verify whether the test has passed. Each assertion is encapsulated in a ViewAssertion object. One convenient way to obtain ViewAssertion objects is to use static methods of the ViewAssertions class(androidx.test.espresso.assertion.ViewAssertions).
Creating the Test
For this tutorial, we will attempt to use Espresso in an instrumentation test. There should already be a test class under androidTest, so we can just re-use that file for simplicity. The class name in my project is ExampleInstrumentedTest. To create our own Espresso test, perform the steps below:
-
Copy and paste this JUnit rule inside the ExampleInstrumentedTest class. This is a special rule used with AndroidJunitRunner that starts the Activity (MainActivity in our case) before each test and stops the Activity at the end of each test. Check the code comment if you want to read more about this Rule, but discussing this Rule is out of scope for this tutorial.
/** * Check https://developer.android.com/training/testing/junit-rules#activity-test-rule */ @get:Rule val activityScenarioRule = ActivityScenarioRule(MainActivity::class.java) -
Remove the default
useAppContext()test from the class because we do not need it. -
Paste the code below into the test class.
@Test fun testFinalTextView() { val testString = "Daniweb Espresso Test" onView(withId(R.id.editText_plaintTextInput)) //Obtains the TextEdit element .perform(typeText(testString)) //Add text to the TextEdit field onView(withId(R.id.button_submit)) //Obtains the Button element .perform(click()) //Click on the Submit button onView(withId(R.id.textView_finalText)) //Obtains the TextView element .check(matches(withText(testString))) //Checks if its value matches the submitted value }
The method testFinalTextView() attempts to replicate the expected flow. The code comments above explains what the code does on each line.
Run the Test
We are ready to run the test.
- Right-click on the Test class, in the Project view.
- RunExampleInstrumentedTest.
Then you can see that the test will fail with the error:
Expected: an instance of android.widget.TextView and view.getText() with or without transformation to match: is "Daniweb Espresso Test"
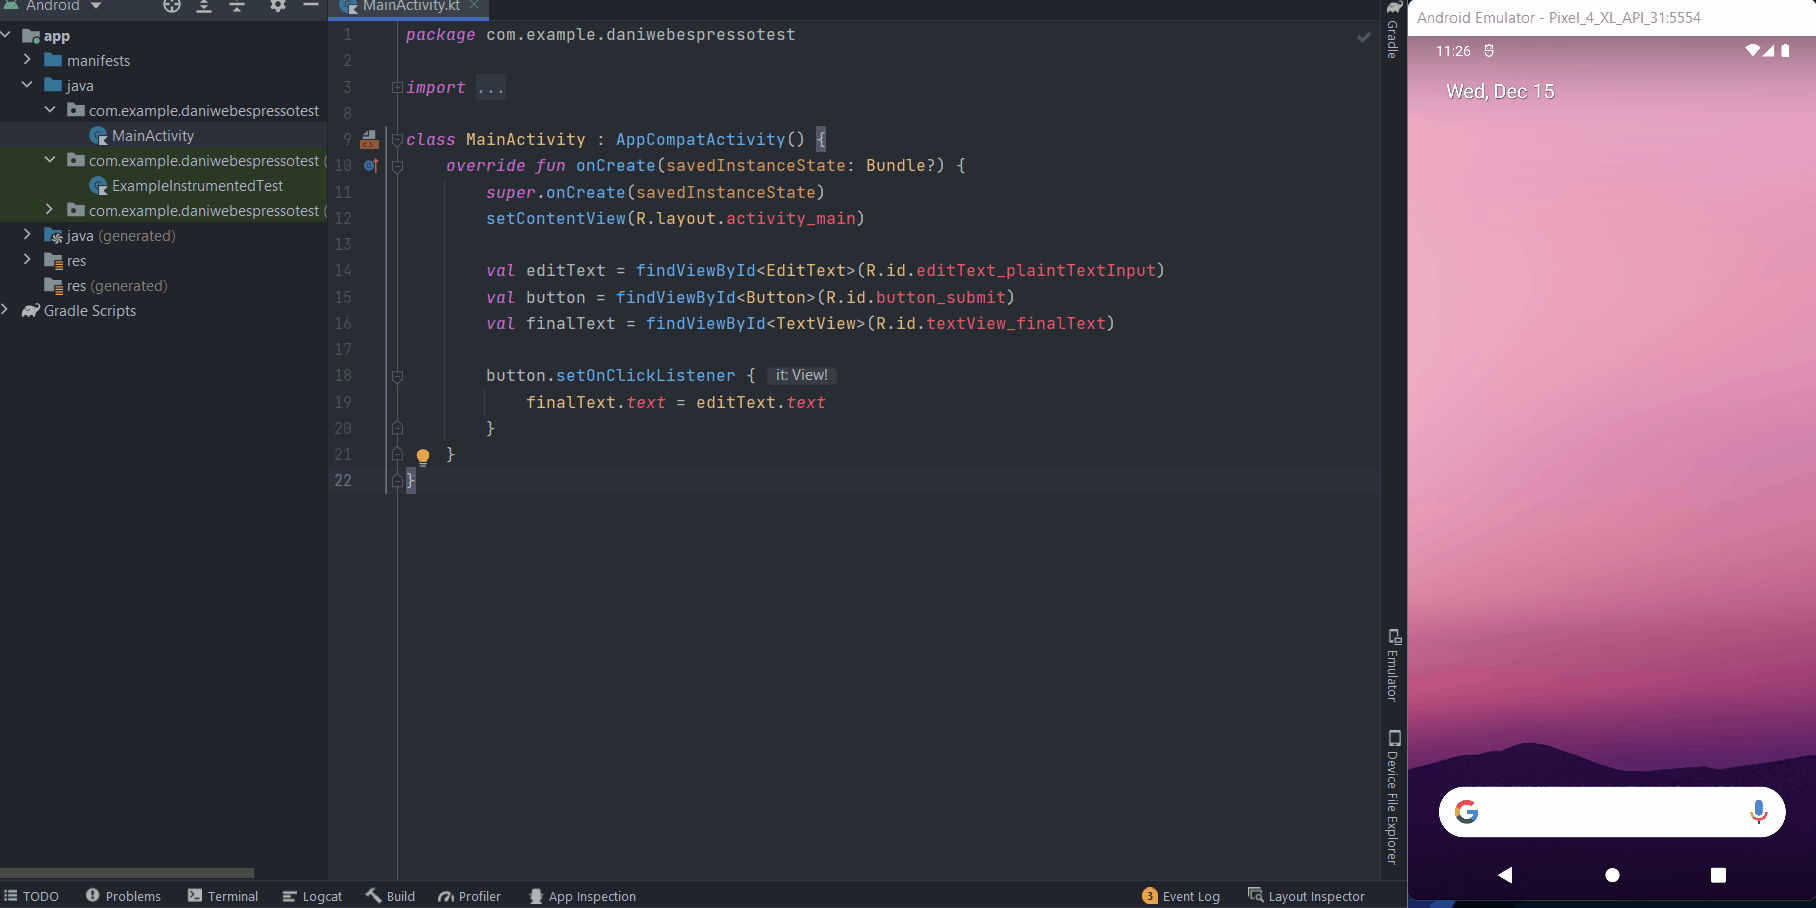
Got: view.getText() was "" transformed text was ""This behavior is expected because we have not implemented any logic for the Submit button yet. To quickly implement the logic, replace the current onCreate() function in MainActivity.kt with the new version below.
override fun onCreate(savedInstanceState: Bundle?) {
super.onCreate(savedInstanceState)
setContentView(R.layout.activity_main)
val editText = findViewById<EditText>(R.id.editText_plaintTextInput)
val button = findViewById<Button>(R.id.button_submit)
val finalText = findViewById<TextView>(R.id.textView_finalText)
button.setOnClickListener {
finalText.text = editText.text
}
}Run the Test again
With the logic implemented, we can run the test again and see it passing.
Solution Code
activity_main.xml
 <?xml version="1.0" encoding="utf-8"?>
 <androidx.constraintlayout.widget.ConstraintLayout xmlns:android="http://schemas.android.com/apk/res/android"
    xmlns:app="http://schemas.android.com/apk/res-auto"
    xmlns:tools="http://schemas.android.com/tools"
    android:layout_width="match_parent"
    android:layout_height="match_parent"
    tools:context=".MainActivity">

    <EditText
        android:id="@+id/editText_plaintTextInput"
        android:layout_width="match_parent"
        android:layout_height="wrap_content"
        android:layout_marginStart="16dp"
        android:layout_marginEnd="16dp"
        android:hint="@string/input_text_here"
        android:inputType="text"
        app:layout_constraintBottom_toTopOf="@id/button_submit"
        app:layout_constraintEnd_toEndOf="parent"
        app:layout_constraintStart_toStartOf="parent"
        app:layout_constraintTop_toTopOf="parent" />

    <Button
        android:id="@+id/button_submit"
        android:layout_width="wrap_content"
        android:layout_height="wrap_content"
        android:text="@string/button"
        app:layout_constraintBottom_toTopOf="@id/textView_finalText"
        app:layout_constraintEnd_toEndOf="parent"
        app:layout_constraintHorizontal_bias="0.5"
        app:layout_constraintStart_toStartOf="parent"
        app:layout_constraintTop_toBottomOf="@id/editText_plaintTextInput" />

    <TextView
        android:id="@+id/textView_finalText"
        android:layout_width="wrap_content"
        android:layout_height="wrap_content"
        android:hint="@string/no_value"
        app:layout_constraintBottom_toBottomOf="parent"
        app:layout_constraintEnd_toEndOf="parent"
        app:layout_constraintHorizontal_bias="0.5"
        app:layout_constraintStart_toStartOf="parent"
        app:layout_constraintTop_toBottomOf="@id/button_submit" />

</androidx.constraintlayout.widget.ConstraintLayout>strings.xml
 <resources>
    <string name="app_name">Daniweb Espresso Test</string>
    <string name="button">SUBMIT</string>
    <string name="no_value">No Value</string>
    <string name="input_text_here">Input text here</string>
</resources>MainActivity.kt
package com.example.daniwebespressotest
import androidx.appcompat.app.AppCompatActivity
import android.os.Bundle
import android.widget.Button
import android.widget.EditText
import android.widget.TextView
class MainActivity : AppCompatActivity() {
override fun onCreate(savedInstanceState: Bundle?) {
super.onCreate(savedInstanceState)
setContentView(R.layout.activity_main)
val editText = findViewById<EditText>(R.id.editText_plaintTextInput)
val button = findViewById<Button>(R.id.button_submit)
val finalText = findViewById<TextView>(R.id.textView_finalText)
button.setOnClickListener {
finalText.text = editText.text
}
}
}ExampleInstrumentedTest.kt
package com.example.daniwebespressotest
import androidx.test.espresso.Espresso.onView
import androidx.test.espresso.action.ViewActions.click
import androidx.test.espresso.action.ViewActions.typeText
import androidx.test.espresso.assertion.ViewAssertions.matches
import androidx.test.espresso.matcher.ViewMatchers.withId
import androidx.test.espresso.matcher.ViewMatchers.withText
import androidx.test.ext.junit.rules.ActivityScenarioRule
import androidx.test.platform.app.InstrumentationRegistry
import androidx.test.ext.junit.runners.AndroidJUnit4
import org.junit.Test
import org.junit.runner.RunWith
import org.junit.Assert.*
import org.junit.Rule
/**
* Instrumented test, which will execute on an Android device.
*
* See [testing documentation](http://d.android.com/tools/testing).
*/
@RunWith(AndroidJUnit4::class)
class ExampleInstrumentedTest {
 /**
 * Check https://developer.android.com/training/testing/junit-rules#activity-test-rule
 */
 @get:Rule
 val activityScenarioRule = ActivityScenarioRule(MainActivity::class.java)
 @Test
 fun testFinalTextView() {
    val testString = "Daniweb Espresso Test"

    onView(withId(R.id.editText_plaintTextInput)) //Obtains the TextEdit element
        .perform(typeText(testString)) //Add text to the TextEdit field

    onView(withId(R.id.button_submit)) //Obtains the Button element
        .perform(click()) //Click on the Submit button

    onView(withId(R.id.textView_finalText)) //Obtains the TextView element
        .check(matches(withText(testString))) //Checks if its value matches the submitted value
 }
}Summary
Congratulations, we have learned how to create UI Automation tests with Espresso. The full project code can be found here https://github.com/dmitrilc/DaniwebEspressoTest.
