Introduction
UI Automator is a library that allows you to create tests that can interact with other components besides your App, such as Settings or other Android components. In this tutorial, we will learn how to incorporate UI Automator into our tests.
Goals
At the end of the tutorial, you would have learned:
- How to use UI Automator to create tests.
Tools Required
- Android Studio. The version used in this tutorial is Arctic Fox 2020.3.1 Patch 4.
Prerequisite Knowledge
- Basic Android.
Project Setup
To follow along with the tutorial, perform the steps below:
-
Create a new Android project with the default Empty Activity.
-
Give the default TextView the
android:idof “textView_helloWorld” -
Add the dependency for Ui Automator to your module gradle file.
androidTestImplementation 'androidx.test.uiautomator:uiautomator:2.2.0'
UI Automator Overview
UI Automator simply refers to a group of classes belonging to the androidx.test.uiautomator package. The primary classes that you need to know in this package are:
- UiDevice: allows you to access device state and simulate user actions. to simulate user actions, you can use methods such as
click(),drag(),pressX(), etc. - UiObject: represents a view. You can obtain UiObject instances via
findObject()methods from the UiDevice class. UiObject’s public constructors are deprecated. You can also reuse this object for different views matching the same UiSelector. - UiSelector: a filter object used to create a UiObject. If you are familiar with Hamcrest Matchers, then this is somewhat similar to the ViewMatchers class (
androidx.test.espresso.matcher.ViewMatchers).
Demo App Test Flow
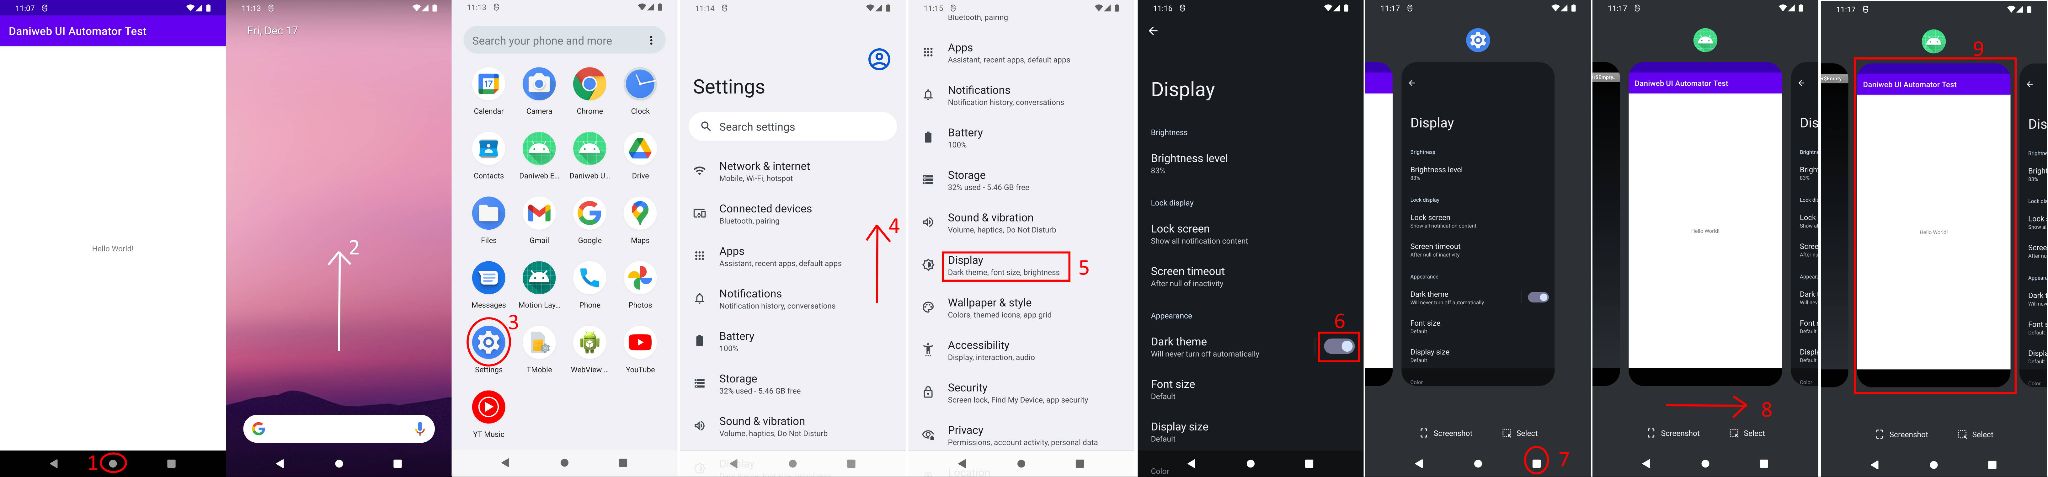
We are only using the default Empty Activity project to simplify the tutorial. For this UI Automator test, we will attempt to switch the App to the Dark theme using the system-wide Display setting on Android. The launcher used in the test is the default Android 12 launcher on a Pixel emulator (Pixel 4 XL API 31).
Our test includes 10 steps, when not including the Activity launcher step.
- When the demo App is the foreground App, press the Home button.
- Swipe up from anywhere on the home screen to open the launcher.
- Open the Settings app.
- After the Settings app is opened, swipe up a little to scroll down on the list.
- Open the Display setting.
- Switch on Dark theme.
- Open the Recents button.
- Swipe right to put our app into focus.
- Resume our App.
- Verify that our App is in Dark mode.
Refer to the picture below for a preview of the desired flow of the test.
UI Automator Viewer
Before we are able to write any code, we must use the UI Automator Viewer (uiautomatorviewer) tool to inspect the UI elements that we want to test. As of this writing, this tool can only be launched from the CLI.
uiautomatorviewer is part of the Android SDK and not part of IntelliJ, so you can find it where the SDK is installed. On a Windows machine, for my Android Studio build, the default location is at:
C:\Users\%USERNAME%\AppData\Local\Android\Sdk\tools\bin\uiautomatorviewer.batIf you are not using Windows, you can find the location of the Android SDK in IntelliJ by doing:
- File > Settings > Appearance & Behavior > System Settings > Android SDK
- Find the Android SDK Location property.
You can also just search for “Android SDK Location” using IntelliJ’s Search Everywhere functionality (press double Shift).
Launching UI Automator Viewer
From the builtin IntelliJ terminal, navigate to the UI Automator Viewer directory with the command below.
cd C:\Users\%USERNAME%\AppData\Local\Android\Sdk\tools\bin\Launch the uiautomatorviewer by calling uiautomatorviewer.bat.
…tools\bin\uiautomatorviewer.batAs of this writing, uiautomatorviewer only works if your JAVA_HOME is set to Java 8. You can also just create a wrapper around the uiautomator.bat file to modify JAVA_HOME just for the terminal session if you do not want to change your system-wide JAVA_HOME. The same workaround also applies to Linux/MacOS when JAVA_HOME is not set to Java 8.
After launching the uiautomatorviewer, make sure that your Emulator is running. Press the Device Screenshot button at the left corner of the uiautomatorviewer tool.
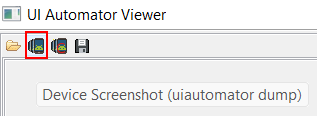
It will generate a static XML tree of UI elements that is currently on the screen.
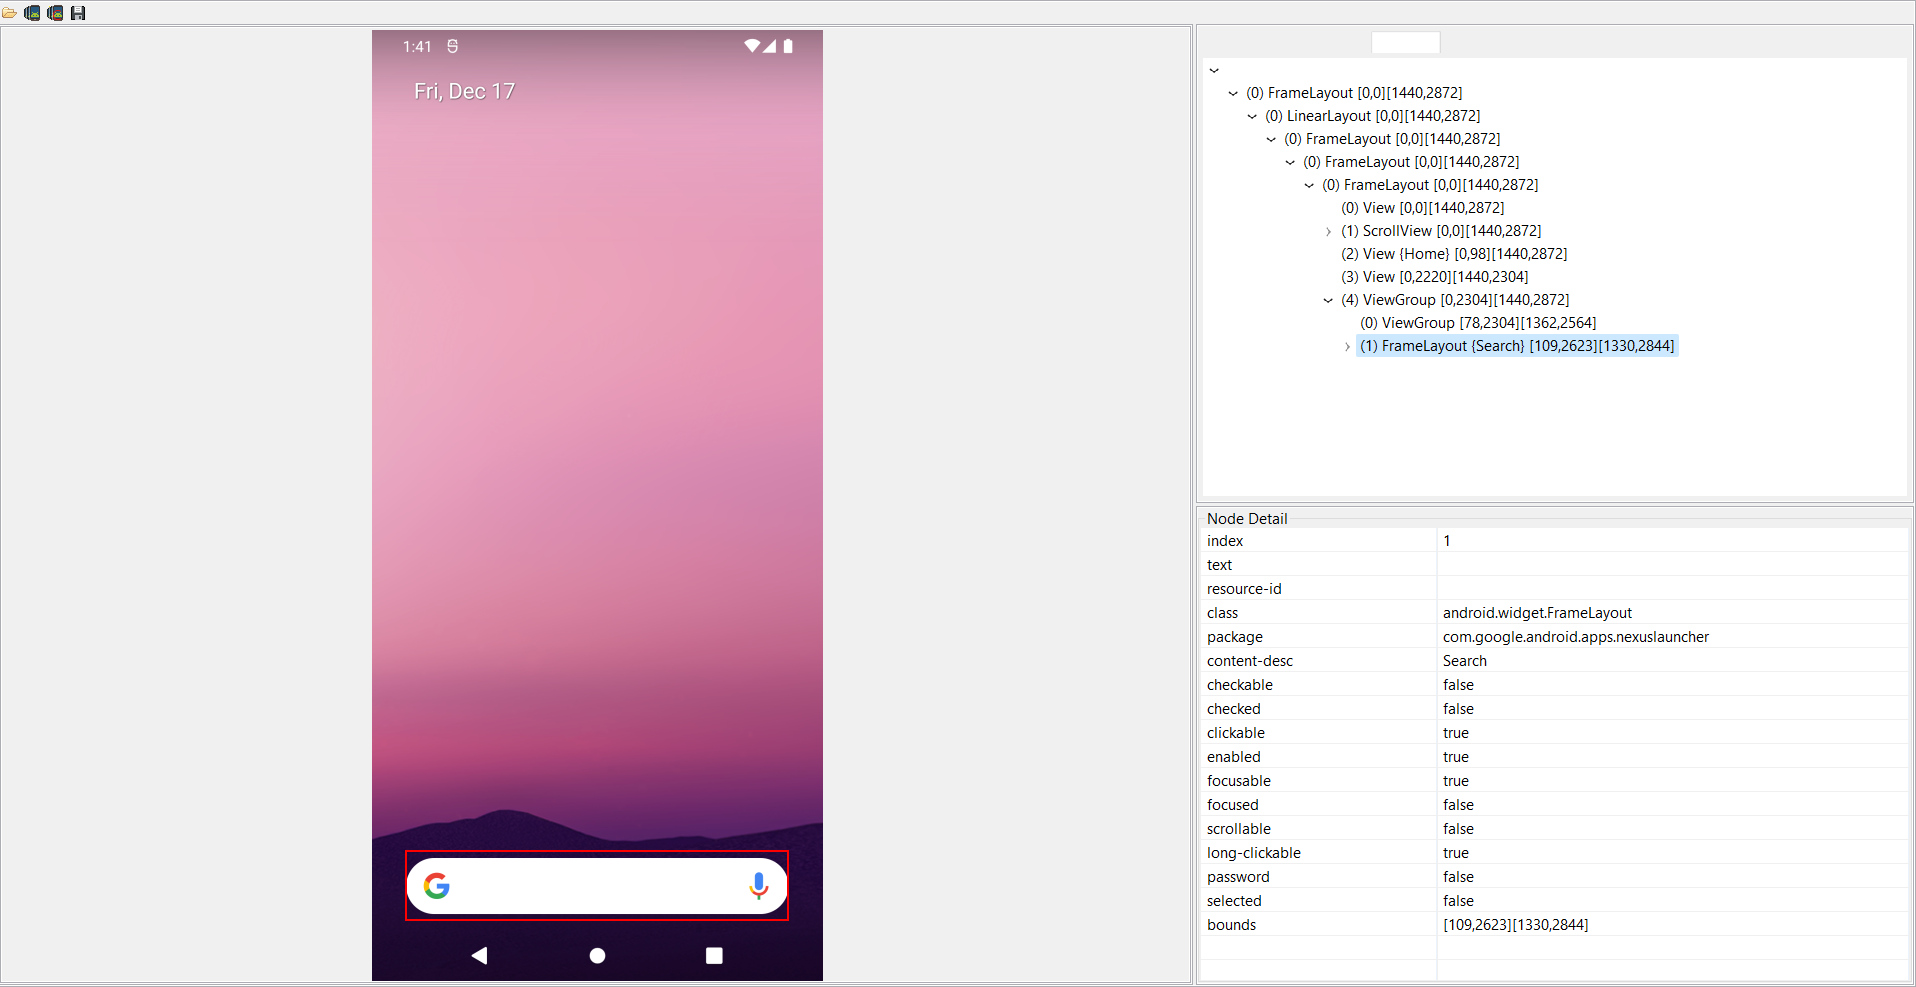
Using this tool, you can extract details about an element and use them to write your test code. Some useful node attributes are text, resource-id, class, package, content-desc. In the next section, we will see what a complete UI Automator test looks like.
Write Test Code
We are now ready to write our test.
-
In the ExampleInstrumentedTest file, remove the
useAppContext()test method. -
Set the ActivityScenarioRule in the class to launch our MainActivity when the test starts.
/** * Check https://developer.android.com/training/testing/junit-rules#activity-test-rule */ @get:Rule val activityScenarioRule = ActivityScenarioRule(MainActivity::class.java) -
Copy and paste the test function below into your test class.
 @Test
 fun testDarkModeSwitch(){
    //Obtains the instrumented device
    val device = UiDevice.getInstance(InstrumentationRegistry.getInstrumentation())

    device.pressHome() //Press the Home button

    val homeScreen = device.findObject(UiSelector() //Starts the findObject query
        .resourceId("android:id/content") //Tries to match the element resource id
        .className(FrameLayout::class.java) //Tries to match the element class name
        .packageName("com.google.android.apps.nexuslauncher")) //Tries to match the package name. UiDevice.getPackageName might be cleaner

    homeScreen.waitForExists(1_000) //this is one option to wait for the View to load

    homeScreen.swipeUp(10) //Swipes up to open the Launcher

    val settingsIcon = device.findObject(UiSelector()
        .resourceId("com.google.android.apps.nexuslauncher:id/icon")
        .className(TextView::class.java)
        .packageName("com.google.android.apps.nexuslauncher")
        .descriptionContains("Settings")
    )

    settingsIcon.waitForExists(1_000)

    settingsIcon.click()

    //UiScrollable provides better API to interact with the Settings RecyclerView
    val settingsView = UiScrollable(UiSelector()
        .resourceId("com.android.settings:id/main_content_scrollable_container")
        .className(ScrollView::class.java)
        .packageName("com.android.settings")
    )

    settingsView.waitForExists(1_000)

    val displayOption = device.findObject(UiSelector()
        .text("Display")
        .resourceId("android:id/title")
        .className(TextView::class.java)
        .packageName("com.android.settings")
    )

    settingsView.scrollIntoView(displayOption)

    displayOption.waitForExists(1_000)

    displayOption.click()

    val darkThemeSwitch = device.findObject(UiSelector()
        .resourceId("com.android.settings:id/switchWidget")
        .className(Switch::class.java)
        .packageName("com.android.settings")
        .descriptionContains("Dark theme")
    )

    darkThemeSwitch.waitForExists(1_000)

    darkThemeSwitch.click()

    device.pressRecentApps() //Recents is black box because uiautomatorviewer is unable to spy the Recents View

    device.pressKeyCode(KeyEvent.KEYCODE_APP_SWITCH)

    val app = device.findObject(UiSelector()
        .packageName("com.example.daniwebuiautomatortest")
    )

    app.waitForExists(1_000)

    val context = InstrumentationRegistry.getInstrumentation().targetContext

    val isDark = context
        .resources
        .configuration.
        isNightModeActive

    assert(isDark)
 }
A few notes about the code snippet above.
- It is quite long and the comments are too verbose, so it can be hard to read in real life, but I find it easier to read in a blog post because the method names are mostly self-explanatory. In real code, you should perform some refactoring to improve readability.
- The UI Automator Viewer is unable to spy the Navigation Buttons and the Recents screen, so
pressKeyCode()was used as a workaround. - My UiSelector queries were way overkill, but I mainly wanted to introduce the API.
Run the Test
We are now ready to run the test. Right-click on ExampleInstrumentedTest in the Project view and select Run ExampleInstrumentedTest.
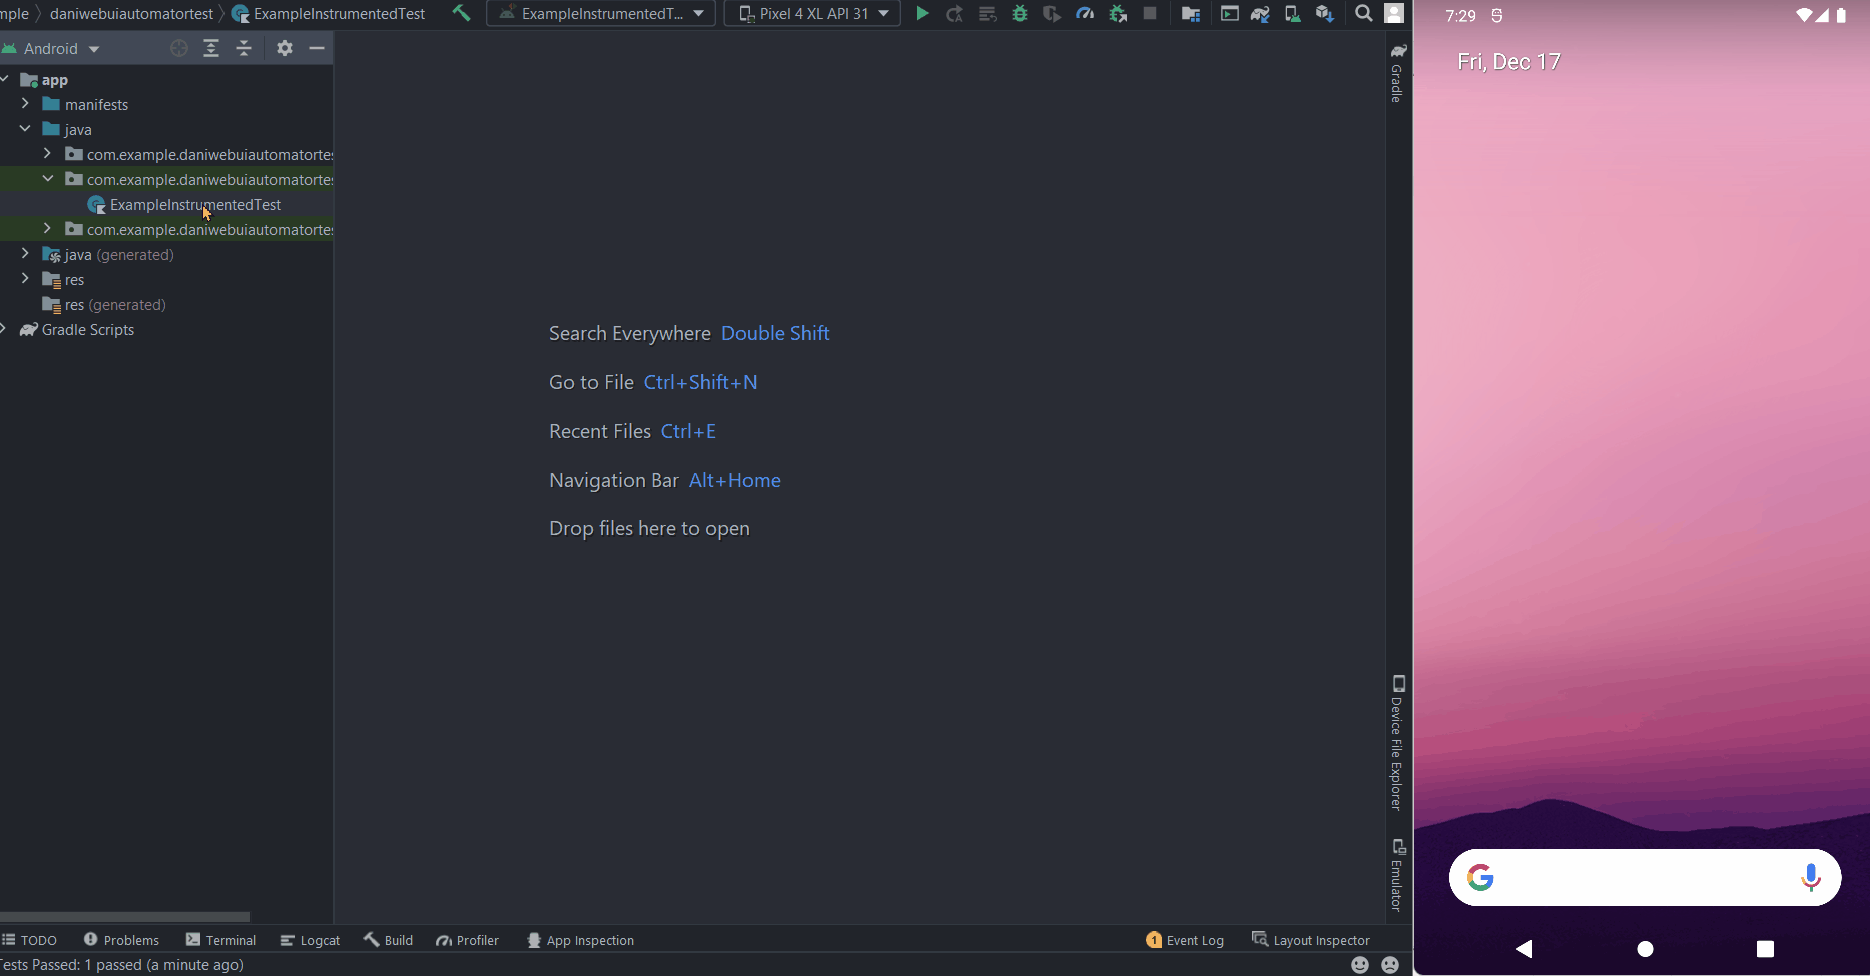
And we can see that the test has passed. The animation above was compressed to save bandwidth; the actual test takes about 7-12 seconds on my computer.
Solution Code
ExampleInstrumentedTest.kt
package com.example.daniwebuiautomatortest

import android.view.KeyEvent
import android.widget.FrameLayout
import android.widget.ScrollView
import android.widget.Switch
import android.widget.TextView
import androidx.test.ext.junit.rules.ActivityScenarioRule
import androidx.test.platform.app.InstrumentationRegistry
import androidx.test.ext.junit.runners.AndroidJUnit4
import androidx.test.uiautomator.*

import org.junit.Test
import org.junit.runner.RunWith

import org.junit.Rule

/**
* Instrumented test, which will execute on an Android device.
*
* See [testing documentation](http://d.android.com/tools/testing).
*/
@RunWith(AndroidJUnit4::class)
class ExampleInstrumentedTest {

   /**
    * Check https://developer.android.com/training/testing/junit-rules#activity-test-rule
    */
   @get:Rule
   val activityScenarioRule = ActivityScenarioRule(MainActivity::class.java)

   @Test
   fun testDarkModeSwitch(){
       //Obtains the instrumented device
       val device = UiDevice.getInstance(InstrumentationRegistry.getInstrumentation())

       device.pressHome() //Press the Home button

       val homeScreen = device.findObject(UiSelector() //Starts the findObject query
           .resourceId("android:id/content") //Tries to match the element resource id
           .className(FrameLayout::class.java) //Tries to match the element class name
           .packageName("com.google.android.apps.nexuslauncher")) //Tries to match the package name. UiDevice.getPackageName might be cleaner

       homeScreen.waitForExists(1_000) //this is one option to wait for the View to load

       homeScreen.swipeUp(10) //Swipes up to open the Launcher

       val settingsIcon = device.findObject(UiSelector()
           .resourceId("com.google.android.apps.nexuslauncher:id/icon")
           .className(TextView::class.java)
           .packageName("com.google.android.apps.nexuslauncher")
           .descriptionContains("Settings")
       )

       settingsIcon.waitForExists(1_000)

       settingsIcon.click()

       //UiScrollable provides better API to interact with the Settings RecyclerView
       val settingsView = UiScrollable(UiSelector()
           .resourceId("com.android.settings:id/main_content_scrollable_container")
           .className(ScrollView::class.java)
           .packageName("com.android.settings")
       )

       settingsView.waitForExists(1_000)

       val displayOption = device.findObject(UiSelector()
           .text("Display")
           .resourceId("android:id/title")
           .className(TextView::class.java)
           .packageName("com.android.settings")
       )

       settingsView.scrollIntoView(displayOption)

       displayOption.waitForExists(1_000)

       displayOption.click()

       val darkThemeSwitch = device.findObject(UiSelector()
           .resourceId("com.android.settings:id/switchWidget")
           .className(Switch::class.java)
           .packageName("com.android.settings")
           .descriptionContains("Dark theme")
       )

       darkThemeSwitch.waitForExists(1_000)

       darkThemeSwitch.click()

       device.pressRecentApps() //Recents is black box because uiautomatorviewer is unable to spy the Recents View

       device.pressKeyCode(KeyEvent.KEYCODE_APP_SWITCH)

       val app = device.findObject(UiSelector()
           .packageName("com.example.daniwebuiautomatortest")
       )

       app.waitForExists(1_000)

       val context = InstrumentationRegistry.getInstrumentation().targetContext

       val isDark = context
           .resources
           .configuration.
           isNightModeActive

       assert(isDark)
   }

}
activity_main.xml
<?xml version="1.0" encoding="utf-8"?>
<androidx.constraintlayout.widget.ConstraintLayout xmlns:android="http://schemas.android.com/apk/res/android"
   xmlns:app="http://schemas.android.com/apk/res-auto"
   xmlns:tools="http://schemas.android.com/tools"
   android:layout_width="match_parent"
   android:layout_height="match_parent"
   tools:context=".MainActivity">

   <TextView
       android:id="@+id/textView_helloWorld"
       android:layout_width="wrap_content"
       android:layout_height="wrap_content"
       android:text="Hello World!"
       app:layout_constraintBottom_toBottomOf="parent"
       app:layout_constraintLeft_toLeftOf="parent"
       app:layout_constraintRight_toRightOf="parent"
       app:layout_constraintTop_toTopOf="parent" />

</androidx.constraintlayout.widget.ConstraintLayout>
build.gradle
plugins {
   id 'com.android.application'
   id 'kotlin-android'
}

android {
   compileSdk 31

   defaultConfig {
       applicationId "com.example.daniwebuiautomatortest"
       minSdk 21
       targetSdk 31
       versionCode 1
       versionName "1.0"

       testInstrumentationRunner "androidx.test.runner.AndroidJUnitRunner"
   }

   buildTypes {
       release {
           minifyEnabled false
           proguardFiles getDefaultProguardFile('proguard-android-optimize.txt'), 'proguard-rules.pro'
       }
   }
   compileOptions {
       sourceCompatibility JavaVersion.VERSION_1_8
       targetCompatibility JavaVersion.VERSION_1_8
   }
   kotlinOptions {
       jvmTarget = '1.8'
   }
}

dependencies {

   implementation 'androidx.core:core-ktx:1.7.0'
   implementation 'androidx.appcompat:appcompat:1.4.0'
   implementation 'com.google.android.material:material:1.4.0'
   implementation 'androidx.constraintlayout:constraintlayout:2.1.2'
   testImplementation 'junit:junit:4.+'
   androidTestImplementation 'androidx.test.ext:junit:1.1.3'
   androidTestImplementation 'androidx.test.espresso:espresso-core:3.4.0'
   androidTestImplementation 'androidx.test.uiautomator:uiautomator:2.2.0'
}
Summary
We have learned how to use UI Automator library to create tests as well as how to use the uiautomatorviewer tool to design tests. The full project code can be found here https://github.com/dmitrilc/DaniwebUiAutomatorTest