Large language models are trained on a fixed corpus, and their knowledge is often limited by the documents they are trained on. Techniques like retrieval augmented generation, continuous pre-training, and fine-tuning enhance an LLM's default knowledge. However, these techniques can still not enable an LLM to answer queries that require web searching.
AI agents use a term tool that allows LLMs to access external knowledge sources such as databases, APIs, and the Internet. To simplify this procedure, OpenAI has introduced a Web Search API that allows you to search the Internet using natural queries through large language models.
You can integrate the Web Search API in Python using the OpenAI Python library. However, most advanced agentic applications in Python are developed using an orchestration framework such as LangGraph. Therefore, it is important to understand the process of integrating the Web Search API in LangGraph.
This article will show you how to integrate the OpenAI Web Search Preview API in a LangGraph node. After reading this article, you can develop LangGraph applications that involve searching the Internet using the OpenAI Web Search Preview API.
So, let's begin without ado.
Importing and Installing Required Libraries
The following script installs the libraries required to run the codes in this article. We will also install the graphviz and libgraphviz libraries to draw the graph diagrams.
# !sudo apt-get update
# !sudo apt-get install -y graphviz libgraphviz-dev

!pip install -U -q \
langgraph langchain-openai langchain-core \
openai pydantic graphviz pygraphviz
The script below imports the required libraries into your Python application.
from typing_extensions import TypedDict
from langchain_openai import ChatOpenAI
from IPython.display import Image, display
from langgraph.graph import StateGraph, START
from langgraph.checkpoint.memory import InMemorySaver
from langgraph.store.memory import InMemoryStore
from langchain_core.messages import AIMessage, HumanMessage
from google.colab import userdata
Binding the Web Search Tool to an LLM
The first step is to configure the web search tool we will use in a LangGraph node.
The OpenAI Web Search API is integrated as the web_search_preview tool in LangGraph. You need to pass this as a value to the type key in a Python dictionary. Next, define your LLM and call the bind_tools() function to bind the list of tools to the LLM.
OPENAI_API_KEY = userdata.get('OPENAI_API_KEY')

search_tool = {"type": "web_search_preview"}
llm_base    = ChatOpenAI(
    model="gpt-4o-mini",
    openai_api_key = OPENAI_API_KEY,
    temperature=0,
    use_responses_api=True
)
llm = llm_base.bind_tools([search_tool])
Once we have a Web Search tool attached to an LLM, we can use the LLM in a LangGraph node.
Creating a LangGraph Graph Using the Web Search Tool
We will start by creating a graph state that contains three attributes:
the user input, the AI message (response from the LLM), and the output, which contains the response's content.
Next, we define the ask_web() function, which accepts user input and generates a response using an LLM. The response is stored in the state graph's ai_msg attribute.
Finally, we define another function() that returns the content attribute of the LLM response.
class WebState(TypedDict):
    input: str
    ai_msg: AIMessage
    output: str

def ask_web(state: WebState) -> WebState:       # State -> Partial
    msg = llm.invoke(state["input"])            # tool call happens automatically
    return {"ai_msg": msg}

def respond(state: WebState) -> WebState:
    return {"output": state["ai_msg"].content}
We will create a LangGraph with two nodes, ask_web and respond, which call the methods we defined above with the same names.
builder = StateGraph(state_schema=WebState)
builder.add_node("ask_web", ask_web)
builder.add_node("respond", respond)

builder.add_edge(START, "ask_web")              # start → first node
builder.add_edge("ask_web", "respond")          # ask_web → respond

# entry & finish points
builder.set_entry_point("ask_web")
builder.set_finish_point("respond")

graph = builder.compile()


png_bytes = graph.get_graph().draw_png()   # raw binary
display(Image(data=png_bytes, format="png"))
Output:
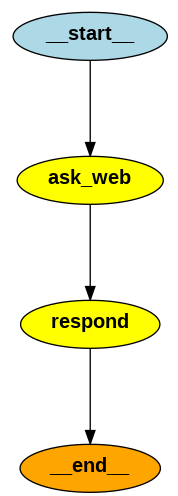
The above image shows the flow of our graph with two nodes. The graph routes every request to the Web Search tool and returns the response to the user.
Searching the Web
To conduct an online search, we can invoke the graph using the invoke function like any other LangGraph object.
Let's ask a question that requires Web Search.
res = graph.invoke({"input": "What is the temperature today in Paris? What is the todays date?"})
print(res['output'][0]['text'])
Output:
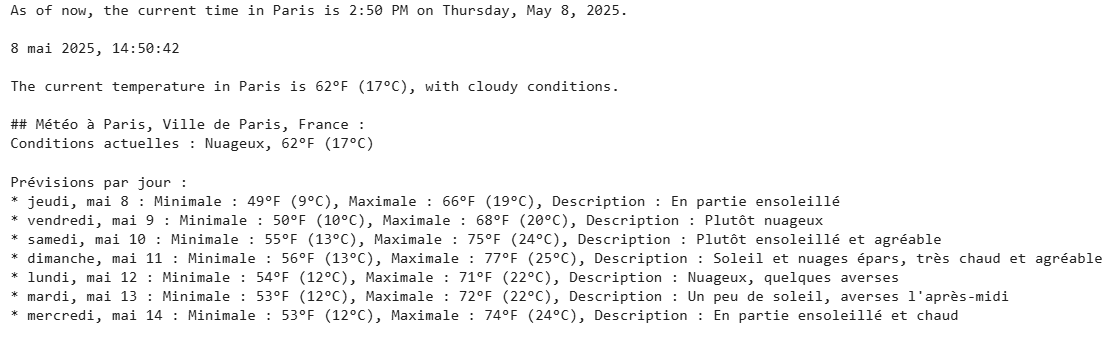
The above output shows that we get the correct output (I verified it).
Let's ask another question that involves referring the recent past.
res = graph.invoke({"input": "Who won the champions league game last night?"})
print(res['output'][0]['text'])
Output:

Again, the model correctly returns the results of the game one day before.
Finally, you can extract URL sources from the LLM response using the following script.
sources = [annot['url'] for annot in res['output'][0]['annotations']]
sources
Output:

Conclusion
Web search is an integral requirement for many advanced agentic applications. This article explains how to integrate OpenAI Web Search API in LangGraph. With the knowledge gained, you can now build advanced LangGraph applications incorporating web search.