Introduction
In Android development, the current recommended library for Dependency Injection is Hilt. The most obvious benefits of using Hilt are reduced boilerplate code and lifecycle-aware components(and their associated annotations).
Hilt is a great library, but it is not perfect. Hilt is built on top of Dagger 2, so the terminologies and concepts are hard to understand for developers who did not use Dagger before being introduced to Hilt.
This tutorial introduces Dagger 2 in its original form using Kotlin to make it easy for Kotlin-only developers to follow. The main feature that we are going to look at in this tutorial is constructor dependency injection using Dagger 2.
Goals
At the end of this tutorial, you would have learned:
- How to use Dagger constructor injection.
Prerequisite Knowledge
- What dependency injection is.
- Basic Kotlin.
Tools Required
- IntelliJ Community Edition.
Project Setup
First we need to set up our Kotlin project:
- In IntelliJ, go to File > New > Project.
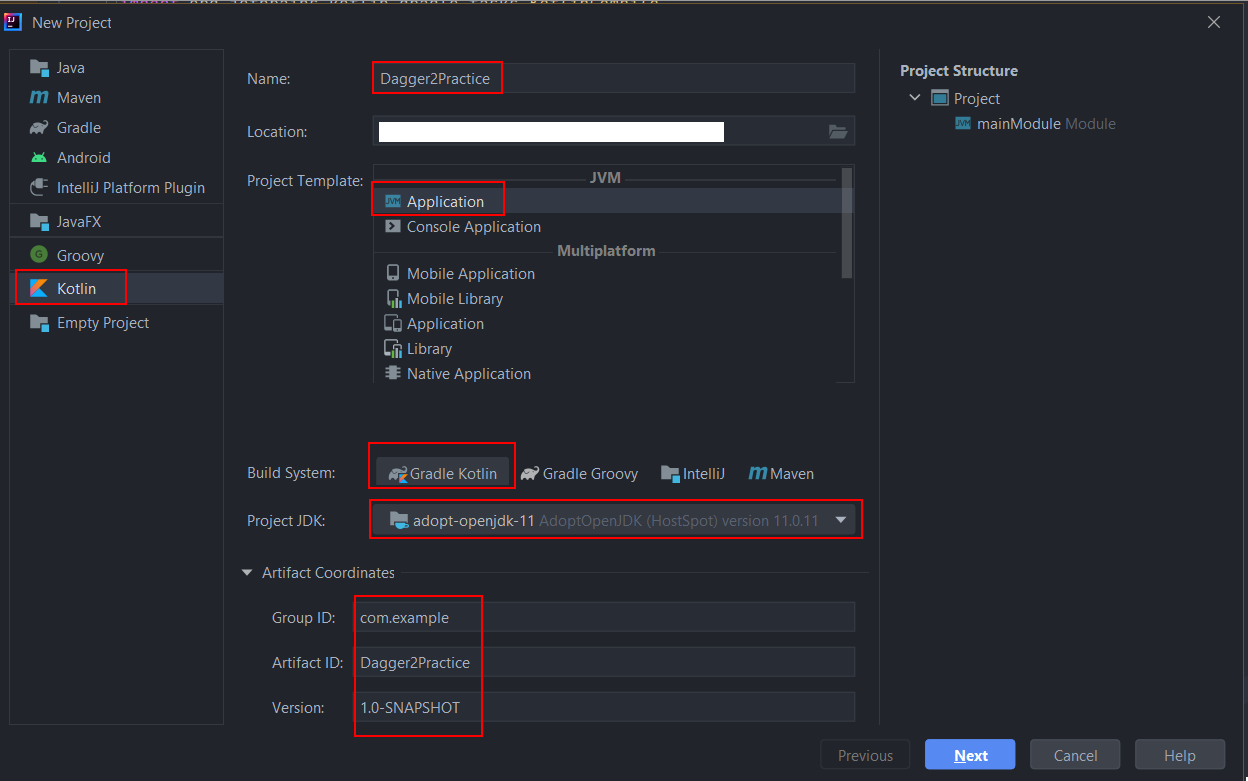
- In the New Project wizard:
a. Select Kotlin on the left hand side.
b. Use Dagger2Practice as project name(optional).
c. You can leave the Location as default if you wish.
d. Project Template is Application.
e. Build System is Gradle Kotlin.
f. Project JDK is set at Java 11. I find this version to be most stable when working with Kotlin.
g. Group ID is com.example.
h. Artifact ID is Dagger2Practice.
i. Version is 1.0-SNAPSHOT.
j. This is how the project setting looks like:
-
Click Next.
-
Leave the next screen as default and click Finish. Wait a few seconds for the project to build.
-
Copy and paste this exact same gradle configuration below into your
build.gradle.ktsfile.import org.jetbrains.kotlin.gradle.tasks.KotlinCompile plugins { kotlin("jvm") version "1.5.30" kotlin("kapt") version "1.5.30" } group = "com.example" version = "1.0-SNAPSHOT" repositories { mavenCentral() google() } dependencies { kapt("com.google.dagger:dagger-compiler:2.38.1") implementation("com.google.dagger:dagger:2.38.1") testImplementation("org.jetbrains.kotlin:kotlin-test:1.5.21") } tasks.test { useJUnitPlatform() } tasks.withType<KotlinCompile>() { kotlinOptions.jvmTarget = "1.8" } -
In your IDE, go to Build -> Build Project. This will bring in necessary libraries and annotation processing for your project.
-
Under the
kotlindirectory, create the packages below. Later on, we will put Dagger boilerplate code in them.com.example.component com.example.module -
Create a new file
Entry.ktunder thepackage com.example. This is where your main function lives, so create amain()function here. -
To be able to use DI, we are going to need an object that depends on some other objects. Under the package
com.example, create a data class calledStore.Storewill depend on two other classes that we will tell Dagger to inject them at runtime. Copy the source code below intoStore.kt. Don’t worry if the code does not compile for now.package com.example; import javax.inject.Inject data class Store @Inject constructor (val manager: Manager, val employee: Employee) -
Under the
com.examplepackage, create aManagerinterface. Copy the code below intoManager.kt.package com.example interface Manager -
Also under
com.example, create a data class calledEmployee. This data class has one string field to store the employee name.package com.example data class Employee(val name: String)
Concept Overview
For Dagger to create a Store object at runtime, we have to configure the whole dependency graph, teaching Dagger how to construct objects with configurable constructors or instances of interfaces.
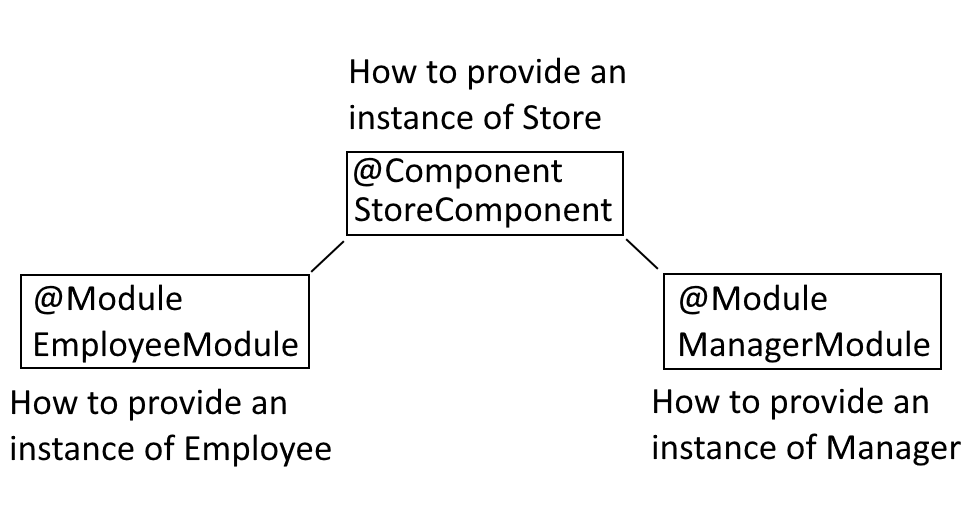
At the top of a dependency graph is a Component. A Component is an interface with an abstract function returning the type of the instance we want (Store in this case). We can provide Modules to a Component to help it complete its dependency graph.
A Module here is not a gradle or Java module. It is a class/interface that contains functions providing the dependency objects at runtime. Have you noticed that Manager is an interface and Employee is a configurable class? Dagger requires the developer to teach it how to provide instances for both.
Employee Module
Let us satisfy Dagger’s requirements one by one, starting with an argument of type Employee for the Store class.
Under com.example.module, create an EmployeeModule abstract class.
    package com.example.module

    import com.example.Employee
    import dagger.Module
    import dagger.Provides

    @Module //1
    abstract class EmployeeModule {

       companion object { //2
           @Provides //3
           fun provideEmployee() = Employee("Anna") //4
       }

    }
Here are the explanations for the code above:
- The
@Moduleannotation at line 1 marks the class as a Dagger module. - We put the function that provides an Employee inside a companion object to make static and Dagger does not have to instantiate EmployeeModule at runtime.
- The
@Providesannotation marks the function as a function that provides a dependency object instance. - The function
provideEmployee()returns an Employee of the name Anna at runtime. By convention, the method name for a@Providesannotation should start with “provide”.
Manager Module
Now that we are finished with the EmployeeModule, we have to teach Dagger how to provide an instance of Manager next.
Let’s not use the @Provides annotation again. Dagger has another annotation that is @Binds. @Binds works differently to @Provides. A @Binds function is abstract and “binds” the function argument as the return value.
Under com.example.module, create a ManagerModule interface.
    package com.example.module

    import com.example.Manager
    import com.example.ManagerImpl
    import dagger.Binds
    import dagger.Module

    @Module //1
    interface ManagerModule { //2

       @Binds //3
       fun bindManager(managerImpl: ManagerImpl): Manager //4

    }
As you can see, the function bindManager takes a ManagerImpl argument (that we have not created yet). This ManagerImpl type must be on the dependency graph and it must implement Manager. Under com.example, create a ManagerImpl class that implements Manager.
    package com.example

    import javax.inject.Inject

    class ManagerImpl @Inject constructor(): Manager
Notice that the constructor of ManagerImpl is an empty no-args constructor marked with @Inject. Dagger knows that this class can be instantiated by calling the empty constructor, which will make it easy for it to pass into the bindManager() function defined previously.
Store Component
Now that we have configured both of the Modules in the dependency graph, the final step is to declare the StoreComponent.
Under com.example.component, create an interface called StoreComponent.
    package com.example.component

    import com.example.Store
    import com.example.module.EmployeeModule
    import com.example.module.ManagerModule
    import dagger.Component

    @Component(modules = [ManagerModule::class, EmployeeModule::class]) //1
    interface StoreComponent { //2
       fun store(): Store //3
    }
A Component needs to be annotated with @Component. This annotation takes a list of class objects for the Modules. By passing in the module classes, we declare that these modules can be used to generate an implementation of StoreComponent. The implementation class will be prefixed with Dagger and the rest of the class name is the same as the interface name.
Go back to our main function (in Entry.kt), and copy the code below into your IDE.
    import com.example.Store
    import com.example.component.DaggerStoreComponent

    fun main(){
       val store: Store = DaggerStoreComponent.create().store()
       println(store.employee)
       println(store.manager)
    }
To get an instance of Store, we simply call the Dagger-generated implementation DaggerStoreComponent -> create() -> store().
store() is the abstract function that we declared earlier.
You might have to go to Rebuild the project for the generated class to show up and for your code to compile.
Solution Code
The full project code can be found here https://github.com/dmitrilc/DaniWebDagger2Constructor/tree/master
Summary
If you look at the final source code folder, you might have noticed that we created quite a lot of boilerplate code just for Dagger: 2 modules and one component. Dagger 2 is somewhat complex to set up, but it is worth it for large projects.