Introduction
Among all of the Android libraries, Paging 3 is perhaps one of the hardest to understand.
Personally, I think the problem with Paging 3 are:
-
Developers need to learn a lot of custom classes before they can understand how Paging 3 works under the hood and how to use the library to its fullest potential. The list of classes is long. It includes:
CombinedLoadStates ConcatAdapter DiffUtil LoadState LoadStateAdapter LoadStates LoadType Pager PagingConfig PagingData PagingDataAdapter PagingSource PagingSource.LoadResult PagingState RemoteMediator RemoteMediator.MediatorResult -
You will have to dig deep into Pager/PagingDataAdapter source code to understand how PagingSource and PagingData are invalidated. Because you are not in control of creating PagingData yourself, how the PagingSource/PagingData pair is created and invalidated can be too magical for comfort.
-
Unlike other libraries that only provide functionality for a specific layer, Paging 3 library classes span across multiple layers of your App: UI, ViewModel, Repository, Database.
On the bright side… The final result is not a lot of code, and using this pre-made library would still most likely be simpler than rolling your own.
Paging 3 can operate in two different modes. The first mode only displays paged data from a network without an offline database as a cache. In the second mode, you can enlist a local Room database to use as your cache, for offline support.
In this tutorial, we will learn how to use Paging 3 without an offline database.
Goals
At the end of the tutorial, you would have learned:
- How to use PagingSource to display data from the network.
Tools Required
- Android Studio. The version used in this tutorial is Bumblebee 2021.1.1 Patch 3.
Prerequisite Knowledge
- Intermediate Android.
- MVVM.
- Hilt.
- Kotlin Flow.
- Retrofit.
- Moshi.
- ViewBinding.
- DataBinding.
Project Setup
To follow along with the tutorial, perform the steps below:
- Clone the sample app called CatFacts from https://github.com/dmitrilc/CatFacts.git
- Switch to the No_RemoteMediator branch.
Project Overview
The project is already completed, but we will walk through the built app to learn what happens at each step.
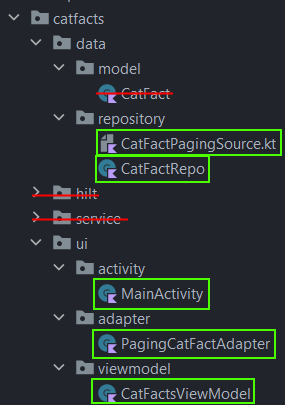
In the screenshot of the project structure below, we are only concerned about the classes in green. It is okay to ignore the packages and classes in red because they are not really interesting to the current topic; they are just Hilt and Retrofit classes if you are curious.
You can run the app now. It is just a RecyclerView that displays cat facts received from the Cat Facts API. As you reach the end of the list, it will reach out to the network to get more data. You can also verify this behavior by using the Network Inspector. Refer to the animation below as a reference.
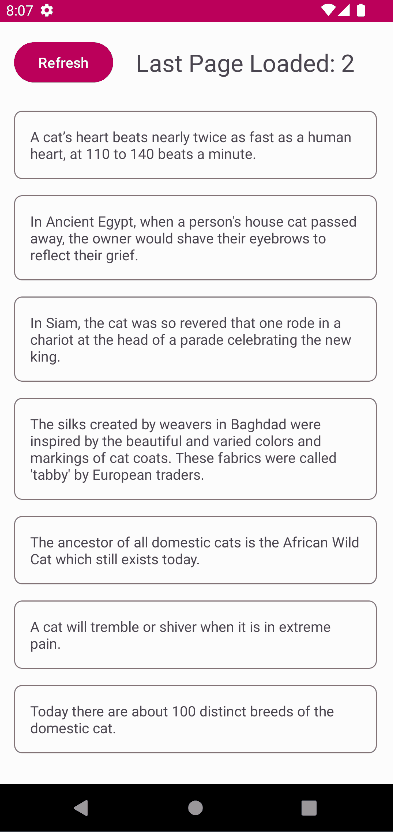
The App also has a button to trigger a refresh, which causes Pager to reload data at a specified location.
App Architecture
To understand the app’s architecture, we can refer to the diagram below.
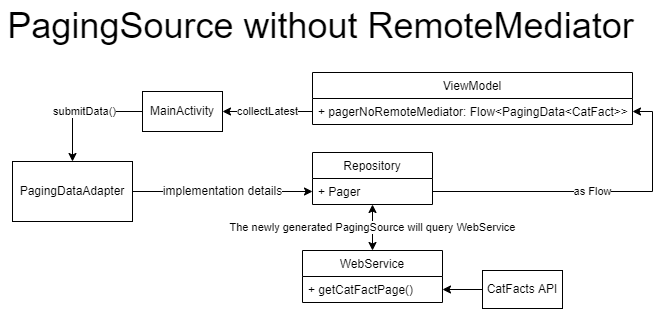
In the diagram above, how PagingDataAdapter loads another item is mostly hidden from us, so we can just call it implementation details. Because implementation details are subject to change, It is really not worth it to divulge them in this tutorial. Though if you are still confused and wants to know what happens, you can start with debugging backwards at the beginning of the CatFactPagingSource#load() function.
The classes PagingDataAdapter, MainActivity, CatFactsViewModel, CatFactRepo, Pager, and WebService all exist within the project code. This is what the app does:
-
At first launch, the Repository prefetches enough data to display on the screen. It might load one or two pages, depending on the height of the screen and how many facts can fit.
-
As the user scrolls to the bottom of the RecyclerView, PagingDataAdapter signals the Pager to load more items, invalidating the current generation (PagingSource/PagingData pair) as well as generating a new generation.
-
After the new pair of PagingSource/PagingData is generated, a new PagingData object is pushed to the PagingDataAdapter.
-
At the top of the App, there is a Button to to manually trigger a
refresh()action. This app always start from the beginning because I am trying to avoid business logic overload in this tutorial, which can lead to unnecessary complexity. Just keep in mind that this refresh feature is very situational and not all Apps will need it, but we are still required to override it. -
I have also injected a callback into CatFactPagingSource, which can be used to update the UI of the last loaded page. This is just to confirm that the refresh is working correctly. This step is entirely optional.
Implementing PagingSource
When using Paging 3 without an offline database, you must first define a custom implementation of PagingSource yourself. The only two functions that you need to override are load() and getRefreshKey().
In CatFactPagingSource.kt, our implementation of load() is as below.
override suspend fun load(params: LoadParams<Int>): LoadResult<Int, CatFact> {
   try {
       // Start refresh at page 1 if undefined.
       val position = params.key ?: CAT_FACTS_STARTING_PAGE_INDEX
       pageNumberUpdater(position)

       val response = webService.getCatFactPage(position)
       val catFacts = response.data

       val prevKey = if (position == CAT_FACTS_STARTING_PAGE_INDEX) {
           null //if current position is the same as the starting position
       } else {
           position - 1
       }

       val nextKey = if (catFacts.isEmpty()){
           null //if there is no more data to load in the current direction
       } else {
           position + 1
       }

       return LoadResult.Page(
           data = catFacts,
           prevKey = prevKey,
           nextKey = nextKey
       )
   } catch (exception: IOException) {
       return LoadResult.Error(exception)
   } catch (exception: HttpException) {
       return LoadResult.Error(exception)
   }
}
Let us go through this code line by line.
-
The function
load()has a parameter of type LoadParams. An internal implementation will provide the argument when it callsload(). The most important properties of LoadParams would be its public propertieskeyandloadSize. -
Typically, the
keyusually come from 4 different places:
A. The previous or the next key that you have provided to the previous generation, depending on the LoadType (APPEND or PREPEND).
B. The key from thegetRefreshKey()function.
C. TheinitialKeyproperty when constructing the Pager.
D. A custom key defined by you. For example, in this App, we used the constantCAT_FACTS_STARTING_PAGE_INDEXas the initial key. -
The other property of LoadParams,
loadSizeindicates how many items to load. This is the numberpageSizepassed to the PagingConfig in the CatFactRepo.kt file. Theload()function is not required to use this property if it does want to. -
You are in control of how you want to calculate the previous and next keys. This heavily depends on the remote API that you are fetching from. For this App, we simply add or subtract one to the current key depending on the scrolling direction.
-
Lastly, we must return a LoadResult object, which can be a LoadResult.Page on success or LoadResult.Error/LoadResult.Invalid if something went wrong. All three classes Page, Error, and Invaliad are subclasses of LoadResult.
Next, we will have to override getRefreshKey() as well. Our current implementation is as below.
override fun getRefreshKey(state: PagingState<Int, CatFact>): Int? {
   /*
   This will always start loading from the beginning.
   Same effect as return AT_FACTS_STARTING_PAGE_INDEX.
   */
   return null
   //If you want the list to resume at page 5, return 5, etc..
}
We are simply returning null, which the load() function will receive and then resets the key back into CAT_FACTS_STARTING_PAGE_INDEX, which will starts loading page one or page two as well, depending on whether the loaded items can fill the viewport.
Creating a Pager
To connect the UI and the Data layers, we would need to use a Pager object. The code below illustrates how to create a Pager.
fun getCatFactPagerWithoutRemoteMediator(): Flow<PagingData<CatFact>> =
   Pager(
       config = PagingConfig(pageSize = 1)
   ) {
       CatFactPagingSource(webService){ page ->
           _currentPage.value = "$page"
       }
   }
       .flow
After creation, its only public property is flow, which can be collected in other layers. There exists an extension function that exposes this flow as a LiveData as well.
Creating the PagingDataAdapter
To consume the Flow<PagingData<T>>, we must use a special RecycleView Adapter called PagingDataAdapter.
class PagingCatFactAdapter : PagingDataAdapter<CatFact, PagingCatFactAdapter.CatFactViewHolder>(DiffCallback) {

   class CatFactViewHolder(val binding: CatFactBinding) : RecyclerView.ViewHolder(binding.root){}

   override fun onCreateViewHolder(parent: ViewGroup, viewType: Int) =
       CatFactViewHolder(
           CatFactBinding.inflate(
               LayoutInflater.from(parent.context),
               parent,
               false
           )
       )

   //Binds data to a viewholder
   override fun onBindViewHolder(holder: CatFactViewHolder, position: Int) {
       val item = getItem(position)
       if (item != null) {
           holder.binding.catFact.text = item.fact
       }
   }

   object DiffCallback : DiffUtil.ItemCallback<CatFact>() {
       override fun areItemsTheSame(old: CatFact, new: CatFact) = old == new
       override fun areContentsTheSame(old: CatFact, new: CatFact) = old.fact == new.fact
   }

}
The implementation is very similar to a normal adapter, there are only 3 main differences.
- You must subclass PagingDataAdapter.
- PagingDataAdapter requires a DiffUtil.ItemCallback in its constructor, which you must implement as well. Your implementation of DiffUtil.ItemCallback must know how to compare the objects and its contents.
- You do not have to implement
getItemCount()yourself.
Connecting Pager to PagingDataAdapter
Lastly, we must collect the Flow from the Pager, and then submit it to PagingDataAdapter in the Activity or Fragment.
lifecycleScope.launch {
   viewModel.pagerNoRemoteMediator.collectLatest {
       adapter.submitData(it)
   }
}
Run the App
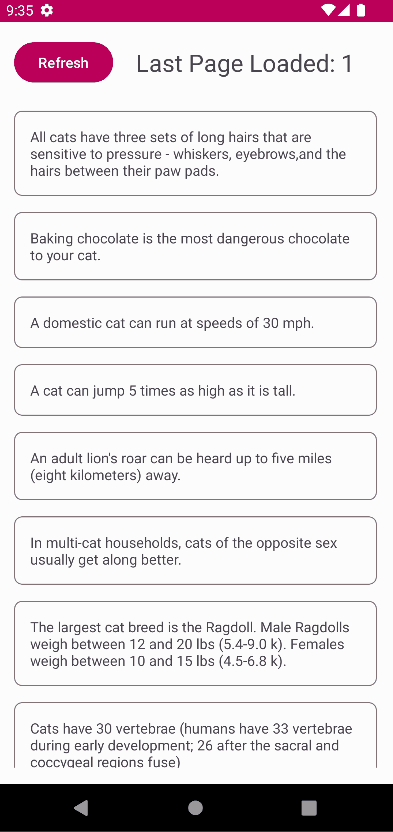
Now that we have understood everything, it is time to run the App again to see how the refresh functionality works.
Summary
Congratulations! We have learned how to use Paging 3 without offline support in this tutorial. If you are interested in learning how to use Paging 3 with offline support as well, check out the RemoteMediator tutorial here. The full project code can be found at https://github.com/dmitrilc/CatFacts/tree/No_RemoteMediator