Understanding facial expressions is crucial for various tasks, from recognizing emotions to enhancing security measures. While extracting faces from pictures is easy, doing the same in videos is tricky. Imagine creating videos with only highlighted facial expressions, offering a unique perspective on human interactions.
Various tools are available for face detection, but deepface stands out as the best choice due to its implementation of state-of-the-art deep-learning algorithms. Additionally, deepface is open-source, allowing you to modify it according to your specific use case.
In this tutorial, you will use the deepface library to detect faces from videos. By the end of this tutorial, you will be able to extract faces from videos and create new videos containing only facial expressions from the original videos. So let's begin without ado.
Installing and Importing Required Libraries
The following pip command installs the deepface and moviepy libraries. We will use the deepface library to extract frames containing faces from the input video. The moviepy library will be used to stitch facial frames to recreate the video containing only faces.
! pip install deepface
! pip install moviepy
The following script imports the library required to execute scripts in this article.
import cv2
from matplotlib import pyplot as plt
from deepface import DeepFace
import numpy as np
from moviepy.editor import *
import math
Extracting Faces from Images
This is relatively straightforward. Let's see an example.
We have the following input image, and we want to detect and crop the face from this image.

Image Source: Pixabay
To extract faces in an image, call the extract_faces() method from the DeepFace module and pass it one or multiple image paths. You can also pass the target size for the extracted face image. Finally, you must pass the deep-learning model for face detection to the detector_backend attribute. In the following script, we pass the retinaface model, one of the state-of-the-art models for face detection. Among the other models, you can use VGG-Face, Google FaceNet, OpenFace, Facebook DeepFace, DeepID, ArcFace, Dlib, and SFace. See the official documentation for more details.
image_path = r"D:\ronaldo.jpg"

face = DeepFace.extract_faces(img_path = image_path,
        target_size = (224, 224),
        detector_backend = "retinaface"
)

face
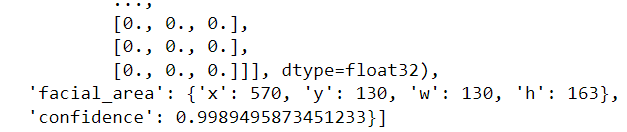
The above output shows the x and y coordinates and the width and height for the detected face bounding box. You can also see the prediction confidence, which, in this case, is 99.89%.
You can plot the cropped face using the following script:
plt.imshow(face[0]['face'])

Extracting Faces from Videos
Extracting faces from images is quite simple, as you can see. However, extracting faces from videos can be tricky. To accomplish this, I devised a simple strategy:
- Extract all the frames from a video.
- Extract faces from each frame using the
DeepFace.extract_faces()method. - Stitched all the extracted frames together using the moviepy module to create an output video.
Let's see how to do this.
I will define a simple function that takes the path of the input video as input. The function will use OpenCV to extract frames from the video. Each frame will be treated as an independent image for retrieving the extracted face. We will only keep frames where the prediction confidence for face detection is > 0.990.
The function returns a list of NumPy arrays for all the frames with extracted faces. Additionally, I will return the frame rate and the path name of the input file. The frame rate will be used to recreate the video, and the path name will be used for the output video. You can assign a different path name if you want.
def get_facial_frames(video_path):

    faces = []
    cap = cv2.VideoCapture(video_path) # read video file
    fps = cap.get(cv2.CAP_PROP_FPS)
    fps = math.ceil(fps)
    path = os.path.basename(video_path)

    i = 0
    while cap.isOpened():
        i = i + 1

        ret, frame = cap.read()

        if not ret:
            break

        face_props = DeepFace.extract_faces(img_path = frame,
                                           target_size = (224, 224),
                                           detector_backend = "retinaface",
                                           enforce_detection = False
                                           )


        frame  = cv2.cvtColor(face_props[0]['face'], cv2.COLOR_BGR2RGB)
        frame  = cv2.cvtColor(frame, cv2.COLOR_BGR2RGB)


        confidence = face_props[0]['confidence']
        if confidence > 0.990:
            features_dict = {"frames":frame,
                             "confidence": confidence}
            faces.append(features_dict)

        if (i % 10 == 0) and i > 1:
            print(f"Total frames processed {i}")

    return faces, fps, path
Let's test the above function. We will extract frames from this YouTube short. I downloaded the YouTube video and renamed it test_video.mp4.
The following script extracts frames from the video:
video_path = r"D:\test_video.mp4"
video_frames, fps, path  = get_facial_frames(video_path)
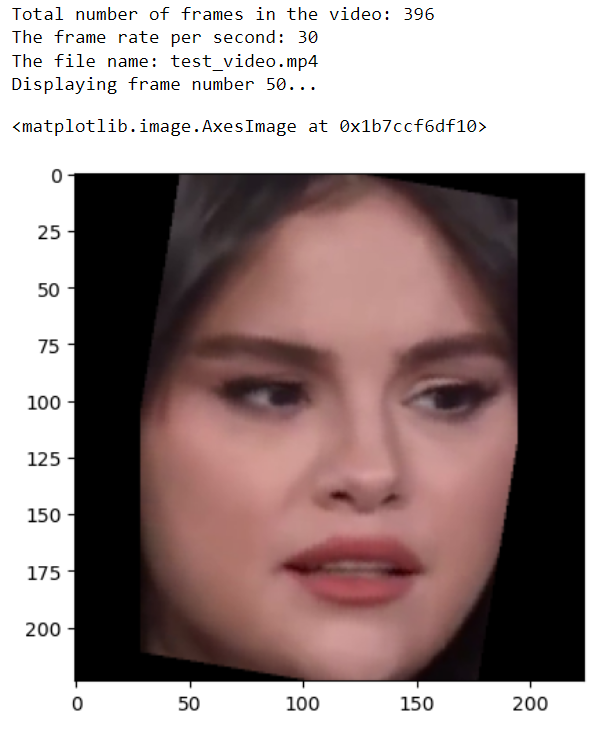
Once all frames are extracted, you can print the video details along with displaying a random frame from the video:
print(f"Total number of frames in the video: {len(video_frames)}")
print(f"The frame rate per second: {fps}")
print(f"The file name: {path}")
frame_number = 50
print(f"Displaying frame number {frame_number}...")

image = video_frames[frame_number]['frames']
plt.imshow(image)
Now, we have extracted all the frames. The next step is to stitch all the frames to create the output video. You can do so using the moviepy library.
The following script first converts the video frames from float values between 0 and 1 to unsigned integer values between 0 and 255 since the moviepy library's ImageSequenceClip() method expects the list of input video frames in this format.
Next, we will create an object of theImageSequenceClip() class and pass it all our image frames along with the frame rate per second. Finally, we will call the write_videofile() method to write our video file.
image_frames = []
for video_frame in video_frames:
a = video_frame['frames']
image_frame = np.interp(a, (a.min(), a.max()), (0, 255)).astype(np.uint8)
image_frames.append(image_frame)
# Create a video clip from the frames
clip = ImageSequenceClip(image_frames, fps=fps)
# Write the video clip to a file
direct_path = r"D:\\"
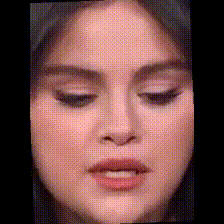
clip.write_videofile(direct_path + path)Here is the final video containing only the facial region from the original video.
I hope you enjoyed this tutorial and learned how to create a video featuring only facial regions from the original footage. Feel free to share your feedback and let me know your thoughts on this approach.