Introduction
The Android platform provides many different types of menus to be added to an Android app. In this tutorial, we will learn how to add the most common type of menu, an Options Menu.
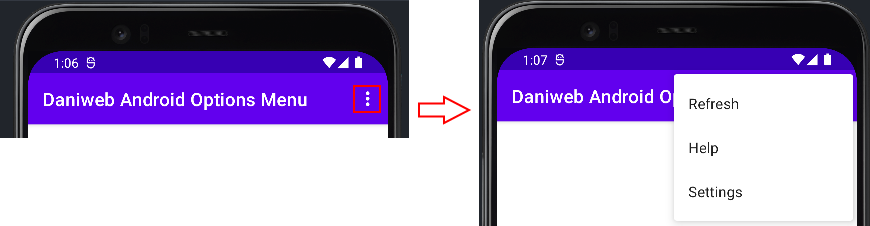
An Options Menu is one that appears at the right corner of the Action Bar/Toolbar. By default, all items in the menu is contained inside the overflow action.
Goals
At the end of the tutorial, you would have learned:
- How to add an Options Menu to an Android app.
Tools Required
- Android Studio. The version used in this tutorial is Bumblebee 2021.1.1 Patch 3.
Prerequisite Knowledge
- Basic Android.
- Action Bar/Toolbar.
Project Setup
To follow along with the tutorial, perform the steps below:
-
Create a new Android project with the default Empty Activity.
-
Give the default TextView an
android:idofhello. -
Change its
android:textSizeto32sp.<?xml version="1.0" encoding="utf-8"?> <androidx.constraintlayout.widget.ConstraintLayout xmlns:android="http://schemas.android.com/apk/res/android" xmlns:app="http://schemas.android.com/apk/res-auto" xmlns:tools="http://schemas.android.com/tools" android:layout_width="match_parent" android:layout_height="match_parent" tools:context=".MainActivity"> <TextView android:id="@+id/hello" android:layout_width="wrap_content" android:layout_height="wrap_content" android:text="Hello World!" android:textSize="32sp" app:layout_constraintBottom_toBottomOf="parent" app:layout_constraintLeft_toLeftOf="parent" app:layout_constraintRight_toRightOf="parent" app:layout_constraintTop_toTopOf="parent" /> </androidx.constraintlayout.widget.ConstraintLayout>
Add an Options Menu using XML
The easiest way to add an Options Menu to an Action Bar is by declaring the menu in an XML file and then inflating it in the Activity’s onCreateOptionsMenu() function.
We will start with creating a simple menu with three items in it:
- Refresh.
- Help.
- Settings.
-
Right-click on res -> New -> Android Resource File.
-
Name the file options.
-
Change the Resource type to
Menu.

-
Select OK.
-
Add these string resources into strings.xml.
<string name="refresh">Refresh</string> <string name="help">Help</string> <string name="settings">Settings</string> -
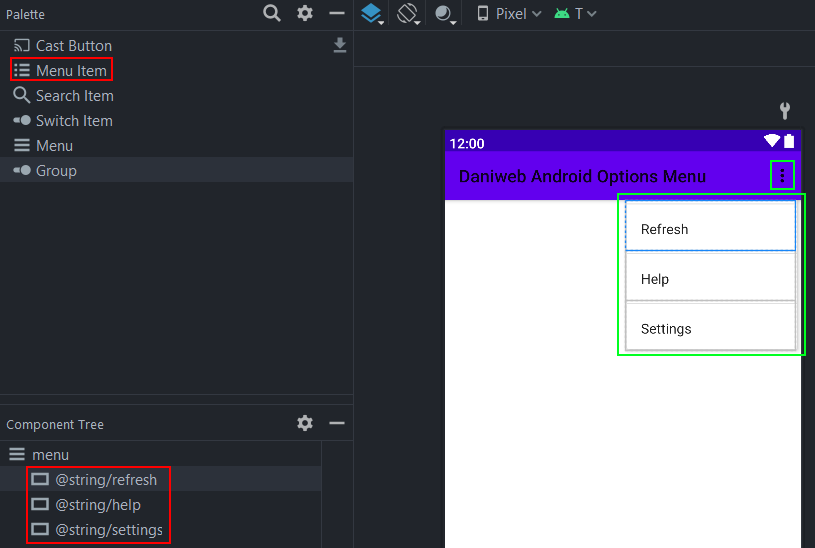
Now that we have the XML file with
<menu>as the root element, we can either build the menu in the Code View by ourselves, or using the Design Surface. Regardless of how you choose to build your menu, add three Menu Item/<item>that corresponds to the three options Refresh, Help, and Settings. -
Make sure that your Menu Items are using the string resources created in step 5 as the value for their
android:titleattributes. -
Your menu should look like the screenshot below if using the Design Surface.
-
In Code View, they should look like the code below.
<?xml version="1.0" encoding="utf-8"?> <menu xmlns:android="http://schemas.android.com/apk/res/android"> <item android:title="@string/refresh" /> <item android:title="@string/help" /> <item android:title="@string/settings" /> </menu> -
We are now done with the XML file for now, but the app will not make use of the menu resource file yet. We still have to inflate the XML resource into the Action Bar. To do this, override MainActivity’s
onCreateOptionsMenu(), inflate the XML resource using the built-inmenuInflaterobject, and returntrue.override fun onCreateOptionsMenu(menu: Menu?): Boolean { menuInflater.inflate(R.menu.options, menu) return true }
Run the app now to check whether the menu is working. It should behave similarly to the animation below.
Handle Click Events for Menu Items
The menu that we have created looks nice, but it does not perform any action when clicked. To respond to click events on each menu item, we will have to do a couple more things.
-
When an item in the menu is clicked, MainActivity’s
onOptionsItemSelected()will be called, so we will have to override this function if we want to respond to click events. -
We should also give the menu items
android:idattributes to make it easy to filter them out inonOptionsItemSelected(). -
Modify options.xml to add
android:ids to each<item>.<?xml version="1.0" encoding="utf-8"?> <menu xmlns:android="http://schemas.android.com/apk/res/android"> <item android:title="@string/refresh" android:id="@+id/refresh"/> <item android:title="@string/help" android:id="@+id/help"/> <item android:title="@string/settings" android:id="@+id/settings"/> </menu> -
Override
onOptionsItemSelected()in MainActivity using the code below. The app will now change the value of the default TextView to match the menu item’s title.override fun onOptionsItemSelected(item: MenuItem): Boolean { val textView = findViewById<TextView>(R.id.hello) return when(item.itemId){ R.id.refresh, R.id.help, R.id.settings -> { textView.text = item.title true } else -> false } }
When we run the app now, we can see that clicks on any menu item will modify the TextView like the animation below.
Solution Code
MainActivity.kt
class MainActivity : AppCompatActivity() {
override fun onCreate(savedInstanceState: Bundle?) {
super.onCreate(savedInstanceState)
setContentView(R.layout.activity_main)
}
override fun onCreateOptionsMenu(menu: Menu?): Boolean {
menuInflater.inflate(R.menu.options, menu)
return true
}
override fun onOptionsItemSelected(item: MenuItem): Boolean {
val textView = findViewById<TextView>(R.id.hello)
return when(item.itemId){
R.id.refresh,
R.id.help,
R.id.settings -> {
textView.text = item.title
true
}
else -> false
}
}
}activity_main.xml
 <?xml version="1.0" encoding="utf-8"?>
 <androidx.constraintlayout.widget.ConstraintLayout xmlns:android="http://schemas.android.com/apk/res/android"
    xmlns:app="http://schemas.android.com/apk/res-auto"
    xmlns:tools="http://schemas.android.com/tools"
    android:layout_width="match_parent"
    android:layout_height="match_parent"
    tools:context=".MainActivity">

    <TextView
        android:id="@+id/hello"
        android:layout_width="wrap_content"
        android:layout_height="wrap_content"
        android:text="Hello World!"
        android:textSize="32sp"
        app:layout_constraintBottom_toBottomOf="parent"
        app:layout_constraintLeft_toLeftOf="parent"
        app:layout_constraintRight_toRightOf="parent"
        app:layout_constraintTop_toTopOf="parent" />

</androidx.constraintlayout.widget.ConstraintLayout>options.xml
<?xml version="1.0" encoding="utf-8"?>
<menu xmlns:android="http://schemas.android.com/apk/res/android">
<item
android:title="@string/refresh"
android:id="@+id/refresh"/>
<item
android:title="@string/help"
android:id="@+id/help"/>
<item android:title="@string/settings"
android:id="@+id/settings"/>
</menu>strings.xml
<resources>
<string name="app_name">Daniweb Android Options Menu</string>
 <string name="refresh">Refresh</string>
 <string name="help">Help</string>
 <string name="settings">Settings</string>
</resources>Summary
Congratulations, we have learned how to add an Options menu into our app’s Action Bar. The full project code can be found at https://github.com/dmitrilc/DaniwebAndroidOptionsMenu.