Oh No, not another LockBits demo. Well hopefully this demo may also give you a little in site into actually playing with, and calculating some simple effects as well as understanding the advantages of LockBits as apposed to GetPixel and SetPixel.
A Useful Note.
It is important to note that using LockBits is only effective beyond a certain point. Bench tests show that if you manipulate below roughly 60 to 70 pixels in one go, you are in fact better off using GetPixel and SetPixel. Why? Well basically the time allowed for locking bits and unlocking bits, as well as copying all the byte information needs to be considered when making these calculations. Much below 60 or 70 pixels, this time taken exceeds the time taken to simply use Get or Set Pixel.
This can be explained in more detail Here
So What Do We Have Here Then?
- Wrapping up Lockbits and associated methods into a more manageble class.
- Applying Filter effects to your images.
- Playing with the Alpha Channel.
- Mimicing Opacity.
- Overlaying Images (Layering).
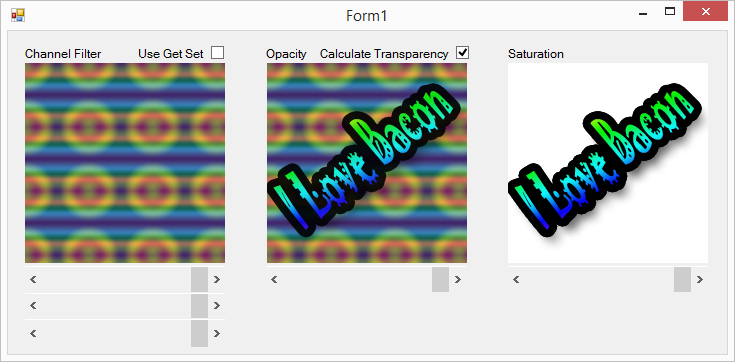
Below you can see the interface which will allow you to manipulate the images, quickly in real time:
** The left hand image, and sliders will allow you to manipulate the saturation of each colour channel in the image, essentially removing a colour from an image.
** The center image shows the left image combined with the right hand image. This image doesnt relay on the alpha chanel. Any shadow, or antialising has been calculated using the pixel information from both images either side.
** The right hand image shows how you can apply a stauration effect to your images.
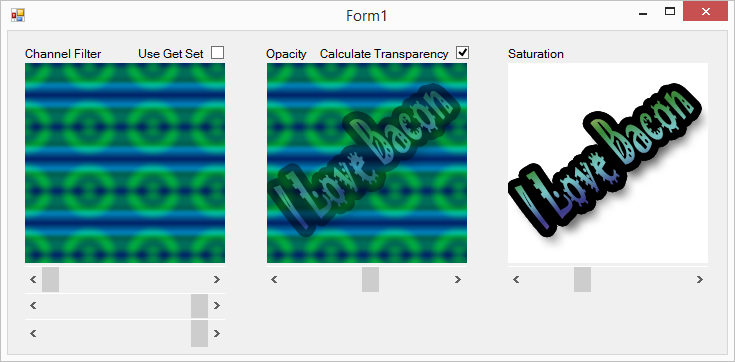
Here you can see some of the effects after playing around with the sliders.
** The left hand image has had it's red channel's saturation set to 0 effectively removing any red from the image. The Sliders from top to bottom effect Red, Green, and Blue channels.
** The center image has had the layer opacity set to roughly 50%, it is now quite clear that layer 1 can bee seen through layer 2, remember though, this image doesn't make use of the alpha channel or opacity, the pixels colour values have been calculated to mimic opacity.
** The right hand image has had it's saturation set to about 40%, you can now see the colours in this image are much less vivid than in the previous snapshot.
Calculate Transparency Check Box
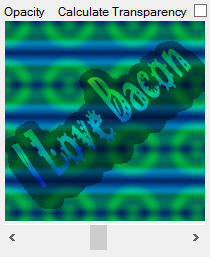
This tells the merge method whether or not it should calculate the actual opacity value of layer 2 (The right hand image). For instance, for the shadow in layer two, the actual pixel colour is black, however with the use of the pixels alpha channel the pixel becomes transparent.
To prove I hadn't cheated, this check box simply tells the merge method to go ahead and apply the opacity calculation to each pixel. Leaving this box unchecked will simply display the color of the pixel (in this case black) as all pixles have their alpha channel set to 255 (Solid), this will result in jaggy looking outlines (as there is no antialiasing) and a black blob where the shadow should be.

Use Get Set Check Box
I haven't provided any actual bench test results, however checking this box and moving the sliders will give you a realtime idea of the benefits of using LockBits. With this box unchecked, manipulating the sliders updates the image quickly and smoothly. Using Get Set you can clearly see just how jery the updates become. Note: all processing is done on the UI thread.
A More Manageable LockBits Class
As promised I have provided a jumping off point on how you can work more effectively with LockBits and it's associated methods. To try and help you further I have included a couple of additional methods "GetByte" and "GetCoordinates".
Unexpected Data Layout
When pixel data is copied from an image to an array of bytes, the array is only a single dimension, not only is it a single dimension, but there are now 4 indexes per pixel (assuming the pixel format is 32bpp). if you imagine you have an image 3 pixels by 3 pixels, you might imagine something like this
1,2,3
4,5,6
7,8,9
where each N is the pixel number. After the data has been coppied using Marshal.Copy your array will look like this:
1,1,1,255,2,2,2,255,3,3,3,255,4,4,4,255,5,5,5,255,6,6,6,255,7,7,7,255,8,8,8,255,9,9,9,255,
each pixel now has 4 bytes, e.g pixel 1: 1,1,1,255. So all data from index 0 to index 3 is relevant to the appearance of the first pixel. You have probably already guessed, that each byte is relevant to a pixels channel Alpha, Red, Green and Blue (A,R,G,B). And you aren't wrong for thinking this, however, it's important to note, that, though the pixel order is correct, the channel order is not, Infact it's quite the opposite (B,G,R,A).
Each pixel is solid hence the 255 in the alpha byte, at the end of each 32 bit chunk.
So remember. If you want to update the Blue channel of the first pixel its index 0 not 2.
A Little Support
Initially, manipulating data in one great big line may seem a little confusing, so I have provided methods to help you get your bearings within the channel byte array (rgbValues)
These methods are wrapped up with the lockbits methods in the BitmapDataEx class:
        /// <summary>
        /// Return the first byte location of a pixel's channel data
        /// </summary>
        /// <param name="Coordinates">The Pixels X and Y location</param>
        /// <returns>Index of a pixels first channel data</returns>
        public Int32 GetByte(Point Coordinates)
        {
            return Coordinates.Y * (BitmapImage.Width * BytesPerPixel) + (Coordinates.X * BytesPerPixel);
        }

        /// <summary>
        /// Return the byte location of a specified pixel and channel.
        /// </summary>
        /// <param name="Coordinates">The Pixels X and Y location, plus the channel</param>
        /// <returns>Inde of a specified pixel and channel</returns>
        public Int32 GetByte(RGBPoint Coordinates)
        {
            return Coordinates.Y * (BitmapImage.Width * BytesPerPixel) + (Coordinates.X * BytesPerPixel)
            + (Int32)Coordinates.Byte;
        }

        /// <summary>
        /// Return pixel coordinates and channel index of specified byte.
        /// </summary>
        /// <param name="Byte"></param>
        /// <returns>X and Y coordinates plus Channel Index of byte</returns>
        public RGBPoint GetPixelCoordinates(Int32 Byte)
        {

            RGBPoint rgbPoint = new RGBPoint();

            //Get the bytes X location
            rgbPoint.X = (Byte % (BitmapImage.Width * BytesPerPixel)) / BytesPerPixel;

            //GetByte The BytesPerPixel Y location
            rgbPoint.Y = (Byte / (BitmapImage.Width * BytesPerPixel));

            //Get The Bytes Channel Index
            rgbPoint.Byte = (RGBPoint.rgbBytes)((Byte % (BitmapImage.Width * BytesPerPixel)) % BytesPerPixel);

            return rgbPoint;
        }
Relying on these methods during a heavy process is ill-advised as it will dramatically reduce the speed of your code, however, hopefully you can use the calculations to help you understand what is going on and where.
For the GetPixelCoordinates method, the rgbPoint structure is similar to the exiting Point structure, however there is an additional property, Byte, which holds the channel number relevant to the Byte argument. The RGBPoint structure is also a member of the BitmapDataEx class.
        public struct RGBPoint
        {
            public enum rgbBytes { Blue = 0, Green = 1, Red = 2, Alpha = 3 };

            public Int32 X { get; set; }
            public Int32 Y { get; set; }
            public rgbBytes Byte { get; set; }
        }
Using BitmapDataEx To Read Pixel Data
Below is an example on how you could get the green value of every single pixel in an image;
//Create a new bitmap instance
    Bitmap BMP = new Bitmap("C:\\MyBitmap.png");

    //Create a new BitmapDataEx instance with our new Bitmap
    BitmapDataEx bmpDataEx = new BitmapDataEx(BMP);

    //Lock the BitmapData into Memory and Copy
    //the channel data to rgbValues
    bmpDataEx.LockBits();

    //Because we are only reading the byte information
    //unlock the data.
    bmpDataEx.UnlockBits();

    //Iterate through every Green Channel (BytePerPixel is 4 for 32bpp images)
    //Byte: 1, 5, 9, 13, 17 etc...
    for (Int32 BytePos = 1; BytePos < bmpDataEx.ByteLength; BytePos += bmpDataEx.BytesPerPixel)
        {
            //Write the Green value of each pixel to the console.
            Console.WriteLine(bmpDataEx.rgbValues[BytePos]);
        }

    //Dispose if BitmapDataEx
    bmpDataEx.Dispose();
Using BitmapDataEx To Update Pixel Data
This time we are actually going to manipulate the pixel data and save it back to the bitmap. Notice the UnlockBits is called after the editing process.
            //Create a new bitmap instance
            Bitmap BMP = new Bitmap("C:\\MyBitmap.png");

            //Create a new BitmapDataEx instance with our new Bitmap
            BitmapDataEx bmpDataEx = new BitmapDataEx(BMP);

            //Lock the BitmapData into Memory and Copy
            //the channel data to rgbValues
            bmpDataEx.LockBits();

            //Iterate through every Green Channel (BytePerPixel is 4 for 32bpp images)
            //Byte: 1, 5, 9, 13, 17 etc...
            for (Int32 BytePos = 1; BytePos < bmpDataEx.ByteLength; BytePos += bmpDataEx.BytesPerPixel)
            {
                //Set the green value of every pixel to 0
                bmpDataEx.rgbValues[BytePos] = 0;
            }

            //Copy the rgbValues back to the BitmapData and unlock from memory
            bmpDataEx.UnlockBits();

            //For more accurate saving of bitmaps you need to include
            //encoding information, but that is beyond the scope of
            //this demo.
            bmpDataEx.BitmapImage.Save("C:\\MyUpdatedBitmap.png", ImageFormat.Png);

            //Dispose if BitmapDataEx
            bmpDataEx.Dispose();
Playing With The Pixel Manager
There are three methods in the pixel manager allowing you to manipulate and merge images. This demo has three picture boxes. each picture box has it's original image stored in the BackgroundImage property. After a bitmap has been manipulated it is set to the relevant pictureboxes Image property.
1. Channel Fileter
This method allows you to adjust the saturation of a pixels individual Reg, Green and Blue channels.
PixelManager pMan = new PixelManager();

PictureBox1.Image = pMan.ChannelFilter(new Bitmap(PictureBox1.BackgroundImage),
    Color.FromArgb(RedSaturationValue, GreenSaturationValue, BlueSaturationValue));
2. Merge Images (Layering)
This method allows you to overlay one image with another BackGroundBitmap and ForegroundBitmap. You can specify the opacity of the ForegroundImgae. Note, this method doesn't use the alpha channel, the pixels colours are calculated to mimic transparency.
Opacity is from 0 to 100, and CalculateTransparency is a boolean value which should really be true.
PixelManager pMan = new PixelManager();

PictureBox1.Image = pMan.ImageMerge(new Bitmap(Background.Image),
    new Bitmap(Foreground.Image),
    Opacity,
    CalculateTransparency);
3. Saturate
This method is similar to the ChannelFilter, however this proccess all the images colour channels from a greyscale image to a full colour image.
SaturationLevel is a value from 0 to 100, where 0 is Gray Scale and 100 is the original, full colour image.
PixelManager pMan = new PixelManager();

PictureBox1.Image = pMan.Saturate(new Bitmap(PictureBox1.BackgroundImage), SaturationLevel);
