Python-wxPython Tutorial
This tutorial will take you through the basics of wxPython.
Introduction:
Let's face it. I am a dinosaur. I got my computer science degree in the mid 70s. And it won't be long before I am in my mid 70s. So why am I trying to learn Python? Mostly because learning new things keeps my brain active. And besides, nobody on Daniweb seems to be asking questions about vb.Net anymore. So I thought I'd give it a try. After a few weeks of puttering I managed to learn enough Python to rewrite all of my vbscripts (stop laughing, it's an actual language). Now that I was comfortable (but still not fluent) in Python I decided to really torture myself and tackle wxPython. I had gotten used to creating GUIs in vb.Net by just dragging and dropping controls in Visual Studio. I was spoiled. With wxPython I would have to craft my interface by hand with no automatic code generation. It reminded me of the old days writing apps in Presentation Manager for OS/2.
For those of you not familiar with wxPython, it is essentially a wrapper for the wxWidgets toolkit, a free and open source, cross-platform library for creating GUIs. wxWidgets has been around since 1992. wxPython allows access to wxWidgets from Python. While tkinter (which is badly out of date) renders controls in a generic style (no matter the platform), wxWidgets renders controls in the style of the platform on which it is running so wxPython apps will look like native Windows desktop apps.
Learning wxPython is difficult at the start. Imagine a blind man asks you to describe a beach and you reply by describing every grain of sand on it. He would have little sense of what a beach was, or what could be done on it. That's what a lot of the wxPython documentation looks like. There is an online reference (plus a down-loadable version) but it consists of infinitely cross-linked text where it seems that the thing you are looking for is always described elsewhere (where "elsewhere" is never linked to). It reminds me of Zork (you are in a maze of twisty little passages - all alike). Only other dinosaurs are likely to get that reference. The docstrings will tell you what you can do but not how you can do it.
There are a number of books available such as
- wxPython in Action by Noel Rappin & Robin Dunn (wxPython author)
- wxPython Recipes: A Problem - Solution Approach by Mike Driscoll
- wxPython 2.8 Application Development Cookbook by Cody Precord
- Creating GUI Applications with wxPython by Mike Driscoll
Only book 4 is for the current release (4.0.3) which is what I am using (versions 4 and above are for Python 3.0 and above). Some of the examples from book 1 will result in "Deprecated" warnings but these should be easy to correct. Current documentation is available at the wxPython web site. You will also find a forum there where you can ask questions.
While I am on the topic of books, if you are just learning Python, I have read around a dozen "teach yourself" books and one is head and shoulders above the rest. Do yourself a huge favour and buy Beginning Python: From Novice to Professional by Magnus Lie Hetland.
Continuing on, a few years ago I wrote a vb.Net GUI that would allow me to solve Sudoku puzzles without the hassle of repeatedly filling in and erasing digits. I wanted a tool where I could enter a puzzle, then eliminate possible digits one by one and have the tool do the grunt work while leaving me to do the brain work. I figured that a port to Python/wxPython would be a suitable challenge.
Developing the app in vb.Net was a different sort of challenge with having to set up a project for nested custom controls, and a test project to run it and more configuration settings to create the library and specifying the platform and on and on and on. It was not pleasant and I was glad to be done. Developing in Python/wxPython, on the other hand, was (except for the infrequent times I hit a wall and repeatedly hit my head against it) actually fun. And in spite of my experience with vb.Net, I highly recommend you use Visual Studio 2019 for developing and debugging Python code. It has excellent Python support and breakpoints are awesome.
As with anything I post, I welcome constructive criticism and suggestions on how to improve. Because I am still in the initial stages I expect there will be a number of things that could have been done better. I also frequently suffer from
So please post your comments and suggestions. Remember, none of us is as smart as all of us.
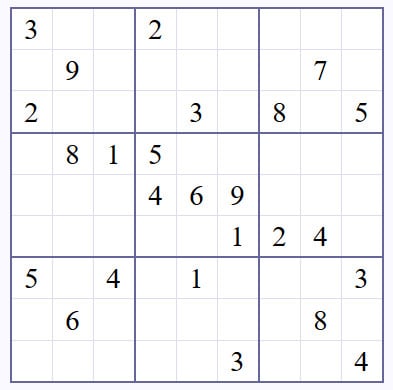
The Basics of Sudoku
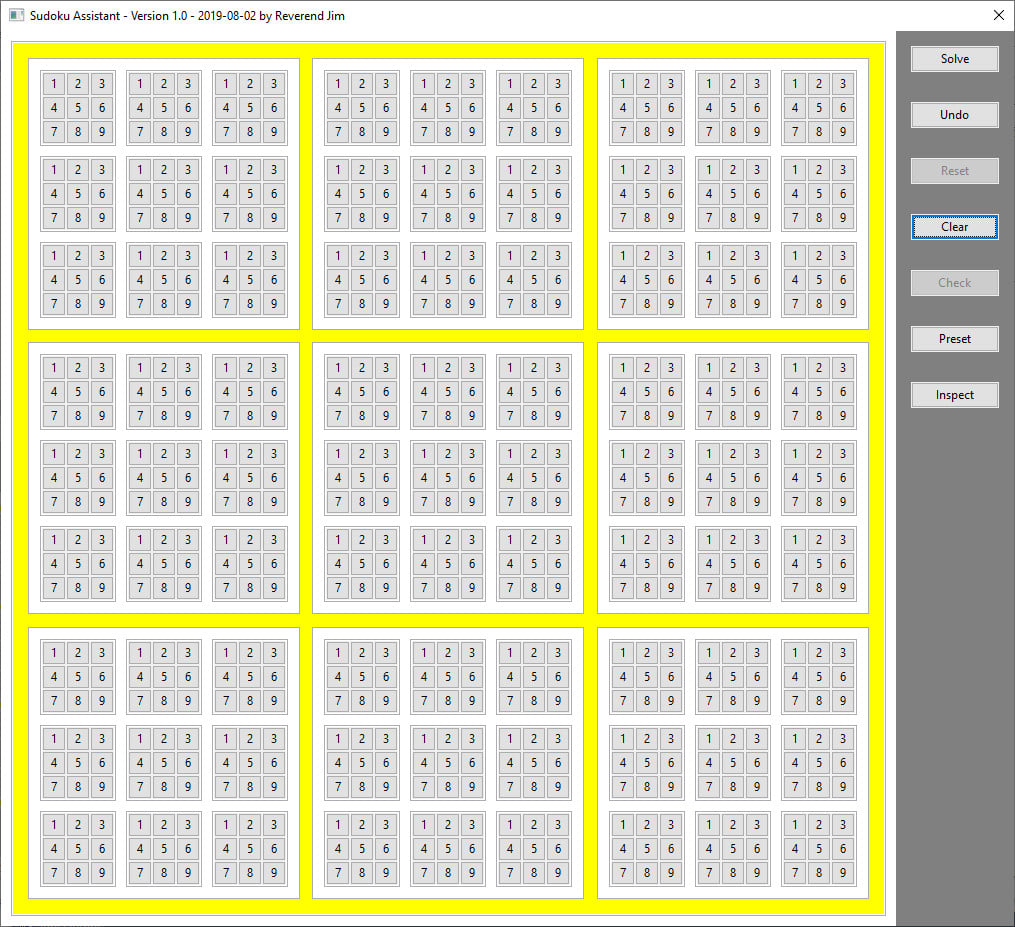
A Sudoku puzzle consists of a 3x3 grid of panes where each pane consists of a 3x3 grid of tiles. Each tile can contain a single digit from 1-9. A puzzle will come with some of the tiles already filled in. To solve the puzzle you must fill in the remaining digits with the restrictions
- each pane must have 9 unique digits
- each row of tiles must have 9 unique digits
- each column of tiles must have 9 unique digits
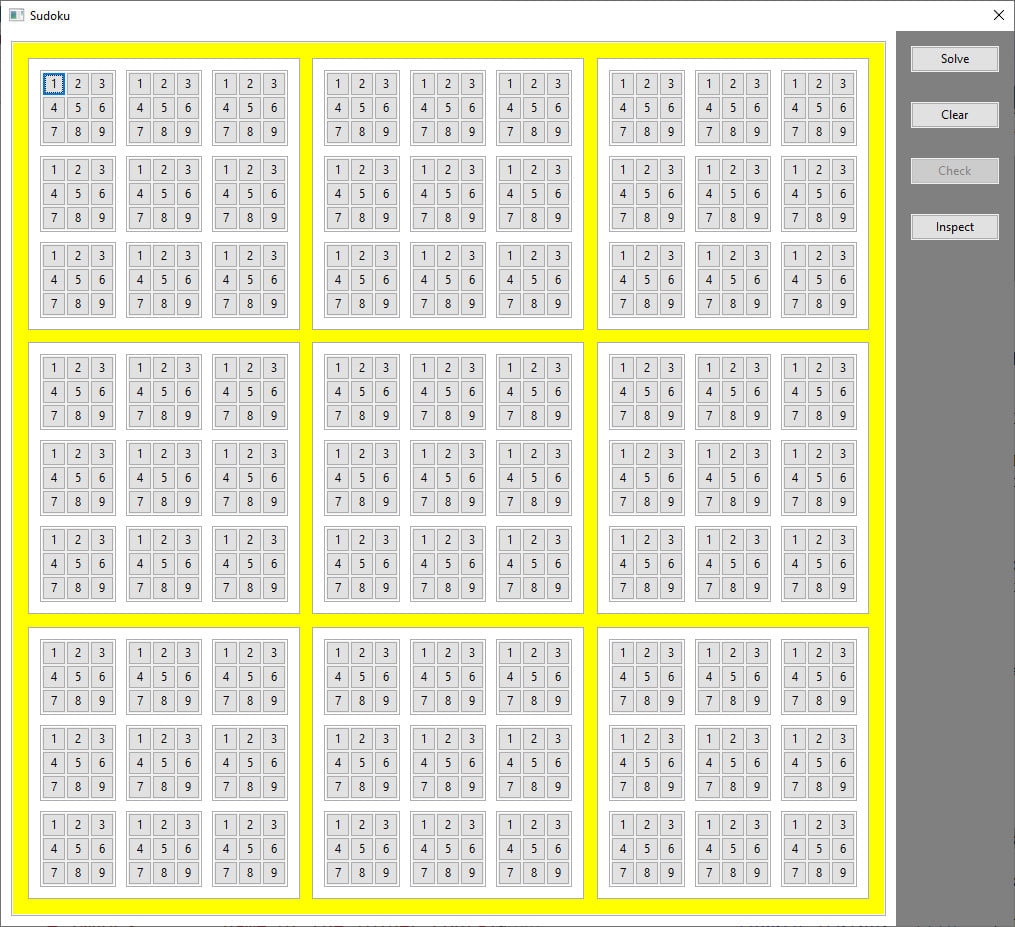
The Application Interface
In my application, a tile initially consists of a 3x3 grid of buttons labeled '1'-'9'. When the app starts (or when it is cleared to start a new puzzle), you specify the initial puzzle values by clicking on the corresponding button in each tile. For example, to set the first tile in pane 1 to the value 6, just click on button 6. This marks that tile as solved. Each button that you click is removed and replaced a larger image of that digit. Once you have entered the initial puzzle you click the Solve button. During setup, when you set the value for a tile, that value (button) is removed from every other tile in that pane.
Once you click Solve you can begin to eliminate digits. Since each row, and column may contain only one of each digit, when you enter Solve mode, the app removes all occurrences of the entered digits from all tiles where they are no longer valid. If this causes any other tiles to be solved (only one possible value remains), those solved values are also removed from the puzzle. As you can see, this removes a great deal of the grunt work. Whereas in Setup mode, clicking a button sets the tile to that value, in Solve mode, clicking a button removes only that button. However, if removal of a button leaves only one button, that last button becomes the solved value (also triggering a possible update of tiles in the same pane, row or column).
Once there are no more buttons to click you may click on the Check button. This will scan the puzzle to ensure that you have solved it within the given constraints.
Let's start with a short intro to wxPython and go from there.
Introduction to wxPython
A simple wxPython program consists of an application object and a frame. It looks like this:
import wx

app = wx.App(redirect=False)
frame = wx.Frame(None, wx.ID_ANY, "Hello World")
frame.Show()
app.MainLoop()
You first create an instance of a basic application. Until you do this you cannot create any other wx objects. wx.App takes one optional argument (the default is False). If False then any print output will go to the console (if one is available). If True then an output window is created as needed and print output will go there.
Every application has to have at least one frame. Since the first one is the top level frame it has no parent object (so the first parameter, the parent, is None). The second parameter is an object id. In most cases you can let the system assign one so you specify wx.ID_ANY (or its integer value of -1). The third parameter is the titlebar text. The next line makes the frame visible. The last line enters the event loop. From this point until you close the window, events will be handled within wxPython.
wxPython objects support inheritance. A lot of the objects you build will be based on existing objects. In fact, everything in Python inherits from a basic object class. You'll see how this works as we build our application. Typically you'll see the applications taking this form:
import wx

class App(wx.App):

    def OnInit(self):
        self.frame = Frame("Sample App")
        self.frame.Show()
        return True

class Frame(wx.Frame):

    def __init__(self, title):

        super(Frame, self).__init__(None, title=title)

        self.panel = wx.Panel(self, size=(400,300))

if __name__ == "__main__":
    app = App()
    app.MainLoop()
If you run this you will see a blank window with a title bar and the usual titlebar gadgets.
You'll create an application object subclassed from wx.App and build everything from within that leaving the mainline as a minimal front end. In this case app creates a frame and frame in turn creates a panel. A subclassed wx.App must have an OnInit method and it must return True or the application will exit.
You are going to see a lot of lines like
super(Frame, self).__init__(...If you subclass an object and you need to initialize it you will have to provide an __init__ method. But if you do this you will override the parent object's __init__ method so you must call it explicitly.
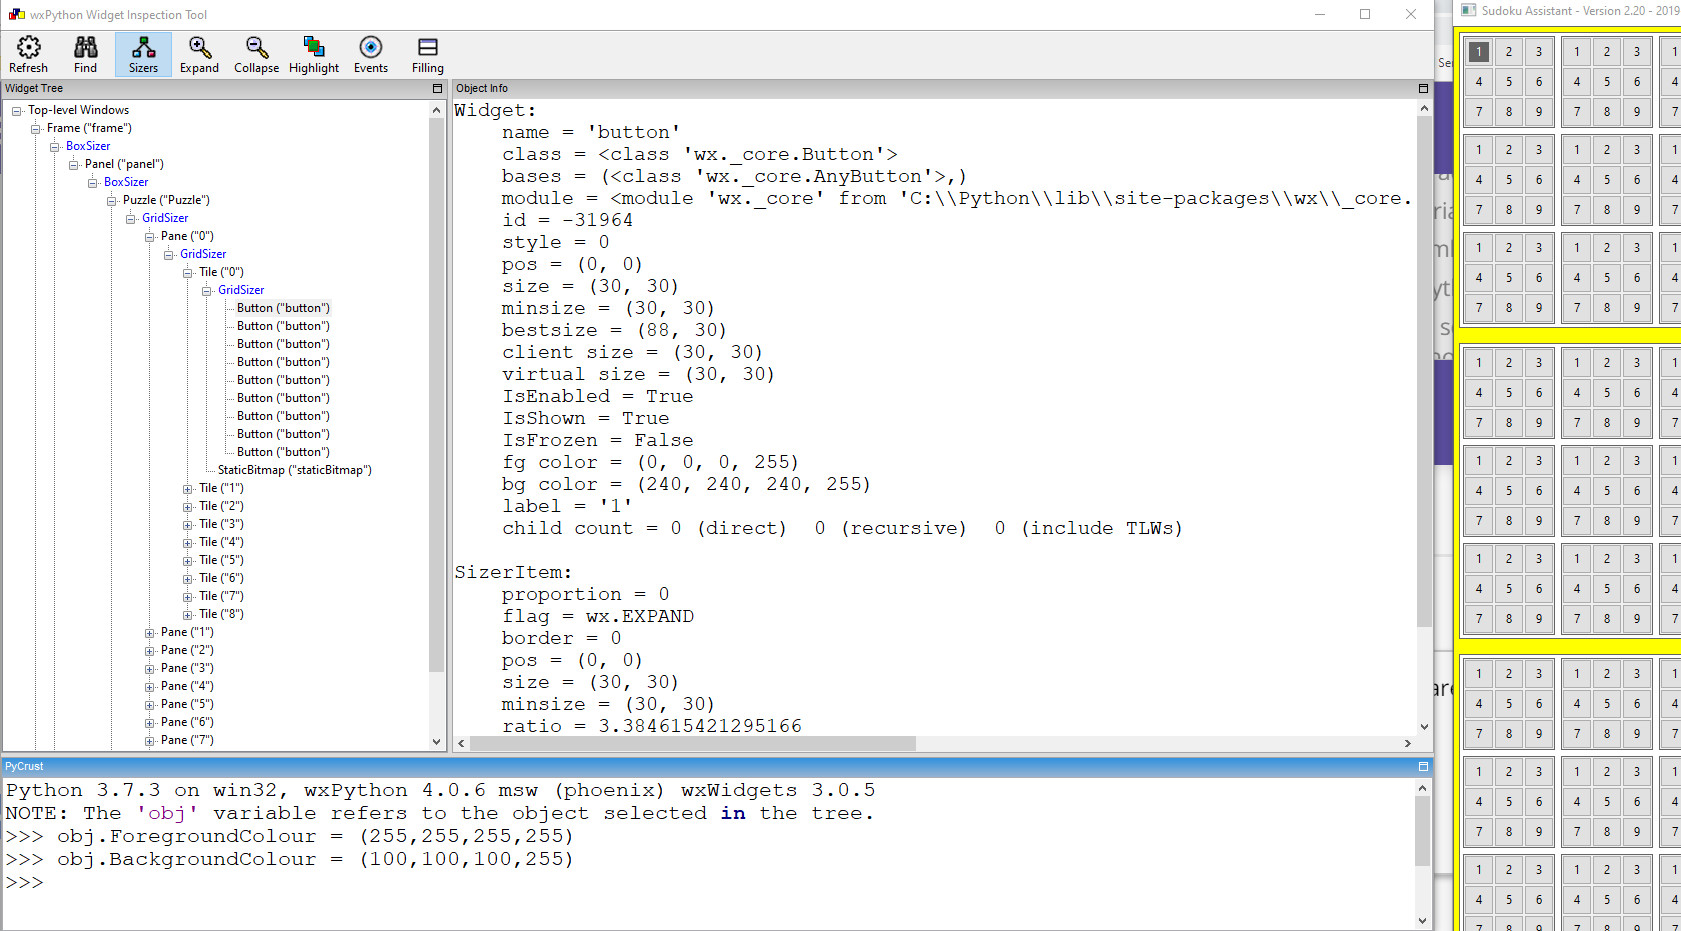
A very useful features is the ability to inspect your objects at run time. You do this by adding two lines as follows:
import wx
import wx.lib.mixins.inspection

class App(wx.App):

    def OnInit(self):
        self.frame = Frame("Sample App")
        self.frame.Show()
        return True

class Frame(wx.Frame):

    def __init__(self, title):

        super(Frame, self).__init__(None, title=title)

        self.panel = wx.Panel(self, size=(400,300))

if __name__ == "__main__":
    app = App()
    wx.lib.inspection.InspectionTool().Show()
    app.MainLoop()
If you run the above code you will see two windows. One is the blank app window. The other is the object inspection tool. In the left pane you can expand the object tree to inspect any object (including objects in the PyCrust extension that provides the inspection tool). As you select objects in the left pane you can inspect them in the right pane. The bottom pane allows you to enter ad hoc Python commands where the object obj always refers to the object with focus in the tree. It's worth noting that the display shows only the standard properties. It will not include properties that you have defined. For example, if you select a pane in the Sudoku app, you will not see pane.index in the list. You can still see what the value is, however, by typing obj.index in the bottom panel.
Now is a good time to introduce sizers. Sizers are pseudo-containers that are used to automatically size and position other controls. Typically you will create a sizer then add controls, specifying parameters such as alignment, allocation of available space, borders, etc. A box sizer can arrange controls in either a single row or a single column. A grid sizer can arrange controls in an equally spaced grid. There are more complex sizers, but these are the ones I will be using here (and the only ones I have bothered to learn).
The inspection tool does not show sizers by default but you can enable them from the toolbar. They will appear on the display as if they were containers but you do not need to refer to them when addressing objects. For example, I use a sizer to arrange the buttons in a tile, the tiles in a pane, and the panes in a puzzle but you do not need to do
puzzle.sizer.pane.sizer.tile.sizer.button.A final note about sizers - you will see that the only controls that I specify a size for are the buttons inside each tile. Everything else is automatically sized to fit (accounting for the padding I specify when I add the controls to each sizer). If you change the button size from (24,24) to (30,30), the entire puzzle will expand accordingly.
Let's start building up our application.
The Application
First of all, decide where you want to work on the project and unzip sudoku.zip there. It will create the following tree:
.\Sudoku
     images
     Pane.py
     Presets.txt
     Puzzle.py
     Sudoku.pyw
     Sudoku-minimal.py
     Tile.py

.\Sudoku\images
     1.jpg
     2.jpg
     3.jpg
     4.jpg
     5.jpg
     6.jpg
     7.jpg
     8.jpg
     9.jpg
Each major object (tile, pane, puzzle) file comes with test code so that you can run the simple case. The final application objects will be more complicated but the simple case files will get across the basic ideas. With any luck you won't have to do much typing. The first draft application is in Sudoku-minimal.py and does not include the bells and whistles. The completed application is in Sudoku.pyw.
A comment on comments - in order to squeeze as much code onto a screen as possible (while still including white space to improve readability), I have eliminated most comments. I felt that with the explanations they were redundant. However, the final post of the complete application will include comments. If you don't comment your code while you are writing it then shame on you ;-P
The Tile Object
The first control we are going to build is the Tile object. We are going to base our Tile on (inherit, or sub-class) a wx.Panel.
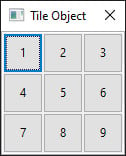
We are going to define the following methods:
SetSetup
SetSetup will be called to switch the tile between the two possible states of setup and solve. In setup mode, clicking on a button will cause the tile to be solved with that button as the solved value. In solve mode, clicking on a button will remove that button from the list of possible tile values.
Clear
Clear will be called to reset the tile to its initial state. All buttons will be made visible and any background image of a digit will be removed.
IsSolved
This will return True if this tile has been solved, or False if it has not.
OnClick
This is the event handler that will be called when any button in this tile is clicked. In Setup mode it will remove all buttons and show the clicked button value as the solved digit.
Remove
Remove will be called with a button as a parameter. It will remove that button from the tile. If that leaves only one remaining button then it will mark that tile as solved.
ShowSolved
ShowSolved will be called with a button as a parameter. It will call Remove to remove all remaining visible buttons and will show the tile as being solved.
ShowDigit
Loads a bitmap image into the tile and displays it. If no digit is given it will remove an image if one is there.
We will also define a few custom properties to make the housekeeping a little cleaner.
setup
This will be True if we are in setup mode and False if we are in solve mode.
buttons
This is a list of all the buttons in the tile, visible or not.
shown
This is a list of all the visible buttons in the tile. Note that this list must be a copy (self.shown = self.buttons.copy()) of self.buttons because doing self.shown = self.buttons will just produce two references to the same list. Later changes to self.shown would alter self.buttons. This is a common "gotcha" for novice Python programmers. I'm enough of a novice that I made that mistake twice while writing this app.
name
This is the name ('1'-'9') that is shown on the button.
index
This is the 0-relative index of the tile in the tiles list of the parent object.
solved
This will be '' if the tile is unsolved, or '1'-'9' representing the displayed value if the tile is solved.
row
This is the row number (0-2) for this tile.
col
This is the column number (0-2) for this tile.
value
This is a list (str) of all of the digits currently visible in the tile.
bitmap
This is a wx.StaticBitmap that will remain hidden until the tile is solved. For now we will load each image as required from disk. Later we will create a list of bitmaps to speed things up a bit.
We will be adding a few more methods and properties as we build our application but these will do to start.
Here is the first run at the tile object. Note that instead of the default window style I am specifying wx.CLOSE_BOX and wx.CAPTION. Because all sizes will be fixed I don't want the window to be sizable. I'm also eliminating the minimize control but you can certainly add it if you want to.
import wx
import wx.lib.mixins.inspection

class App(wx.App):

    def OnInit(self):
        self.frame = Frame("Tile Object")
        self.frame.SetPosition((10,10))
        self.frame.Show()
        wx.lib.inspection.InspectionTool().Show()
        return True

class Frame(wx.Frame):

    def __init__(self, title):

        super(Frame, self).__init__(None, title=title, style=wx.CLOSE_BOX | wx.CAPTION)

        self.tile = Tile(self, '1', 0)
        self.tile.SetSetup(True)
        self.Fit()

class Tile(wx.Panel):

    def __init__(self, parent, name, index):

        super(Tile, self).__init__(parent, -1, style=wx.BORDER_DOUBLE)

        self.setup   = True                 # True if entering puzzle
        self.buttons = []                   # all buttons
        self.shown   = []                   # visible buttons
        self.name    = name                 # Tile name is '1' to '9'
        self.index   = index                # Tile index is 0 to 8
        self.solved  = ''                   # set to solved digit when solved
        self.row     = index // 3           # row number (0-2) for this tile
        self.col     = index  % 3           # col number (0-2) for this tile
        self.value   = list("123456789")    # visible digits

        # The bitmap control is used to display the solved value

        self.bitmap  = wx.StaticBitmap(self, -1)
        self.bitmap.Hide()

        # Create a 3x3 grid of buttons with an OnClick handler.

        gsizer = wx.GridSizer(cols=3, vgap=0, hgap=0)

        for i in range(0,9):
            button = wx.Button(self, label=str(i+1), size=(40,40))
            button.name = str(i+1)
            button.index = i
            button.Bind(wx.EVT_BUTTON, self.OnClick)
            self.buttons.append(button)
            self.shown.append(button)
            flags = wx.EXPAND | wx.ALIGN_CENTRE
            gsizer.Add(button,0, flags , border=0)
        self.SetSizerAndFit(gsizer)

    def SetSetup(self, setup):

        if setup: self.Clear()
        self.setup = setup

    def Clear(self):

        self.value  = list("123456789")
        self.solved = ''
        self.shown  = self.buttons.copy()
        self.ShowDigit('')

        for button in self.buttons: button.Show()

    def IsSolved(self):

        return self.solved != ''

    def OnClick(self, event):

        button = event.GetEventObject()

        if self.setup:
            self.ShowSolved(button)
        else:
            self.Remove(button)

    def Remove(self, button):

        button.Hide()

        try:
            self.shown.remove(button)
            self.value.remove(button.name)
        except: pass

        if len(self.shown) == 1:
            self.ShowSolved(self.shown[0])

    def ShowSolved(self, button):

        for b in self.shown: b.Hide()

        self.shown  = []
        self.value  = []
        self.solved = button.name

        self.ShowDigit(button.name)

    def ShowDigit(self, digit):

        if digit == '':
            self.bitmap.Hide()
        else:
            bmp = wx.Image('images/' + digit + '.jpg', wx.BITMAP_TYPE_ANY).ConvertToBitmap()
            self.bitmap.Bitmap = bmp
            self.bitmap.Centre()
            self.bitmap.Show()

# Main ###############################################################

if __name__ == '__main__':

    app = App(True)
    app.MainLoop()
Note that because we called self.tile.SetSetup(True) it will run in Setup mode so clicking on a button will solve the tile. If you want to see how it works in Solve mode then call it with self.tile.SetSetup(False). For the stand-alone version I used size = (40,40) for the buttons to make things a little easier to see.
Next we will build a pane.
The Pane Object
Like the tile object, the pane will contain a 3x3 grid (using the GridSizer again), but of tiles instead of buttons.
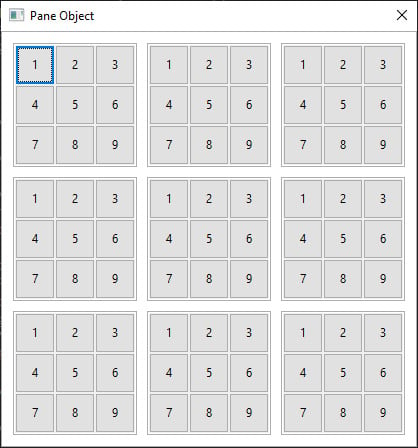
Our only methods for now will be
SetSetup
All this will do is set the background colour and then set each of the contained tiles into the same mode.
IsSolved
This will return two values. The first will indicate with True or False whether the pane has been solved. If solved then the second value will be a null string. If not solved the string will indicate the reason.
Its custom properties are
setup
This will be True if we are in setup mode and False if we are in solve mode.
tiles
This is a list of all the tiles in the pane.
name
This is the name ('1'-'9') of the pane.
index
This is the 0-relative index of the pane in the panes list of the parent object.
row
This is the row number (0-2) for this pane.
col
This is the column number (0-2) for this pane.
You'll notice when you run Pane.py that you can solve tiles by clicking on them. But clicking on a tile button removes the button from only that tile. What we would like is for the clicked button to be removed from every other tile in that pane. To do that we have to have some way for the tile object to signal the pane that something has happened.
Here's where I introduce custom events. What we will do is create a new type of event, then add an event handler to the pane to process it. We create both a new event type object, and a binder to be used later to associate the event with a handler. Because an event handler requires an event object as a parameter, we will also create a custom event and populate it with information that the handler will find useful. Some of the information could be derived from the event object but it is clearer to just do this when we create the event.
myEVT_TILE_SOLVED = wx.NewEventType()
EVT_TILE_SOLVED   = wx.PyEventBinder(myEVT_TILE_SOLVED)

class TileSolvedEvent(wx.PyCommandEvent):
    """ Raised by a Tile object when a tile has been marked as solved """

    def __init__(self, evtType, tile, button):

        wx.PyCommandEvent.__init__(self, evtType)

        self.solved = button.name           # string value of the solved tile
        self.number = int(self.solved)      # integer value of the solved tile
        self.button = button                # button for the solved value
        self.tile   = tile                  # the solved tile
        self.pane   = tile.Parent           # pane containing the solved tile
We'll trigger the event in our Tile.ShowSolved() method which will now become
def ShowSolved(self, button):

    for b in self.shown: b.Hide()
    self.shown  = []
    self.value  = []

    # Display the bitmap image for the solved value.

    self.ShowDigit(button.name)

    # Raise the TileSolved event to allow app to scan for eliminations

    evt = TileSolvedEvent(myEVT_TILE_SOLVED, self, button)
    self.GetEventHandler().ProcessEvent(evt)
First we create an event object and load it with information, then we get the event handler and execute it. It doesn't help to trigger an event unless you have written an event handler, so before we start generating events we'd better create the handler in the pane object and bind it to the custom event. The handler will look like:
def Tile_OnSolved(self, event):

    bIndex = event.button.index

    for tile in self.tiles:
        if not tile.solved:
            tile.Remove(tile.buttons[bIndex])
and we bind it to the handler in __init__ by
self.Bind(EVT_TILE_SOLVED, self.Tile_OnSolved)Now when you run this with self.pane.SetSetup(True) you will see that the clicked button is now removed from all other tiles in the pane. One more thing to mention, once an event has been handled it disappears. However, actions in one pane can affect other panes so the event must also be passed up to the parent object to manage those effects. We do this by adding
event.Skip()to the end of our handler. But there remains one problem. We don't want to do this elimination during setup. We want the user to be able to setup the puzzle to match a given (printed) puzzle. So we we'll eliminate tiles in the same pane during setup, but not pass it up for further processing.
    if not self.setup:
        event.Skip()
The file Pane-event.py contains the code for tile & pane with the event handler.
You may have noticed the lists RPAD and CPAD at the top of the listing. These will be used when populating the grid sizers. we want extra padding on outside edges of panes and tiles in the grid and indexing RPAD and CPAD by the appropriate row and col index adds the appropriate padding.
I'm going to add a few more constants to make the code a little clearer. Except for BITMAPS they should be self-explanatory.
IMAGES  = 'images/'
PRESETS = 'presets.txt'
BITMAPS = {}

SETUP_COLOUR = 'yellow'
SOLVE_COLOUR = 'light grey'
PANE_COLOUR  = 'white'

PANEBORDER = 15
TILEBORDER = 10
the images folder contains bitmaps of the nine digits. Instead of hitting on the disk every time we want to show a digit, we can load them into a dictionary at startup.
Now it's time to create the Puzzle object.
The Puzzle Object
By now you should be seeing a familiar pattern. The puzzle object is going to be a 3x3 grid of panes.
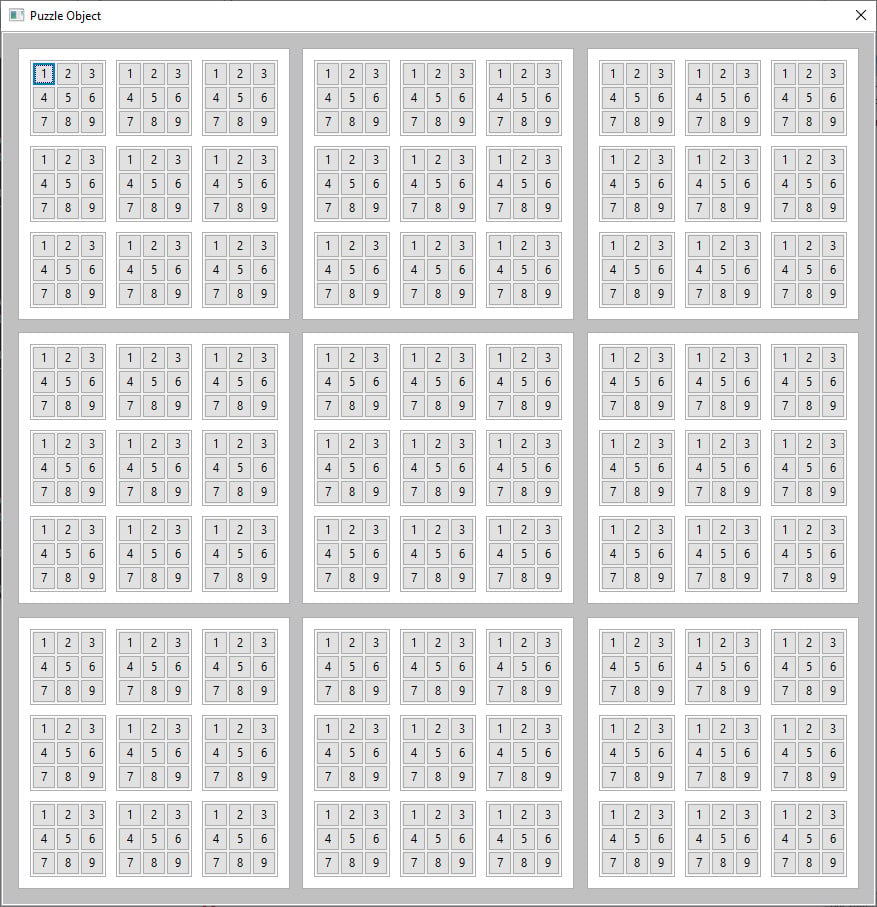
The puzzle object has to do a lot more housekeeping so we'll have a few more methods.
SetSetup
Like pane, this handles transitions between the states and ensures that the desired state propagates downward to all panes.
Tile_OnSolved
This is the handler that will respond, at the puzzle level, to TileSolved events. It calls Eliminate to remove the solved value from related tiles.
Eliminate
Eliminates the solved value from all tiles in all panels in the same row or column.
ScanAndEliminate
Called when moving from setup to solve mode. Because we don't eliminate tiles in other panes during setup (to ensure that the entered puzzle matches a printed puzzle) we have to scan the entire puzzle for solved tiles, then call Eliminate to remove from related tiles.
IsSolved
This will return two values. The first will indicate with True or False whether the puzzle has been solved. If solved then the second value will be a null string. If not solved the string will indicate the reason.
And now the properties
setup
This will be True if we are in setup mode and False if we are in solve mode.
panes
This is a list of all the panes in the puzzle.
rows
This is a list, indexed by a 0-relative pane number that identifies which panes are in the same row as a given pane. For example, for pane number 4, panes [3, 4, 5] are in the same row.
cols
Same as rows but for columns.
If you don't understand how the elimination is done I suggest you take an example and work through the numbers by stepping through the code.
Here is the code from puzzle.py.
import wx
import wx.lib.mixins.inspection

IMAGES  = 'images/'
PRESETS = 'presets.txt'
BITMAPS = {}

SETUP_COLOUR = 'yellow'
SOLVE_COLOUR = 'light grey'
PANE_COLOUR  = 'white'

PANEBORDER = 15
TILEBORDER = 10

RPAD = (wx.TOP , 0, wx.BOTTOM)
CPAD = (wx.LEFT, 0, wx.RIGHT)

myEVT_TILE_SOLVED = wx.NewEventType()
EVT_TILE_SOLVED   = wx.PyEventBinder(myEVT_TILE_SOLVED)

class TileSolvedEvent(wx.PyCommandEvent):

    def __init__(self, evtType, tile, button):

        wx.PyCommandEvent.__init__(self, evtType)

        self.solved = button.name       # string value of the solved tile
        self.number = int(self.solved)  # integer value of the solved tile
        self.button = button            # button for the solved value
        self.tile   = tile              # the solved tile
        self.pane   = tile.Parent       # pane containing the solved tile

class App(wx.App):

    def OnInit(self):
        self.frame = Frame("Puzzle Object")
        self.frame.SetPosition((10,10))
        self.frame.Show()
        wx.lib.inspection.InspectionTool().Show()
        return True

class Frame(wx.Frame):

    def __init__(self, title):

        super(Frame, self).__init__(None, title=title, style=wx.CLOSE_BOX | wx.CAPTION)

        self.puzzle = Puzzle(self)
        self.puzzle.SetSetup(True)
        self.Fit()

class Puzzle(wx.Panel):

    def __init__(self, parent):

        super(Puzzle, self).__init__(parent, -1, style=wx.BORDER_DOUBLE)

        self.setup = True               # true if in initial setup
        self.panes = []                 # all panes within this puzzle

        self.rows = [[0,1,2], [0,1,2], [0,1,2],
                     [3,4,5], [3,4,5], [3,4,5],
                     [6,7,8], [6,7,8], [6,7,8]]

        self.cols = [[0,3,6], [1,4,7], [2,5,8],
                     [0,3,6], [1,4,7], [2,5,8],
                     [0,3,6], [1,4,7], [2,5,8]]

        gsizer = wx.GridSizer(cols=3, vgap=5, hgap=5)

        for i in range(0,9):
            pane = Pane(self, name=str(i+1), index=i)
            self.panes.append(pane)
            flags = wx.ALIGN_CENTER | RPAD[pane.row] | CPAD[pane.col]
            gsizer.Add(pane, 0, flags, border=PANEBORDER)

        self.SetSizerAndFit(gsizer)

        self.SetBackgroundColour(SETUP_COLOUR)
        self.Bind(EVT_TILE_SOLVED, self.Tile_OnSolved)

    def SetSetup(self, setup):

        for pane in self.panes: pane.SetSetup(setup)

        if setup:
            self.state = []
        else:
            self.ScanAndEliminate()

        self.SetBackgroundColour(SETUP_COLOUR if setup else SOLVE_COLOUR)
        self.Refresh()

        self.setup = setup

    def Tile_OnSolved(self, event):

        self.Eliminate(event.pane.index, event.tile.index, event.button.index)

    def Eliminate(self, pIndex, tIndex, bIndex):

        # Eliminate the solved value from all tiles in all panels in the same row

        for p in self.rows[pIndex]:
            pane = self.panes[p]
            for t in self.rows[tIndex]:
                tile = pane.tiles[t]
                tile.Remove(tile.buttons[bIndex])

        # Eliminate the solved value from all tiles in all panels in the same column

        for p in self.cols[pIndex]:
            pane = self.panes[p]
            for t in self.cols[tIndex]:
                tile = pane.tiles[t]
                tile.Remove(tile.buttons[bIndex])

    def ScanAndEliminate(self):

        for pane in self.panes:
            for tile in pane.tiles:
                if tile.solved:
                    bIndex = int(tile.solved) - 1
                    self.Eliminate(pane.index, tile.index, bIndex)

    def IsSolved(self):

        # Check that every pane has been solved

        for p, pane in enumerate(self.panes):
            solved, reason = pane.IsSolved()
            if not solved: return (False, 'Pane ' + pane.name + ' ' + reason)

        # Check that each row has 9 unique digits

        for row in range(0,9):
            digits = set()
            for col in range(0,9):
                p = 3 * (row // 3) + col // 3
                t = col % 3 + 3 * (row % 3)
                digits.add(self.panes[p].tiles[t].solved)
            if len(digits) != 9:
                return (False, 'Row ' + str(r) + ' contains a repeated digit')

        # Check that each column has 9 unique digits

        for col in range(0,9):
            digits = set()
            for row in range(0,9):
                p = 3 * (row // 3) + col // 3
                t = col % 3 + 3 * (row % 3)
                digits.add(self.panes[p].tiles[t].solved)
            if len(digits) != 9:
                return False, 'Column ' + str(r) + ' contains a repeated digit'

            return (True, 'Congratulations')

class Pane(wx.Panel):

    def __init__(self, parent, name, index):

        super(Pane, self).__init__(parent, -1, style=wx.BORDER_DOUBLE)

        self.setup = True               # True if in setup mode, False otherwise
        self.tiles = []                 # All tiles in this pane
        self.name  = name               # Pane name is '1' to '9'
        self.index = index              # Pane index is 0 to 8
        self.row   = index // 3         # row number (0-2) for this pane
        self.col   = index  % 3         # col number (0-2) for this pane

        # Make a 3x3 grid of tiles

        gsizer = wx.GridSizer(cols=3, vgap=5, hgap=5)

        for i in range(0,9):
            tile = Tile(self, name=str(i+1), index=i)
            self.tiles.append(tile)
            flags = wx.ALIGN_CENTER | RPAD[tile.row] | CPAD[tile.col]
            gsizer.Add(tile, 0, flags, border=TILEBORDER)

        self.SetSizerAndFit(gsizer)

        self.SetBackgroundColour(PANE_COLOUR)
        self.Bind(EVT_TILE_SOLVED, self.Tile_OnSolved)

    def SetSetup(self, setup):

        for tile in self.tiles: tile.SetSetup(setup)

        self.setup = setup

    def IsSolved(self):

        digits = set()

        # Check that every tile has been solved and has all 9 digits

        for t,tile in enumerate(self.tiles):
            if not tile.IsSolved():
                return (False, 'Tile ' + tile.name + ' has not been solved')
            digits.add(tile.solved)

        if len(digits) != 9:
            return (False, 'Pane ' + self.name + ' has repeated digits')

        return (True, '')

    def Tile_OnSolved(self, event):

        b = event.button.index

        for tile in self.tiles:
            if not tile.IsSolved():
                tile.Remove(tile.buttons[b])

        if not self.setup:
            event.Skip()

class Tile(wx.Panel):

    def __init__(self, parent, name, index):

        super(Tile, self).__init__(parent, -1, style=wx.BORDER_DOUBLE)

        self.setup   = True                 # True if entering puzzle
        self.buttons = []                   # all buttons
        self.shown   = []                   # visible buttons
        self.name    = name                 # Tile name is '1' to '9'
        self.index   = index                # Tile index is 0 to 8
        self.solved  = ''                   # set to solved digit when solved
        self.row     = index // 3           # row number (0-2) for this tile
        self.col     = index  % 3           # col number (0-2) for this tile
        self.value   = list("123456789")    # visible digits

        # The bitmap control is used to display the solved value

        self.bitmap  = wx.StaticBitmap(self, -1)
        self.bitmap.Hide()

        # Create a 3x3 grid of buttons with an OnClick handler.

        gsizer = wx.GridSizer(cols=3, vgap=0, hgap=0)

        for i in range(0,9):
            button = wx.Button(self, label=str(i+1), size=(24,24))
            button.name = str(i+1)
            button.index = i
            button.Bind(wx.EVT_BUTTON, self.OnClick)
            self.buttons.append(button)
            self.shown.append(button)
            flags = wx.EXPAND | wx.ALIGN_CENTRE
            gsizer.Add(button,0, flags , border=0)
        self.SetSizerAndFit(gsizer)

    def SetSetup(self, setup):

        if setup: self.Clear()
        self.setup = setup

    def Clear(self):

        self.value  = list("123456789")
        self.solved = ''
        self.shown  = self.buttons.copy()
        self.ShowDigit('')

        for button in self.buttons: button.Show()

    def IsSolved(self):

        return self.solved != ''

    def OnClick(self, event):

        button = event.GetEventObject()

        if self.setup:
            self.ShowSolved(button)
        else:
            self.Remove(button)

    def Remove(self, button):

        button.Hide()

        try:
            self.shown.remove(button)
            self.value.remove(button.name)
        except: pass

        if len(self.shown) == 1:
            self.ShowSolved(self.shown[0])

    def ShowSolved(self, button):

        for b in self.shown: b.Hide()

        self.shown  = []
        self.value  = []
        self.solved = button.name

        self.ShowDigit(button.name)

        evt = TileSolvedEvent(myEVT_TILE_SOLVED, self, button)
        self.GetEventHandler().ProcessEvent(evt)

    def ShowDigit(self, digit):

        if digit == '':
            self.bitmap.Hide()
        else:
            bmp = wx.Image('images/' + digit + '.jpg', wx.BITMAP_TYPE_ANY).ConvertToBitmap()
            self.bitmap.Bitmap = bmp
            self.bitmap.Centre()
            self.bitmap.Show()

# Main ###############################################################

if __name__ == '__main__':

    app = App()

    # Load the digit background images into bitmaps

    for i in ('123456789'):
        BITMAPS[i] = wx.Image(IMAGES + i + '.jpg', wx.BITMAP_TYPE_ANY).ConvertToBitmap()

    app.MainLoop()
The Controls Object
I figured that the number of options for the application was small enough, and the operations were simple enough that a menu bar was unnecessary. As such, all program functions, other than clicking of tiles, are performed through buttons.
Because the controls aren't really functional on their own I didn't provide a stand-alone test module for them.
The controls we'll need (at least for now) are:
Solve
This button will be enabled at startup, and when the user decides to enter a new puzzle by clicking Clear. The user will select solved tiles by clicking on them. Once the puzzle has been entered, clicking Solve will move the puzzle from Setup mode into Solve mode and disable the Solve button.
Clear
Clicking this button at any time will cause the puzzle to be reset to the start state. The Solve button will be enabled and the user will be able to enter a new puzzle.
Check
Just because all of the tiles have a digit doesn't mean that the puzzle has been successfully solved. Clicking this button will cause the puzzle to be scanned. The user will be notified at the first occurrence of
- a tile that has not been solved
- a non-unique digit in any pane
- a non-unique digit in any row
- a non-unique digit in any column
For the time being if the solution is incorrect, the user is pretty much screwed and would have to clear the puzzle, re-enter it and try again. Later on we will add in two features which are surprisingly easy to implement in Python (not so much in vb.Net). They are
- reset to start (re-display the originally entered values)
- unlimited undo
Inspect
While this is something you wouldn't see in the finished application, it's only a couple of extra lines of code. Clicking this will bring up the inspection window allowing you to browse the complete object hierarchy. Note again that sizers are not included by default in the object tree, but if you click on the Sizers button in the inspection toolbar you will be able to examine these as well.
NewButton
This method creates a new wx.Button object, binds it to a handler, and saves a reference to it in a dictionary (see properties below)
The controls object has the following properties:
buttons
Typically you would create a property for each button with a unique name like
self.solve = wx.Button...but because the same setup is required for each button (create, bind, save reference) I find it easier to have a generic NewButton method. Each button reference is saved in a dictionary with the button name as the key, and the button reference (address) as the value. That way when I need to do something like enable or disable a button I can just do
self.buttons['Solve'].Enabled = Falsepuzzle
This is a direct reference through the parent object, to the puzzle object. It's normally not recommended to cross reference objects like this. I could have arranged the objects like
Sudoku
    Controls
        Puzzle
        etc.
But with my limited knowledge of sizers at the time it would have made the layout more difficult. I could change it but that would mean rewriting this tutorial (again) and debugging (again).
The buttons are all in a single column so instead of the more complicated GridSizer, I use a BoxSizer with its orientation set to wx.VERTICAL. A BoxSizer can arrange controls in a single row (wx.HORIZONTAL), or a single column (wx.VERTICAL).
Here is the Controls object.
class Controls(wx.Panel):

    def __init__(self, parent, puzzle):

        super(Controls, self).__init__(parent, -1)

        self.buttons = {}               # references to command buttons
        self.puzzle  = puzzle           # direct path to puzzle object

        bsizer = wx.BoxSizer(wx.VERTICAL)
        bsizer.Add(self.NewButton(name='Solve'  , handler=self.Solve_OnClick)  ,0,wx.ALL,15)
        bsizer.Add(self.NewButton(name='Clear'  , handler=self.Clear_OnClick)  ,0,wx.ALL,15)
        bsizer.Add(self.NewButton(name='Check'  , handler=self.Check_OnClick)  ,0,wx.ALL,15)
        bsizer.Add(self.NewButton(name='Inspect', handler=self.Inspect_OnClick),0,wx.ALL,15)
        self.SetSizerAndFit(bsizer)

        self.buttons['Check'].Enabled = False

        self.SetBackgroundColour('grey')

    def NewButton(self, name, handler):

        button = wx.Button(self,name=name, label=name)
        button.Bind(wx.EVT_BUTTON, handler)
        self.buttons[name] = button
        return button

    def Solve_OnClick(self, event):

        self.puzzle.SetSetup(False)

        self.buttons['Solve' ].Enabled = False
        self.buttons['Check' ].Enabled = True

    def Inspect_OnClick(self, event):

        wx.lib.inspection.InspectionTool().Show()

    def Clear_OnClick(self, event):

        self.puzzle.SetSetup(True)

        self.buttons['Solve' ].Enabled = True
        self.buttons['Check' ].Enabled = False

    def Check_OnClick(self, event):

        result, text = self.puzzle.IsSolved()
        wx.MessageBox(text,"Sudoku", wx.OK | wx.CENTRE | wx.ICON_INFORMATION, self)
Notice that the Check_OnClick doesn't really have to do any checking. It just asks the puzzle object "have you been solved". I think the code, for the most part, is self-explanatory.
That just leaves us with the task of creating a top level window (frame) to contain everything else.
The Sudoku Object
This object will have no methods. It will act only as a container. It looks like this
class Sudoku(wx.Frame):

    def __init__(self, title):

        super(Sudoku, self).__init__(None, title=title, style=wx.CLOSE_BOX | wx.CAPTION)

        self.setup    = True
        self.puzzle   = Puzzle(self)
        self.controls = Controls(self, self.puzzle)

        bsizer = wx.BoxSizer(wx.HORIZONTAL)
        bsizer.Add(self.puzzle, 0, wx.ALL, 10)
        bsizer.Add(self.controls, 0, wx.EXPAND, 0)
        self.SetSizerAndFit(bsizer)

        self.SetBackgroundColour('white')
        self.Raise()
The only new thing here is self.Raise(). This causes the application window to initially appear on top of all other windows. This class contains only two things, a puzzle object and a controls object. Because they are arranged side-by-side, we again use a BoxSizer, but this time with wx.HORIZONTAL. Once again I will post the complete code for the project so far. Following that I will explain how to add the Reset and Undo features. This is the code from sudoku-minimal.py. If you run it you will have a functional, but still limited, Sudoku tool.
import wx
import wx.lib.mixins.inspection

IMAGES  = 'images/'
PRESETS = 'presets.txt'
BITMAPS = {}

SETUP_COLOUR = 'yellow'
SOLVE_COLOUR = 'light grey'
PANE_COLOUR  = 'white'

PANEBORDER = 15
TILEBORDER = 10

RPAD = (wx.TOP , 0, wx.BOTTOM)
CPAD = (wx.LEFT, 0, wx.RIGHT)

myEVT_TILE_SOLVED = wx.NewEventType()
EVT_TILE_SOLVED   = wx.PyEventBinder(myEVT_TILE_SOLVED)

class TileSolvedEvent(wx.PyCommandEvent):

    def __init__(self, evtType, tile, button):

        wx.PyCommandEvent.__init__(self, evtType)

        self.solved = button.name       # string value of the solved tile
        self.number = int(self.solved)  # integer value of the solved tile
        self.button = button            # button for the solved value
        self.tile   = tile              # the solved tile
        self.pane   = tile.Parent       # pane containing the solved tile

class App(wx.App):

    def OnInit(self):
        self.sudoku = Sudoku("Sudoku")
        self.sudoku.SetPosition((10,10))
        self.sudoku.Show()
        return True

class Sudoku(wx.Frame):

    def __init__(self, title):

        super(Sudoku, self).__init__(None, title=title, style=wx.CLOSE_BOX | wx.CAPTION)

        self.setup    = True
        self.puzzle   = Puzzle(self)
        self.controls = Controls(self, self.puzzle)

        bsizer = wx.BoxSizer(wx.HORIZONTAL)
        bsizer.Add(self.puzzle, 0, wx.ALL, 10)
        bsizer.Add(self.controls, 0, wx.EXPAND, 0)
        self.SetSizerAndFit(bsizer)

        self.SetBackgroundColour('white')
        self.Raise()

class Controls(wx.Panel):

    def __init__(self, parent, puzzle):

        super(Controls, self).__init__(parent, -1)

        self.buttons = {}               # references to command buttons
        self.puzzle  = puzzle           # direct path to puzzle object

        bsizer = wx.BoxSizer(wx.VERTICAL)
        bsizer.Add(self.NewButton(name='Solve'  , handler=self.Solve_OnClick)  ,0,wx.ALL,15)
        bsizer.Add(self.NewButton(name='Clear'  , handler=self.Clear_OnClick)  ,0,wx.ALL,15)
        bsizer.Add(self.NewButton(name='Check'  , handler=self.Check_OnClick)  ,0,wx.ALL,15)
        bsizer.Add(self.NewButton(name='Inspect', handler=self.Inspect_OnClick),0,wx.ALL,15)
        self.SetSizerAndFit(bsizer)

        self.buttons['Check'].Enabled = False

        self.SetBackgroundColour('grey')

    def NewButton(self, name, handler):

        button = wx.Button(self,name=name, label=name)
        button.Bind(wx.EVT_BUTTON, handler)
        self.buttons[name] = button
        return button

    def Solve_OnClick(self, event):

        self.puzzle.SetSetup(False)

        self.buttons['Solve' ].Enabled = False
        self.buttons['Check' ].Enabled = True

    def Inspect_OnClick(self, event):

        wx.lib.inspection.InspectionTool().Show()

    def Clear_OnClick(self, event):

        self.puzzle.SetSetup(True)

        self.buttons['Solve' ].Enabled = True
        self.buttons['Check' ].Enabled = False

    def Check_OnClick(self, event):

        result, text = self.puzzle.IsSolved()
        wx.MessageBox(text,"Sudoku", wx.OK | wx.CENTRE | wx.ICON_INFORMATION, self)

class Puzzle(wx.Panel):

    def __init__(self, parent):

        super(Puzzle, self).__init__(parent, -1, style=wx.BORDER_DOUBLE)

        self.setup = True               # true if in initial setup
        self.panes = []                 # all panes within this puzzle

        self.rows = [[0,1,2], [0,1,2], [0,1,2],
                     [3,4,5], [3,4,5], [3,4,5],
                     [6,7,8], [6,7,8], [6,7,8]]

        self.cols = [[0,3,6], [1,4,7], [2,5,8],
                     [0,3,6], [1,4,7], [2,5,8],
                     [0,3,6], [1,4,7], [2,5,8]]

        gsizer = wx.GridSizer(cols=3, vgap=5, hgap=5)

        for i in range(0,9):
            pane = Pane(self, name=str(i+1), index=i)
            self.panes.append(pane)
            flags = wx.ALIGN_CENTER | RPAD[pane.row] | CPAD[pane.col]
            gsizer.Add(pane, 0, flags, border=PANEBORDER)

        self.SetSizerAndFit(gsizer)

        self.SetBackgroundColour(SETUP_COLOUR)
        self.Bind(EVT_TILE_SOLVED, self.Tile_OnSolved)

    def SetSetup(self, setup):

        for pane in self.panes: pane.SetSetup(setup)

        if setup:
            self.state = []
        else:
            self.ScanAndEliminate()

        self.SetBackgroundColour(SETUP_COLOUR if setup else SOLVE_COLOUR)
        self.Refresh()

        self.setup = setup

    def Tile_OnSolved(self, event):

        self.Eliminate(event.pane.index, event.tile.index, event.button.index)

    def Eliminate(self, pIndex, tIndex, bIndex):

        # Eliminate the solved value from all tiles in all panels in the same row

        for p in self.rows[pIndex]:
            pane = self.panes[p]
            for t in self.rows[tIndex]:
                tile = pane.tiles[t]
                tile.Remove(tile.buttons[bIndex])

        # Eliminate the solved value from all tiles in all panels in the same column

        for p in self.cols[pIndex]:
            pane = self.panes[p]
            for t in self.cols[tIndex]:
                tile = pane.tiles[t]
                tile.Remove(tile.buttons[bIndex])

    def ScanAndEliminate(self):

        for pane in self.panes:
            for tile in pane.tiles:
                if tile.solved:
                    bIndex = int(tile.solved) - 1
                    self.Eliminate(pane.index, tile.index, bIndex)

    def IsSolved(self):

        # Check that every pane has been solved

        for p, pane in enumerate(self.panes):
            solved, reason = pane.IsSolved()
            if not solved: return (False, 'Pane ' + pane.name + ' ' + reason)

        # Check that each row has 9 unique digits

        for row in range(0,9):
            digits = set()
            for col in range(0,9):
                p = 3 * (row // 3) + col // 3
                t = col % 3 + 3 * (row % 3)
                digits.add(self.panes[p].tiles[t].solved)
            if len(digits) != 9:
                return (False, 'Row ' + str(r) + ' contains a repeated digit')

        # Check that each column has 9 unique digits

        for col in range(0,9):
            digits = set()
            for row in range(0,9):
                p = 3 * (row // 3) + col // 3
                t = col % 3 + 3 * (row % 3)
                digits.add(self.panes[p].tiles[t].solved)
            if len(digits) != 9:
                return False, 'Column ' + str(r) + ' contains a repeated digit'

            return (True, 'Congratulations')

class Pane(wx.Panel):

    def __init__(self, parent, name, index):

        super(Pane, self).__init__(parent, -1, style=wx.BORDER_DOUBLE)

        self.setup = True               # True if in setup mode, False otherwise
        self.tiles = []                 # All tiles in this pane
        self.name  = name               # Pane name is '1' to '9'
        self.index = index              # Pane index is 0 to 8
        self.row   = index // 3         # row number (0-2) for this pane
        self.col   = index  % 3         # col number (0-2) for this pane

        # Make a 3x3 grid of tiles

        gsizer = wx.GridSizer(cols=3, vgap=5, hgap=5)

        for i in range(0,9):
            tile = Tile(self, name=str(i+1), index=i)
            self.tiles.append(tile)
            flags = wx.ALIGN_CENTER | RPAD[tile.row] | CPAD[tile.col]
            gsizer.Add(tile, 0, flags, border=TILEBORDER)

        self.SetSizerAndFit(gsizer)

        self.SetBackgroundColour(PANE_COLOUR)
        self.Bind(EVT_TILE_SOLVED, self.Tile_OnSolved)

    def SetSetup(self, setup):

        for tile in self.tiles: tile.SetSetup(setup)

        self.setup = setup

    def IsSolved(self):

        digits = set()

        # Check that every tile has been solved and has all 9 digits

        for t,tile in enumerate(self.tiles):
            if not tile.IsSolved():
                return (False, 'Tile ' + tile.name + ' has not been solved')
            digits.add(tile.solved)

        if len(digits) != 9:
            return (False, 'Pane ' + self.name + ' has repeated digits')

        return (True, '')

    def Tile_OnSolved(self, event):

        b = event.button.index

        for tile in self.tiles:
            if not tile.IsSolved():
                tile.Remove(tile.buttons[b])

        if not self.setup:
            event.Skip()

class Tile(wx.Panel):

    def __init__(self, parent, name, index):

        super(Tile, self).__init__(parent, -1, style=wx.BORDER_DOUBLE)

        self.setup   = True                 # True if entering puzzle
        self.buttons = []                   # all buttons
        self.shown   = []                   # visible buttons
        self.name    = name                 # Tile name is '1' to '9'
        self.index   = index                # Tile index is 0 to 8
        self.solved  = ''                   # set to solved digit when solved
        self.row     = index // 3           # row number (0-2) for this tile
        self.col     = index  % 3           # col number (0-2) for this tile
        self.value   = list("123456789")    # visible digits

        # The bitmap control is used to display the solved value

        self.bitmap  = wx.StaticBitmap(self, -1)
        self.bitmap.Hide()

        # Create a 3x3 grid of buttons with an OnClick handler.

        gsizer = wx.GridSizer(cols=3, vgap=0, hgap=0)

        for i in range(0,9):
            button = wx.Button(self, label=str(i+1), size=(24,24))
            button.name = str(i+1)
            button.index = i
            button.Bind(wx.EVT_BUTTON, self.OnClick)
            self.buttons.append(button)
            self.shown.append(button)
            flags = wx.EXPAND | wx.ALIGN_CENTRE
            gsizer.Add(button,0, flags , border=0)
        self.SetSizerAndFit(gsizer)

    def SetSetup(self, setup):

        if setup: self.Clear()
        self.setup = setup

    def Clear(self):

        self.value  = list("123456789")
        self.solved = ''
        self.shown  = self.buttons.copy()
        self.ShowDigit('')

        for button in self.buttons: button.Show()

    def IsSolved(self):

        return self.solved != ''

    def OnClick(self, event):

        button = event.GetEventObject()

        if self.setup:
            self.ShowSolved(button)
        else:
            self.Remove(button)

    def Remove(self, button):

        button.Hide()

        try:
            self.shown.remove(button)
            self.value.remove(button.name)
        except: pass

        if len(self.shown) == 1:
            self.ShowSolved(self.shown[0])

    def ShowSolved(self, button):

        for b in self.shown: b.Hide()

        self.shown  = []
        self.value  = []
        self.solved = button.name

        self.ShowDigit(button.name)

        evt = TileSolvedEvent(myEVT_TILE_SOLVED, self, button)
        self.GetEventHandler().ProcessEvent(evt)

    def ShowDigit(self, digit):

        if digit == '':
            self.bitmap.Hide()
        else:
            bmp = wx.Image('images/' + digit + '.jpg', wx.BITMAP_TYPE_ANY).ConvertToBitmap()
            self.bitmap.Bitmap = bmp
            self.bitmap.Centre()
            self.bitmap.Show()

# Main ###############################################################

if __name__ == '__main__':

    app = App()

    # Load the digit background images into bitmaps

    for i in ('123456789'):
        BITMAPS[i] = wx.Image(IMAGES + i + '.jpg', wx.BITMAP_TYPE_ANY).ConvertToBitmap()

    app.MainLoop()
Finally, we are going to add our bells and whistles. Everyone makes mistakes. And it would be nice if all mistakes were correctable. Fortunately we can easily implement that. vb.Net requires the use of complicated data structures. Python (thank you Guido) has lists. What we would like to do is save the complete state of the puzzle at every change. Obviously, a good place to start is with the originally entered puzzle, then at every tile button click thereafter. We need two things
- some mechanism whereby a tile can signal to the puzzle that a state save is needed
- some sort of state stack where we can push (save) or pop (restore) a state
We have already seen what to do for the first item. All we have to do is create another custom event and trigger it in the tile button click handler. As long as we do that at the top of the handler, the new event will be handled before anything else changes state. The second item is also quite trivial. We create a new method for a pane that returns the state of that pane. Similarly, we create the same method for a tile. The state list will contain one list for each pane, where each pane entry is a list containing the state for each tile. The state of a tile is simply the list of remaining digits for that tile. When we want to restore a previous state we can
- clear the puzzle
- restore the values for all tiles
But let's say the user has really messed things up and would like to start over. In this case, rather than have the user click undo many times, it would be more convenient to have a Reset button. This would throw away everything in the state stack except for state[0] (the initial state), then call ScanAndEliminate to resolve all puzzle tiles.
So we are actually going to have a couple of new methods for Pane and Tile. These will be
GetState
Which will return the current state of that object, and
SetState
Which will take a state entry and restore it to that object.
For Pane they look like
def GetState(self):
    state = []
    for tile in self.tiles:
        state.append(tile.GetState())
    return state

def SetState(self, state):
    for t,tile in enumerate(state):
        self.tiles[t].SetState(tile)
and for Tile they are
def GetState(self):

    return [self.solved] if self.solved else self.value.copy()

def SetState(self, state):

    self.Clear()

    if len(state) == 1:
        button = self.buttons[int(state[0])-1]
        self.ShowSolved(button)
    else:
        for index,digit in enumerate(list("123456789")):
            if digit not in state:
                self.Remove(self.buttons[index])
In GetState (tile) note that everything in state is a list so for a single value (when the tile is solved) we must return
[self.solved]rather than
self.solvedThere is still one problem. When restoring states at the tile level, we don't want to start triggering TileSolved events so we are going to have to suppress them somehow. We'll introduce another tile property, self.events which we will normally have set to True, but we will set it to False while restoring a tile state. Our tile SetState will then look like
def SetState(self, state):

    self.events = False

    self.Clear()

    if len(state) == 1:
        button = self.buttons[int(state[0])-1]
        self.ShowSolved(button)
    else:
        for index,digit in enumerate(list("123456789")):
            if digit not in state:
                self.Remove(self.buttons[index])

    self.events = True
and in our button ShowSolved method we will now do
    if self.events:
        evt = TileSolvedEvent(myEVT_TILE_SOLVED, self, button)
        self.GetEventHandler().ProcessEvent(evt)
We'll add an Undo button in our Controls object and a little housekeeping code in the Puzzle object to create and manage the stack. These methods are
GetState
This returns one list which is the complete puzzle state. All it has to do it build a list containing the state of each pane.
PushState
Calls GetState to get the current state and pushes it onto the stack.
PopState
Pops the previous state off the stack and restores it. Note that it will always preserve the initial state.
One more nice feature would be the ability to load a puzzle from a file. Over the months of solving Sudoku puzzles with my vb.Net app I have come across a number of puzzles which were challenging but not entirely evil. I had a button in that app which would append the initial puzzle to a file of puzzle presets that had the form
--98-2--- 6-7-5---- 13-----9- --478---- --354-9-- ----297-- -9-----65 ----9-1-8 ---5-1---
-1--27--- --7--86-3 -------12 --9-8-1-- ----4---- --6-3-5-- 34------- 7-91--5-- ---69--8-
-1--5-3-4 --57----- 2---81--9 -----1--- -6-3-4-5- ---8----- 9--42---3 -----85-- 1-6-5--2-
-135--9-- -----7-6- 7-93---8- ---6---8- --1---5-- -4---3--- -2---68-9 -7-9----- --8--427-
-15-----4 7-4---8-- -----6-3- -79-6-3-- ----5---- --2-4-16- -3-1----- --8---4-3 6-----89-
-182--3-- 7--8----1 ---9---7- 1-573---6 --------- 7---962-3 -7---1--- 5----8--2 --2--938-
-2------7 --8--79-- 37--4--62 ----5-9-- --5---3-- --9-3---- 18--9--32 --36--5-- 7------1-
Each line represents one puzzle. Each set of 9 values represents the initial values of a pane. For example, the first line,
--98-2--- 6-7-5---- 13-----9- --478---- --354-9-- ----297-- -9-----65 ----9-1-8 ---5-1---would resolve into the puzzle
- - 9   6 - 7   1 3 -
8 - 2   - 5 -   - - -
- - -   - - -   - 9 -

- - 4   - - 3   - - -
7 8 -   5 4 -   - 2 9
- - -   9 - -   7 - -

- 9 -   - - -   - - -
- - -   - 9 -   5 - 1
- 6 5   1 - 8   - - -
So it was easy to add a Preset button to load a random line from the preset file into the app. As a future feature I might add a hint button which could tell the user if a particular digit appeared only once in a pane, row or column.
So our final (except for the many improvements I hope to make with some helpful feedback) application follows. You can find the code in the file Sudoku.py.
"""
    Name:

        Sudoku.py

    Description:

        This is a GUI tool to be used as an aid in solving Sudoku puzzles. While
        not elim