Introduction
Navigation component is an abstraction on top of FragmentManager, which simplifies navigation between fragments. In this tutorial, we will learn how to use the Navigation component in our App.
Goal
At the end of the tutorial, you would have learned:
- How to use the Navigation Component.
Tools Required
- Android Studio. The version used in this tutorial is Arctic Fox 2020.3.1 Patch 4.
Prerequisite Knowledge
- Basic Android.
Project Setup
To follow along with the tutorial, perform the steps below:
-
Create a new Android project with the default Empty Activity.
-
Remove the default Hello World! TextView.
-
Add the two string resources below into strings.xml.
<string name="hello_blank_fragment">Hello blank fragment</string> <string name="second_screen">2nd Screen</string> -
Add dependencies below to your Module gradle file.
 def nav_version = "2.3.5"

 // Kotlin
 implementation("androidx.navigation:navigation-fragment-ktx:$nav_version")
 implementation("androidx.navigation:navigation-ui-ktx:$nav_version")
Navigation Component Concept Overview
Before we can start using the Navigation component, we will need to understand the basic concepts of this library.
- Navigation Graph: this is an XML file that contains the navigation logics for your Destinations. Android Studio includes a powerful GUI editor to make it easy to visualize your App’s navigation flow.
- Navigation Host: this is an empty activity that houses a NavHostFragment.
- NavHostFragment: an object whose primary job is swapping out destinations using its NavController.
- NavController: an object with
navigate()functions that you can call to direct user navigation. - Destination: where the user navigates to.
- Home Destination: the first screen that the user sees.
Create the Nav graph
Now that we are somewhat familiar with the basic concepts, the first thing that we will need to do is to create the Navigation Graph XML file by following the steps below.
- Right-click on res > New > Android Resource File.
- Generate the nav_graph.xml file based on the settings in the below screenshot. This will place the file under the navigation directory as well as letting Android Studio know that this file can be opened with the Navigation Editor.

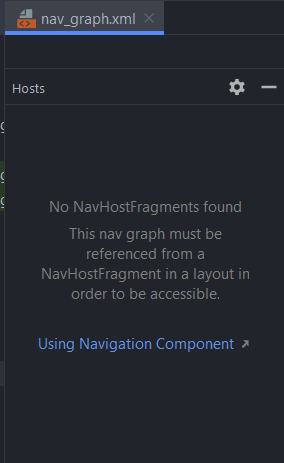
- Open nav_graph.xml in the Design surface. Notice that there is currently zero Host under the Hosts panel.
Designate an Activity as the Navigation Host
We need a Navigation Host to house the NavHostFragment. Follow the steps below to add a Navigation Host:
-
Open activity_main.xml.
-
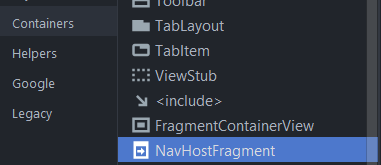
Palette > Container > (select) NavHostFragment.
-
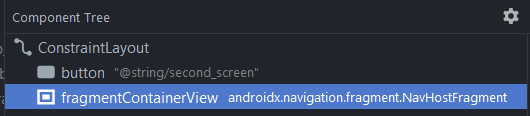
Drag NavHostFragment into the Component Tree.
-
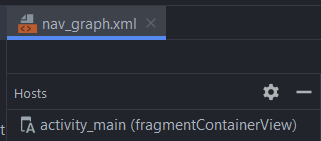
Go back to nav_graph.xml in the Design surface, we will now see that
acitivty_mainnow shows up as a Host. This means that theactivity_mainNavigation Host is associated with this navigation graph (nav_graph.xml).
-
Now open activity_main.xml in Code view. The
app:navGraphattribute that you see here determines that association.app:navGraph="@navigation/nav_graph"
Home Destination
Next, we need to create a new destination(Fragment) and designate it as the Home Destination.
-
Open nav_graph.xml in the Surface view.
-
Select the New Destination icon > Create new destination.
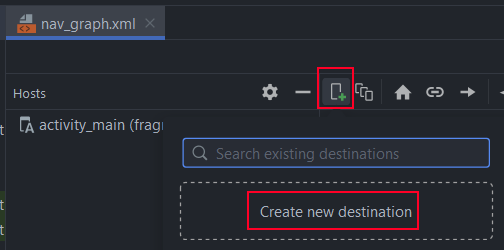
-
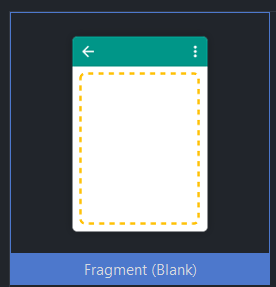
We only need a very simple Fragment, so select Fragment (Blank) > Next.
-
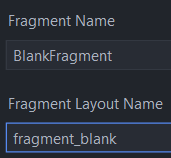
Use
BlankFragmentas the Fragment Name. -
Use
fragment_blankas the Fragment Layout Name > Finish.
-
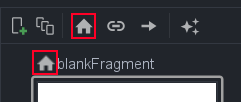
Designate
fragment_blankas the Home Destination by selecting it and then click on the house icon.
-
While we are at it, let us modify fragment_blank.xml a little bit more for this tutorial. Remove the default TextView from this fragment.
-
Convert the Fragment FrameLayout to ConstraintLayout**.

-
Add a new Button inside ConstraintView using the code below. We will use this Button to navigate to another screen later.
 <Button
    android:id="@+id/button"
    android:layout_width="wrap_content"
    android:layout_height="wrap_content"
    android:text="@string/second_screen"
    app:layout_constraintBottom_toBottomOf="parent"
    app:layout_constraintEnd_toEndOf="parent"
    app:layout_constraintStart_toStartOf="parent"
    app:layout_constraintTop_toTopOf="parent" />
Add another Destination
Next, we will need to add another destination(Fragment) to navigate to. Repeat the steps 1-5 in the previous section, but suffix this fragment’s Fragment Name and Fragment Layout Name with a number 2.
Connect the Destinations
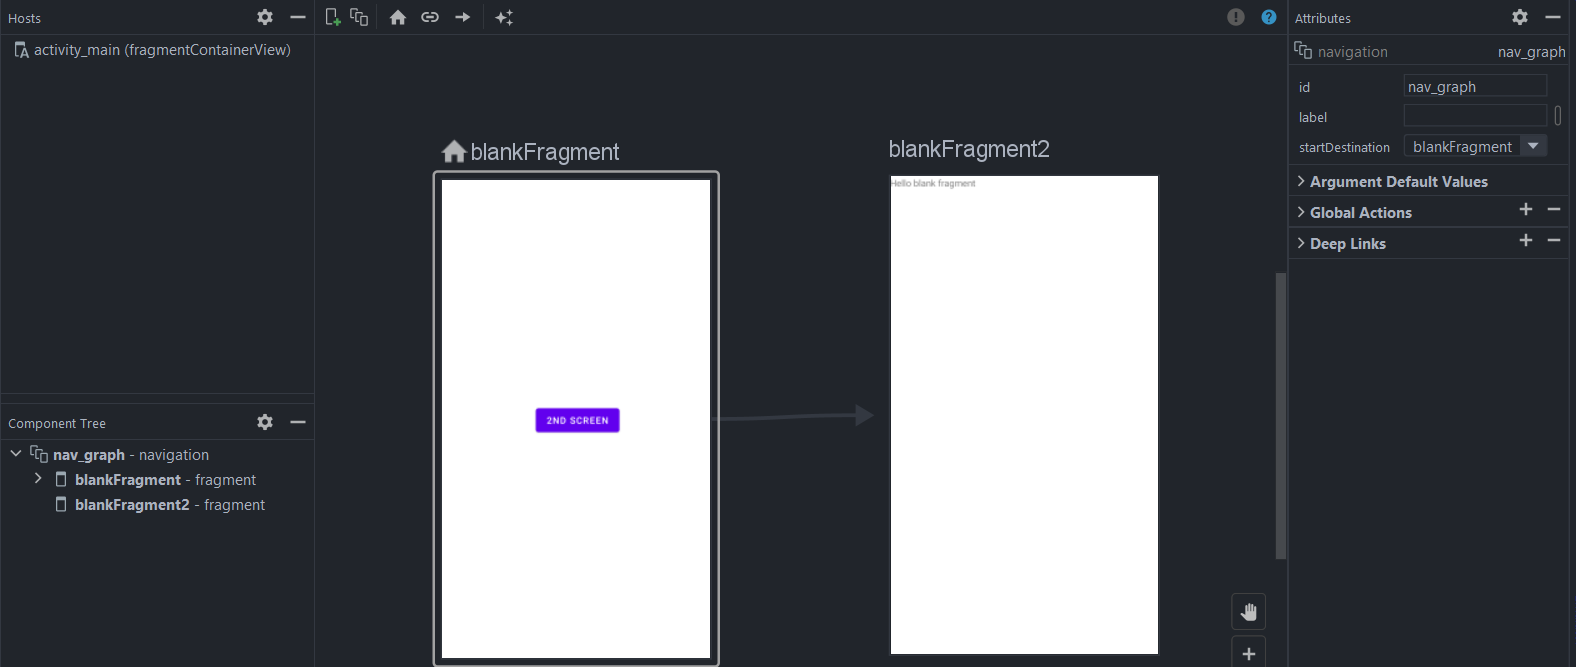
Now that we have both destinations, we can start connecting them with actions.
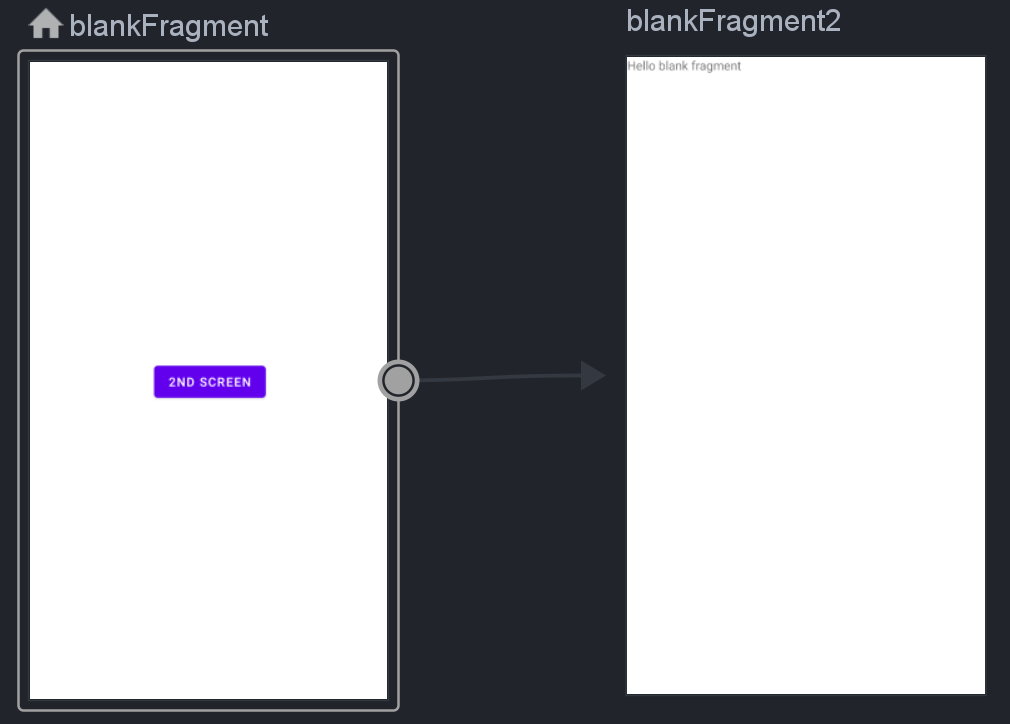
- Connect the two fragments by dragging the circle on the right side of
blankFragmenttoblankFragment2.
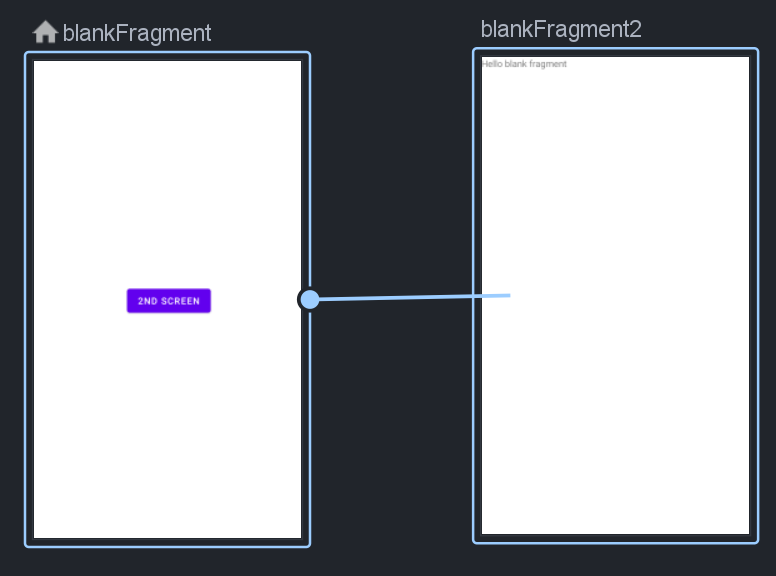
- Alternatively, you can also use the Add Action button to link the two destinations.

- After connecting the two destinations, you should see something similar to the screenshot below. The Navigation Editor becomes a powerful tool to visualize your Application flow especially when you have a lot of destinations.
Navigate to Destinations
To navigate to another destination, we will need to obtain the reference of the NavController object.
-
Inside BlankFragment.kt, override the
onViewCreated()callback.override fun onViewCreated(view: View, savedInstanceState: Bundle?) { super.onViewCreated(view, savedInstanceState) } -
Inside
onViewCreated(), get a reference to the NavController object withfindNavController(). This function comes from thenavigation-fragment-ktxdependency that we added in the beginning.val navController = findNavController() //gets the navController -
Get a reference to the Button.
val button = view.findViewById<Button>(R.id.button) //finds the Button -
Bind the Button
onClickListenerto a Navigation action with the code below. Note that we are using the android:id of the<action>element located insidenav_graph.xmlhere.button.setOnClickListener { //navigate using the Action ID, not fragment ID navController.navigate(R.id.action_blankFragment_to_blankFragment2) }
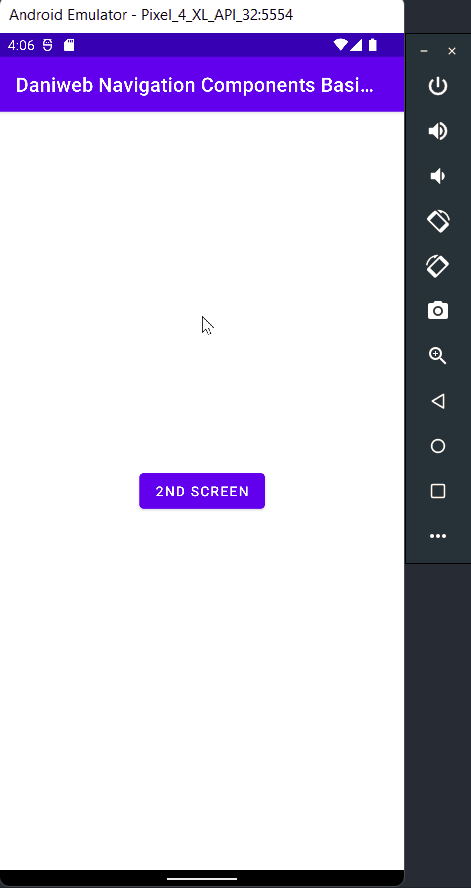
Run the app
We are now ready to run the App. Try clicking on the Button to navigate to the next destination in the flow and then back.
Solution Code
build.gradle
plugins {
id 'com.android.application'
id 'kotlin-android'
}
android {
compileSdk 31
defaultConfig {
applicationId "com.example.daniwebnavigationcomponentsbasics"
minSdk 21
targetSdk 31
versionCode 1
versionName "1.0"
testInstrumentationRunner "androidx.test.runner.AndroidJUnitRunner"
}
buildTypes {
release {
minifyEnabled false
proguardFiles getDefaultProguardFile('proguard-android-optimize.txt'), 'proguard-rules.pro'
}
}
compileOptions {
sourceCompatibility JavaVersion.VERSION_1_8
targetCompatibility JavaVersion.VERSION_1_8
}
kotlinOptions {
jvmTarget = '1.8'
}
}
dependencies {
implementation 'androidx.legacy:legacy-support-v4:1.0.0'
def nav_version = "2.3.5"
// Kotlin
implementation("androidx.navigation:navigation-fragment-ktx:$nav_version")
implementation("androidx.navigation:navigation-ui-ktx:$nav_version")
implementation 'androidx.core:core-ktx:1.7.0'
implementation 'androidx.appcompat:appcompat:1.4.0'
implementation 'com.google.android.material:material:1.4.0'
implementation 'androidx.constraintlayout:constraintlayout:2.1.2'
testImplementation 'junit:junit:4.+'
androidTestImplementation 'androidx.test.ext:junit:1.1.3'
androidTestImplementation 'androidx.test.espresso:espresso-core:3.4.0'
}strings.xml
<resources>
<string name="app_name">Daniweb Navigation Components Basics</string>
<string name="hello_blank_fragment">Hello blank fragment</string>
<string name="second_screen">2nd Screen</string>
</resources>nav_graph.xml
<?xml version="1.0" encoding="utf-8"?>
<navigation xmlns:android="http://schemas.android.com/apk/res/android"
xmlns:app="http://schemas.android.com/apk/res-auto"
xmlns:tools="http://schemas.android.com/tools"
android:id="@+id/nav_graph"
app:startDestination="@id/blankFragment">
<fragment
android:id="@+id/blankFragment"
android:name="com.example.daniwebnavigationcomponentsbasics.BlankFragment"
android:label="fragment_blank"
tools:layout="@layout/fragment_blank" >
<action
android:id="@+id/action_blankFragment_to_blankFragment2"
app:destination="@id/blankFragment2" />
</fragment>
<fragment
android:id="@+id/blankFragment2"
android:name="com.example.daniwebnavigationcomponentsbasics.BlankFragment2"
android:label="fragment_blank2"
tools:layout="@layout/fragment_blank2" />
</navigation>fragment_blank.xml
<?xml version="1.0" encoding="utf-8"?>
<androidx.constraintlayout.widget.ConstraintLayout xmlns:android="http://schemas.android.com/apk/res/android"
xmlns:app="http://schemas.android.com/apk/res-auto"
xmlns:tools="http://schemas.android.com/tools"
android:id="@+id/frameLayout"
android:layout_width="match_parent"
android:layout_height="match_parent"
tools:context=".BlankFragment" >
<Button
android:id="@+id/button"
android:layout_width="wrap_content"
android:layout_height="wrap_content"
android:text="@string/second_screen"
app:layout_constraintBottom_toBottomOf="parent"
app:layout_constraintEnd_toEndOf="parent"
app:layout_constraintStart_toStartOf="parent"
app:layout_constraintTop_toTopOf="parent" />
</androidx.constraintlayout.widget.ConstraintLayout>fragment_blank2.xml
<?xml version="1.0" encoding="utf-8"?>
<FrameLayout xmlns:android="http://schemas.android.com/apk/res/android"
xmlns:tools="http://schemas.android.com/tools"
android:layout_width="match_parent"
android:layout_height="match_parent"
tools:context=".BlankFragment2">
<!-- TODO: Update blank fragment layout -->
<TextView
android:layout_width="match_parent"
android:layout_height="match_parent"
android:text="@string/hello_blank_fragment" />
</FrameLayout>activity_main.xml
<?xml version="1.0" encoding="utf-8"?>
<androidx.constraintlayout.widget.ConstraintLayout xmlns:android="http://schemas.android.com/apk/res/android"
xmlns:app="http://schemas.android.com/apk/res-auto"
xmlns:tools="http://schemas.android.com/tools"
android:layout_width="match_parent"
android:layout_height="match_parent"
tools:context=".MainActivity">
<androidx.fragment.app.FragmentContainerView
android:id="@+id/fragmentContainerView"
android:name="androidx.navigation.fragment.NavHostFragment"
android:layout_width="match_parent"
android:layout_height="match_parent"
app:defaultNavHost="true"
app:navGraph="@navigation/nav_graph"
/>
</androidx.constraintlayout.widget.ConstraintLayout>BlankFragment.kt
package com.example.daniwebnavigationcomponentsbasics
import android.os.Bundle
import androidx.fragment.app.Fragment
import android.view.LayoutInflater
import android.view.View
import android.view.ViewGroup
import android.widget.Button
import androidx.navigation.fragment.findNavController
// TODO: Rename parameter arguments, choose names that match
// the fragment initialization parameters, e.g. ARG_ITEM_NUMBER
private const val ARG_PARAM1 = "param1"
private const val ARG_PARAM2 = "param2"
/**
* A simple [Fragment] subclass.
* Use the [BlankFragment.newInstance] factory method to
* create an instance of this fragment.
*/
class BlankFragment : Fragment() {
// TODO: Rename and change types of parameters
private var param1: String? = null
private var param2: String? = null
override fun onCreate(savedInstanceState: Bundle?) {
super.onCreate(savedInstanceState)
arguments?.let {
param1 = it.getString(ARG_PARAM1)
param2 = it.getString(ARG_PARAM2)
}
}
override fun onCreateView(
inflater: LayoutInflater, container: ViewGroup?,
savedInstanceState: Bundle?
): View? {
// Inflate the layout for this fragment
return inflater.inflate(R.layout.fragment_blank, container, false)
}
override fun onViewCreated(view: View, savedInstanceState: Bundle?) {
super.onViewCreated(view, savedInstanceState)
val navController = findNavController() //gets the navController
val button = view.findViewById<Button>(R.id.button) //finds the Button
 button.setOnClickListener {
    //navigate using the Action ID, not fragment ID
    navController.navigate(R.id.action_blankFragment_to_blankFragment2)
 }
}
companion object {
/**
* Use this factory method to create a new instance of
* this fragment using the provided parameters.
*
* @param param1 Parameter 1.
* @param param2 Parameter 2.
* @return A new instance of fragment BlankFragment.
*/
// TODO: Rename and change types and number of parameters
@JvmStatic
fun newInstance(param1: String, param2: String) =
BlankFragment().apply {
arguments = Bundle().apply {
putString(ARG_PARAM1, param1)
putString(ARG_PARAM2, param2)
}
}
}
}Summary
We have learned how to use the Navigation Component.
The full project code can be found here https://github.com/dmitrilc/DaniwebNavigationComponentsBasics