Introduction
If you are working with the latest Material 3 libraries on Android, you might have wondered how to use the Bottom Navigation Bar in your App. In this tutorial, we will learn how to use the Material 3 Bottom Navigation Bar (BNB).
Goals
At the end of the tutorial, you would have learned:
- How to use the Material 3 Bottom Navigation Bar.
Tools Required
- Android Studio. The version used in this tutorial is Arctic Fox 2020.3.1 Patch 4.
Prerequisite Knowledge
- Intermediate Android.
Project Setup
To follow along with the tutorial, perform the steps below:
-
Create a new Android project with the default Empty Activity.
-
Add the Material 3 dependency below into your project’s build.gradle file.
implementation 'com.google.android.material:material:1.5.0' -
Sync Gradle.
-
Change the current theme(themes.xml)
parenttoTheme.Material3.DayNight.NoActionBar.
Add the Bottom Navigation Bar
First, let us add the BNB into our project. I normally use BNB with a LinearLayout-based parent, but that is not a hard requirement. We can just add a BNB to the ConstraintLayout that we already have in activity_main.xml just fine.
-
Open activity_main.xml in Code view, add the code below under the default
<TextView>. The code below already includes constraints for the parent ConstraintLayout, so you do not have to worry about them.<com.google.android.material.bottomnavigation.BottomNavigationView android:id="@+id/bottom_navigation" android:layout_width="match_parent" android:layout_height="wrap_content" app:layout_constraintBottom_toBottomOf="parent" app:layout_constraintEnd_toEndOf="parent" app:layout_constraintStart_toStartOf="parent" app:menu="@menu/bottom_navigation_menu" /> -
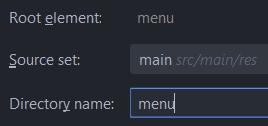
Upon seeing the compile error
Cannot resolve symbol '@menu/bottom_navigation_menu', go ahead and create the missing file with the same configurations as the screenshot below.
Bottom Navigation Bar items
Because the newly created menu resource is empty, the BNB is just an empty bar. Let us assume that we are building an App for a taxi company, so we will add five shortcuts for the most frequently used features into the BNB. The five shortcuts are:
- Call Cab: for calling a cab.
- Map: for tracking where your Cab is.
- SOS: a convenient button for emergencies.
- Schedule: schedule a taxi for a future trip.
- Payment: payment-related functionalities.
To add the five shortcuts to our BNB, follow the steps below:
-
Add these 5 vector assets from the built-in Clip Art library into res/drawable.
ic_baseline_local_taxi_24 ic_baseline_map_24 ic_baseline_emergency_24 ic_baseline_edit_calendar_24 ic_baseline_payment_24 -
Add these 5 string resources into strings.xml.
<string name="text_label_1">Call Cab</string> <string name="text_label_2">Map</string> <string name="text_label_3">SOS</string> <string name="text_label_4">Schedule</string> <string name="text_label_5">Payment</string> -
Open the file bottom_navigation_menu.xml. Add these
<item>elements as children of the root<menu>.<?xml version="1.0" encoding="utf-8"?> <menu xmlns:android="http://schemas.android.com/apk/res/android"> <item android:id="@+id/page_1" android:enabled="true" android:icon="@drawable/ic_baseline_local_taxi_24" android:title="@string/text_label_1"/> <item android:id="@+id/page_2" android:enabled="true" android:icon="@drawable/ic_baseline_map_24" android:title="@string/text_label_2"/> <item android:id="@+id/page_3" android:enabled="true" android:icon="@drawable/ic_baseline_emergency_24" android:title="@string/text_label_3"/> <item android:id="@+id/page_4" android:enabled="true" android:icon="@drawable/ic_baseline_edit_calendar_24" android:title="@string/text_label_4"/> <item android:id="@+id/page_5" android:enabled="true" android:icon="@drawable/ic_baseline_payment_24" android:title="@string/text_label_5"/> </menu>
If you run the app now, you can see something similar to the animation below.
Menu Item actions
Currently, the BNB buttons are technically only dummy placeholders without any useful behavior. To bind user navigation actions to callbacks, you can use the function NavigationBarView#setOnItemSelectedLisenter(). Append the code below into MainActivity.kt’s onCreate().
val textView = findViewById<TextView>(R.id.textView)
val bottomNav = findViewById<BottomNavigationView>(R.id.bottom_navigation)
bottomNav.setOnItemSelectedListener { item ->
when(item.itemId){
R.id.page_1 -> {
textView.text = getString(R.string.text_label_1)
true
}
R.id.page_2 -> {
textView.text = getString(R.string.text_label_2)
true
}
R.id.page_3 -> {
textView.text = getString(R.string.text_label_3)
true
}
R.id.page_4 -> {
textView.text = getString(R.string.text_label_4)
true
}
R.id.page_5 -> {
textView.text = getString(R.string.text_label_5)
true
}
else -> false
}
}Now the default TextView will change every time a navigation action occurs. Run the app again and it will behave similarly to the animation below.
Solution Code
activity_main.xml
<?xml version="1.0" encoding="utf-8"?>
<androidx.constraintlayout.widget.ConstraintLayout xmlns:android="http://schemas.android.com/apk/res/android"
xmlns:app="http://schemas.android.com/apk/res-auto"
xmlns:tools="http://schemas.android.com/tools"
android:layout_width="match_parent"
android:layout_height="match_parent"
tools:context=".MainActivity">
<TextView
android:id="@+id/textView"
android:layout_width="wrap_content"
android:layout_height="wrap_content"
android:text="Hello World!"
app:layout_constraintBottom_toBottomOf="parent"
app:layout_constraintLeft_toLeftOf="parent"
app:layout_constraintRight_toRightOf="parent"
app:layout_constraintTop_toTopOf="parent" />
 <com.google.android.material.bottomnavigation.BottomNavigationView
    android:id="@+id/bottom_navigation"
    android:layout_width="match_parent"
    android:layout_height="wrap_content"
    app:layout_constraintBottom_toBottomOf="parent"
    app:layout_constraintEnd_toEndOf="parent"
    app:layout_constraintStart_toStartOf="parent"
    app:menu="@menu/bottom_navigation_menu" />
</androidx.constraintlayout.widget.ConstraintLayout>MainActivity.kt
package com.example.daniwebmaterial3bottomnavigationbar
import androidx.appcompat.app.AppCompatActivity
import android.os.Bundle
import android.widget.TextView
import com.google.android.material.bottomnavigation.BottomNavigationView
class MainActivity : AppCompatActivity() {
override fun onCreate(savedInstanceState: Bundle?) {
super.onCreate(savedInstanceState)
setContentView(R.layout.activity_main)
val textView = findViewById<TextView>(R.id.textView)
val bottomNav = findViewById<BottomNavigationView>(R.id.bottom_navigation)
bottomNav.setOnItemSelectedListener { item ->
when(item.itemId){
R.id.page_1 -> {
textView.text = getString(R.string.text_label_1)
true
}
R.id.page_2 -> {
textView.text = getString(R.string.text_label_2)
true
}
R.id.page_3 -> {
textView.text = getString(R.string.text_label_3)
true
}
R.id.page_4 -> {
textView.text = getString(R.string.text_label_4)
true
}
R.id.page_5 -> {
textView.text = getString(R.string.text_label_5)
true
}
else -> false
}
}
}
}bottom_navigation_menu.xml
<?xml version="1.0" encoding="utf-8"?>
<menu xmlns:android="http://schemas.android.com/apk/res/android">
<item
android:id="@+id/page_1"
android:enabled="true"
android:icon="@drawable/ic_baseline_local_taxi_24"
android:title="@string/text_label_1"/>
<item
android:id="@+id/page_2"
android:enabled="true"
android:icon="@drawable/ic_baseline_map_24"
android:title="@string/text_label_2"/>
<item
android:id="@+id/page_3"
android:enabled="true"
android:icon="@drawable/ic_baseline_emergency_24"
android:title="@string/text_label_3"/>
<item
android:id="@+id/page_4"
android:enabled="true"
android:icon="@drawable/ic_baseline_edit_calendar_24"
android:title="@string/text_label_4"/>
<item
android:id="@+id/page_5"
android:enabled="true"
android:icon="@drawable/ic_baseline_payment_24"
android:title="@string/text_label_5"/>
</menu>strings.xml
<resources>
<string name="app_name">Daniweb Material 3 Bottom Navigation Bar</string>
 <string name="text_label_1">Call Cab</string>
 <string name="text_label_2">Map</string>
 <string name="text_label_3">SOS</string>
 <string name="text_label_4">Schedule</string>
 <string name="text_label_5">Payment</string>
</resources>themes.xml
<resources xmlns:tools="http://schemas.android.com/tools">
   <!-- Base application theme. -->
   <style name="Theme.DaniwebMaterial3BottomNavigationBar" parent="Theme.Material3.DayNight.NoActionBar">
       <!-- Primary brand color. -->
       <item name="colorPrimary">@color/purple_500</item>
       <item name="colorPrimaryVariant">@color/purple_700</item>
       <item name="colorOnPrimary">@color/white</item>
       <!-- Secondary brand color. -->
       <item name="colorSecondary">@color/teal_200</item>
       <item name="colorSecondaryVariant">@color/teal_700</item>
       <item name="colorOnSecondary">@color/black</item>
       <!-- Status bar color. -->
       <item name="android:statusBarColor" tools:targetApi="l">?attr/colorPrimaryVariant</item>
       <!-- Customize your theme here. -->
   </style>
</resources>
build.gradle
plugins {
   id 'com.android.application'
   id 'kotlin-android'
}

android {
   compileSdk 31

   defaultConfig {
       applicationId "com.example.daniwebmaterial3bottomnavigationbar"
       minSdk 21
       targetSdk 31
       versionCode 1
       versionName "1.0"

       testInstrumentationRunner "androidx.test.runner.AndroidJUnitRunner"
   }

   buildTypes {
       release {
           minifyEnabled false
           proguardFiles getDefaultProguardFile('proguard-android-optimize.txt'), 'proguard-rules.pro'
       }
   }
   compileOptions {
       sourceCompatibility JavaVersion.VERSION_1_8
       targetCompatibility JavaVersion.VERSION_1_8
   }
   kotlinOptions {
       jvmTarget = '1.8'
   }
}

dependencies {
   implementation 'com.google.android.material:material:1.5.0'
   implementation 'androidx.core:core-ktx:1.7.0'
   implementation 'androidx.appcompat:appcompat:1.4.1'
   implementation 'com.google.android.material:material:1.5.0'
   implementation 'androidx.constraintlayout:constraintlayout:2.1.3'
   testImplementation 'junit:junit:4.+'
   androidTestImplementation 'androidx.test.ext:junit:1.1.3'
   androidTestImplementation 'androidx.test.espresso:espresso-core:3.4.0'
}
Summary
We have learned how to use the Bottom Navigation Bar. The full project code can be found at https://github.com/dmitrilc/DaniwebMaterial3BottomNavigationBar