Introduction
In this tutorial, we will learn how to capture a picture with the new ActivityResult APIs(androidx.activity.result), which replace the startActivityForResult() and onActivityResult() APIs(from Activity class).
Additionally, we will also learn about the ContentProvider FileProvider, which we will have to set up to save our images.
Goal
At the end of the tutorial, you would have learned:
- How to use ActivityResult APIs to launch another Activity(default Camera) from your App.
- How to set up and use FileProvider.
Tools Required
- Android Studio. The version used in this tutorial is Arctic Fox 2020.3.1 Patch 4.
Prerequisite Knowledge
- Intermediate Android.
Project Setup
To follow along with the tutorial, perform the steps below:
-
Create a new Android project with the default Empty Activity.
-
Remove the default Hello World! TextView.
-
Add a new Button inside ConstraintView using the code below.
<Button android:id="@+id/button" android:layout_width="wrap_content" android:layout_height="wrap_content" android:text="@string/button_takePicture" app:layout_constraintBottom_toBottomOf="parent" app:layout_constraintEnd_toEndOf="parent" app:layout_constraintStart_toStartOf="parent" app:layout_constraintTop_toTopOf="parent" /> -
Add these string resources in strings.xml. You should modify the
authoritiesstring value if your domain name is different.<string name="button_takePicture">Take Picture</string> <string name="temp_images_dir">temp_images</string> <string name="temp_image">temp_image.jpg</string> <string name="authorities">com.example.fileprovider</string> -
Add a new ImageView under the Button using the code below.
<ImageView android:id="@+id/imageView" android:layout_width="wrap_content" android:layout_height="0dp" android:layout_marginTop="8dp" android:layout_marginBottom="8dp" app:layout_constraintBottom_toBottomOf="parent" app:layout_constraintEnd_toEndOf="parent" app:layout_constraintStart_toStartOf="parent" app:layout_constraintTop_toBottomOf="@+id/button" tools:srcCompat="@tools:sample/avatars" /> -
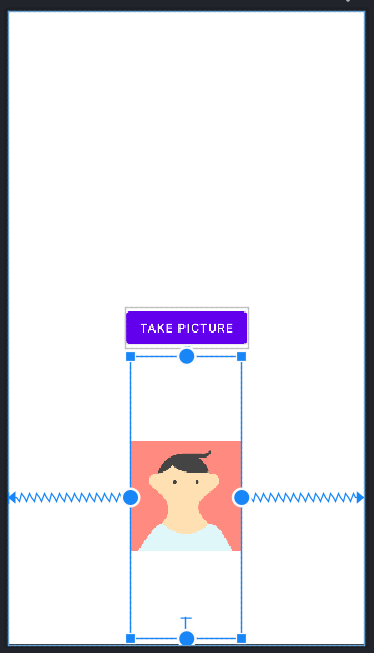
Your activity_main.xml should look like the screenshot below.
Project Overview
Firstly, let us quickly go over the starter project.
- The project mostly has only two elements, a Button and an ImageView.
- The Button is centered inside the parent ConstraintLayout.
- The ImageView does not contain any Drawable resource at runtime. The avatar image that you see right now only shows up during development.
- The ImageView has
8dpmargins at the top and the bottom and it is constrained to sit below the Button.
When the project is completed, our App will be able to perform the following actions:
- When the Button is clicked, our App will launch the default Camera app.
- After a picture is taken with the Camera app, Android will automatically return our App to the foreground.
- The newly taken picture will be displayed inside the ImageView element.
- Anytime we take a new picture, the ImageView will refresh its current Drawable.
FileProvider Setup
Before we can implement the ActivityResult API, we need to agree on a way to save the taken pictures first. For this tutorial, we will use the FileProvider API, which encapsulates File URIs as Content URIs(android.net.Uri). launch() functions from ActivityResultLauncher specifically require Uri objects.
To set up FileProvider for our project, there are a couple of steps that we need to follow:
-
Define a FileProvider in the manifest (inside the
<application>element, but outside of the<activity>element). We needandroid:grantUriPermissionto betruehere because the Camera App will need temporary access to Uri objects internal to our App via the FileProvider. If you are not sure what these attributes do to<provider>, you can check out the docs here.<provider android:name="androidx.core.content.FileProvider" android:authorities="@string/authorities" android:exported="false" android:grantUriPermissions="true"> </provider> -
FileProvider can only generate Uri objects from files that you specified beforehand, so we need to pass the
<meta-data>element below into<provider>to let the FileProvider know which files it can generate Uri objects for.<meta-data android:name="android.support.FILE_PROVIDER_PATHS" android:resource="@xml/file_paths" /> -
Notice the
@xml/file_pathsresource. We will have to create it because it does not exist yet. Right-click on the res directory > New > Android Resource File. Create the new resource file with the parameters matching the screenshot below.
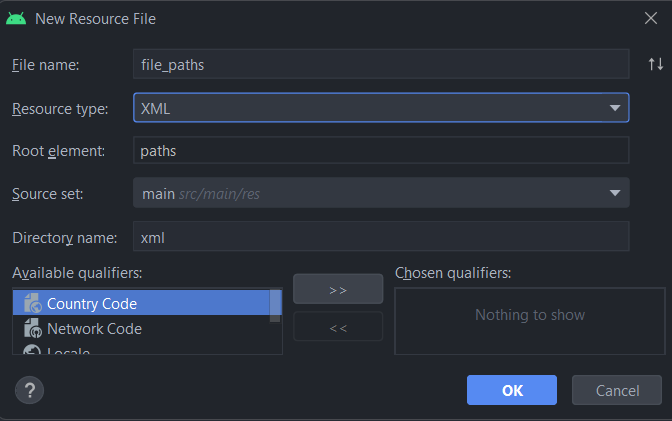
-
Add the xml content below into file_paths.xml.
<paths> <files-path name="@strings/temp_images" path="."/> </paths>
Generate the Uri
Next, we will need to generate the Uri object.
-
Inside the MainAcitivity class, copy and paste the function below.
private fun initTempUri(): Uri { } -
Add the code below into
initTempUri(). This code snippet creates an abstract file path to the temporary directory that will house the temporary file later.//gets the temp_images dir val tempImagesDir = File( applicationContext.filesDir, //this function gets the external cache dir getString(R.string.temp_images_dir)) //gets the directory for the temporary images dir -
Because this directory does not yet exist, we must create it in the file system (our App’s private storage area) with the line of the code below.
tempImagesDir.mkdir() //Create the temp_images dir -
Now we need to create an abstract file path for the temporary image file.
//Creates the temp_image.jpg file val tempImage = File( tempImagesDir, //prefix the new abstract path with the temporary images dir path getString(R.string.temp_image)) //gets the abstract temp_image file name -
Finally, we create and return the Uri object from the File object with
FileProvider#getUriForFile().//Returns the Uri object to be used with ActivityResultLauncher return FileProvider.getUriForFile( applicationContext, getString(R.string.authorities), tempImage)
ActivityResult API
To be able to work with ActivityResult APIs, it is crucial to understand the classes below:
- ActivityResultCaller: interface with abstract functions
registerForActivityResult(). AppCompatActivity (as well many other classes) implements this interface, so we are able to callregisterForActivityResult()inside our MainActivity. - ActivityResultContract: the first argument for
registerForActivityResult(). There are pre-made implementations of this interface, so we do not have to implement it in this tutorial. - ActivityResultContracts: a collection of pre-made ActivityResultContract implementations.
- ActivityResultContracts.TakePicture: the premade ActivityResultContract that we use in this tutorial to take a picture.
- ActivityResultCallback: A functional interface and the second argument for
registerForActivityResult(). The return type of its SAM is dependent on the ActivityResultContract passed intoregisterForActivityResult()in the first argument. For the TakePicture object used in this tutorial, ActivityResultCallback SAM returns a Boolean. - ActivityResultLauncher: the return value of
registerForActivityResult(), which we will calllaunch()on and pass in our Uri object.
Use ActivityResult APIs to launch another Activity
Now that we are familiar with the classes in androidx.activity.result.contract, we can finally use them in our code.
-
Add the function below into the MainActivity class.
private fun registerTakePictureLauncher(path: Uri) { } -
Get references to the Button and ImageView objects.
val button = findViewById<Button>(R.id.button) //gets the Button object val imageView = findViewById<ImageView>(R.id.imageView) //gets the ImageView object -
Then, we call
registerForActivityResult(), passing in the premade ActivityResultContracts.TakePicture and setting the ImageView URI. There a few differentImageView#setX()functions, butsetImageURI()was chosen here for simplicity because we already have an Uri object. You should also test the image dimensions on older versions of Android; that topic is out of scope for this tutorial, so I picked the simplest method calls to use.//Creates the ActivityResultLauncher val resultLauncher = registerForActivityResult(ActivityResultContracts.TakePicture()){ imageView.setImageURI(null) //rough handling of image changes. Real code need to handle different API levels. imageView.setImageURI(path) } -
Finally, we bind the Button click actions to launch the Camera activity.
//Launches the camera when button is pressed. button.setOnClickListener { resultLauncher.launch(path) //launches the activity here } -
Inside
onCreate(), call the two functions that we have created like below.//initialize temp image directory on first launch val tempImageUri = initTempUri() registerTakePictureLauncher(tempImageUri) //Binds button to launch camera activity
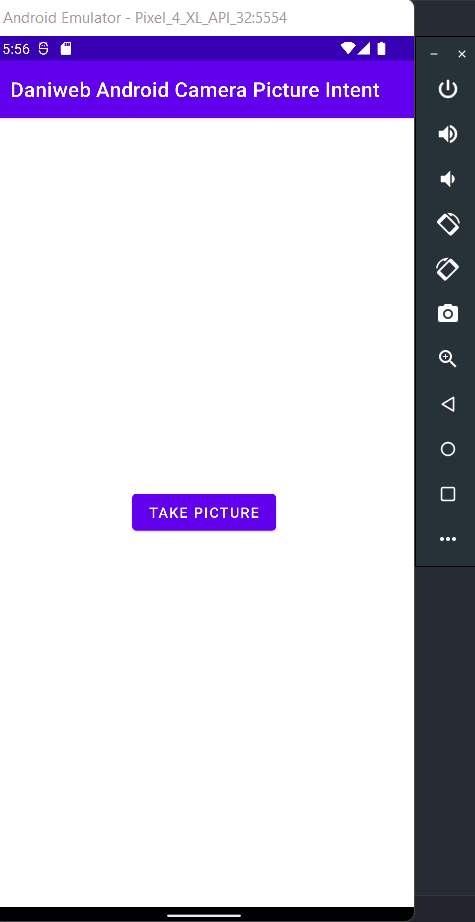
Run the App
Launch the App to test if it works. When you are inside the simulated Camera app, hold Alt + WASD/Mouse to move around.
The app behavior should be similar to the animation below.
Solution Code
AndroidManifest.xml
<?xml version="1.0" encoding="utf-8"?>
<manifest xmlns:android="http://schemas.android.com/apk/res/android"
package="com.example.daniwebandroidcamerapictureintent">
<application
android:allowBackup="true"
android:icon="@mipmap/ic_launcher"
android:label="@string/app_name"
android:roundIcon="@mipmap/ic_launcher_round"
android:supportsRtl="true"
android:theme="@style/Theme.DaniwebAndroidCameraPictureIntent">
<activity
android:name=".MainActivity"
android:exported="true">
<intent-filter>
<action android:name="android.intent.action.MAIN" />
<category android:name="android.intent.category.LAUNCHER" />
</intent-filter>
</activity>
<provider
android:name="androidx.core.content.FileProvider"
android:authorities="@string/authorities"
android:exported="false"
android:grantUriPermissions="true">
<meta-data
android:name="android.support.FILE_PROVIDER_PATHS"
android:resource="@xml/file_paths" />
</provider>
</application>
</manifest>MainActivity.kt
package com.example.daniwebandroidcamerapictureintent
import android.net.Uri
import androidx.appcompat.app.AppCompatActivity
import android.os.Bundle
import android.widget.Button
import android.widget.ImageView
import androidx.activity.result.contract.ActivityResultContracts
import androidx.core.content.FileProvider
import java.io.File
class MainActivity : AppCompatActivity() {
override fun onCreate(savedInstanceState: Bundle?) {
super.onCreate(savedInstanceState)
setContentView(R.layout.activity_main)
//initialize temp image directory on first launch
val tempImageUri = initTempUri()
registerTakePictureLauncher(tempImageUri) //Binds button to launch camera activity
}
private fun initTempUri(): Uri {
//gets the temp_images dir
val tempImagesDir = File(
applicationContext.filesDir, //this function gets the external cache dir
getString(R.string.temp_images_dir)) //gets the directory for the temporary images dir
tempImagesDir.mkdir() //Create the temp_images dir
//Creates the temp_image.jpg file
val tempImage = File(
tempImagesDir, //prefix the new abstract path with the temporary images dir path
getString(R.string.temp_image)) //gets the abstract temp_image file name
//Returns the Uri object to be used with ActivityResultLauncher
return FileProvider.getUriForFile(
applicationContext,
getString(R.string.authorities),
tempImage)
}
private fun registerTakePictureLauncher(path: Uri) {
val button = findViewById<Button>(R.id.button) //gets the Button object
val imageView = findViewById<ImageView>(R.id.imageView) //gets the ImageView object
//Creates the ActivityResultLauncher
val resultLauncher = registerForActivityResult(ActivityResultContracts.TakePicture()){
imageView.setImageURI(null) //rough handling of image changes. Real code need to handle different API levels.
imageView.setImageURI(path)
}
//Launches the camera when button is pressed.
button.setOnClickListener {
resultLauncher.launch(path) //launches the activity here
}
}
}activity_main.xml
<?xml version="1.0" encoding="utf-8"?>
<androidx.constraintlayout.widget.ConstraintLayout xmlns:android="http://schemas.android.com/apk/res/android"
xmlns:app="http://schemas.android.com/apk/res-auto"
xmlns:tools="http://schemas.android.com/tools"
android:layout_width="match_parent"
android:layout_height="match_parent"
tools:context=".MainActivity">
<Button
android:id="@+id/button"
android:layout_width="wrap_content"
android:layout_height="wrap_content"
android:text="@string/button_takePicture"
app:layout_constraintBottom_toBottomOf="parent"
app:layout_constraintEnd_toEndOf="parent"
app:layout_constraintStart_toStartOf="parent"
app:layout_constraintTop_toTopOf="parent" />
<ImageView
android:id="@+id/imageView"
android:layout_width="wrap_content"
android:layout_height="0dp"
android:layout_marginTop="8dp"
android:layout_marginBottom="8dp"
app:layout_constraintBottom_toBottomOf="parent"
app:layout_constraintEnd_toEndOf="parent"
app:layout_constraintStart_toStartOf="parent"
app:layout_constraintTop_toBottomOf="@+id/button"
tools:srcCompat="@tools:sample/avatars" />
</androidx.constraintlayout.widget.ConstraintLayout>strings.xml
<resources>
<string name="app_name">Daniweb Android Camera Picture Intent</string>
 <string name="button_takePicture">Take Picture</string>
 <string name="temp_images_dir">temp_images</string>
 <string name="temp_image">temp_image.jpg</string>
 <string name="authorities">com.example.fileprovider</string>
</resources>file_paths.xml
 <paths>
    <files-path name="@strings/temp_images" path="."/>
</paths>Summary
We have learned how to capture an image with the default Camera and return back to our Activity using ActivityResult APIs as well as how to use FileProvider.
The full project code can be found here https://github.com/dmitrilc/DaniwebAndroidCameraPictureIntent