Introduction
In the last tutorial, we learned how to draw basic shapes on Android using premade methods from the graphics library.
In this tutorial, we step up the difficulty a notch by learning how to draw using the Path class. The Path class allows for drawing of technically any shape imaginable, as a consequence, it is also a bit more complex to use compared to premade methods in the Canvas class.
Goals
At the end of the tutorial, you would have learned:
- How to draw complex shapes using Path.
Tools Required
- Android Studio. The version used in this tutorial is Android Studio Dolphin | 2021.3.1.
Prerequisite Knowledge
- Intermediate Android.
- How to draw basic shapes using the Canvas class.
Project Setup
To follow along with the tutorial, perform the steps below:
-
Create a new Android project with the default Empty Activity.
-
Replace the code in MainActivity.kt with the code below.
class MainActivity : AppCompatActivity() { override fun onCreate(savedInstanceState: Bundle?) { super.onCreate(savedInstanceState) setContentView(R.layout.activity_main) findViewById<ImageView>(R.id.imageView_myImage) .setImageDrawable(ComplexShapes()) } } class ComplexShapes : Drawable() { private val paint: Paint = Paint().apply { // Create your paint here style = Paint.Style.STROKE strokeWidth = 10f color = Color.RED } override fun draw(canvas: Canvas) { } override fun setAlpha(alpha: Int) { // Required but can be left empty } override fun setColorFilter(colorFilter: ColorFilter?) { // Required but can be left empty } @Deprecated("Deprecated by super class") override fun getOpacity() = PixelFormat.OPAQUE } -
Replace the code inside activity_main.xml with the code below.
 <?xml version="1.0" encoding="utf-8"?>
 <androidx.constraintlayout.widget.ConstraintLayout xmlns:android="http://schemas.android.com/apk/res/android"
    xmlns:app="http://schemas.android.com/apk/res-auto"
    xmlns:tools="http://schemas.android.com/tools"
    android:layout_width="match_parent"
    android:layout_height="match_parent"
    tools:context=".MainActivity">

    <ImageView
        android:id="@+id/imageView_myImage"
        android:layout_width="0dp"
        android:layout_height="0dp"
        app:layout_constraintBottom_toBottomOf="parent"
        app:layout_constraintEnd_toEndOf="parent"
        app:layout_constraintStart_toStartOf="parent"
        app:layout_constraintTop_toTopOf="parent"
        tools:srcCompat="@tools:sample/backgrounds/scenic" />
 </androidx.constraintlayout.widget.ConstraintLayout>
Understanding The Path Class
There are a few important concepts that you might encounter when working with Path.
- Contour: I am not an artist myself, but for you non-artists out there, you can think of this as a counter of when a brush touches the surface and then lifted. Every time a brush starts drawing at a (x,y) coordinate and finishes at another (x,y) coordinate, it counts as one contour.
- new contour vs append to a contour: some of the methods of the Path class will continue a previous contour, while others will start a new contour.
moveTo()method: this method sets a starting point for a new contour. When a Path object is first created, its position is set to (0x,0y), so if you want to start the first contour at a different coordinate, you will have to usemoveTo()to move the origin to the coordinate that you want.
Draw A Line
We will start with drawing a line as a warm-up exercise. Add the implementation below as ComplexShapes’s draw() method.
override fun draw(canvas: Canvas) {
val path = Path().apply {
lineTo(200f, 200f)
}
canvas.drawPath(path, paint)
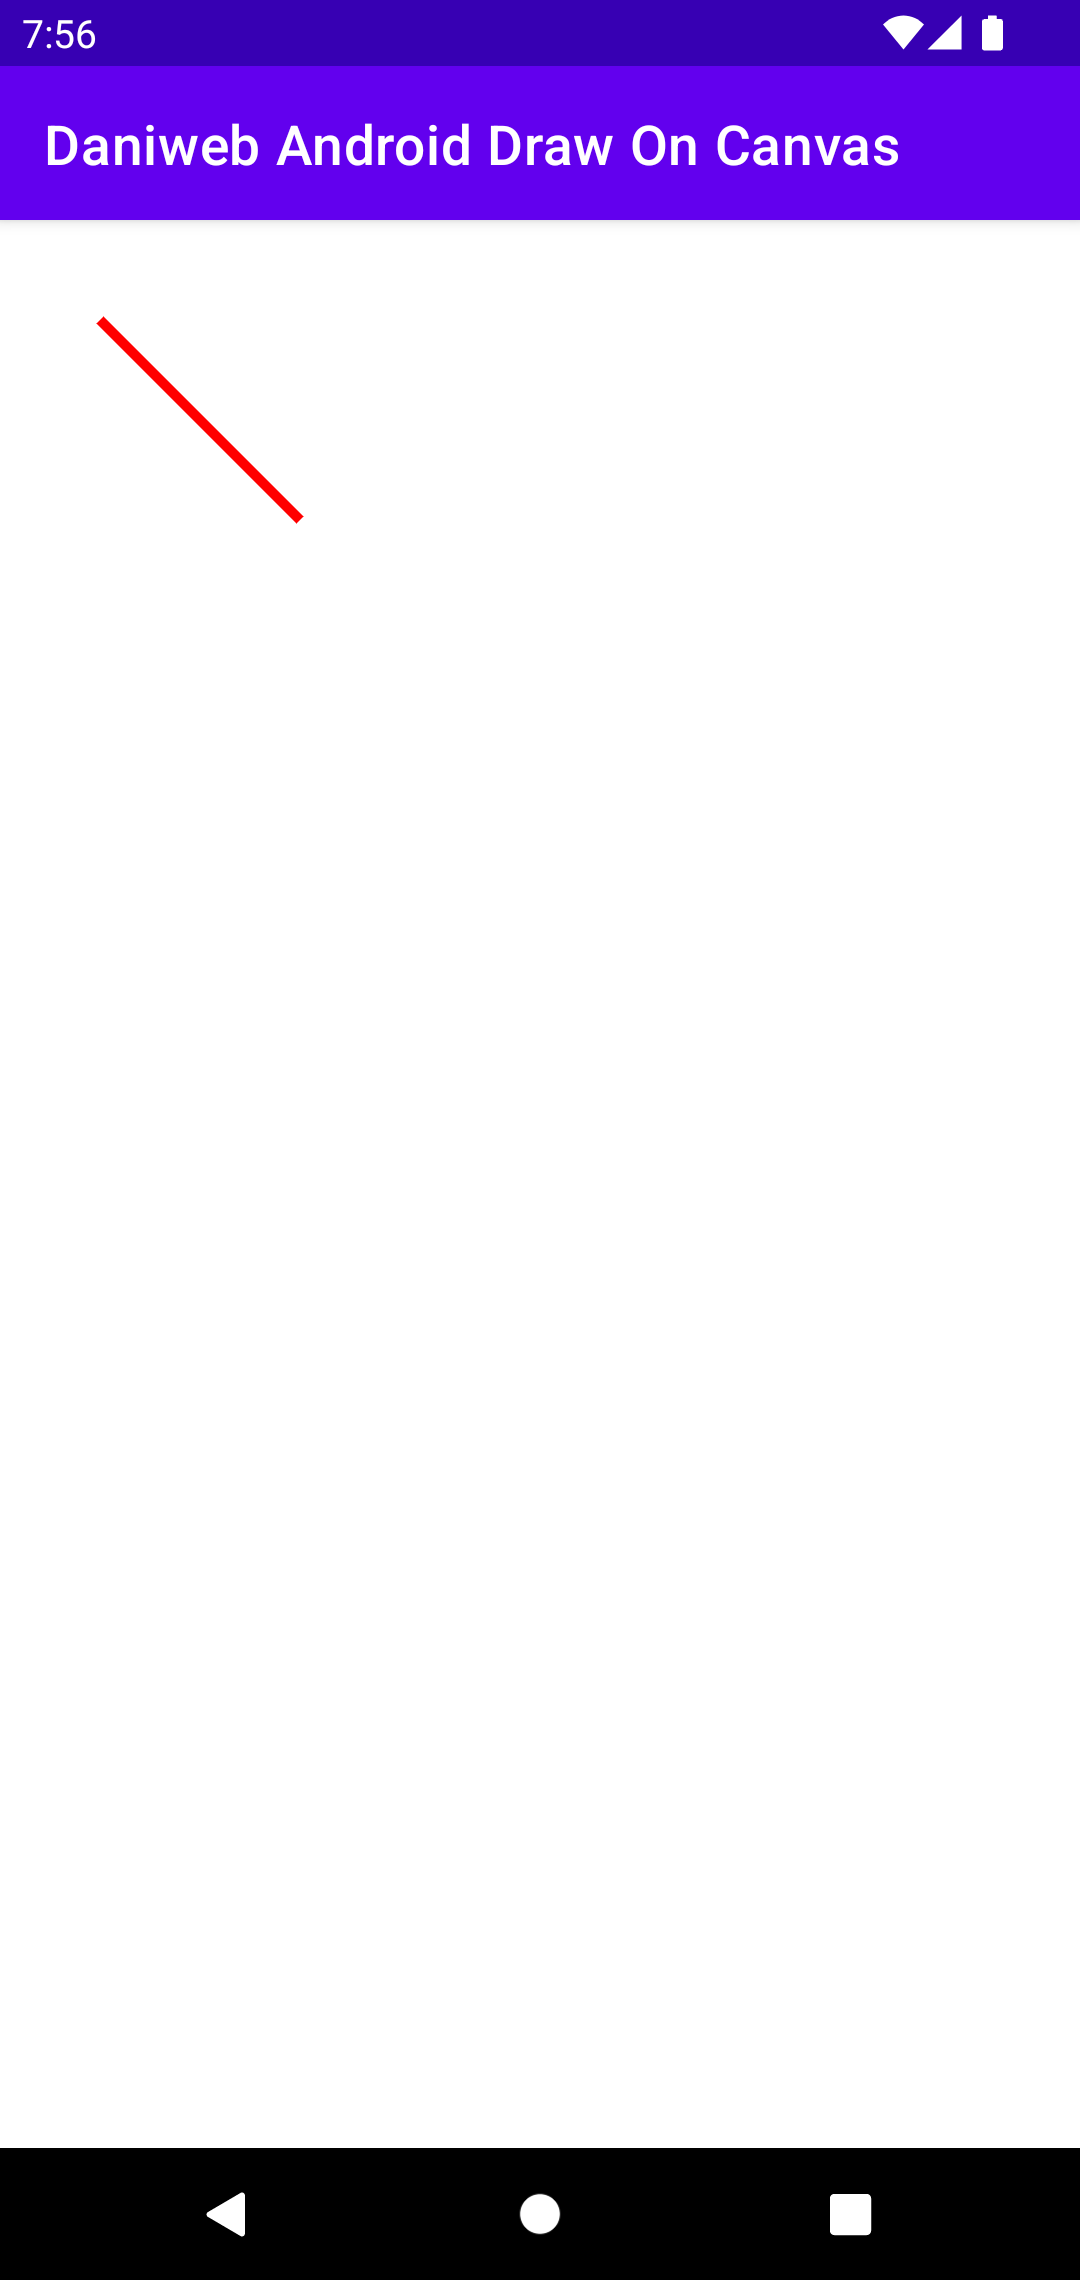
}The lineTo() method draws a straight line from the (0,0) origin of the ImageView to the (200, 200) coordinate that we specified. lineTo() appends to the default contour.

Let us use moveTo() to move the origin point to somewhere that is not touching the corner of the screen, this will prevent the image being drawn outside the screen’s bounds.
override fun draw(canvas: Canvas) {
   val path = Path().apply {
       moveTo(100f, 100f)
       lineTo(300f, 300f)
   }

   canvas.drawPath(path, paint)
}
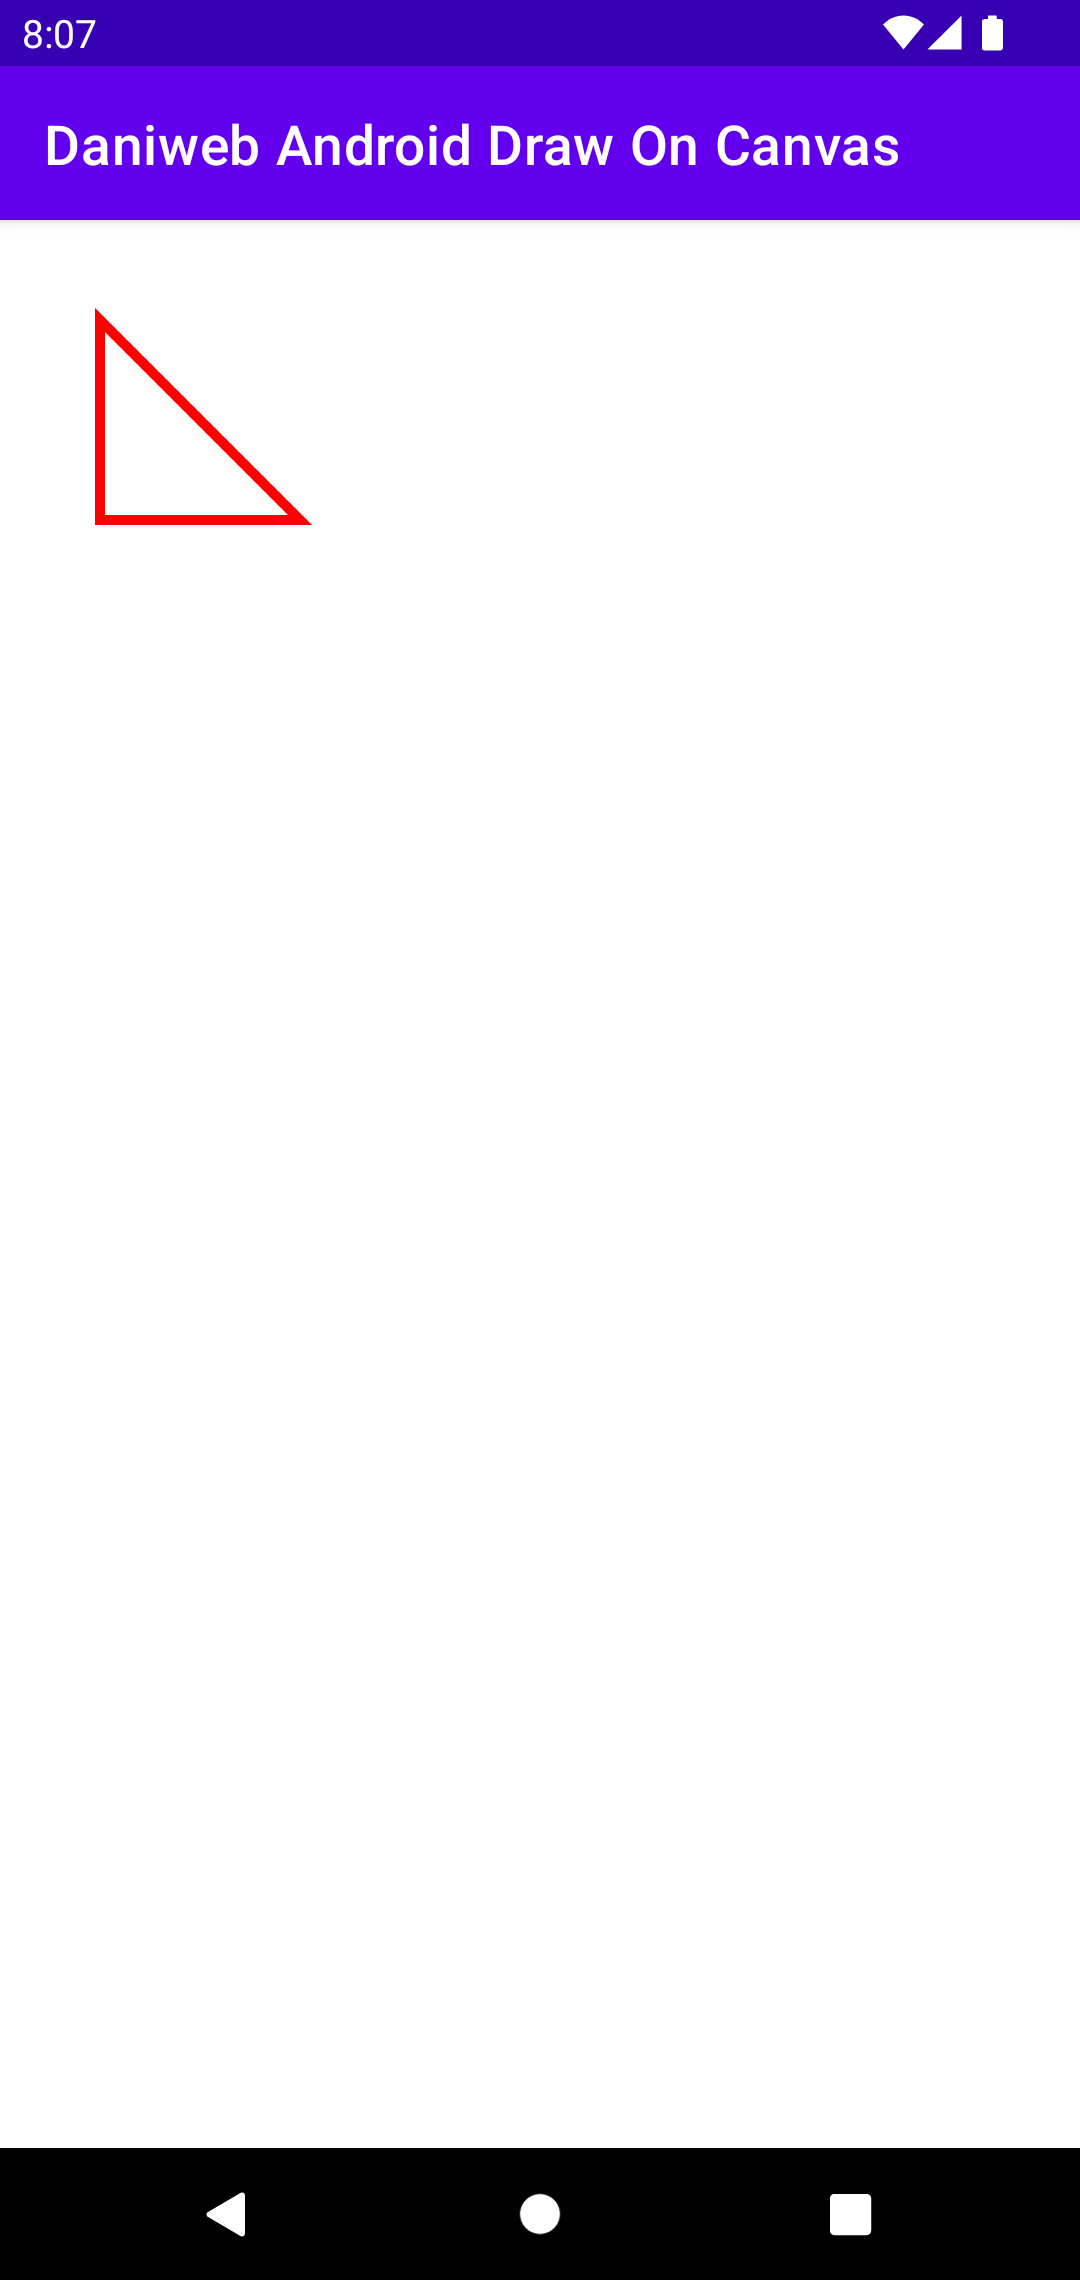
Draw A Triangle
We already have a straight line, so we add one more line, and then use the close() method to end the current contour (think of this as lifting the brush when you are done with your current stroke).
override fun draw(canvas: Canvas) {
   val path = Path().apply {
       // Draws triangle
       moveTo(100f, 100f)
       lineTo(300f, 300f)
       lineTo(100f, 300f)
       close()
   }

   canvas.drawPath(path, paint)
}
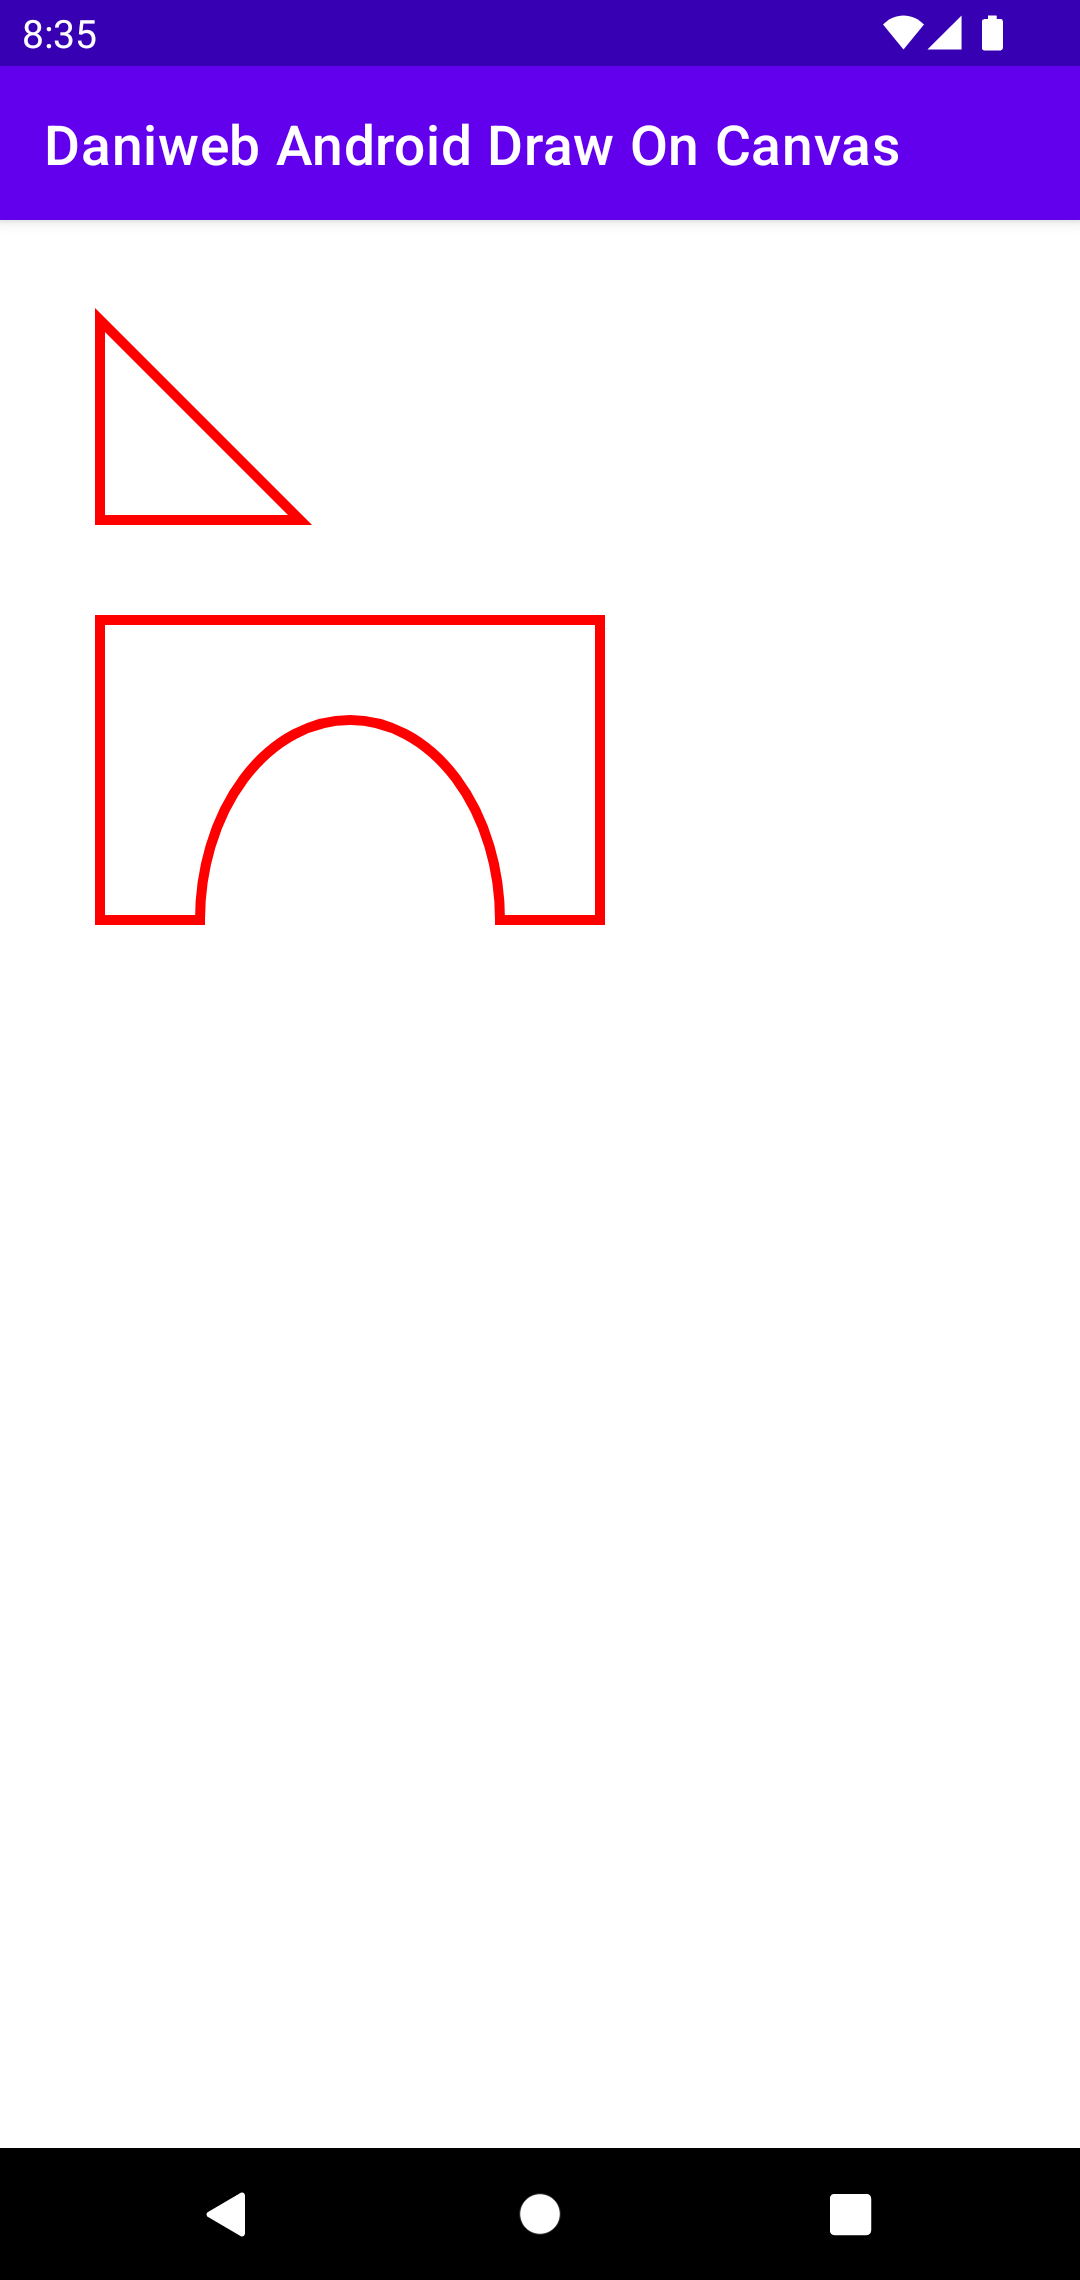
Draw A Bridge
Next up, let’s attempt to draw a bridge. This is slightly more complex because it contains 6 strokes, including an arc.
To make an arc, you can use the arcTo() method. The most important thing that you need to know about this method is that it will draw an oval inside an imaginary rectangle.
override fun draw(canvas: Canvas) {
   val path = Path().apply {
       // Draws triangle
       moveTo(100f, 100f)
       lineTo(300f, 300f)
       lineTo(100f, 300f)
       close()

       // Draws bridge
       moveTo(100f, 400f)
       lineTo(600f, 400f)
       lineTo(600f, 700f)
       lineTo(500f, 700f)
       // bottom is 900 because the system draws the arc inside an
       // imaginary rectangle
       arcTo(200f, 500f, 500f, 900f, 0f, -180f, false)
       lineTo(100f, 700f)
       close()
   }

   canvas.drawPath(path, paint)
}
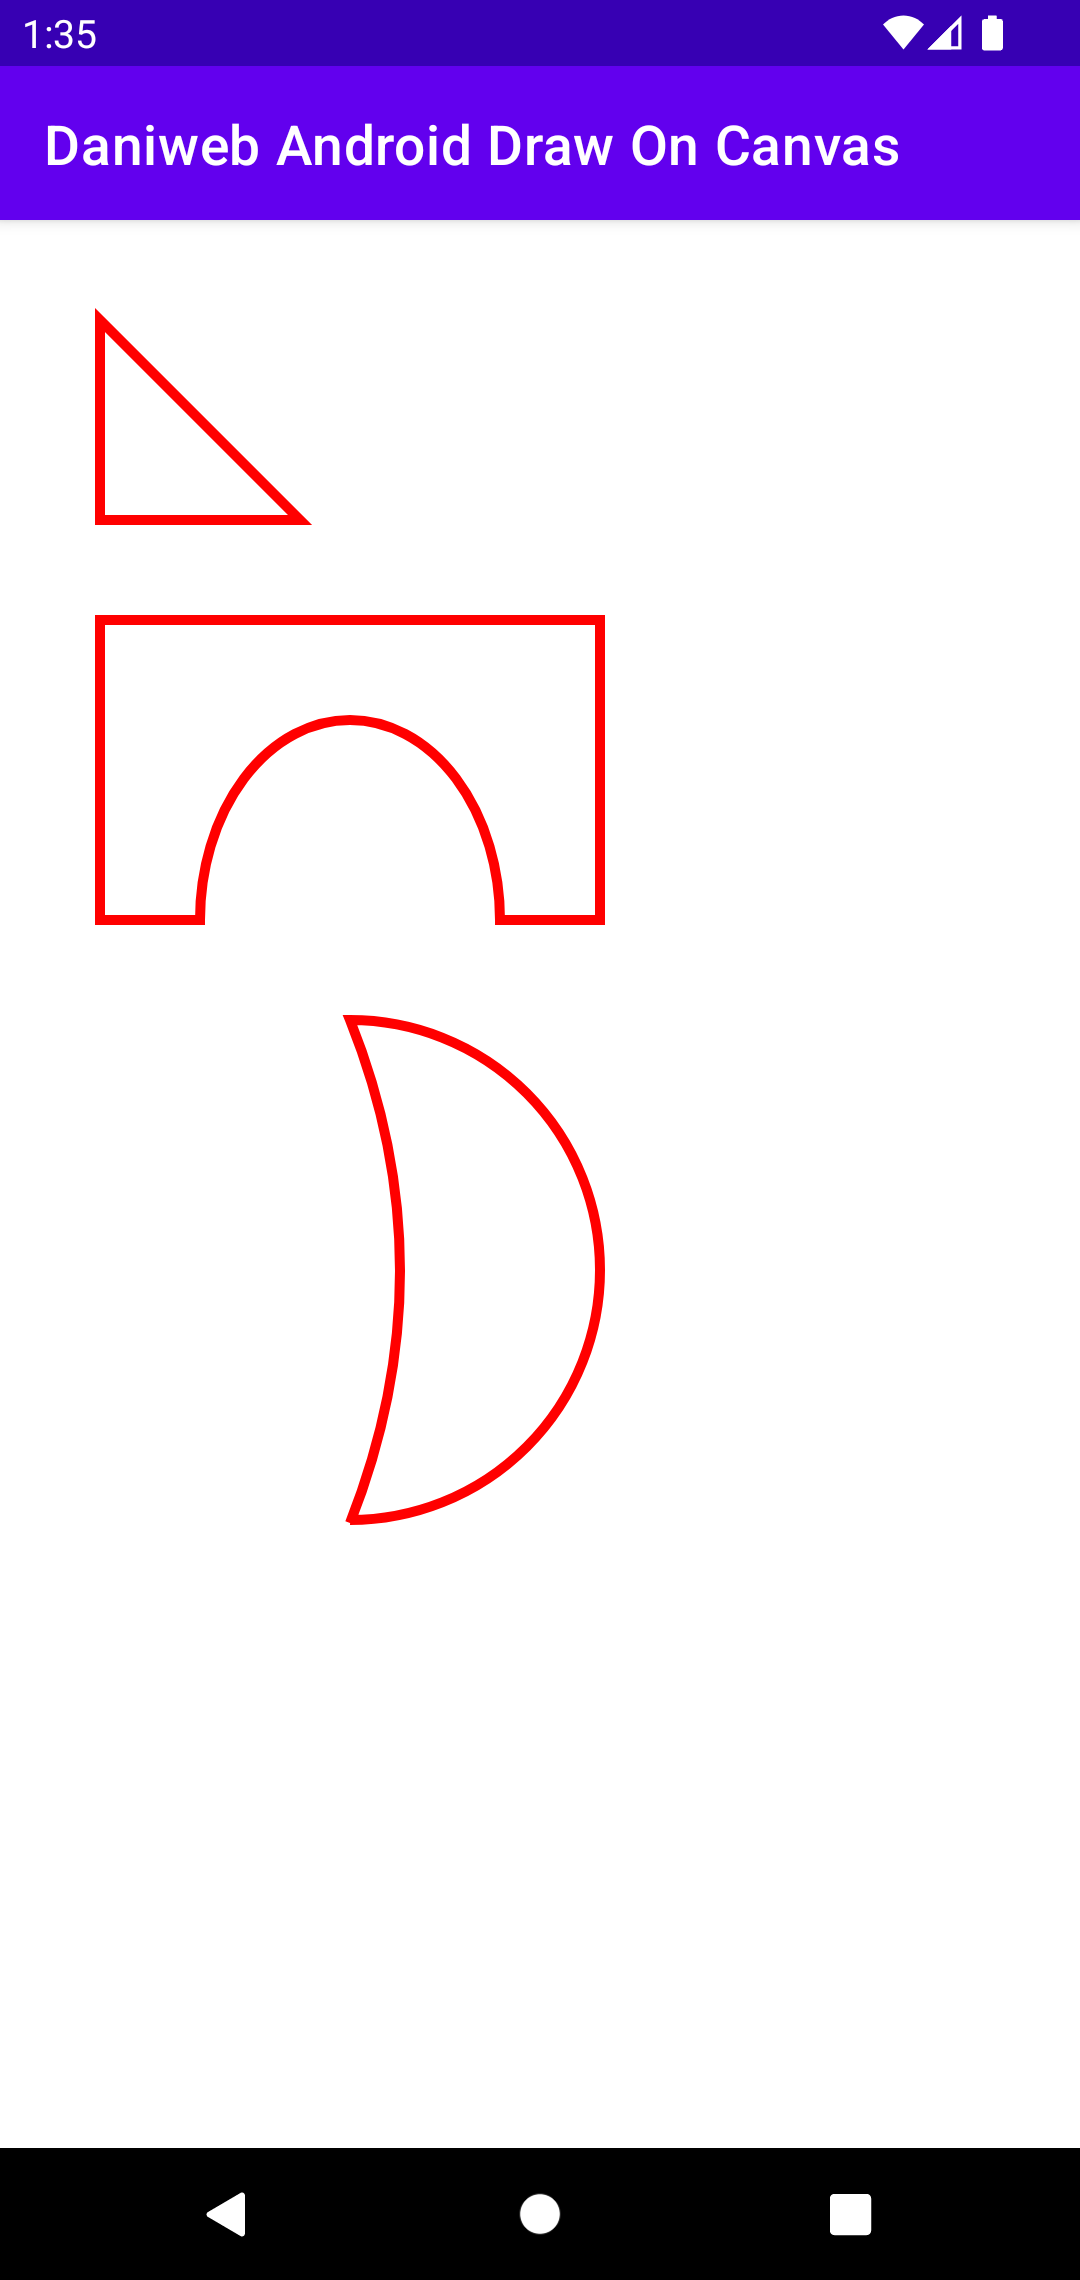
Draw A Quarter Moon
The last shape that we will draw for this tutorial would be a quarter moon. For this shape, we will need two curves. We can re-use arcTo(), but because we already use that method previously, we will try some new methods this time.
override fun draw(canvas: Canvas) {
   val path = Path().apply {
       // Draws triangle
       moveTo(100f, 100f)
       lineTo(300f, 300f)
       lineTo(100f, 300f)
       close()

       // Draws bridge
       moveTo(100f, 400f)
       lineTo(600f, 400f)
       lineTo(600f, 700f)
       lineTo(500f, 700f)
       // bottom is 900 because the system draws the arc inside an
       // imaginary rectangle
       arcTo(200f, 500f, 500f, 900f, 0f, -180f, false)
       lineTo(100f, 700f)
       close()

       // Draws quarter moon
       moveTo(100f, 800f)
       addArc(100f, 800f, 600f, 1_300f, 90f, -180f)
       quadTo(450f, 1_050f, 350f, 1_303f)
   }

   canvas.drawPath(path, paint)
}
To draw the outer curve, we use addArc(), and to draw the inner curve, we use the quadTo() method.
Summary
We have learned how to draw complex shapes in this tutorial. In my opinion, while the ability to draw the custom shapes are nice, if the shape is too complex, then it is still better to make them in a vector editor such as Inkscape or Adobe Illustrator.
The full project code can be found at https://github.com/dmitrilc/DaniwebAndroidDrawComplexShapes.