Introduction
Even though the built-in vector library included in Android Studio contains many icons readily for use, you might eventually run into a situation where a custom icon is needed. In this tutorial, we will learn how to create our own icons from basic shapes drawn on a Drawable’s Canvas.
Goals
At the end of the tutorial, you would have learned:
- How to draw basic shapes using custom Drawable.
Tools Required
- Android Studio. The version used in this tutorial is Android Studio Dolphin | 2021.3.1.
Prerequisite Knowledge
- Intermedia Android.
Project Setup
To follow along with the tutorial, perform the steps below:
-
Create a new Android project with the default Empty Activity.
-
Replace the code in activity_main.xml with the code below.
 <androidx.constraintlayout.widget.ConstraintLayout xmlns:android="http://schemas.android.com/apk/res/android"
    xmlns:app="http://schemas.android.com/apk/res-auto"
    xmlns:tools="http://schemas.android.com/tools"
    android:layout_width="match_parent"
    android:layout_height="match_parent"
    tools:context=".MainActivity">

    <ImageView
        android:id="@+id/imageView_myImage"
        android:layout_width="0dp"
        android:layout_height="0dp"
        app:layout_constraintBottom_toBottomOf="parent"
        app:layout_constraintEnd_toEndOf="parent"
        app:layout_constraintStart_toStartOf="parent"
        app:layout_constraintTop_toTopOf="parent"
        tools:srcCompat="@tools:sample/backgrounds/scenic" />
 </androidx.constraintlayout.widget.ConstraintLayout>
At this stage, our sample application only displays a blank screen.
- (Optional) Go to Developer options and enable Pointer Location. This will allow you to see the screen coordinates when drawing.
Overriding Drawable
Before we can draw shapes, we will need to create a custom Drawable for our ImageView. Drawable’s children are required to override the method draw(), which is where the drawing can start.
Copy and paste the following custom Drawable, either in the file MainActivity.kt or as a different file.
class BasicShapes : Drawable() {
   private val paint: Paint = Paint().apply {
       // Create your paint here
       style = Paint.Style.STROKE
       strokeWidth = 10f
       color = Color.CYAN
   }

   override fun draw(canvas: Canvas) {
       // Do your drawing here
       canvas.drawRect(
           RectF(100f, 100f, 200f, 300f),
           paint
       )
   }

   override fun setAlpha(alpha: Int) {
       // Required but can be left empty
   }

   override fun setColorFilter(colorFilter: ColorFilter?) {
       // Required but can be left empty
   }

   @Deprecated("Deprecated by super class")
   override fun getOpacity() = PixelFormat.OPAQUE
}
Drawable requires us to override many different methods, but we can just focus on the draw() method and leave everything else as default.
The Paint object located in our custom implementation is also important. We need it to be able to draw anything.
Even though we do not have any useful implementation of draw() yet, it is fine to use BasicShapes as the drawable of the ImageView. Append the code below to onCreate().
findViewById<ImageView>(R.id.imageView_myImage)
   .setImageDrawable(BasicShapes())
Drawing A Rectangle
One more thing that we need to understand before we can draw on a Canvas is the coordinate system. A View’s top left corner always have a (0x, 0y) coordinates, which also means that the bottom right corner contains (maxX, maxY) coordinates.
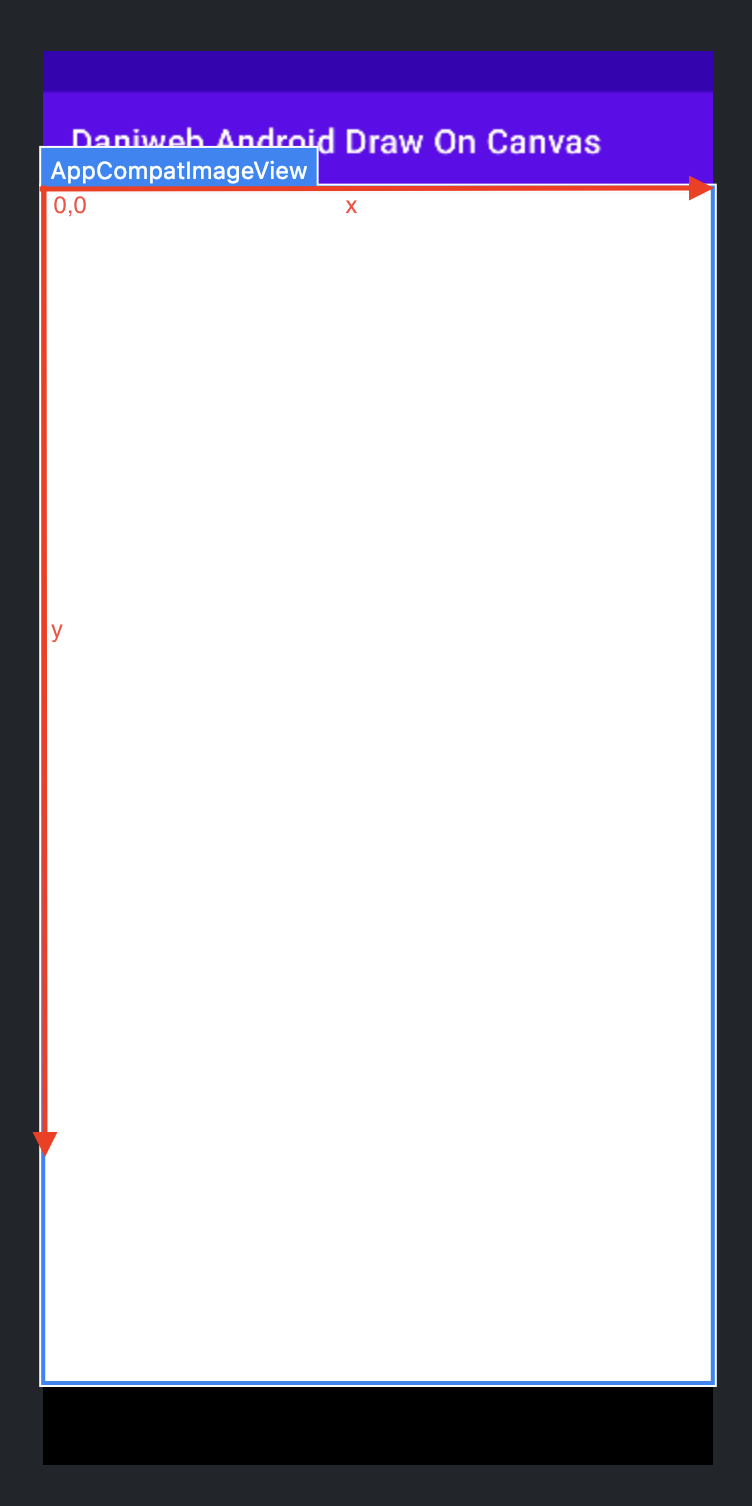
In most cases, we will have to provide the coordinates when drawing on Canvas.
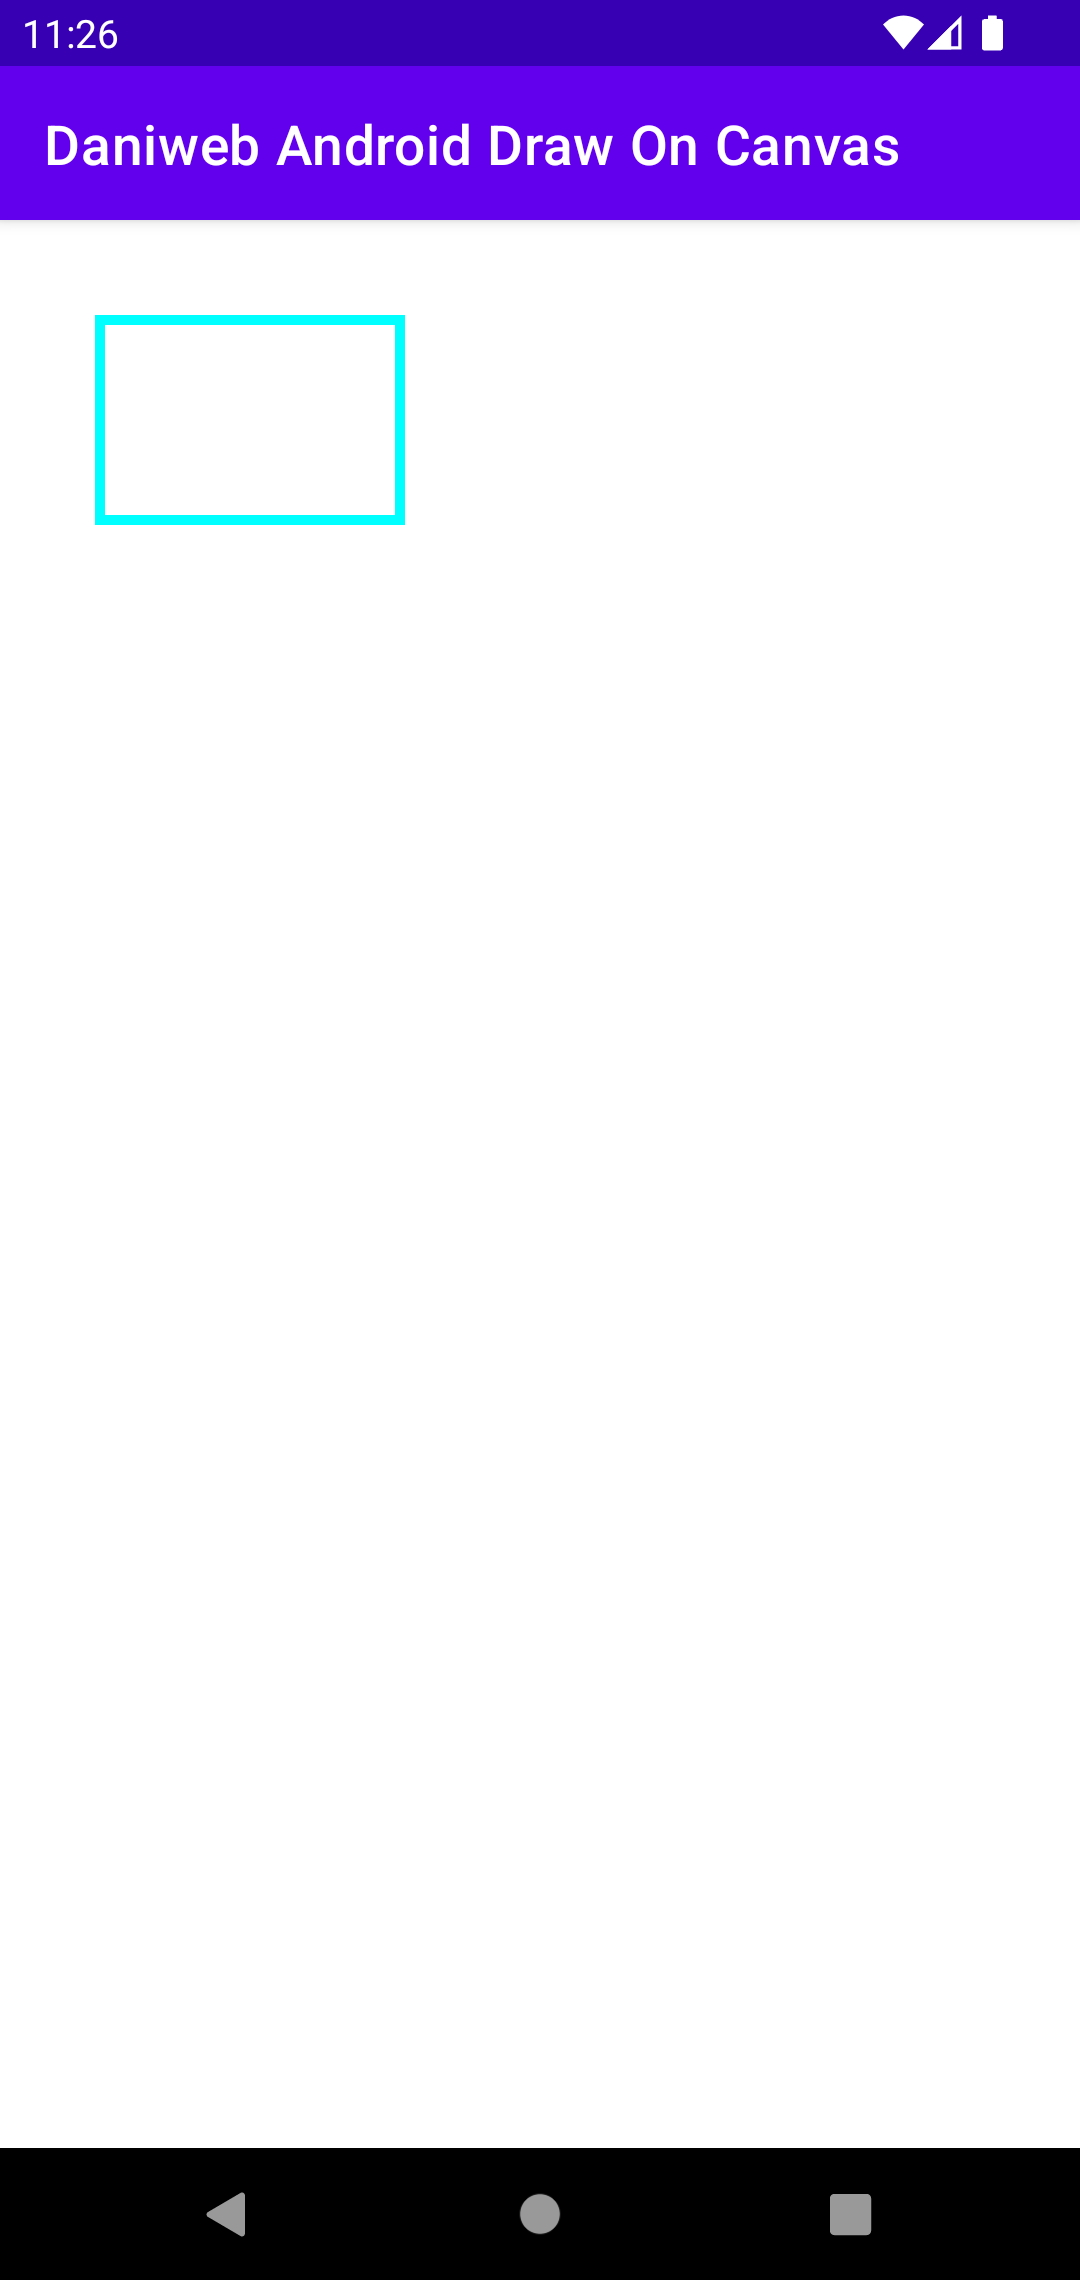
To draw a Rectangle, we would use the drawRect() method from the Canvas object passed to onDraw().
override fun draw(canvas: Canvas) {
   // Do your drawing here
   canvas.drawRect(
       Rect(
           100, // distance from left of view
           100, // distance from top of view
           400, // distance from left of view
           300 // distance from top of view
       ),
       paint
   )
}
The code above will draw a rectangle (check code comments), as the screenshot below illustrates.
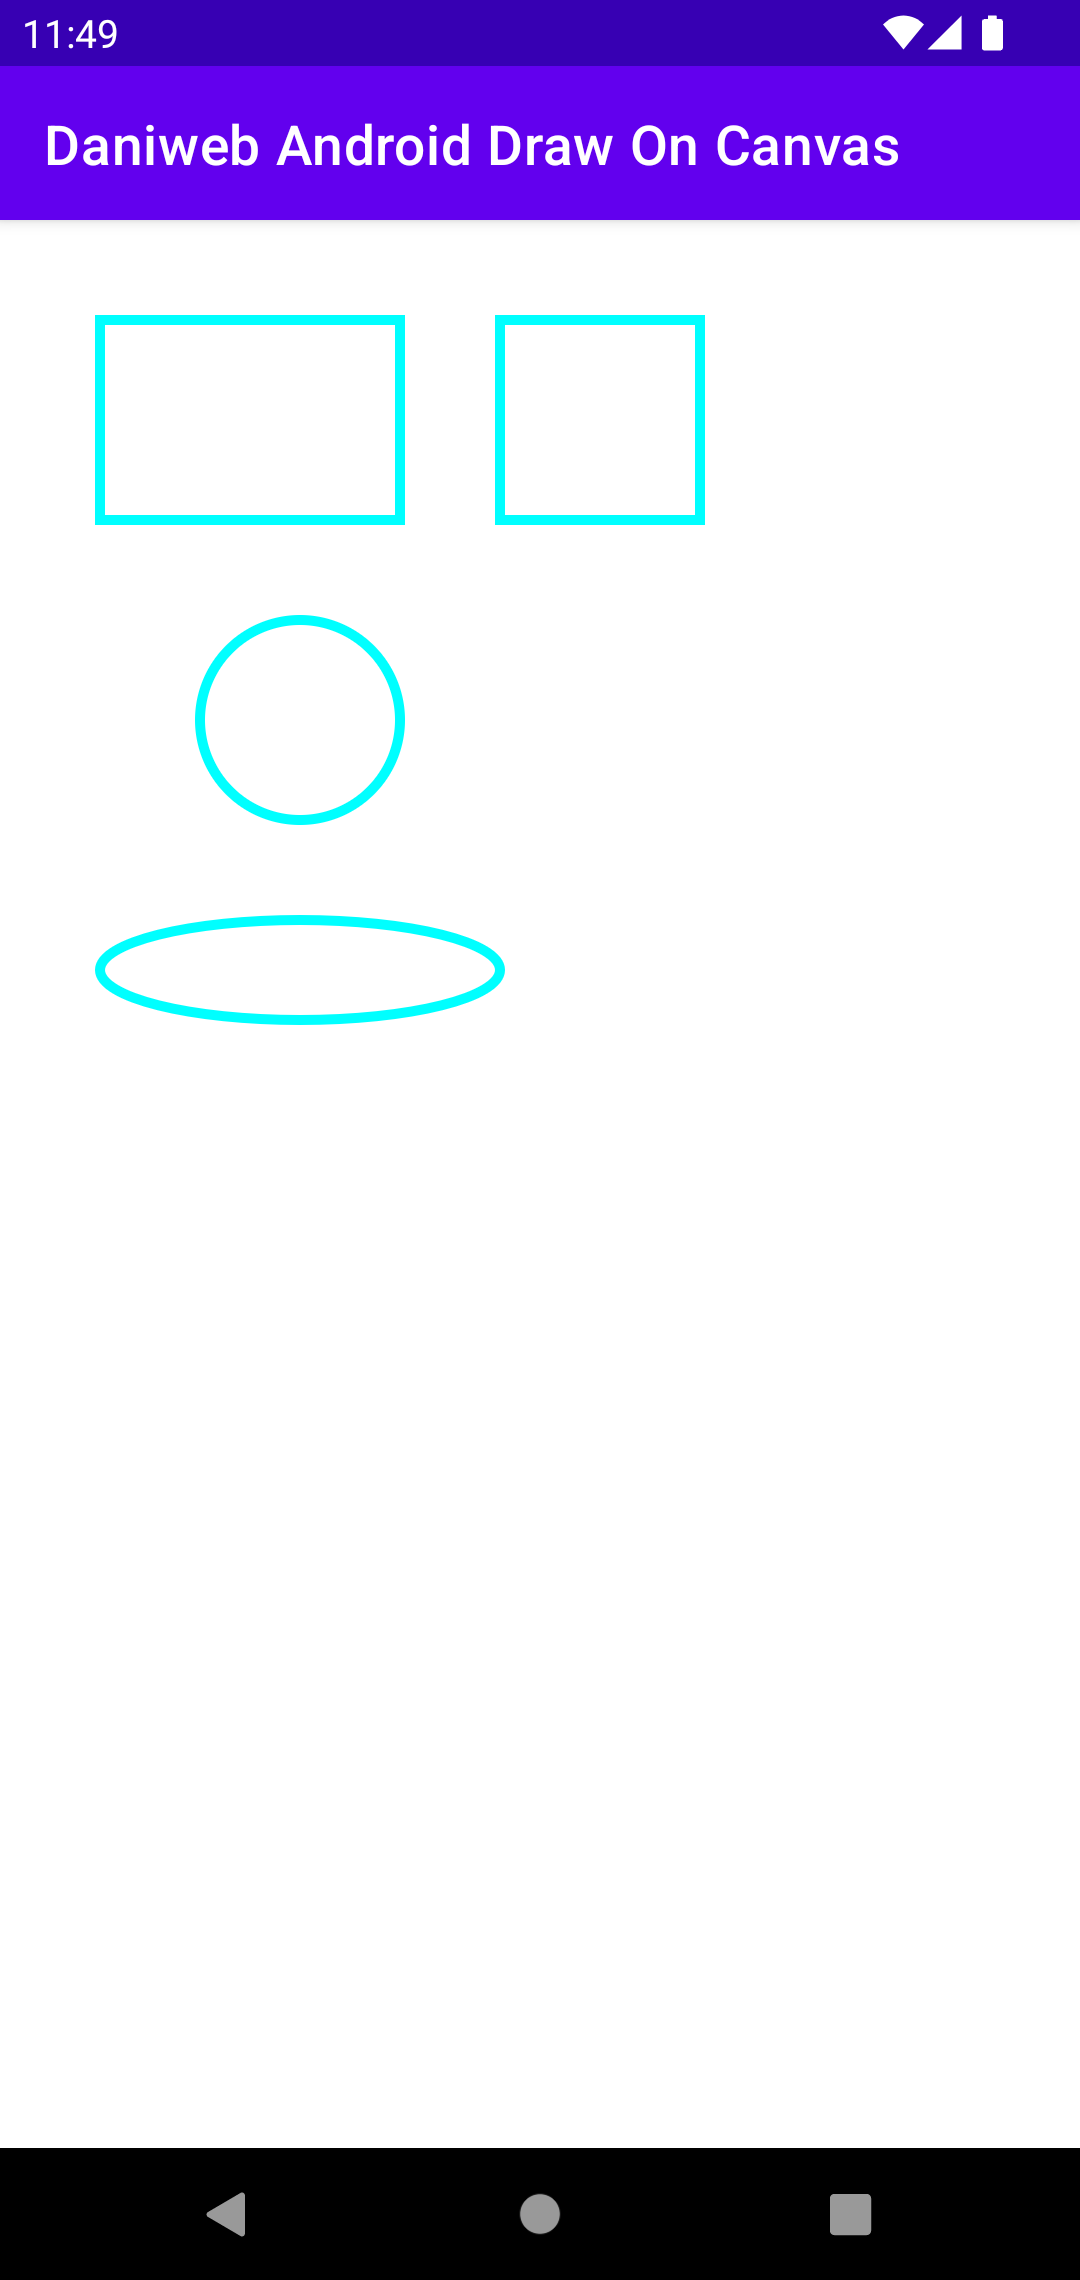
Draw More Basic Shapes
Once you have figured out the coordinate system, drawing other shapes is only a matter of applying basic geometry on the appropriate methods.
- A circle can be drawn using
drawCircle(). - An oval can be drawn using
drawOval(). - A square can be drawn using
drawRect()with appropriate dimensions.
The code below adds a circle, an oval and a square to our application.
override fun draw(canvas: Canvas) {
   // Do your drawing here
   canvas.drawRect(
       Rect(
           100, // distance from left of view
           100, // distance from top of view
           400, // distance from left of view
           300 // distance from top of view
       ),
       paint
   )

   canvas.drawCircle(300f, 500f, 100f, paint)
   canvas.drawOval(
       RectF(100f, 700f, 500f, 800f),
       paint
   )
   // square
   canvas.drawRect(
       Rect(
           500, // distance from left of view
           100, // distance from top of view
           700, // distance from left of view
           300 // distance from top of view
       ),
       paint
   )
}
The app should look like the screenshot below.
Summary
We have learned how to draw basic shapes in this tutorial. The full project code can be found at https://github.com/dmitrilc/DaniwebAndroidDrawBasicShapesOnCanvas.