I followed this guide for VC++ 2010,

http://msdn.microsoft.com/en-us/library/ms235636.aspx

and apparently I either have a missing module/component or I did something wrong.

I followed everything smoothly up until step 6--

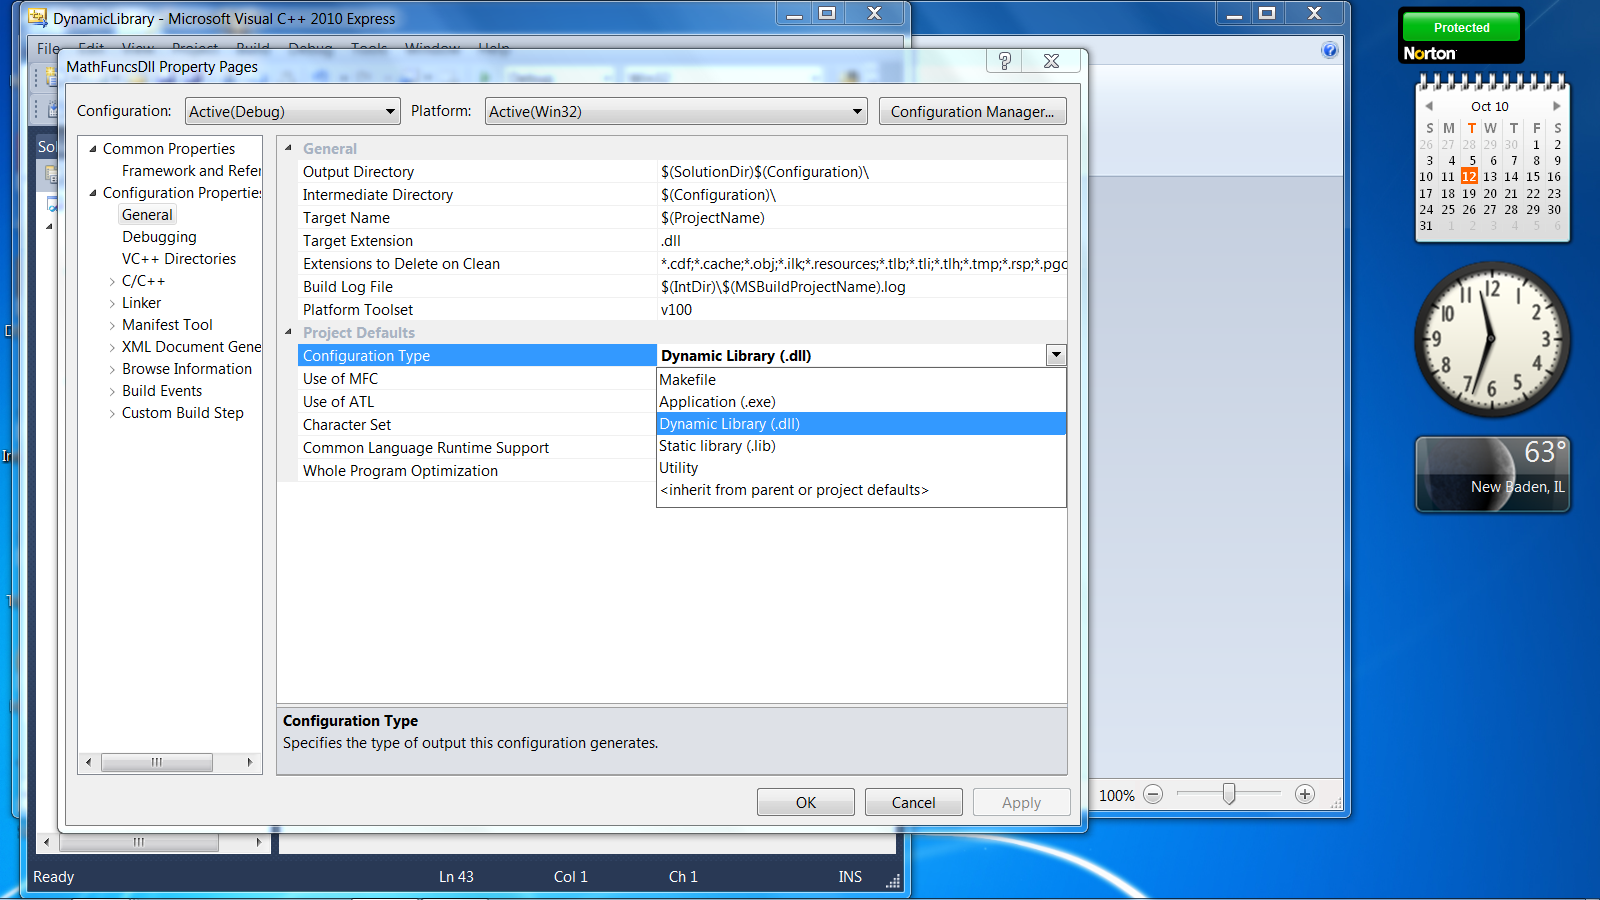
"6. To build the project into a DLL, from the Project menu, select MathFuncsDllProperties…. On the left pane, under Configuration Properties, select General. On the right pane, change the Configuration Type to Dynamic Library (.dll). Click OK to save the changes."

There was no option in the configuration type for .dll's.

The documentation then states that I can use a compiler-specific command to make a .dll file (/LD) which I think works, but then I go to import references and my file doesn't show up in the reference list.

I tried to, manually, add my .dll generated fie to my project by stuffing the .dll in the ReferenceAssemblies folder (C:\Program Files\Microsoft Visual Studio 10.0\Common7\IDE\ReferenceAssemblies\v4.0) with no luck, so I'm not sure what I'm supposed to do to get the .dll to appear in my reference window so I can link it to other projects.

I'm not sure if this is a known issue or not, or if I somehow did something wrong during the installation? Or if the /LD command dumps the .dll in the folder I need it to.

Any help is appreciated. Thanks!

Recommended Answers

All 4 Replies

If you created the project as a DLL project then the configuration type will already be selected for you. You don't really have to do that step. At that point, just hit the Build Solution option

If you don't see a Build menu option -- located just to the right of Project menu -- then you need to change another setting. Select Tools --> Settings --> Expert Settings.

I managed to get that far, but I can't use the .dll file in the second portion of the example.

I have the .dll generated, I just can't seem to use it via the References window...

Upon further inspection I tried reading ahead and realized that I may have needed to do additional steps, so I did.

I corrected my mistake by including the PATH of the .dll and to reference the header file and not the actual .dll--

"#

To reference the header files of the dynamic link library, you must modify the include directories path. To do this, on the Property Pages dialog box, expand the Configuration Properties node, expand the C/C++ node, and then select General. Next to Additional Include Directories, type the path of the location of the MathFuncsDll.h header file.
#

The executable does not load dynamic link libraries until runtime. You must tell the system where to locate MathFuncsDll.dll. You do so by using the PATH environment variable. To do this, on the Property Pages dialog box, expand the Configuration Properties node and select Debugging. Next to Environment, type the following: PATH=<path of MathFuncsDll.dll file>, where <path of MathFuncsDll.dll file> is replaced with the actual location of MathFuncsDll.dll. Click OK to save all the changes."

And I still see nothing in the Reference window on the new project.

My additional include directory is C:\Documents and Settings\****\My Documents\Visual Studio 2010\Headers_References, a new folder I created to hold Header references I wish to use (so I can create my own library and simply import them per project)

My PATH for the environment is set to C:\Documents and Settings\****\My Documents\Visual Studio 2010\DLLs which will hold all of my .dll files for future use.

I still don't understand why the Reference window isn't working for me! It displays absolutely nothing in my 2nd project even though I have properly set both fields... I don't understand what I'm doing wrong.

During development I just copy the dll into the project's home directory (where the *.cpp and *.h files exist). That way you don't have to worry about changing the PATH environment variable.

When you compile a DLL project it will generate both the *.dll and *.lib files. The *.lib file is used in the application program that uses the dll just like it uses any other *.lib file from the standard C and C++ libraries. That means you have to add the name of the *.lib file in Project --> Configuration Properties --> Linker --> Input. On the right side of the screen add the *.lib to Additional Dependencies edit box. It should already contain several *.lib files.

After that you have to tell the IDE where to find that *.lib file. Add the path to Project --> Configuration Properties --> General. Then on the right side put the path to the .lib file in Additional Library Diectories edit box.

Thank you Ancient Dragon! =)

Be a part of the DaniWeb community

We're a friendly, industry-focused community of developers, IT pros, digital marketers, and technology enthusiasts meeting, networking, learning, and sharing knowledge.