Hi forum.
I really need help on this issue.

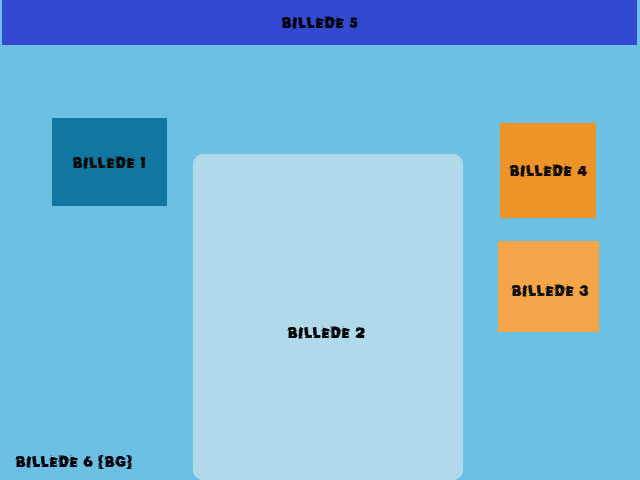
I have 5 pictures, which I would like to be the layout on my front web page. Picture 1 is one big picture which will fill up the whole screen. The other pictures I would like to add on that background (pic 1). I hope this make sence.

How can I acheive this?

I attached a jpeg pic to get the visual idea.

Please advice someone...

regards Hamid
Denmark
Dani AI

Generated

Brief, up-to-date guidance to implement the layout described by and to build on suggestions from and .

Stacking images: modern CSS allows multiple background layers on one element so the big full-bleed image can sit behind several decorative images without extra markup. This keeps HTML semantic while keeping the decorative artwork out of the DOM. See the MDN reference for details: background / MDN. Example pattern (stack order is left-to-right):

.element {
  background-image: url("big.jpg"), url("round1.png"), url("round2.png");
  background-position: center center, 120px 80px, right 60px top 140px;
  background-size: cover, 140px 140px, 120px 120px;
  background-repeat: no-repeat;
}

Overlayed, interactive boxes: if the rounded boxes must contain menus, buttons or forms, keep those as real DOM elements (not background images). Use pseudo-elements (::before/::after) or absolutely positioned child elements to render decorative artwork while the HTML box remains the interactive container. For rounded masks use border-radius for simple shapes and clip-path for complex shapes; see clip-path / MDN.

Practical tips and gotchas:

  • Backgrounds are decorative and not keyboard-focusable; put interactive controls in the DOM and use aria-hidden on purely decorative images if needed.
  • Optimize images (SVG for vector shapes, WebP/optimized PNG/JPEG for photos) and reduce file sizes for mobile.
  • Use media queries to simplify or hide overlays on small viewports.
  • Test older browsers if supporting them; multiple backgrounds and some clip-path features require modern browsers—consult MDN or resources like CSS-Tricks: Multiple Backgrounds for compatibility notes.

This approach keeps markup semantic, preserves accessibility, and makes the decorative rounded boxes capable of holding live content as requested.

Recommended Answers

All 3 Replies

There are a number of ways to do this, some more successful than others.

1. You could edit the pictures together into one image with an image editor, and then adjust the size of the picture to fit the width of the browser viewport with the width: 100%; style.

2. Use the big image (maybe with the top image edited in) as the background. Use css relative (%) styles to position the other images and adjust their sizes.

3. Use CSS to position all of the images.

There are a number of ways to do this, some more successful than others.

1. You could edit the pictures together into one image with an image editor, and then adjust the size of the picture to fit the width of the browser viewport with the width: 100%; style.

2. Use the big image (maybe with the top image edited in) as the background. Use css relative (%) styles to position the other images and adjust their sizes.

3. Use CSS to position all of the images.

Thanks for reply. Ok. So what I mean with these pic is really, that they will be rounded shaped boxes, which I hope I can place with css, and then in dreamweaver create some tables in them or something like that, so that I can fill the boxes out with what-ever applications. Can this be achieved?

So maybe your option 3 is the way, because with 1 and 2 I wont be able to create e.g menu, buttons and so on.

Or is easy to cut/slice a hole header from photoshop and implement it in dreamweaver to live actions??

regards Hamid
Denmark

Ok... Let me try help you out, with css do the following:

Image 6 will be your body background.
Image 5 will be your header background.
Image 2 your main content background.
Image 1, 3, 4 will have the same class with an additional class to change the background accordingly. eg. (class="wrapper img1") (class="wrapper img3") ect.

Oh, if you using css to style and position these divs, there is no need to nest tables inside. Just use enough padding and you should get away with it.

Be a part of the DaniWeb community

We're a friendly, industry-focused community of developers, IT pros, digital marketers, and technology enthusiasts meeting, networking, learning, and sharing knowledge.