Introduction
In this tutorial, we will look at the RxJava mergeWith() and concatWith() operators. Amongst others, they are used to combine Observables together.
All of the RxJava operators have ambiguous names, and behave differently, so let us take a look at 2 operators, mergeWith() and concatWith(), to see how they are different.
Goals
At the end of the tutorial, you would have learned:
- How to use the RxJava
mergeWith()operator. - How to use the RxJava
concatWith()operator.
Prerequisite Knowledge
- Intermediate Java.
- Basic RxJava 3.
Tools Required
- A Java IDE such as IntelliJ Community Edition.
- The project uses Gradle 7.2 and JDK 17, you can use different versions if you wish.
Project Setup
To follow along with the tutorial, perform the steps below:
-
Create a new Java Gradle project.
-
In the
build.gradlefile, add the dependency for RxJava 3.implementation 'io.reactivex.rxjava3:rxjava:3.1.1' -
Create a new package called
com.exampleunder thesrc/mainfolder. -
Create a new class called Entry.
-
Create the
main()method inside the Entry class.
mergeWith() Concept Overview
Among all of the RxJava operators, I consider mergeWith() to be one of the easiest combining operators to understand.
mergeWith() is an instance method, so it must be used from a current Observable object. Its method signature is
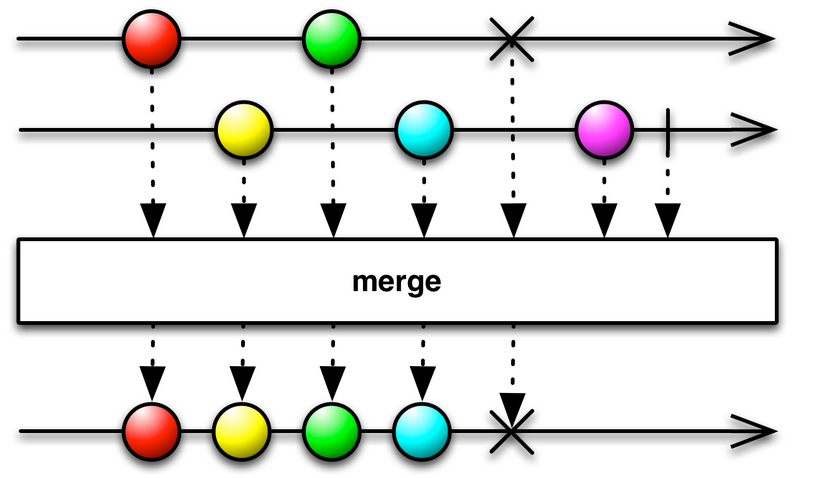
public final @NonNull Observable<T> mergeWith(@NonNull ObservableSource<? extends T> other)Fortunately, its documentation includes a graphic depicting how the two Observable(s) interact with one another when being combined with mergeWith().

In the picture above, The top two arrows represent two different Observables. The first Observable emits a red circle; the second Observable emits the yellow circle, but they do not necessarily have to emit their circles in this same order. They do not wait for one another and the mergeWith() operator also does not perform any scheduling.
These two Observables must be of the same Generic bounds, which means you cannot combine an Observable<String> with an Observable<Integer>. If you have not noticed, all 5 values emitted from both Observables are of type Circle, although they might have different color attributes.
mergeWith() also does not perform any transforming of the Observables themselves. It only emits exactly what it received from the Observables downstream.
mergeWith() Usage
In the Entry class, create a mergeWith() method just to encapsulate our example code for the mergeWith() operator. Copy and paste the code below.
    private static void mergeWith(){
       Observable.intervalRange(1, 10, 0, 2000,TimeUnit.MILLISECONDS) //1
               .mergeWith(Observable.intervalRange(11, 10, 1000, 2000, TimeUnit.MILLISECONDS)) //2
               .blockingSubscribe(System.out::println); //3
    }
On line 1, we have created an Observable with intervalRange() to simulate an async data stream starting from 1 to 10 with no starting delay. This first Observable does not have any starting delay because I want it to start emitting first, before the second Observable(which has a delay of 1 second).
The second Observable created on line 2 is also created using intervalRange(). The only difference between the two is that the first value it will emit is 11(to make it easy to discern in the terminal which Observable is emitting later) and the starting delay is 1 second because I want it to start after the first Observable.
After the initial delay, they both emit values at every two seconds. If we call mergeWith(), which is the method that we just created, then we will receive the output below.
    1
    11
    2
    12
    3
    13
    4
    14
    5
    15
    6
    16
    7
    17
    8
    18
    9
    19
    10
    20
I purposely synced the time of the emitted values to make the concept easy to understand. As stated previously, the Observables do not have to wait for one another when emitting values.
The mergeWith() operator has variants that will take other types of arguments besides ObservableSource, such as SingleSource, MaybeSource, and CompletableSource,
    public final @NonNull Observable<T> mergeWith(@NonNull SingleSource<? extends T> other)
    public final @NonNull Observable<T> mergeWith(@NonNull MaybeSource<? extends T> other)
    public final @NonNull Observable<T> mergeWith(@NonNull CompletableSource other)
but the concept behind the operator is the same for all 4 variants of mergeWith().
concatWith() Concept Overview
Now that we have understood mergeWith(), concatWith() should be quite simple to understand. The method signature for concatWith() is:
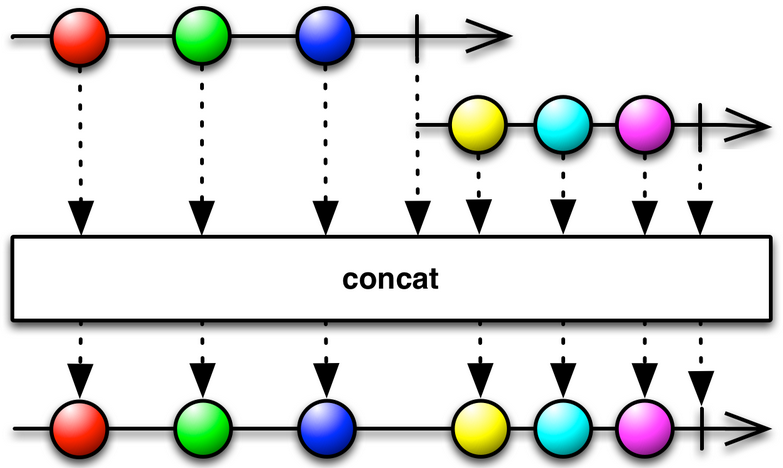
public final @NonNull Observable<T> concatWith(@NonNull ObservableSource<? extends T> other)The flow of concatWith() is depicted in the picture below (from the official docs).

Similar to mergeWith(), concatWith():
- Requires that both Observables extend the same Generic bounds.
- Is an instance method.
- Does not perform any operation on the emitted values.
But the similarities pretty much stop there, the main difference between concatWith() and mergeWith() is:
- The second Observable cannot start until the first Observable is complete. Do you recall that, with
mergeWith(), they both start at the same time?
concatWith() Usage
To put the concept that we just learned into code, create a method called concatWith() to encapsulate our example like the code below.
    private static void concatWith(){
       Observable.intervalRange(1, 10, 0, 2000,TimeUnit.MILLISECONDS) //1
               .concatWith(Observable.intervalRange(11, 10, 1000, 2000, TimeUnit.MILLISECONDS)) //2
               .blockingSubscribe(System.out::println); //3
    }
The code snippet above is almost exactly the same as the code used for mergeWith(), with the only difference being that we are using concatWith() instead of mergeWith() on the 2nd line. If we run this method, we will see that the second Observable does not start until the second Observable.
The code outputs
    1
    2
    3
    4
    5
    6
    7
    8
    9
    10
    11
    12
    13
    14
    15
    16
    17
    18
    19
    20
Where 1 to 10 were emitted from the first Observable, and 11 to 20 were emitted by the second Observable.
Solution Code
    package com.example;

    import io.reactivex.rxjava3.core.Observable;

    import java.util.concurrent.TimeUnit;

    public class Entry {
       public static void main(String[] args){
           //mergeWith();
           concatWith();
       }

       private static void mergeWith(){
           Observable.intervalRange(1, 10, 0, 2000,TimeUnit.MILLISECONDS) //1
                   .mergeWith(Observable.intervalRange(11, 10, 1000, 2000, TimeUnit.MILLISECONDS)) //2
                   .blockingSubscribe(System.out::println); //3
       }

       private static void concatWith(){
           Observable.intervalRange(1, 10, 0, 2000,TimeUnit.MILLISECONDS) //1
                   .concatWith(Observable.intervalRange(11, 10, 1000, 2000, TimeUnit.MILLISECONDS)) //2
                   .blockingSubscribe(System.out::println); //3
       }
    }
Summary
We have learned how to use the mergeWith() and concatWith() operators in RxJava. The code snippet can be found here https://github.com/dmitrilc/DaniwebRxJavaMergeWithConcatWith