dimitrilc 30 Junior Poster
Introduction

If you are a Java developer coming to Kotlin, you might have wondered how to use a language construct that is similar to the try-with-resource statement in Java to automatically close Autocloseable/Closeable resources for you.

Luckily, Kotlin provides the inline extension function use() that provides similar functionality to the try-with-resource block.

In this tutorial, we will learn how to use the use() extension function with Autocloseable resources.

Goals

At the end of the tutorial, you would have learned:

  1. How to use the use() extension function.
  2. How it differs from the Java try-with-resource statement.
Prerequisite Knowledge
  1. Basic Kotlin.
  2. Basic Java IO/NIO concepts.
Tools Required
  1. A Kotlin IDE such as IntelliJ Community Edition.
Project Setup

To follow along with the tutorial, perform the steps below:

  1. Create a new Kotlin project, using JDK 16 as the project JDK and Gradle 7.2 as the build tool.

  2. Copy and paste the configuration code below into your build.gradle.kts file.

     import org.jetbrains.kotlin.gradle.tasks.KotlinCompile
    
     plugins {
        kotlin("jvm") version "1.5.31"
     }
    
     group = "com.example"
     version = "1.0-SNAPSHOT"
    
     repositories {
        mavenCentral()
     }
    
     dependencies {
        testImplementation(kotlin("test"))
     }
    
     tasks.test {
        useJUnitPlatform()
     }
    
     tasks.withType<KotlinCompile>() {
        kotlinOptions.jvmTarget = "11"
     }
  3. Under src/main/kotlin, create a new package called com.example.

  4. Under src/main/kotlin/com/example, create a new Kotlin file called Entry.kt.

  5. Create the main() function inside this file.

  6. Under src/main, create a new source set to contain Java code.

  7. Under src/main/java, create a new package called com.example.

dimitrilc 30 Junior Poster
Introduction

In Java, a common way to express a type that is a combination of two or more types is to just create an interface that extends the other types. The problem with this approach is that your code might be littered with interface declarations, polluting your code and namespace.

But there is a solution to this problem, and that is the usage of Intersection Type. The Intersection Type is somewhat of an elusive language feature in Java, so in this tutorial, we will learn how to use it on our code.

Goals

At the end of the tutorial, you would have learned:

  1. How to use intersection types.
Prerequisite Knowledge
  1. Basic Java.
  2. Basic Java Generics.
Tools Required
  1. A Java IDE such as IntelliJ Community Edition.
Project Setup

To follow along with the tutorial, perform the steps below:

  1. Create a new Java project.
  2. Create a package com.example.
  3. Create a class called Entry.
  4. Create the main() method inside Entry.java.
Not using Intersection Types

Before going into Intersection Types, let us look at how it is done without it. Add these two top-level interfaces into the Entry.java file.

interface Human { //1
   void talk();
}

interface Wolf { //2
   void howl();
}

In the code snippet above, we have two interfaces, Human and Wolf. But what if we want a new type that is both a human and a wolf? To do that, we add the top-level HumanWolf interface into Entry.java like below.

interface HumanWolf …
dimitrilc 30 Junior Poster
Introduction

In Kotlin, we can extend classes without subclassing via extension functions and extension properties. This feature is useful whenever we want to extend 3rd party libraries or final classes.

In this tutorial, we will learn what extension functions and extension properties are, and how to create our own.

Goals

At the end of the tutorial, you would have learned:

  1. What extension functions are.
  2. What extension properties are.
  3. How to create extension functions.
  4. How to create extension properties.
Prerequisite Knowledge
  1. Basic Kotlin.
Tools Required
  1. An IDE that supports Kotlin such as IntelliJ Community Edition.
Project Setup

To follow along with this tutorial, perform the steps below:

  1. Create a new Kotlin project using Gradle as the build system.

  2. For the Project JDK, use JDK 16.

  3. After your Gradle project is loaded, copy and paste the content for the build.gradle.kts file below.

     import org.jetbrains.kotlin.gradle.tasks.KotlinCompile
    
     plugins {
        kotlin("jvm") version "1.5.31"
     }
    
     group = "com.example"
     version = "1.0-SNAPSHOT"
    
     repositories {
        mavenCentral()
     }
    
     dependencies {
        testImplementation(kotlin("test"))
     }
    
     tasks.test {
        useJUnitPlatform()
     }
    
     tasks.withType<KotlinCompile>() {
        kotlinOptions.jvmTarget = "11"
     }
  4. Under src/main/kotlin, create a new package called com.example.

  5. Under com.example, create an Entry.kt file.

  6. Create the main() function with zero argument in this file.

Extension Functions Concept Overview

To understand how extension functions work, let us start with a scenario where extending a class is not allowed. In the Entry.kt file, below the main() function, create a …

dimitrilc 30 Junior Poster
Introduction

launch() and async() are two of the most common coroutine builders to use in Kotlin, but they are somewhat different in usage.

launch() returns a Job object, which can be used to cancel or perform other operations on the underlying coroutine. If our coroutine lambda returned a useful result, then there is no way to access it via this Job object.

async() is different to launch() because it returns a Deferred<T> object, where T stands for the result returned from its lambda expression. Deferred<T> is actually a child of Job, and via a Deferred object, we can retrieve the underlying lambda value.

In this tutorial, we will learn how to use the async() coroutine builder.

Goals

At the end of the tutorial, you would have learned:

  1. How to use the async() coroutine builder.
Prerequisite Knowledge
  1. Intermediate Kotlin.
  2. Basic coroutine.
Tools Required
  1. A Kotlin IDE such as IntelliJ Community Edition.
Project Setup

To follow along with the tutorial, perform the steps below:

  1. Create a new Kotlin project, using JDK 16 as the project JDK and Gradle 7.2 as the build tool.

  2. Copy and paste the configuration code below into your build.gradle.kts file.

     import org.jetbrains.kotlin.gradle.tasks.KotlinCompile
    
     plugins {
        kotlin("jvm") version "1.5.31"
     }
    
     group = "com.example"
     version = "1.0-SNAPSHOT"
    
     repositories {
        mavenCentral()
     }
    
     dependencies {
        implementation ("org.jetbrains.kotlinx:kotlinx-coroutines-core:1.5.2")
        testImplementation("org.jetbrains.kotlin:kotlin-test:1.5.31")
     }
    
     tasks.test {
        useJUnitPlatform()
     }
    
     tasks.withType<KotlinCompile>() {
        kotlinOptions.jvmTarget = "11"
     }
  3. Under src/main/kotlin, create a new package called com.example.

dimitrilc 30 Junior Poster
Introduction

In this tutorial, we will look at the RxJava mergeWith() and concatWith() operators. Amongst others, they are used to combine Observables together.

All of the RxJava operators have ambiguous names, and behave differently, so let us take a look at 2 operators, mergeWith() and concatWith(), to see how they are different.

Goals

At the end of the tutorial, you would have learned:

  1. How to use the RxJava mergeWith() operator.
  2. How to use the RxJava concatWith() operator.
Prerequisite Knowledge
  1. Intermediate Java.
  2. Basic RxJava 3.
Tools Required
  1. A Java IDE such as IntelliJ Community Edition.
  2. The project uses Gradle 7.2 and JDK 17, you can use different versions if you wish.
Project Setup

To follow along with the tutorial, perform the steps below:

  1. Create a new Java Gradle project.

  2. In the build.gradle file, add the dependency for RxJava 3.

     implementation 'io.reactivex.rxjava3:rxjava:3.1.1'
  3. Create a new package called com.example under the src/main folder.

  4. Create a new class called Entry.

  5. Create the main() method inside the Entry class.

mergeWith() Concept Overview

Among all of the RxJava operators, I consider mergeWith() to be one of the easiest combining operators to understand.

mergeWith() is an instance method, so it must be used from a current Observable object. Its method signature is

    public final @NonNull Observable<T> mergeWith(@NonNull ObservableSource<? extends T> other)

Fortunately, its documentation includes a graphic depicting how the two Observable(s) interact with one another …

dimitrilc 30 Junior Poster
Introduction

RxJava 3 includes 5 core classes:

  1. Flowable,
  2. Observable,
  3. Single,
  4. Completable,
  5. Maybe.

This tutorial aims to teach the basic concepts behind Observable, which serves as a foundation for understanding the other 4 classes.

Goals

At the end of the tutorial, you would have learned:

  1. How to create an Observable.
  2. How to subscribe to an Observable using an Observer.
  3. How to subscribe to an Observable using Consumers.
Prerequisite Knowledge
  1. Intermediate Java.
  2. Basic knowledge of the Observer pattern.
Tools Required
  1. A Java IDE such as IntelliJ Community Edition.
  2. The project uses Gradle 7.2 and JDK 17, you can use different versions if you wish.
Project Setup

To follow along with the tutorial, perform the steps below:

  1. Create a new Java Gradle project.

  2. In the build.gradle file, add the dependency for RxJava 3.

     implementation 'io.reactivex.rxjava3:rxjava:3.1.1'
  3. Create a new package called com.example under the src/main folder.

  4. Create a new class called Entry.

  5. Create the main() method inside the Entry class.

Creating an Observable

The Observable interface (io.reactivex.rxjava3.core.Observable) has a lot of builder methods that can be used to create an instance of Observable. For this tutorial, we will use the intervalRange() builder to simulate an async stream of data and to keep our code simple.

Below is the method signature of intervalRange():

    public static @NonNull Observable<Long> intervalRange(long start,
            long count,
            long initialDelay,
            long period,
            @NonNull TimeUnit unit)
dimitrilc 30 Junior Poster
Introduction

With coroutines in Kotlin, we are able to execute suspending functions without blocking the current thread. By default, most coroutine builder functions use the Dispatchers.Default context, but it is also possible to use other implementations of CoroutineContext.

In this tutorial, we will learn about the 2 CoroutineDispatchers: Default and IO.

Goals

At the end of the tutorial, you would have learned:

  1. The difference between:
    a. Dispatchers.Default.
    b. Dispatchers.IO.
  2. How to use them.
Prerequisite Knowledge
  1. Basic Kotlin.
  2. Basic Coroutines.
Tools Required
  1. A Kotlin IDE such as IntelliJ Community Edition.
Project Setup

To follow along with the tutorial, perform the steps below:

  1. Create a Kotlin project using Gradle 7.2 as the build tool and Kotlin DSL as configuration file.

  2. Copy and paste the content below into your build.gradle.kts.

     import org.jetbrains.kotlin.gradle.tasks.KotlinCompile
    
     plugins {
        kotlin("jvm") version "1.5.31"
     }
    
     group = "com.example"
     version = "1.0-SNAPSHOT"
    
     repositories {
        mavenCentral()
     }
    
     dependencies {
        implementation("org.jetbrains.kotlinx:kotlinx-coroutines-core:1.5.2")
        testImplementation(kotlin("test"))
     }
    
     tasks.test {
        useJUnitPlatform()
     }
    
     tasks.withType<KotlinCompile>() {
        kotlinOptions.jvmTarget = "16"
     }
  3. The project uses the latest Kotlin and coroutines version as of this writing.

  4. Create a new package under src/main/kotlin called com.example.

  5. Create a new Kotlin file called Entry.

  6. Copy and paste the code below into Entry.kt.

     package com.example
    
     import kotlinx.coroutines.*
     import kotlin.coroutines.*
    
     fun main() = runBlocking { //1
    
        println(this) //2
        println(this.coroutineContext) //3
        println("ContinuationInterceptor: ${this.coroutineContext[ContinuationInterceptor]}") //4
    
        launch { //5
            doBlocking()
        }
    
        this.launch(
            EmptyCoroutineContext, // 6
            CoroutineStart.DEFAULT,
            { doBlocking() }
        )
     // …
dimitrilc 30 Junior Poster
Introduction

The java.nio.file.Files class includes many convenient methods to read file attributes, but sometimes these convenient methods just are not enough to meet our needs.

In this tutorial, we will go over 5 ways to use the Files class to read file attributes so you can choose the best way for your use case.

Goals

At the end of the tutorial, you would have learned:

  1. 5 different ways to view file attributes with Java NIO.
Prerequisite Knowledge
  1. Basic Java.
  2. Java NIO/IO.
Tools Required
  1. A Java IDE such as IntelliJ Community Edition or Eclipse.
Project Setup

To follow along with the tutorial, perform the steps below:

  1. Create a new Java project.

  2. Create a package com.example.

  3. Create a class called Entry.

  4. Create the main() method inside Entry.java.

  5. Copy and paste the following content into the main() method.

     Path path = Path.of(".", "Test.txt");
    
     createTestFile(path);
    
     viewAttributes1(path);
     viewAttributes2(path);
     viewAttributes3(path);
     viewAttributes4(path);
     viewAttributes5(path);
  6. Create the creatTestFile() method like below:

     private static void createTestFile(Path path){
        try {
            if (Files.notExists(path))
                Files.createFile(path);
        } catch (IOException e) {
            e.printStackTrace();
        }
     }
  7. The code will not compile yet because we are missing those viewAttributes() methods, which we will add later.

Read file attributes using convenient methods

As of Java 17, the Files class has 10 convenient methods to read file attributes. They are great to use because they are idiomatic and are very readable.

    Files.getLastModifiedTime(path); //1 …
dimitrilc 30 Junior Poster
Introduction

When working with an application with a global user base, there is usually a need to display text, numbers, currency, date, and time in multiple localized formats. For example, the en-US (English-USA) version of the date

September 22, 2021 

is written as

22 сентября 2021 г.

when the locale used is ru-RU (Russian-Russia).

In this tutorial, we will learn how to format currency and date in localized formats using java.time.* and java.text.* classes.

Goals

At the end of this tutorial, you would have learned:

  1. How to format currency based on locale.
  2. How to format dates based on locale.
Prerequisite Knowledge
  1. Basic Java.
Tools Required
  1. A Java IDE.
Locale Overview

Before proceeding further, let us discuss an important concept: java.util.Locale.

A Locale object is an encapsulation of data used to specify the language, the country, and/or the variant of a geographic region.

There are 3 Locale constructors:

    public Locale(String language)
    public Locale(String language, String country)
    public Locale(String language, String country, String variant)

When creating a Locale object (the first constructor), you must at least pass in a language code, which must be in the form of “an ISO 639 alpha-2 or alpha-3 language code, or a language subtag up to 8 characters in length.” For this tutorial, we will only be using the ISO 639-1 alpha-2 language code, which is in the form of lowercase 2 letters abbreviation (i.e, “en”, “es”).

For the second constructor, we can pass in a …

dimitrilc 30 Junior Poster
Introduction

Although not included in the headlines, the release of JDK 17 also added 3 sets of new methods to the class java.lang.Process:

  1. inputReader() to read from stdout.
  2. inputWriter() to write to stdin.
  3. errorReader() to read from stderr.

In this tutorial, we are going to learn how to use Process.inputReader() to read stdout from external processes.

Goals

At the end of this tutorial, you would have learned:

  1. How to read stdout from an external process.
  2. What command injection is.
Prerequisite Knowledge
  1. Basic Java.
  2. Java IO/NIO.
Tools Required
  1. A Java IDE with at least JDK 17 support.
Project Setup

To follow along with this tutorial, perform the steps below:

  1. Create a new Java project.

  2. Create a package com.example.

  3. Create a Java class called Entry.java. This is where our main() method lives.

  4. Create a static reference to the current Runtime object like below.

     private static final Runtime runtime = Runtime.getRuntime();
Read stdout from scripts

If the security policy allows it, it is possible to execute a script that is not part of the current Java runtime environment.

Executing scripts written in other programming languages or system shells can also be used for illegitimate purposes, such as in a code injection/shell injection attack. After an external script is run, it can potentially evade your Java application’s permissions. If you are running a service that is executing arbitrary code from end users(e.g Slack/Discord bots that …

dimitrilc 30 Junior Poster
Introduction

In Android development, the current recommended library for Dependency Injection is Hilt. The most obvious benefits of using Hilt are reduced boilerplate code and lifecycle-aware components(and their associated annotations).

Hilt is a great library, but it is not perfect. Hilt is built on top of Dagger 2, so the terminologies and concepts are hard to understand for developers who did not use Dagger before being introduced to Hilt.

This tutorial introduces Dagger 2 in its original form using Kotlin to make it easy for Kotlin-only developers to follow. The main feature that we are going to look at in this tutorial is constructor dependency injection using Dagger 2.

Goals

At the end of this tutorial, you would have learned:

  1. How to use Dagger constructor injection.
Prerequisite Knowledge
  1. What dependency injection is.
  2. Basic Kotlin.
Tools Required
  1. IntelliJ Community Edition.
Project Setup

First we need to set up our Kotlin project:

  1. In IntelliJ, go to File > New > Project.
  2. In the New Project wizard:
    a. Select Kotlin on the left hand side.
    b. Use Dagger2Practice as project name(optional).
    c. You can leave the Location as default if you wish.
    d. Project Template is Application.
    e. Build System is Gradle Kotlin.
    f. Project JDK is set at Java 11. I find this version to be most stable when working with Kotlin.
    g. Group ID is com.example.
    h. Artifact ID is Dagger2Practice.
    i. Version is 1.0-SNAPSHOT.
    j. This is how the project setting looks …
dimitrilc 30 Junior Poster
Introduction

In Java 8, @Repeatable was introduced and this is the recommended way to create repeating annotations. We still have to create a holder Annotation(annotation that holds an array of other annotations), but we no longer have to declare the holder Annotation at the callsite.

This tutorial aims to show you the difference between the old way and the new way using @Repeatable.

Goals

At the end of this tutorial, you would have learned:

  1. How to create your own custom Annotations.
  2. How to create repeatable Annotations.
Prerequisite Knowledge
  1. Basic Java
  2. Basic knowledge of Reflection API.
  3. Basic understanding of Annotations.
Tools Required
  1. A Java IDE with at least JDK 8 support.
Project Setup

To follow along with this tutorial, perform the steps below:

  1. Create a new Java project.
  2. Create a package com.example.
  3. Create a Java class called Entry.java. This is where our main() method lives.
  4. Under the com.example package, create 3 public classes:
    a. Banana
    b. Cat
    c. Bike
Custom Annotation Review

Most Java developers I met have told me that they never had to create their own custom Annotations, even though they use Annotations every day(@Override). It is usually the job of frameworks to provide out-of-the-box Annotations for other developers to use.

This section of the tutorial provides a quick overview of how to create custom Annotations for those who are not familiar with the syntax or as a review for those who have forgotten.

Copy and paste the code below …

dimitrilc 30 Junior Poster
Introduction

Before Java 8, methods had to throw an exception or return null, with neither of which approaches were perfect. Optional, OptionalInt, OptionalLong, and OptionalDouble were introduced in Java 8 to represent values that might possibly be null.

Optionals have two internal states, empty or present. An Optional is empty if the underlying reference is null. An Optional is present when the underlying reference is not null.

Although there are many ways to use Optionals, chaining optionals usually provides for writing clear and concise code, especially when complex filtering is required.

Goals

At the end of this tutorial, you would have learned:

  1. How to use Optional methods map() and filter().
Prerequisite Knowledge
  1. Java 8.
  2. Java functional concepts: Optional, method reference.
Tools Required
  1. A Java IDE with at least JDK 8 support.
Project Setup

To follow along with this tutorial, perform the steps below:

  1. Create a new empty Java 8+ project.

  2. Create a new package com.example.

  3. Create a new Java class called Entry.

  4. Create the main() method inside the Entry class.

  5. Create two LocalDate constants inside the Entry class like below:

     private static final LocalDate GEN_ALPHA = LocalDate.ofYearDay(2010,1); //1
     private static final LocalDate GEN_Z = LocalDate.ofYearDay(1997, 1); //2
  6. Add a convenient method for checking if a LocalDate instance is considered a Gen Z.

     private static boolean isGenZ(LocalDate d){ //7
        return (d.isEqual(GEN_Z) || d.isAfter(GEN_Z)) && d.isBefore(GEN_ALPHA);
     }
Project Explanation

Our …

dimitrilc 30 Junior Poster
Introduction

Java 15 introduced Text Blocks. The main reason behind Text Blocks is that programmers can write multiline strings without having to specify escapes for the most common scenarios.

Goals

At the end of this tutorial, you would have learned:

  1. How to store multiline String using Text Block.
  2. Some edge cases to watch out for when using Text Blocks.
Prerequisite Knowledge
  1. Basic Java
Tools Required
  1. A Java IDE with support for JDK 15+.
Syntax

A Text Block can be used anywhere a String literal can be used. Instead of one pair of double quotes used in String literals, a Text Block uses 3 pairs of double quotes.

Here is a traditional multiline String of an HTML document:

    var html = "<!DOCTYPE html>\n" +
           "<html>\n" +
           "    <head>\n" +
           "    </head>\n" +
           "    <body>\n" +
           "        <p>Hello World</p>\n" +
           "    </body>\n" +
           "</html>";

And here is a Text Block:

    var html = """
           <!DOCTYPE html>
           <html>
               <head>
               </head>
               <body>
                   <p>Hello World</p>
               </body>
           </html>
           """;

As you can see, the version using the Text Block no longer has to add the new line character (\n) and concatenate every new line. Removing the need for String concatenation also removes all of the extra double quotes () and plus signs (+), improving readability.

Edge Cases

Text Block has compiler support, so syntax errors are mostly obvious. But there are quite a few edge cases that programmers should watch out for when working with Text Blocks.

The …
dimitrilc 30 Junior Poster
Introduction

There are many ways to design secure Java objects. In this tutorial, we are going to learn how to create secure Java objects by understanding Accessibility, Extensibility, and Immutability.

Goals

At the end of this tutorial, you would have learned:

  1. Understand how and why to limit accessibility to a class.
  2. Understand how and why to limit extensibility in a class.
  3. Understand why Immutability is important and how to create an immutable object.
Prerequisite Knowledge
  1. Basic Java.
Tools Required
  1. A Java IDE.
Limit Accessibility

Whenever we design a Java object, we should always strive to follow the principle of least privilege, which means we should limit access as much as possible. There are 4 access modifiers in Java, from least to most accessible: private, package-private, protected, and public. Developers should make use of these access modifiers to limit accessibility to data encapsulated within a class.

Let us take a look at a bad example.

    package com.example;

    import java.time.ZonedDateTime;
    import java.util.List;

    public class InsecureBirthdaysHolder {
       public List<ZonedDateTime> birthdays;
    }

The code snippet above uses the public access modifier for the birthdays List, which anybody can access.

Maybe the developer who wrote this piece of code thought that birthdays are not sensitive data as compared to social security numbers, so they did not bother limiting access to the list of birthdays. Little did they know, birthdays can usually be combined with some other publicly available information to impersonate a person’s identity for authentication with insecure …

dimitrilc 30 Junior Poster
Introduction

In this tutorial, we will focus on how to manage IO permissions to read, write, and delete local files using the SecurityManager class.

Goals

At the end of this tutorial, you would have learned:

  1. What policy files are and how to use them.
  2. How to use policy files and the SecurityManager class to manage IO permissions.
Prerequisite Knowledge
  1. Basic Java.
  2. Java IO/NIO Concepts.
Tools Required
  1. A Java IDE that supports JDK 11 (I prefer NIO2/Path over older IO/File).
Concept Overview

The Java class SecurityManager can be used to limit the permissions of a program to perform tasks in these categories: File, Socket, Net, Security, Runtime, Property, AWT, Reflect, and Serializable. The focus of this tutorial would only be on File read, write, and delete permissions.

By default, a SecurityManager is not provided in the runtime environment. In order to use the SecurityManager, one must either set the runtime flag java.security.manager on the command line or provide an instance of SecurityManager in code. Our example will use the latter approach, which will create an instance of SecurityManager manually.

It is possible to extend the SecurityManager class, but that is out of scope of this tutorial, so the instance of SecurityManager that we will create later will be of the default implementation.

The java.policy File

When the SecurityManager instance is loaded, it will automatically look for java.policy files located at the paths below:

    java.home/lib/security/java.policy (Solaris/Linux)
    java.home\lib\security\java.policy (Windows)

    user.home/.java.policy (Solaris/Linux)
    user.home\.java.policy (Windows)

In case you …

dimitrilc 30 Junior Poster
Introduction

Java 14 was released with a new type of expression called Switch Expression. Its syntax is similar to that of the Switch Statement, with a few differences.

In this tutorial, we will walk through concepts related to the Switch Expression and learn how to use it.

Goals

At the end of this tutorial, you would have learned:

  1. The following concepts of Switch Expression: Arrow Label and Yielding.
  2. How to use the Switch Expression.
Prerequisite Knowledge
  • Basic Java.
Tools Required
  • An IDE with support for JDK 14+
Project Setup

Before writing any code, we need to set up our project first. Below are the steps to set up our project:

  1. Create a new vanilla Java project.
  2. Create the package com.example.switcher. This is where our main method lives.
  3. Create a public Java class Entry.java.
  4. Add the main method to Entry.java.
  5. Add an enum Season with 4 constants representing 4 seasons SPRING, SUMMER, FALL, WINTER. This enum has the package-private access modifier.

Your code should now look like this.

    package com.example.switcher;

    public class Entry {

       public static void main(String[] args){

       }

    }

    enum Season { SPRING, SUMMER, FALL, WINTER }
The Arrow Label

The first concept that we will look at is the arrow label. Instead of the colon label : used in switch statements, an arrow -> indicates that the current switch block is a Switch Expression.

Copy the 2 methods below into the Entry class to see how it is used.

dimitrilc 30 Junior Poster
Introduction

In this tutorial, we are going to learn how to create a Java module by hand.

Goals

At the end of this tutorial, you would have learned:

  1. What a module-info.java file is.
  2. How to compile a module.
  3. Describing a module.
Prerequisite Knowledge
  1. Basic Java.
  2. Basic command-line interface.
Tools Required
  1. A CLI shell, such as Command Prompt for Windows, Terminal for Mac, or Bash for Linux.
  2. JDK 9+ path/environment variables already setup.
Concept Overview

Java Module is an abstraction on top of packages that allows for more fine-grained encapsulation.

In the module-info.java file that defines every module, we can restrict the module’s dependencies, the packages that it exports, services that it consumes or offers, and whether it allows reflection.

The Bank Example

In order to see the concept of modules in action, we will create an example module. For learning purposes, we will not be using an IDE at all in this tutorial.

Let us assume that we are writing software for a bank. This bank has a software engineering team responsible for security.

The module that the security team creates is responsible for:

  1. Biometrics(information).
  2. Vault(security).

To give you a rough idea, later on, we are going to create the following modules and packages:

module: com.bank.security
package: com.bank.security.biometrics
package: com.bank.security.vault
The Security Module

First we will start with creating the security module.

  1. Create a folder called example. This is where all of our modules live.

  2. Under example, create …

dimitrilc 30 Junior Poster
Introduction

This tutorial introduces the CyclicBarrier class and teaches you how to use it.

Goals

At the end of this tutorial, you would have learned:

  1. How to use CyclicBarrier to synchronize tasks across multiple threads.
Prerequisite Knowledge
  1. Intermediate Java.
  2. Basic knowledge of threads.
  3. Executors/ExecutorService.
  4. Lambdas.
Tools Required
  1. A Java IDE with at least JDK 10 support (optionally for LVTI), such as IntelliJ Community Edition.
Concept Overview

CyclicBarrier is a synchronization tool that can be used to synchronize tasks in multiple threads. CyclicBarrier introduces a performance penalty because task(s) in any specific thread is blocked until task(s) in other threads complete, so it is important to weigh the pros and cons when using it.
A CyclicBarrier object keeps count of how many times await() has been called on it. Whenever a thread calls await() on a CyclicBarrier object, that thread is disabled until the CyclicBarrier trips.
The CyclicBarrier object is tripped when the number of threads calling await() is equal to the number that the CyclicBarrier object was initialized with(in the constructor). When a CyclicBarrier object is tripped, all threads waiting are allowed to resume execution.

Scenario

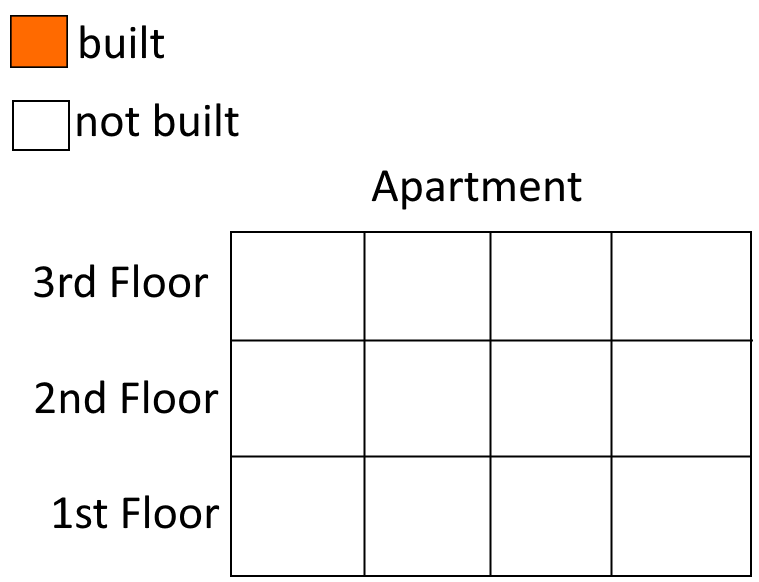
To understand this concept, we are going to create a program to build an apartment building with 3 floors and 4 apartments on each floor.
apartments.png

To simplify the concept, we are going to assume that all the apartments on a floor must be built first before any apartment on the upper floor can be built. …

JamesCherrill commented: The hits keep on coming. Excellent stuff. +0
dimitrilc 30 Junior Poster
Introduction

partitioningBy() collects a Stream into a Map. In this tutorial, we will compare the two different partitioningBy methods and learn how to use them.

Goals

At the end of this tutorial, you would have learned:

  1. What Collectors.partitioningBy does and how to use it.
Prerequisite Knowledge
  1. Basic Java.
  2. Java Streams (java.util.stream, not IO streams).
  3. Functional Interfaces (java.util.function).
  4. Lambdas/Method References.
Tools Required
  1. A Java IDE with support for at least JDK 16 (optionally for Record). If you do not want to use the Record class in the example, JDK 8 is enough.
partitioningBy Concept Overview

When operated on a stream, partitioningBy() returns a Map where the keys are always of Boolean type. This is a great Collector to use when you want the returned Map to contain 2 “partitions”, one for True and one for False.

Let us use an example to clarify the concept here.

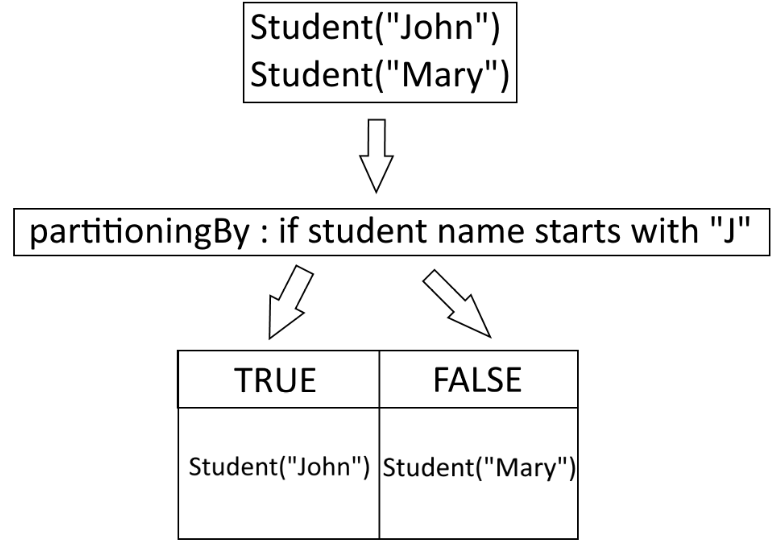
You are given 2 students with different names, John and Mary, in a stream. partitioningBy() can help us to create a table with 2 columns, with the first column containing only students that match a specific Predicate(java.util.function.Predicate), while the other column containing students that do not match that same Predicate. If our Predicate matches only students with names starting with the letter “J”, then the scenario is depicted below.
partitioningby.png

As you can see, the partitioningBy``Collector along with a Predicate helped us divide our data set into two “partitions”.

partitioningBy In Action

It is time to write …

JamesCherrill commented: Another outstanding contribution. Thank you. +15
dimitrilc 30 Junior Poster

I believe IntelliJ has 60-80% market share, then Eclipse, with VSC and Netbeans fighting for 3rd place. VSC is still missing basic things like Javadocs preview.

IntelliJ is massively popular with the younger devs because they get the ultimate version for free with an edu email. The younger devs I talk to are mostly discord devs and minecraft modders.

dimitrilc 30 Junior Poster

Hi James, while the this keyword is unnecessary on line 38 and the constructor, I find it makes the code easier to read, especially outside of an IDE, like a blog post, for example.

The other Java devs I talked to or have reviewed my code didn't seem to mind or even realize that it's there. When I searched online, it looks like a 60/40 split (I'm guessing ~60% of devs prefer skipping the implicit whenever possible). I also don't see anything against it in either the Google Java Style/Oracle Java Style guides.

Neither Sonar Lint or IntelliJ gave me any warning at all (although IntelliJ has an optional inspector to remove unnecessary this).

So I guess it's a matter of preference.

dimitrilc 30 Junior Poster
Introduction

Based on the 2020 Java Ecosystem survey from Jetbrains, 75% of Java developers are still using JDK 8. JDK 11 introduces HttpClient, which replaces the legacy HttpURLConnection API. For this tutorial, we will build a HttpClient that consumes the free Cat Facts API.

Goals

At the end of this tutorial, you would have learned:

  1. How to use the HttpClient to consume REST APIs.
Prerequisite Knowledge
  1. Basic Java.
  2. Good understanding of HTTP protocols.
Tools Required
  1. Any Java IDE that supports JDK 11 and above.
The Application Entry Point

Our App does not need any special build tool. Follow the steps below to create the main method:

  1. Create an empty Java project with support for JDK 11+.
  2. Create a package called com.example.client.
  3. Inside the client package, create a class called Entry.
  4. Add the main method inside Entry.

Your Entry.java file should now look like this:

package com.example.client;

public class Entry {

   public static void main(String[] args){
   }
}
The CatFactsService Class

Next, we need to create a class for grouping all of the logics for our HttpClient.

  1. Inside the same Entry.java file, create another top level class called CatFactsService with package visibility (empty modifier).
  2. Add a private final instance variable with type HttpClient(from java.net.http) and identifier httpClient.
  3. Add an empty constructor and initialize httpClient using the static method newHttpClient() from the HttpClient class. This will initialize a HttpClient with default settings, which is sufficient for this tutorial. If you want to …
JamesCherrill commented: Why the "this" on line 38? +15
dimitrilc 30 Junior Poster
Introduction

This tutorial teaches you how to implement the Type-safe Builder pattern using Kotlin. This pattern allows developers to create declarative and concise DSLs. Our implementation will be a Burger Builder that enables our users to create Burger objects expressively.

Goals

At the end of the tutorial, you would have learned:

  1. A general understanding of DSLs.
  2. How to combine various Kotlin features to create DSLs.
Prerequisite Knowledge
  1. Basic Kotlin syntax.
  2. Good understanding of these Kotlin concepts: extension functions, higher-order functions, function types with receiver, lambdas with receiver, lambda expressions, passing trailing lambdas.
Tools Required

An IDE that supports Kotlin, such as IntelliJ Community Edition.

What is a DSL?

In simple terms, DSLs are mini-languages that simplify complex programs for the end users in a specific domain. Most of us are already using DSLs daily without realizing it. Examples of DSLs are SQL, shell commands, HTML, CSS, etc.

Database administrators can interact with databases using SQL commands that look almost like English without having to know any programming.

DELETE FROM users where username = 'monkey';

System administrators can call Bash or Powershell commands with just one word or more.

reboot
history
ping 192.168.0.1
Internal vs External DSLs

The second concept about DSL that we need to understand for the purpose of this tutorial is the difference between internal and external DSL.

External DSLs, such as SQL, require a parser into our programming language to be able to work. Internal DSLs, however, utilizes the …

dimitrilc 30 Junior Poster
Introduction

This tutorial teaches you how to create a Spring Boot application that provides RESTful API Endpoints. These endpoints are best consumed by other applications or for integrating with a SPA (Single Page Application) frontend such as Angular.

For the purpose of this tutorial, we will create a web service for managing students and their grade(seniority) for a highschool. I will refer to the application as App from now on.

Goals

At the end of this tutorial, you would have learned:

  1. How to create a Spring Boot project.
  2. How to create a @RestController to handle HTTP requests.
  3. How to create a @Service to perform business logic.
  4. How to create a @Repository to perform CRUD operations.
Prerequisite Knowledge
  1. Basic Java knowledge, especially with Java Annotations.
  2. Basic understanding of Dependency Injection.
  3. Basic understanding of HTTP requests.
  4. Familiarity with at least one Java IDE such as Eclipse, IntelliJ, Visual Studio Code(with Java extensions), or Netbeans, etc.
  5. Basic SQL or JDBC.
Tools Required
  1. Eclipse IDE for Java Developers, version 2021‑06 R. Although IntelliJ is the most popular Java IDE right now, Spring integration in IntelliJ requires the non-free Ultimate edition. I chose to stick with Eclipse to ensure that most of my readers can follow the tutorial for free.
  2. Postman API Client. The free tier is enough for this tutorial.
Spring Initilizr

For new Spring projects, the recommended way is to use Spring Initilizr.

https://start.spring.io/ is an official Spring website that generates Spring …