You can also try this:
    def incSpeed(self, event):
        print("Test", event.keysym)
You can also try this:
def incSpeed(self, event):
print("Test", event.keysym)
Tkinter bind passes an event argument that you have to take care of even if you don't use it:
from tkinter import *

class App:

    def __init__(self, master):

        self.left = 0
        self.right = 0
        widget = Label(master, text='Hello bind world')
        widget.config(bg='red')
        widget.config(height=5, width=20)
        widget.pack(expand=YES, fill=BOTH)

        widget.bind('<Up>',self.incSpeed)
        widget.focus()

    def incSpeed(self, event):
        print("Test")

root = Tk()
app = App(root)
root.mainloop()
If you want to span over 2 rows (rows 4 and 5) use:
text.grid(row=4, column=1, rowspan=2)
Is it true that the development of wxPython is dead?
A number of things wrong here, see the comments in the code:
# guess the number in a GUI

from tkinter import *
import random


class Application(Frame):
    ''' GUI guess the number application  '''
    def __init__(self, master):
        '''initialise frame'''
        super(Application, self).__init__(master)
        self.grid()
        self.create_widgets()
        # create the random number self.rnumber
        # notice the different name of this method
        self.pick_rnumber()

    def create_widgets(self):
        '''create widgets for GUI guess game'''
        #Create title label
        Label(self, text = 'Guess the number'
              ).grid(row = 0, column = 1, columnspan = 2, sticky = N)
        # create instruction labels
        Label(self, text = 'I am thinking of a number between 1 and 100'
              ).grid(row = 1, column = 0, columnspan = 3, sticky = W)

        Label(self, text = 'Try to guess in as few attempts as possible'
              ).grid(row = 2, column = 0, columnspan = 3, sticky = W)

        Label(self, text = 'I will tell you to go higher or lower after each guess'
              ).grid(row = 3, column = 0, columnspan = 3, sticky = W)
        # Create a label and number entry
        Label(self, text = 'Your guess: '
              ).grid(row = 4, column = 0, sticky = W)
        self.guess_ent = Entry(self)
        self.guess_ent.grid(row = 4, column = 1, sticky = W)
        # put cursor in entry
        self.guess_ent.focus()
        # create label and text box for number of tries
        Label(self, text = ' number of tries: '
              ).grid(row = 5, column = 0, sticky = W)
        self.no_tries_txt = Text(self, width = 2, height = 1, wrap = NONE)
self.no_tries_txt.grid(row = 5, …Sooner or later all cars will run electric, then we will have to post a new thread called
"Kilowatthour Prices"
To run a timer in the background you have to use the module threading.
You can also use the current time at start and end of the game and calculate the difference.
 import time


# time.clock() is for windows only, updates every 1 ms
start = time.clock()

# your program code here ...

# for instance this demo code will take about 7.5 seconds
print "going"
time.sleep(2.5)  # 2.5 seconds
print "still going"
time.sleep(2.5)
print "still going"
time.sleep(2.5)
print "done"


# ... your program ends
end = time.clock()
print "Time elapsed = ", end - start, "seconds"
Note that Portable Python does not use the Windows Registry, after all it is supposed to be portable.
Okay, I downloaded
PortablePython3.2.1.1.exe
from
http://www.portablepython.com/wiki/PortablePython3.2.1.1
and installed it on my C: drive
Now you can run the excellent IDE (a Python editor)
PyScripter-Portable
which is located in directory
C:\Portable Python 3.2.1.1
From the PyScripter's File Explorer (on the left side of the IDE) you can load
yinyang.py
from directory
C:\Portable Python 3.2.1.1\App\Lib\turtledemo
and run it from the IDE directly. Works great for me.
I can't find file turtleDemo.py in the Python32 installation. If you have it from older installations you might try to change
import Tkinter
to
import tkinter
In your file manager double click on one of the python source files (have extension .py) in directory
C:\Python32\Lib\turtledemo
for instance
yinyang.py
You can also run this batch file
C:\Python32\python -u C:\Python32\Lib\turtledemo\yinyang.py
Or simply use the Python editor IDLE, load the source code file and run the module.
jbennet, you are simply exceptional!
Remember half the people you know are below average.
One more way for the fun of it:
import random

let = [ 'a', 'b', 'c', 'd', 'e', 'f', 'g' ]
random.shuffle(let)

while len(let):
print let.pop()Amazing how a bunch of lines can create a nifty pattern, here is an example using a wxPython canvas and a simple DrawLinePoint() function:
# draw a line pattern using a wx.ClientDC() canvas
# wx.ClientDC() does not use the wx.PaintEvent

import wx
import math

class MyFrame(wx.Frame):
    def __init__(self, parent, title):
        wx.Frame.__init__(self, parent, wx.ID_ANY, title, size=(600, 400))
        self.SetBackgroundColour('white')
        # this small millisecond delay is needed
        wx.FutureCall(10, self.draw_lines)

    def draw_lines(self):
        # create the canvas to draw on
        dc = wx.ClientDC(self)

        # set line colour and thickness (pixels)
        dc.SetPen(wx.Pen("red", 1))

        # get the width and height of the canvas (the client)
        width, height = self.GetClientSizeTuple()

        # set the dc origin to the canvas center
        dc.SetDeviceOrigin(width//2, height//2)

        # note that this point is actually the center of the canvas
        point1 = (0, 0)

        # calculate the usable radius
        radius = math.hypot(width//2, height//2)

        # not that the angle is in radians
        angle = 0
        notch = 4 * math.pi/360
        while (angle < 2 * math.pi):
            # calculate x and y for each end point
            x = radius * math.cos(angle)
            y = radius * math.sin(angle)
            point2 = (x, y)
            dc.DrawLinePoint(point1, point2)
            # advance the angle a notch
            angle += notch


app = wx.App()
MyFrame(None, 'draw a line pattern with DrawLinePoint()').Show(True)
app.MainLoop()An example on how to load an image onto a wxPython canvas sized to the image. Also, point the mouse to any part of the image, click and display the color pixel pointed to:
# show an image from a file using a wx.ClientDC() canvas
# any previous image on the canvas can be cleared
# wx.ClientDC() does not use the wx.PaintEvent
# optionally show rgb colour tuple at point (x, y) clicked

import wx

class ImagePanel(wx.Panel):
    """ create a panel with a canvas to draw on"""
    def __init__(self, parent):
        wx.Panel.__init__(self, parent, wx.ID_ANY)
        self.parent = parent
        # pick an image file you have in your working folder
        # (can be a .jpg, .png, .gif, or .bmp image file)
        image_file = 'Zingerman1.jpg'
        self.bmp = wx.Bitmap(image_file)
        image_width = self.bmp.GetWidth()
        image_height = self.bmp.GetHeight()

        # set frame size (also panel) to image size
        parent.SetClientSize((image_width, image_height))

        # set special cursor
        self.SetCursor(wx.StockCursor(wx.CURSOR_CROSS))

        # this small delay is needed to allow image loading first
        wx.FutureCall(50, self.make_canvas)

        # bind mouse left click event
        self.Bind(wx.EVT_LEFT_DOWN, self.onClick)

        # optionally show some image information
        info = "%s  %dx%d  (click mouse)" %\
            (image_file, image_width, image_height)
        # the parent is the frame
        self.parent.SetTitle(info)

    def make_canvas(self):
        self.dc = wx.ClientDC(self)
        # clear the canvas
        self.dc.Clear()
        # draw the image
        self.dc.DrawBitmap(self.bmp, 0, 0, True)

    def onClick(self, event):
        # get (x, y) position tuple
        pt = event.GetPosition()
        colour = self.dc.GetPixelPoint(pt)
        s = "RGB = %s at point %s" % (str(colour[:3]), str(pt))
        self.parent.SetTitle(s)


app = wx.App()
# create window/frame
frame = wx.Frame(None, wx.ID_ANY, size=(400, 300))
# create …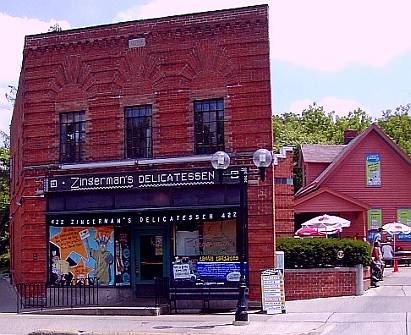
Give this a try and see if it works:
import subprocess
subprocess.call()
An oldy but goody, drawing a simple bar graph using thick lines for the bars. The wxPython canvas created with wx.ClientDC() makes this project look easy:
# a simple bar graph using a thick line
# the wx.ClientDC surface is wxPython's canvas
# use wx.ClientDC() without the wx.PaintEvent

import wx

class MyFrame(wx.Frame):
    def __init__(self, parent, title):
        wx.Frame.__init__(self, parent, wx.ID_ANY, title, size=(360, 320))
        self.SetBackgroundColour('white')

        # data to be graphed
        self.data = [30, 45, 80, 150, 220, 180, 110, 75, 50, 35, 25, 15]
        # call bargraph() 10 ms after the window has been created
        # this small delay is needed
        wx.FutureCall(10, self.bargraph)

    def bargraph(self):
        """draw a simple bar graph"""
        # does not use a wx.PaintEvent
        dc = wx.ClientDC(self)
        # set line colour and thickness (pixels)
        dc.SetPen(wx.Pen('black', 2))
        # DrawLine(x1, y1, x2, y2) from point (x1,y1) to (x2,y2)
        # draw the baseline
        dc.DrawLine(20, 260, 340, 260)

        # set up the bars
        thick = 20
        dc.SetPen(wx.Pen('red', thick))
        delta = thick + 5
        x = 20
        for y in self.data:
            y1 = 255
            y2 = y1 - y
            # draw each bar
            dc.DrawLine(x, y1, x, y2)
            # add values to the top of each bar
            s = str(y)
            dc.DrawText(s, x-8, y2-25)
            x += delta


app = wx.App()
MyFrame(None, 'draw a simple bar graph').Show(True)
app.MainLoop()You want it real sweet and short?
# add file contents to lists
wordlist = [line.strip() for line in file('wordlist.txt')]
possible = [line.strip() for line in file('possible.txt')]

match_list = []
for poss in possible:
    for word in wordlist:
        # narrow down the wordlist with len() and set()
        if len(poss) == len(word) and set(poss) == set(word):
                match_list.append((poss, word))

# show result
print "there are %d matches:" % len(match_list)
for match in match_list:
    print "%-10s -->  %-10s" % (match)
Pulling all the tricks of Python, but harder to read and understand:
for poss in [line.strip() for line in file('possible.txt')]:
    for word in [line.strip() for line in file('wordlist.txt')]:
        if len(poss) == len(word) and set(poss) == set(word):
print "%-10s --> %-10s" % (poss, word)By using set() you can really streamline your code:
# modified to allow testing
wordlistfile = open('wordlist.txt', 'r')
possiblefile = open('possible.txt', 'r')

# add file contents to lists
wordlist = []
possible = []
for line in wordlistfile:
    wordlist.append(line.strip())
for line in possiblefile:
    possible.append(line.strip())

match_list = []
for poss in possible:
    for word in wordlist:
        # narrow down the wordlist with len() and set()
        if len(poss) == len(word):
            if set(poss) == set(word):
                # now partial match the characters
                count = 0
                for c in poss:
                    if c in word:
                        count += 1
                if count == len(poss):
                    match_list.append((poss, word))

# show result
print "there are %d matches:" % len(match_list)
for match in match_list:
    print "%-10s -->  %-10s" % (match)

"""
my result -->
there are 10 matches:
raolns     -->  larson
1itdalig   -->  digital1
caeaph     -->  apache
eeirgg     -->  reggie
nanajo     -->  joanna
ahtrru     -->  arthur
sunatr     -->  saturn
cc0171n    -->  ncc1701
rfisedn    -->  friends
aangle     -->  angela
"""There are two "print p" in your code.
Sorry, I left the original
for line in wordlistfile:
    wordlist.append(line.strip())
for line in possiblefile:
    possible.append(line.strip())
still in the loop. Just remove it. On first blush meant that I didn't test it out, just looked at your code.
Why it doesn't print out 'friends', I don't know.
If you look into Main.py, you find:
def opj(path):
    """Convert paths to the platform-specific separator"""
    st = apply(os.path.join, tuple(path.split('/')))
    # HACK: on Linux, a leading / gets lost...
    if path.startswith('/'):
        st = '/' + st
    return st
The problem is that the 'wx code demo stuff' is unnecessarily complex on the one side and often very shallow where it counts. It is written by the same guy that wrote the book on wxPython, by all reports a frustrating failure.
On first blush, you need to create your wordlist outside the loop, or you will keep appending to it all the time:
#decode scrambled word from a word list in 30 sec or less.
matches = []
thelist = []
myvar = -1
c = -1
p = -1
wordlistfile = open('C:\\Documents and Settings\\William\\Desktop\\wordlist\\wordlist.txt', 'r')
possiblefile = open('C:\\Documents and Settings\\William\\Desktop\\possible.txt', 'r')
#add file contents to lists.
wordlist = []
possible = []
for line in wordlistfile:
    wordlist.append(line.strip())
for line in possiblefile:
    possible.append(line.strip())

while p < 9:
    i = -1
    p = p + 1
    print p
    for line in wordlistfile:
        wordlist.append(line.strip())
    for line in possiblefile:
        possible.append(line.strip())
#match length of words to narrow possible matches
    for line in wordlist:
        i = i + 1
        if len(wordlist[i]) == len(possible[p]):
            matches.append(wordlist[i])
#narrow further by checking for instances of charecters
    word = possible[p]
    x = len(matches)
    while c < x:
        c = c + 1
        for letter in word:
            if c == x:
                break
            if not letter in matches[c]:
                del matches[c]
                x = x - 1
#start rearanging word.
    word = word.strip().lower()
    for pos in matches:
        tmp1 = []
        tmp2 = []
        tmp1 = list(pos.lower().strip())
        tmp2 = list(word)
        tmp1.sort()
        tmp2.sort()
        if tmp1 == tmp2:
            print p
            myvar = myvar + 1
            thelist.append(pos)
            if myvar == 10:
                print(thelist[myvar])
                break
            elif myvar < 9:
                print(thelist[myvar] + ', ')

wordlistfile.close()
possiblefile.close()The GUI kit for the C++ folks is wxWindows, entirely written in C++. The Pythonistas made a wrapper of it for Python and called it wxPython. Looks like nobody wanted to get into changing the manual.
What a poor example of Python, violates all the Zen! There is an outcry for loops and functions.
import thisThe question came up in the forum how to overlap playing cards in wxPython. Here is one way to do it, using a wx.PaintDC() paint canvas and Blit() to handle the card images on the canvas:
# draw card images on a paint canvas and overlap the cards
# note: the name of the card matches the image file

import wx
import random

class CardPanel(wx.Panel):
    """ create a panel with a canvas"""
    def __init__(self, parent):
        wx.Panel.__init__(self, parent, wx.ID_ANY)

        # the subdirectory containing the card image files
        self.image_dir = "./cards/"
        # create the card list
        self.card_list = self.create_cards()

        self.button = wx.Button(self, wx.ID_ANY, label='deal a hand',
            pos=(10, 120))
        # bind mouse event to an action
        self.button.Bind(wx.EVT_BUTTON, self.draw_hand)

        # set up a paint event on a PaintDC canvas
        wx.EVT_PAINT(self, self.on_paint)

    def create_cards(self):
        """
        create a list of 52 cards
        suit: club=C, diamond=D, heart=H spade=S
        rank: ace=A, 10=T, jack=J, queen=Q, king=K, numbers=2..9
        ace of spade would be SA, 8 of heart would be H8 and so on ...
        """
        return [suit + rank for suit in "CDHS" for rank in "A23456789TJQK"]

    def shuffle_cards(self):
        """random shuffle a list of cards"""
        # make a copy of the original list
        card_list1 = self.card_list[:]
        random.shuffle(card_list1)
        return card_list1

    def pick_5cards(self):
        """pick five cards from the shuffled list"""
        return self.card_list_shuffled[:5]

    def on_paint(self, event=None):
        # create the paint canvas
        self.canvas_dc = wx.PaintDC(self)
        # color the game table top
        self.canvas_dc.SetBrush(wx.Brush('dark green'))
        # DrawRectangle(x, y, width, height)
        self.canvas_dc.DrawRectangle(0, 0, 320, 200)
        # pick and draw a random hand of five cards
self.draw_hand() …Hi
I have made a program that uses a GUI for most of its functions but as soon as i change it to an exe using py2exe all the buttons turn all square and everythin looks like it came from windows 98 rather than XP.Is there any way to change this so the program keeps its XP styling?
Take a look at:
http://www.daniweb.com/forums/post623822-10.html
You have to let your function return something and assign it after the call:
something = 1

def dosomething():
    something = 2
    return something

print something
something = dosomething()
print somethingWhat other purposes would you do in a church?
One of our neighborhood churches was converted into a dance studio.
This short code sample shows how to add an exit confirm to your wxPython program, from either a menu exit or the title bar exit:
# confirm exit of a wxPython program

import wx

class MyFrame(wx.Frame):
    def __init__(self, parent, mytitle, mysize):
        wx.Frame.__init__(self, parent, wx.ID_ANY, mytitle, size=mysize)

        # create a status bar at the bottom
        self.CreateStatusBar()
        self.SetStatusText("Click on File")

        menu = wx.Menu()
        # just one item to test exit confirm
        # the optional & allows you to use alt/x
        # the last string argument shows in the status bar on mouse_over
        menu_exit = menu.Append(wx.ID_ANY, "E&xit", "Exit the program")

        # create a menu bar at the top
        menuBar = wx.MenuBar()
        # the & allows you to use alt/f
        menuBar.Append(menu, "&File")
        self.SetMenuBar(menuBar)

        # bind the menu events to an action
        self.Bind(wx.EVT_MENU, self.onMenuExit, menu_exit)
        # responds to exit symbol x on frame title bar
        self.Bind(wx.EVT_CLOSE, self.onCloseWindow)

    def onMenuExit(self, event):
        # triggers wx.EVT_CLOSE event and hence onCloseWindow()
        self.Close(True)

    def onCloseWindow(self, event):
        # dialog to verify exit
        dlg = wx.MessageDialog(self, "Want to exit?", "Exit",
            wx.YES_NO|wx.ICON_QUESTION)
        if dlg.ShowModal() == wx.ID_YES:
            self.Destroy()
        dlg.Destroy()


app = wx.App(0)
# create the MyFrame instance and then show the frame
MyFrame(None, 'Confirm exit', (400, 300)).Show()
app.MainLoop()
Zoe
As far as I understand it, Python has a very efficient builtin memory manager and user memory allocation is not need or wanted.
Actually a bubble sort will do exactly what you want:
# follow the progression of a bubble sort

def bubble_sort(list1):
    swap_test = False
    for i in range(0, len(list1) - 1):
        for j in range(0, len(list1) - i - 1):
            if list1[j] > list1[j + 1]:
                # do a tuple swap
                list1[j], list1[j + 1] = list1[j + 1], list1[j]
            swap_test = True
        if swap_test == False:
            break
        print list1

list1 = [8, 10, 6, 7, 4, 5, 9, 1, 4, 7]
bubble_sort(list1)

"""
output --->
[8, 6, 7, 4, 5, 9, 1, 4, 7, 10]
[6, 7, 4, 5, 8, 1, 4, 7, 9, 10]
[6, 4, 5, 7, 1, 4, 7, 8, 9, 10]
[4, 5, 6, 1, 4, 7, 7, 8, 9, 10]
[4, 5, 1, 4, 6, 7, 7, 8, 9, 10]
[4, 1, 4, 5, 6, 7, 7, 8, 9, 10]
[1, 4, 4, 5, 6, 7, 7, 8, 9, 10]
[1, 4, 4, 5, 6, 7, 7, 8, 9, 10]
[1, 4, 4, 5, 6, 7, 7, 8, 9, 10]
"""
To make things complete, here is a selection sort:
# follow the progression of a selection sort

def selection_sort(list1):
    for i in range(0, len (list1)):
        min = i
        for j in range(i + 1, len(list1)):
            if list1[j] < list1[min]:
                min = j
        # do a tuple swap
        list1[i], list1[min] = list1[min], list1[i]
        print list1

list1 = [8, 10, 6, 7, 4, 5, 9, 1, 4, 7]
selection_sort(list1)

"""
output --->
[1, 10, 6, 7, 4, 5, 9, 8, 4, 7]
[1, 4, 6, 7, 10, 5, 9, 8, 4, 7]
[1, 4, 4, 7, 10, 5, 9, 8, 6, 7]
[1, 4, 4, 5, 10, 7, 9, 8, 6, 7]
[1, 4, 4, 5, 6, 7, 9, 8, 10, 7]
[1, 4, 4, 5, 6, 7, 9, 8, 10, 7]
[1, 4, 4, 5, 6, 7, 7, 8, 10, 9]
[1, 4, 4, 5, 6, 7, 7, 8, 10, 9]
[1, 4, 4, 5, 6, 7, 7, 8, 9, 10]
[1, 4, 4, 5, 6, 7, 7, 8, 9, 10]
"""
The insertion sort is also interesting:
# follow the progression of an insertion sort

def insertion_sort(list1):
    for i in range(1, len(list1)):
        save = list1[i]
        j = i
        while j > 0 and list1[j - 1] > save:
            list1[j] = list1[j - 1]
            j -= 1
        list1[j] = save
        print list1

list1 = [8, 10, 6, 7, 4, 5, 9, 1, 4, 7]
insertion_sort(list1)

"""
output --->
[8, 10, 6, 7, 4, 5, 9, 1, 4, 7]
[6, 8, 10, 7, 4, 5, 9, 1, 4, 7]
[6, 7, 8, 10, 4, 5, 9, 1, 4, 7]
[4, 6, 7, 8, 10, 5, 9, 1, 4, 7]
[4, 5, 6, 7, 8, 10, 9, 1, 4, 7]
[4, 5, 6, 7, 8, 9, 10, 1, 4, 7]
[1, 4, 5, 6, 7, 8, 9, 10, 4, 7]
[1, 4, 4, 5, 6, 7, 8, 9, 10, 7]
[1, 4, 4, 5, 6, 7, 7, 8, 9, 10]
"""
Under normal circumstances, the insertion and the selection sort are at least twice as fast as the bubble sort.
This might be the simplest way to display an image from a file using the wxPython GUI toolkit:
# simplest way to show an image from a file with wxPython

import wx

app = wx.App(0)
frame = wx.Frame(None, -1, "Show an image file")

# pick an image file you have in the working folder
# (can be a .jpg, .png, ,gif, .bmp image file)
image_file = 'clouds.jpg'
# create an internal image
image = wx.Bitmap(image_file)
# show the image as static bitmap
wx.StaticBitmap(frame, -1, image)

frame.Show()
app.MainLoop()
What the heck, lets make it even simpler:
import wx

app = wx.App(0)
frame = wx.Frame(None, -1, "Show an image file")
wx.StaticBitmap(frame, -1, wx.Bitmap('clouds.jpg'))
frame.Show()
app.MainLoop()Some heavier wxPython stuff. I was playing around with the wx.ListCtrl() widget, and it took me quite a while to find a way to get a hold of the selected row. Here is a short example of the solution:
# exploring wxPython's
# wx.ListCtrl(parent, id, pos, size, style)
# a fancier list box with a lot of mix-in options
# some of the styles =
# wxLC_REPORT  report mode
# wxLC_HRULES  draws horizontal rules between rows in report mode
# wxLC_VRULES  draws vertical rules between columns in report mode.

import wx

class MyFrame(wx.Frame):
    def __init__(self, parent, data):
        # use default size and position
        wx.Frame.__init__(self, parent, wx.ID_ANY,
            'Test the wx.ListCtrl()',
            size=(400, 220))
        self.SetBackgroundColour("yellow")
        # make data available to the instance
        self.data = data

        # create the list control
        self.lc = wx.ListCtrl(self, wx.ID_ANY, size=(-1, 120),
             style=wx.LC_REPORT|wx.SUNKEN_BORDER|wx.LC_HRULES)
        # select an item (left mouse click on it) and bind to an action
        self.lc.Bind(wx.EVT_LIST_ITEM_SELECTED,self.onAction)

        self.loadList()

        # create an output widget
        self.label = wx.StaticText(self, wx.ID_ANY, "Select a name")

        # use a vertical boxsizer for the widget placement
        sizer_v = wx.BoxSizer(wx.VERTICAL)
        sizer_v.Add(self.lc, 1, flag=wx.ALL|wx.EXPAND, border=10)
        sizer_v.Add(self.label, 0, flag=wx.ALL|wx.EXPAND, border=10)
        self.SetSizer(sizer_v)

    def loadList(self):
        # first the columns with header titles
        self.lc.InsertColumn(0,"Name")
        self.lc.SetColumnWidth(0, 200)
        self.lc.InsertColumn(1,"Age",wx.LIST_FORMAT_RIGHT)
        self.lc.InsertColumn(2,"Weight",wx.LIST_FORMAT_RIGHT)

        # now each data row
        for key, val in self.data.items():
            # set max_rows, change if need be
            max_rows = 1000
            # also sets/updates row index starting at 0
            index = self.lc.InsertStringItem(max_rows, val[0])
            self.lc.SetStringItem(index, 1, val[1])
            self.lc.SetStringItem(index, 2, val[2])
            # needed by GetItemData()
            self.lc.SetItemData(index, key)

    def onAction(self, event):
        """ some action code"""
# …Look in "Starting wxPython (GUI code)" right on this forum, for instance:
http://www.daniweb.com/forums/post624835-12.html
Maybe something like this:
def bubbleSort(list1):
    swap = False
    for j in range(len(list1)-1):
        for k in range(len(list1)-1-j):
            if list1[k] > list1[k+1]:
                list1[k], list1[k+1] = list1[k+1], list1[k]
                swap = True
        if swap == False:
            break

list1 = [4, 6, 2, 8, 1]
bubbleSort(list1)

print list1 # [1, 2, 4, 6, 8]Some light wxPython stuff. The first example shows you how to bring in your own icon in the title of a frame:
# set the icon of a wx.Frame()

import wx

app = wx.App(0)

frame = wx.Frame(None, wx.ID_ANY, title='Set A New Icon')
# pick an icon image file you have ...
frame.SetIcon(wx.Icon('py.ico', wx.BITMAP_TYPE_ICO))
frame.Center()
frame.Show()
app.MainLoop()
The second example uses the wx.EVT_SIZE event to respond to changes in the size of the frame:
# use the wx.EVT_SIZE event to show the frame size
# the title itself may take up 34 pixels of the height

import wx

class MyFrame(wx.Frame):
    def __init__(self, parent):
        # use default size and position
        wx.Frame.__init__(self, parent, wx.ID_ANY)
        self.SetBackgroundColour("yellow")
        wx.StaticText(self, wx.ID_ANY, "change the size of the frame", (5,5))

        # respond to changes in the size of the frame
        self.Bind(wx.EVT_SIZE, self.onSize)

    def onSize(self, event):
        """display the current frame size in the title"""
        self.SetTitle(str(event.GetSize()))  # eg. (400, 489)


app = wx.App(0)
# create a MyFrame instance and show the frame
MyFrame(None).Show()
app.MainLoop()Nice observation! Trap the error with try/except like this:
def my_func(aaa, main_var=None):
    try:
        mvar = [key for key, val in main_var.items() if val==aaa][0]
        print aaa, main_var, mvar
    except:
        print aaa
    # other code follows
    pass

def main():
    test_var = 123
    my_func(test_var, vars())
    my_func(123, vars())
    my_func(456, vars())
    my_func(123)

main()

"""
my output -->
123 {'test_var': 123} test_var
123 {'test_var': 123} test_var
456
123
"""I took the above wxPython templet and added a background or splash image. So now you have a templet that shows you how to create a frame, a panel, a label, an entry (input), a button, sizers, a multiline display and show an image. Could be the backbone of many wxPython GUI applications:
# basic wx.Frame with splash image panel (panel needed for sizers)
# label, edit, button, display, sizer, and border sizer

import wx

class MyFrame(wx.Frame):
    """
    frame and panel
    panel is neded for any sizer widgets
    """
    def __init__(self, parent, id, title):
        # this will be self
        wx.Frame.__init__(self, parent, id, title)
        # add panel
        panel = wx.Panel(self, -1)

        # pick a splash image file you have in the working folder
        image_file = 'HIVirus1.jpg'
        bmp = wx.Bitmap(image_file)
        # allow for alternative if splash image file not found
        if bmp:
            splash = wx.StaticBitmap(panel, -1, bmp)
        else:
            panel.SetBackgroundColour('green')
            splash = panel

        # now add the needed widgets
        self.label1 = wx.StaticText(splash, -1, 'Enter ... :')
        self.entry1 = wx.TextCtrl(splash, -1, '...')
        self.button1 = wx.Button(splash, -1, 'Do ... ')
        self.button1.SetBackgroundColour('yellow')
        self.button1.Bind(wx.EVT_BUTTON, self.onCmd)
        info = "Optional instructive message!"
        self.display = wx.TextCtrl(splash, -1, info, size=(250, 100),
            style=wx.TE_MULTILINE)

        # use gridbagsizer for layout of widgets
        # set optional vertical and horizontal gaps
        sizer = wx.GridBagSizer(vgap=5, hgap=10)
        sizer.Add(self.label1, pos=(0, 0))       # pos(row,column)
        sizer.Add(self.entry1, pos=(0, 1))  # row 0, column 1

        # span=(1, 2) --> allow to span over 2 columns
        sizer.Add(self.button1, pos=(1, 0), span=(1, 2))
        sizer.Add(self.display, pos=(2, 0), span=(1, 2))

        # use boxsizer to add border around …
I took Lardmeister's code and made a generic wxPython templet that you can then flesh out for cases when you need the user to enter data, press a button to process the data, and then show the result in an output area:
# basic wx.Frame with panel (needed for sizers), label,
# edit, button, display, sizer, and border sizer

import wx

class MyFrame(wx.Frame):
    """
    frame and panel
    panel is neded for any sizer widgets
    """
    def __init__(self, parent, id, title):
        # this will be self
        wx.Frame.__init__(self, parent, id, title)
        # add panel
        panel = wx.Panel(self, -1)
        panel.SetBackgroundColour('green')

        # now add the needed widgets
        self.label1 = wx.StaticText(panel, -1, 'Enter ... :')
        self.entry1 = wx.TextCtrl(panel, -1, '...')
        self.button1 = wx.Button(panel, -1, 'Do ... ')
        self.button1.SetBackgroundColour('yellow')
        self.button1.Bind(wx.EVT_BUTTON, self.onCmd)
        info = "Optional instructive message!"
        self.display = wx.TextCtrl(panel, -1, info, size=(250, 100),
            style=wx.TE_MULTILINE)

        # use gridbagsizer for layout of widgets
        # set optional vertical and horizontal gaps
        sizer = wx.GridBagSizer(vgap=5, hgap=10)
        sizer.Add(self.label1, pos=(0, 0))       # pos(row,column)
        sizer.Add(self.entry1, pos=(0, 1))  # row 0, column 1

        # span=(1, 2) --> allow to span over 2 columns
        sizer.Add(self.button1, pos=(1, 0), span=(1, 2))
        sizer.Add(self.display, pos=(2, 0), span=(1, 2))

        # use boxsizer to add border around sizer
        border = wx.BoxSizer()
        border.Add(sizer, 0, wx.ALL, 20)
        panel.SetSizerAndFit(border)
        self.Fit()

    def onCmd(self, event):
        """process data and show result"""
        # get the data from the input widget
        string1 = self.entry1.GetValue()
        # do the processing ...
        proc_data = string1 * 3
        # show the result ...
        self.display.SetValue(proc_data)


app = wx.App(redirect=False)
frame = MyFrame(None, -1, "Title …Use something like this:
self.button2 = Button(frameToolbar, text="PRINT", bg="light green", width=5,
    relief=RAISED, font=("Verdana", "9", "bold"), command=self.print_)
self.button2.grid(row=0, column=0)

self.button = Button(frameToolbar, text="CLOSE", bg="red", width=5,
    relief=RAISED, font=("Verdana", "9", "bold"), command=self.destrparent)
self.button.grid(row=0, column=1)

self.button1 = Button(frameToolbar, text="SUM", bg="light blue", width=5,
    relief=RAISED, font=("Verdana", "9", "bold"), command=self.mult)
self.button1.grid(row=0, column=2)
Please use code tags -->
[code=python]
your Python code here
[/code]
Bacterial infections are becoming more and more difficult to treat. Strange varieties of normally mild acting bacteria appear on common food items. Makes you think.
Maybe we can blame the Iranians.
Hopefully it's 41 month at hard labor! Oh yes, no computer in the prison cell, and let his cellmates be 350 pound horny roughnecks.
BTW, I use the wxPython based SPE IDE and like it a lot. Its a free download from:
for any CPU
http://prdownload.berlios.de/python/SPE-0.8.4.c-wx2.6.1.0-no_setup.zip
for i386 CPU
http://prdownload.berlios.de/python/SPE-0.8.4.d-wx2.6.1.0-no_setup.zip.zip
Make sure you have wxPython installed, then simply extract the zip file into your Python Lib directory, open the _spe directory and run SPE.pyw, thats it.
To be able to run eric4 you should have the following installed first:
Python 2.4.0 or better
Qt 4.2.0 or better (from Trolltech)
PyQt 4.1.0 or better (from Riverbank)
QScintilla 2.1 or better (from Riverbank)
Do have all of these installed?
Welcome to the world of self! Just a side note, the Python style guide recommends to start class names with upper case and function/method names with lower case. If you write larger programs, this really helps.
The Python style guide by GVR himself:
http://www.python.org/peps/pep-0008.html
I suggest you study your class notes more carefully. Here is a short example that might help you:
class Die(object):

    def __init__(self, v):
        """
        the constructor of the class
        self 'carries' the instance
        dice initially has value v
        """
        self.value = v

    def __str__(self):
        """overload __str__ will be used in print statement"""
        s = "dice shows " + str(self.value)
        return s

    def throw(self):
        """throw one dice here to show 1 - 6"""
        import random
        self.value = random.randint(1, 6)


# create an instance of class Die and set initial value to 1
# uses Die.__init__(self, 1) where self would be the instance q
q = Die(1)

print q  # dice shows 1

q.throw()

print q  # eg. dice shows 3

q.throw()

print q # eg. dice shows 6You could use module re and its sub() method.
The standard try/except way would be:
def choose(s):
    try:
        return "You entered " + {
        '1' : "one",
        '2' : "two",
        '3' : "three"
        }[s]
    except:
        return "Bad input"

var1 = raw_input("Input a number between one and three: ")
print choose(var1)
Or straight foreward with dictionary method get():
def choose2(s):
    return "You entered " + {
    '1' : "one",
    '2' : "two",
    '3' : "three"
    }.get(s, "a bad number")

var1 = raw_input("Input a number between one and three: ")
print choose2(var1)
This is closer to the switch/case default.
Eating a large amount of beans and then do one or more of the following:
Take a bubble bath.
Get my teeth checked at the dentist.
Go to an IRS audit.
Go to jury duty.
ok I used:
diffInstance = difflib.Differ()
diffList = list(diffInstance.compare(list1, list2))
and this returns a list of words with + - before them. As I read and understand probably - means just list1 has the word, and + that just list2 has the word. And I'm not getting and similar words, maybe I'm doing something wrong, can you help me a little bit. Also I'm new to python, I'm working in it just few months
I modified one of vegaseat's Python snippets in the hope it will help you:
# find the difference between two texts

import difflib

text1 = """The World's Shortest Books:
Human Rights Advances in China
"My Plan to Find the Real Killers" by OJ Simpson
"Strom Thurmond:  Intelligent Quotes"
America's Most Popular Lawyers
Career Opportunities for History Majors
Different Ways to Spell "Bob"
Dr. Kevorkian's Collection of Motivational Speeches
Spotted Owl Recipes by the EPA
The Engineer's Guide to Fashion
Ralph Nader's List of Pleasures
"""

text2 = """The World's Shortest Books:
Human Rights Advances in China
"My Plan to Find the Real Killers" by OJ Simpson
"Strom Thurmond:  Intelligent Quotes"
America's Most Popular Lawyers
Career Opportunities for History Majors
Different Ways to Sell "Bob"
Dr. Kevorkian's Collection of Motivational Speeches
Spotted Owl Recipes by the EPA
The Engineer's Guide to Passion
Ralph Nader's List of Pleasures
"""

# create a list of lines in text1
text1_lines = text1.splitlines(1)

# dito for text2
text2_lines = text2.splitlines(1)

diff_instance = difflib.Differ()
diff_list = list(diff_instance.compare(text1_lines, text2_lines))

print "Lines in diff_list …