Introduction
Notification is a great way to display information outside of your Android application. Your end users most likely already interact with notifications everyday, so knowing how to create notifications can greatly boost your user experience (but can also backfire if used incorrectly).
In this tutorial, we will learn how to create a simple notification for our app.
Goals
At the end of the tutorial, you would have learned:
- How to create a notification on Android.
Tools Required
- Android Studio. The version used in this tutorial is Arctic Fox 2020.3.1 Patch 3.
Prerequisite Knowledge
- Basic Android.
Project Setup
To follow along with the tutorial, perform the steps below:
-
Create a new Android project with the default Empty Activity.
-
Delete the “Hello World!” TextView.
-
Add a new Button inside ConstraintLayout.
-
Extract Hard-coded “Button” to
strings.xml. Change the text value to “Add Notification”. -
Constraint the Button to all 4 sides of ConstraintLayout with 0 margin.
-
Your
activity_main.xmlshould look like this:<?xml version="1.0" encoding="utf-8"?> <androidx.constraintlayout.widget.ConstraintLayout xmlns:android="http://schemas.android.com/apk/res/android" xmlns:app="http://schemas.android.com/apk/res-auto" xmlns:tools="http://schemas.android.com/tools" android:layout_width="match_parent" android:layout_height="match_parent" tools:context=".MainActivity"> <Button android:id="@+id/button" android:layout_width="wrap_content" android:layout_height="wrap_content" android:text="@string/button" app:layout_constraintBottom_toBottomOf="parent" app:layout_constraintEnd_toEndOf="parent" app:layout_constraintStart_toStartOf="parent" app:layout_constraintTop_toTopOf="parent" /> </androidx.constraintlayout.widget.ConstraintLayout> -
Your
strings.xmlshould look like this:<resources> <string name="app_name">Daniweb Create Notification</string> <string name="button">Add Notification</string> </resources>
NotificationChannel
There is quite a bit of boilerplate code required to create just a simple Notification. If you want your notification to work on Android 8.0 and above, the very first thing that you would need to do is to create a NotificationChannel.
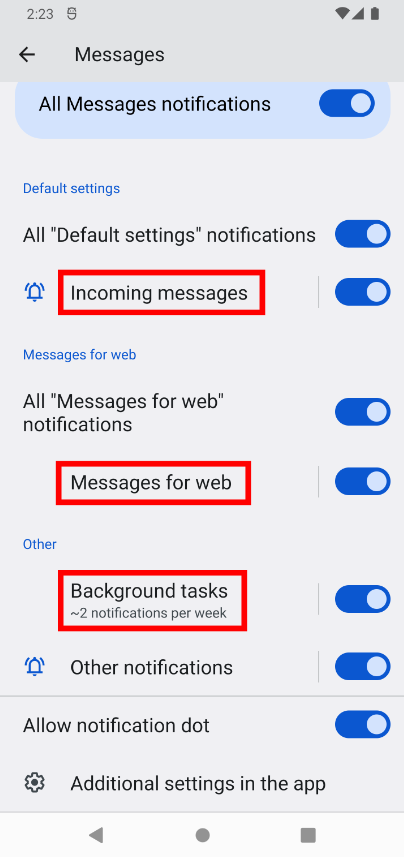
You can simply think of Notification channels as categories for your notifications. Notification channels allow app users to only turn off certain notification channels as they wish. For example, in the screenshot below of the Messages app, each category in red is a channel.
Create and register the NotificationChannel
Android recommends that we should create a notification as soon as the app starts, so we will add a function called createNotificationChannel() and call it from onCreate().
-
Add the empty
createNotificationChannel()function below toMainActivity.kt. This function encapsulates code to create a NotificationChannel object. It only runs if the target SDK is above or equal to API level 26 (Oreo).private fun createNotificationChannel() { if (Build.VERSION.SDK_INT >= Build.VERSION_CODES.O) { //O = Oreo, not zero } } -
Call it from
onCreate().override fun onCreate(savedInstanceState: Bundle?) { super.onCreate(savedInstanceState) setContentView(R.layout.activity_main) createNotificationChannel() }
Next, we need to create the notification channel. There are about 8 steps to create a notification channel.
-
Create a unique ID for the notification channel, so add a new string resource in
strings.xml.<string name="channel_id">123</string> -
Add a variable
channelIdas a lazy property of MainActivity.private val channelId by lazy { getString(R.string.channel_id) //Don't access me before resources are available. } -
Create a name for the notification channel. Add the String resource below into
strings.xmlas well.<string name="channel_name">Notification Channel Name</string> -
Then, add a variable for the
channelNameinside theifblockval channelName = getString(R.string.channel_name) -
Create an
importancelevel for the notification channel inside theifblock.val importance = NotificationManager.IMPORTANCE_DEFAULT -
Create a NotificationChannel object with the
channelId,channelName, andimportancelevel inside theifblock.val channel = NotificationChannel( channelId), channelName, importance) -
Retrieve the NotificationManager.
val notificationManager: NotificationManager = getSystemService(Context.NOTIFICATION_SERVICE) as NotificationManager -
Register the notification channel with
createNotificationChannel().notificationManager.createNotificationChannel(channel)
Your final createNotificationChannel() function should look similar to the code snippet below.
private fun createNotificationChannel() {
if (Build.VERSION.SDK_INT >= Build.VERSION_CODES.O) { //O = Oreo, not zero
val channelName = getString(R.string.channel_name)
val importance = NotificationManager.IMPORTANCE_DEFAULT
//Create the NotificationChannel object
val channel = NotificationChannel(
channelId,
channelName,
importance)
//Retrieve the NotificationManager from the system.
val notificationManager: NotificationManager =
getSystemService(Context.NOTIFICATION_SERVICE) as NotificationManager
//Registers the channel with NotificationManager
notificationManager.createNotificationChannel(channel)
}
}Create a Notification
Now that we have a notification channel, we need to create the actual notification itself next. Android recommends using the NotificationCompat.Builder class to create Notification objects. Add the createNotification() function below into MainActivity.
private fun createNotification(): Notification {
val icon = R.drawable.ic_baseline_notifications_24
val title = getString(R.string.notification_title)
val content = getString(R.string.notification_content)
return NotificationCompat.Builder(this, channelId)
.setSmallIcon(icon) //required
.setContentTitle(title) //required
.setContentText(content) //required
.build()
}The code will not compile just yet because the icon, title and content resources are missing. Perform the steps below to add them:
-
Add a new Vector Image asset called
notificationsand name itic_baseline_notifications_24. -
In
strings.xml, add the String resources for the notification title and content.<string name="notification_title">Example Notification Title</string> <string name="notification_content">Example Notification Content</string>
Show the Notification
The very last step for our project would be to bind a trigger to show the notification. We will simply bind the onClick action to the Button that we created in the Project Setup phase. Since the android:onClick attribute has just been deprecated on the latest API (level 31), we would have to bind onClick in code instead of XML.
Add the bindNotification() function below inside MainActivity.kt.
private fun bindNotification() {
val button = findViewById<Button>(R.id.button)
val notificationId = R.id.notification_id
val notification = createNotification()
button.setOnClickListener {
with(NotificationManagerCompat.from(this)) {
notify(notificationId, notification)
}
}
}To show the notification, we retrieved the NotificationManagerCompat object and called notify() on it, passing in the Notification ID(not to be confused with the Notification Channel ID) and the Notification object.
The code snippet does not compile because we are missing the notification_id resource, so add it in strings.xml(for simplicity).
<item type="id" name="notification_id"/>ID is a special resource type. If you are not sure what it is, you can read more about it here.
Run the App
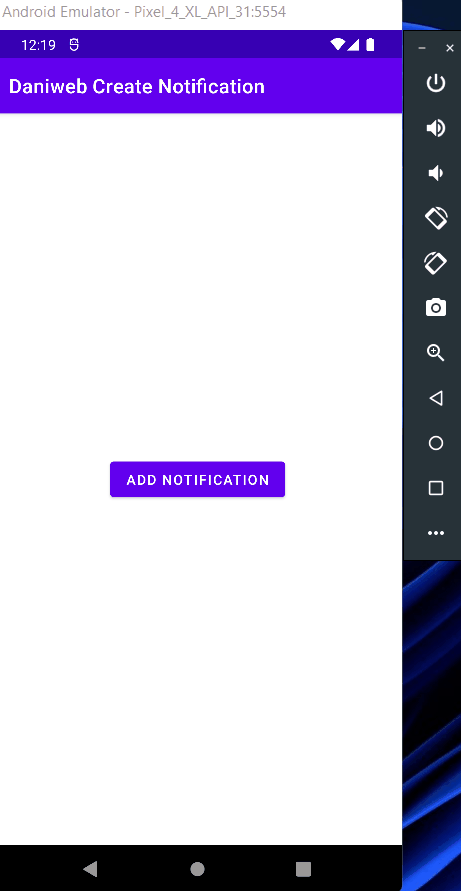
We are ready to run the App. After the App is started, tap the Add Notification button to see the notification.
Notification Setting
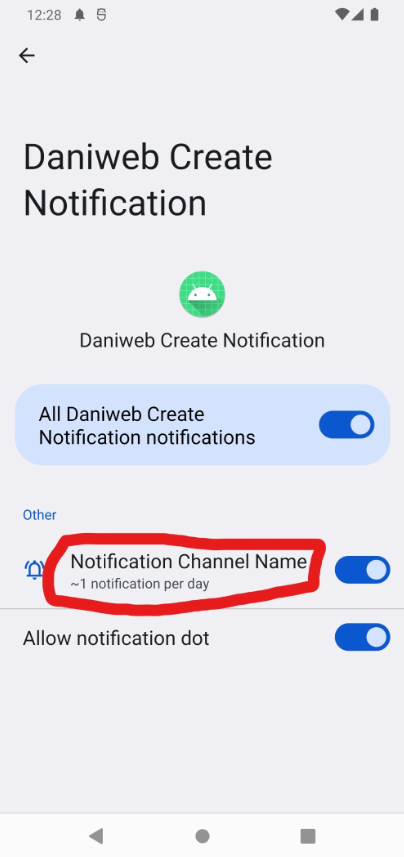
Check out the notification channel in Settings to see how it looks.
- Go to Settings > Notifications > App Settings > App Name
- You can see the notification channel name that we set in
strings.xmlearlier.
If you turn off the notification channel and relaunch the app, then the notification will no longer show after tapping Add Notification.
Solution Code
strings.xml
<resources>
<string name="app_name">Daniweb Create Notification</string>
<string name="button">Add Notification</string>
<string name="channel_id">123</string>
<string name="channel_name">Notification Channel Name</string>
<string name="notification_title">Example Notification Title</string>
<string name="notification_content">Example Notification Content</string>
<item type="id" name="notification_id"/>
</resources>activity_main.xml
 <?xml version="1.0" encoding="utf-8"?>
 <androidx.constraintlayout.widget.ConstraintLayout xmlns:android="http://schemas.android.com/apk/res/android"
    xmlns:app="http://schemas.android.com/apk/res-auto"
    xmlns:tools="http://schemas.android.com/tools"
    android:layout_width="match_parent"
    android:layout_height="match_parent"
    tools:context=".MainActivity">

    <Button
        android:id="@+id/button"
        android:layout_width="wrap_content"
        android:layout_height="wrap_content"
        android:text="@string/button"
        app:layout_constraintBottom_toBottomOf="parent"
        app:layout_constraintEnd_toEndOf="parent"
        app:layout_constraintStart_toStartOf="parent"
        app:layout_constraintTop_toTopOf="parent" />
</androidx.constraintlayout.widget.ConstraintLayout>MainActivity.kt
package com.example.daniwebcreatenotification
import android.app.Notification
import android.app.NotificationChannel
import android.app.NotificationManager
import android.content.Context
import android.os.Build
import androidx.appcompat.app.AppCompatActivity
import android.os.Bundle
import android.widget.Button
import androidx.core.app.NotificationCompat
import androidx.core.app.NotificationManagerCompat
class MainActivity : AppCompatActivity() {
 private val channelId by lazy {
    getString(R.string.channel_id) //Don't access me before resources are available.
 }
override fun onCreate(savedInstanceState: Bundle?) {
super.onCreate(savedInstanceState)
setContentView(R.layout.activity_main)
createNotificationChannel()
bindNotification()
}
private fun createNotificationChannel() {
if (Build.VERSION.SDK_INT >= Build.VERSION_CODES.O) { //O = Oreo, not zero
val channelName = getString(R.string.channel_name)
val importance = NotificationManager.IMPORTANCE_DEFAULT
//Create the NotificationChannel object
val channel = NotificationChannel(
channelId,
channelName,
importance)
//Retrieve the NotificationManager from the system.
 val notificationManager: NotificationManager =
    getSystemService(Context.NOTIFICATION_SERVICE) as NotificationManager
//Registers the channel with NotificationManager
notificationManager.createNotificationChannel(channel)
}
}
    private fun createNotification(): Notification {
       val icon = R.drawable.ic_baseline_notifications_24
       val title = getString(R.string.notification_title)
       val content = getString(R.string.notification_content)

       return NotificationCompat.Builder(this, channelId)
           .setSmallIcon(icon) //required
           .setContentTitle(title) //required
           .setContentText(content) //required
           .build()
    }
private fun bindNotification() {
   val button = findViewById<Button>(R.id.button)
   val notificationId = R.id.notification_id
   val notification = createNotification()

   button.setOnClickListener {
       with(NotificationManagerCompat.from(this)) {
           notify(notificationId, notification)
       }
   }
}
}Ic_baseline_notifications_24.xml
<vector xmlns:android="http://schemas.android.com/apk/res/android"
   android:width="24dp"
   android:height="24dp"
   android:viewportWidth="24"
   android:viewportHeight="24"
   android:tint="?attr/colorControlNormal">
 <path
     android:fillColor="@android:color/white"
     android:pathData="M12,22c1.1,0 2,-0.9 2,-2h-4c0,1.1 0.89,2 2,2zM18,16v-5c0,-3.07 -1.64,-5.64 -4.5,-6.32L13.5,4c0,-0.83 -0.67,-1.5 -1.5,-1.5s-1.5,0.67 -1.5,1.5v0.68C7.63,5.36 6,7.92 6,11v5l-2,2v1h16v-1l-2,-2z"/>
</vector>
Summary
We have learned how to create a notification in this tutorial, the project code can be found here https://github.com/dmitrilc/DaniwebCreateNotification