Introduction
Starting from Android 10 (API 29), Android places many restrictions on how apps can launch activities from the background.
There are a couple of exemptions, which can be found on this list. At the end of the list is the usage of the dangerous permission SYSTEM_ALERT_WINDOW. I have seen this permission recommended elsewhere, but usage of this permission is unnecessary to show an Activity for an alarm application and violates best practices for Android permission. Even the stock Clock app does not require this permission, the only install-time permission that it needs is SCHEDULE_EXACT_ALARM.
The correct way to show an Activity with an alarm is by using a notification with a full-screen Intent.
Goals
At the end of the tutorial, you would have learned:
- How to schedule an exact alarm.
- How to show an Activity on the lock screen even if the screen is off and the Activity destroyed.
Tools Required
- Android Studio. The version used in this tutorial is Android Studio Chipmunk 2021.2.1.
Prerequisite Knowledge
- Intermediate Android.
- Notification.
- BroadcastReceiver.
Project Setup
To follow along with the tutorial, perform the steps below:
-
Create a new Android project with the default Empty Activity.
-
Add the
<string>resource below into strings.xml.<string name="schedule_alarm">Schedule Alarm</string> -
Replace the code in activity_main.xml with the code below. This replaces the default TextView with a Button.
 <?xml version="1.0" encoding="utf-8"?>
 <androidx.constraintlayout.widget.ConstraintLayout xmlns:android="http://schemas.android.com/apk/res/android"
    xmlns:app="http://schemas.android.com/apk/res-auto"
    xmlns:tools="http://schemas.android.com/tools"
    android:layout_width="match_parent"
    android:layout_height="match_parent"
    tools:context=".MainActivity">

    <Button
        android:id="@+id/button_scheduleAlarm"
        android:layout_width="wrap_content"
        android:layout_height="wrap_content"
        android:text="@string/schedule_alarm"
        app:layout_constraintBottom_toBottomOf="parent"
        app:layout_constraintEnd_toEndOf="parent"
        app:layout_constraintStart_toStartOf="parent"
        app:layout_constraintTop_toTopOf="parent" />
 </androidx.constraintlayout.widget.ConstraintLayout>
AlarmManager Overview
Although there are many types of alarms that you can set on Android, for this tutorial, knowing that we are only working with exact alarms is enough. Android allows other types of inexact alarms, which are not relevant for this tutorial. To set an exact alarm, you can use the method setAlarmClock() from the AlarmManager class.
You can retrieve an instance of AlarmManager inside your Activity by calling getSystemService().
Project Plan
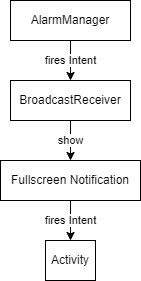
To be able to set an exact alarm and show the Activity on the lock screen when the device is sleeping, there are quite a few steps involved. The list below provides a quick summary.
- The application must be ready to show a notification on high priority, so we must create a NotificationChannel with
IMPORTANTCE_HIGH. - The AlarmManager cannot show the Activity directly, so it must go through a BroadcastReceiver, which will then displays a Notification that can show an Activity.
- Install-time permissions and proper attributes for the Activity must be set in the manifest.
Now that we have a rough idea of what to do next, it is time to write some code.
Create the NotificationChannel
-
Add the constants above on top of MainActivity.kt. These are just convenient constants for the NotificationManager.
private const val NOTIFICATION_CHANNEL_NAME = "0" const val NOTIFICATION_CHANNEL_ID = "1" -
Add the function to create the NotificationChannel to MainActivity.
private fun createNotificationChannel(){ if (Build.VERSION.SDK_INT >= Build.VERSION_CODES.O) { val channel = NotificationChannel( NOTIFICATION_CHANNEL_ID, NOTIFICATION_CHANNEL_NAME, NotificationManager.IMPORTANCE_HIGH ) with(getSystemService(NOTIFICATION_SERVICE) as NotificationManager){ createNotificationChannel(channel) } } } -
Finally, call it in
onCreate().createNotificationChannel()
Schedule an exact alarm
Next, we will have to bind the Button to schedule an exact alarm.
-
Append the code below to
onCreate()to find the Button and binds itsonClickListener.findViewById<Button>(R.id.button_scheduleAlarm).setOnClickListener { } -
We will have to add
FLAG_IMMUTABLEto all PendingIntent created in this tutorial, so add the constant below above MainActivity.ktval compatFlags = if (Build.VERSION.SDK_INT >= Build.VERSION_CODES.M) { FLAG_IMMUTABLE } else { 0 } -
Add the code below inside the
setOnClickListener()callback. This code creates the explicit Intent as well as wrapping it in a PendingIntent, which is required later by AlarmClockInfo. Ignores the compile error because of the missing AlarmReceiver for now.val sendBroadcastIntent = Intent(this, AlarmReceiver::class.java) val pendingIntent = PendingIntent.getBroadcast( this, 0, sendBroadcastIntent, compatFlags ) -
Finally, retrieve the AlarmManager, and use
setAlarmClock().with(getSystemService(Context.ALARM_SERVICE) as AlarmManager){ //Alarm will trigger in 10 seconds //You should set the alarm by clicking the Button, and then clears the Activity // from the backstack by swiping up on the Recents screen. val triggerTime = Calendar.getInstance().apply { add(SECOND, 10) } val alarmInfo = AlarmManager.AlarmClockInfo( triggerTime.timeInMillis, pendingIntent //The alarm will fire this PendingIntent ) setAlarmClock( alarmInfo, pendingIntent ) }
Create the BroadcastReceiver
We will now create a BroadcastReceiver called AlarmReceiver.
Copy and paste the entire code below into your project. Here, we created and show a Notification with a full-screen Intent.
import android.app.PendingIntent
import android.content.BroadcastReceiver
import android.content.Context
import android.content.Intent
import androidx.core.app.NotificationCompat
import androidx.core.app.NotificationManagerCompat
class AlarmReceiver : BroadcastReceiver() {
override fun onReceive(context: Context?, intent: Intent?) {
if (context != null){
val fullScreenPendingIntent = PendingIntent.getActivity(
context,
0,
Intent(context, MainActivity::class.java),
compatFlags
)
val notificationBuilder = NotificationCompat.Builder(context, NOTIFICATION_CHANNEL_ID)
.setSmallIcon(R.drawable.ic_launcher_foreground)
.setPriority(NotificationCompat.PRIORITY_HIGH)
.setFullScreenIntent(fullScreenPendingIntent, true)
with(NotificationManagerCompat.from(context)) {
//This notification only works once until the end user dismiss the previous notification.
//Can also make the notification auto-dismiss if desired.
notify(1, notificationBuilder.build())
}
}
}
}Tasks in the Manifest
-
For the app to work, we will need to declare two install-time permissions, so add to the the manifest.
<uses-permission android:name="android.permission.SCHEDULE_EXACT_ALARM" /> <uses-permission android:name="android.permission.USE_FULL_SCREEN_INTENT"/> -
For MainActivity, we will need to add the
showWhenLockedandturnScreenOnattributes.android:showWhenLocked="true" android:turnScreenOn="true" -
Finally, declare the BroadcastReceiver AlarmReceiver.
<receiver android:name=".AlarmReceiver" android:exported="false"/>
Run the App
If you ran the app previously on your device, completely uninstall it and install it again.
To test if the app is working correctly, follow the steps below:
- Starts the app.
- Press the Button to schedule an alarm.
- Immediately kills the app from the Recents screen.
- Put the device into sleep.
- Wait a couple of seconds. Remember that you only have ten seconds to perform steps 2-4.
- Wait for the app to show on the home screen. Home screen is still locked for obvious security reasons.
You can use the animation below as reference.
Solution Code
MainActivity.kt
private const val NOTIFICATION_CHANNEL_NAME = "0"
const val NOTIFICATION_CHANNEL_ID = "1"
 val compatFlags = if (Build.VERSION.SDK_INT >= Build.VERSION_CODES.M) {
    FLAG_IMMUTABLE
 } else {
    0
 }
class MainActivity : AppCompatActivity() {
override fun onCreate(savedInstanceState: Bundle?) {
super.onCreate(savedInstanceState)
setContentView(R.layout.activity_main)
createNotificationChannel()
findViewById<Button>(R.id.button_scheduleAlarm).setOnClickListener {
 val sendBroadcastIntent = Intent(this, AlarmReceiver::class.java)
 val pendingIntent = PendingIntent.getBroadcast(
    this,
    0,
    sendBroadcastIntent,
    compatFlags
 )
 with(getSystemService(Context.ALARM_SERVICE) as AlarmManager){
    //Alarm will trigger in 10 seconds
    //You should set the alarm by clicking the Button, and then clears the Activity
    // from the backstack by swiping up on the Recents screen.
    val triggerTime = Calendar.getInstance().apply {
        add(SECOND, 10)
    }

    val alarmInfo = AlarmManager.AlarmClockInfo(
        triggerTime.timeInMillis,
        pendingIntent //The alarm will fire this PendingIntent
    )

    setAlarmClock(
        alarmInfo,
        pendingIntent
    )
 }
}
}
private fun createNotificationChannel(){
if (Build.VERSION.SDK_INT >= Build.VERSION_CODES.O) {
val channel = NotificationChannel(
NOTIFICATION_CHANNEL_ID,
NOTIFICATION_CHANNEL_NAME,
NotificationManager.IMPORTANCE_HIGH
)
with(getSystemService(NOTIFICATION_SERVICE) as NotificationManager){
createNotificationChannel(channel)
}
}
}
}AlarmReceiver.kt
class AlarmReceiver : BroadcastReceiver() {
override fun onReceive(context: Context?, intent: Intent?) {
if (context != null){
val fullScreenPendingIntent = PendingIntent.getActivity(
context,
0,
Intent(context, MainActivity::class.java),
compatFlags
)
val notificationBuilder = NotificationCompat.Builder(context, NOTIFICATION_CHANNEL_ID)
.setSmallIcon(R.drawable.ic_launcher_foreground)
.setPriority(NotificationCompat.PRIORITY_HIGH)
.setFullScreenIntent(fullScreenPendingIntent, true)
with(NotificationManagerCompat.from(context)) {
//This notification only works once until the end user dismiss the previous notification.
//Can also make the notification auto-dismiss if desired.
notify(1, notificationBuilder.build())
}
}
}
}activity_main.xml
<?xml version="1.0" encoding="utf-8"?>
<androidx.constraintlayout.widget.ConstraintLayout xmlns:android="http://schemas.android.com/apk/res/android"
xmlns:app="http://schemas.android.com/apk/res-auto"
xmlns:tools="http://schemas.android.com/tools"
android:layout_width="match_parent"
android:layout_height="match_parent"
tools:context=".MainActivity">
<Button
android:id="@+id/button_scheduleAlarm"
android:layout_width="wrap_content"
android:layout_height="wrap_content"
android:text="@string/schedule_alarm"
app:layout_constraintBottom_toBottomOf="parent"
app:layout_constraintEnd_toEndOf="parent"
app:layout_constraintStart_toStartOf="parent"
app:layout_constraintTop_toTopOf="parent" />
</androidx.constraintlayout.widget.ConstraintLayout>strings.xml
<resources>
<string name="app_name">Daniweb Android Native AlarmManager</string>
<string name="schedule_alarm">Schedule Alarm</string>
</resources>AndroidManifest.xml
<?xml version="1.0" encoding="utf-8"?>
<manifest xmlns:android="http://schemas.android.com/apk/res/android"
xmlns:tools="http://schemas.android.com/tools"
package="com.example.daniwebandroidnativealarmmanager">
 <uses-permission android:name="android.permission.SCHEDULE_EXACT_ALARM" />
 <uses-permission android:name="android.permission.USE_FULL_SCREEN_INTENT"/>
<application
android:allowBackup="true"
android:dataExtractionRules="@xml/data_extraction_rules"
android:fullBackupContent="@xml/backup_rules"
android:icon="@mipmap/ic_launcher"
android:label="@string/app_name"
android:roundIcon="@mipmap/ic_launcher_round"
android:supportsRtl="true"
android:theme="@style/Theme.DaniwebAndroidNativeAlarmManager"
tools:targetApi="31">
<activity
android:name=".MainActivity"
 android:showWhenLocked="true"
 android:turnScreenOn="true"
android:exported="true">
<intent-filter>
<action android:name="android.intent.action.MAIN" />
<category android:name="android.intent.category.LAUNCHER" />
</intent-filter>
</activity>
 <receiver
    android:name=".AlarmReceiver"
    android:exported="false"/>
</application>
</manifest>Summary
We have learned how to launch an Activity from an exact alarm in this tutorial. Please keep in mind that this tutorial was only tested on Android API 32. The full project code can be found at https://github.com/dmitrilc/DaniwebAndroidNativeAlarmManager.