usmanmalik57 12 Junior Poster in Training

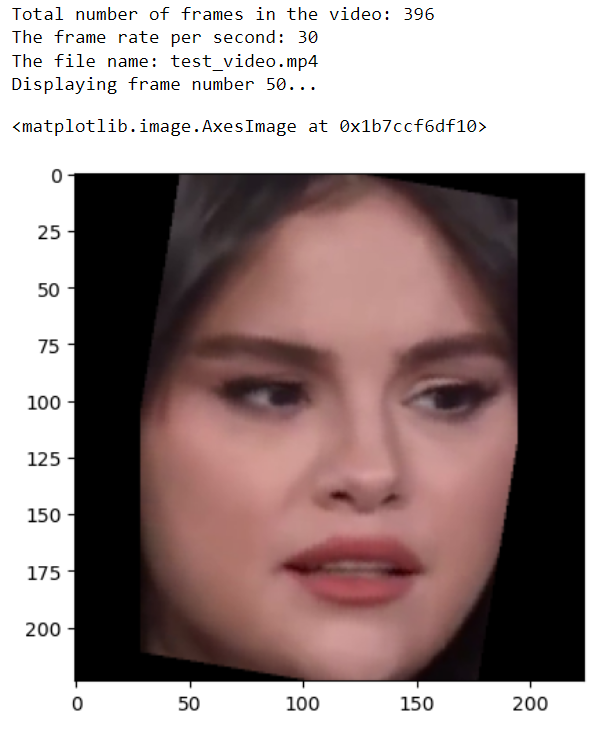
In this article, you will learn how to track faces within a video using the Python DeepFace library. Additionally, you'll discover how to include portions of the video background in face tracking by implementing custom methods that utilize the DeepFace library's extract_faces() method for face extraction.

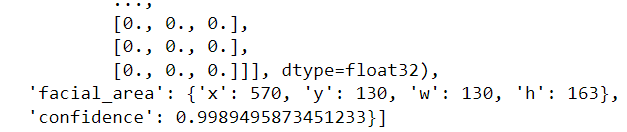
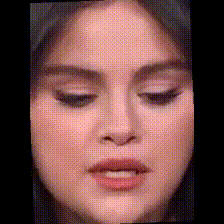
I explained how to extract faces from videos using the Python DeepFace library in [one of my previous articles. However, I recently encountered a couple of issues when working with DeepFace's extract_faces() method:

  1. This method does not allow the extraction of portions of the face background. It also sometimes ignores the boundary features of a face, such as ears, hair, etc.
  2. Videos created by stitching together faces extracted by DeepFace are often jittery, as the extracted frames frequently miss some boundary facial features.

In this article, I provide solutions to these two problems.

It is pertinent to mention that OpenCV library provides functionalities for video tracking. However, they use very naive methods, which are less accurate than deep learning methods provided by the DeepFace library. Hence, I preferred DeepFace over OpenCV.

Installing and Importing Required Libraries

The following script installs the DeepFace and MoviePy libraries. The DeepFace library will be used to extract faces from videos. You will use the MoviePy library to create a modified video that contains facial regions by stitching together individual image frames.

! pip install deepface
! pip install moviepy

The script imports the Python libraries required to run the code in …

usmanmalik57 12 Junior Poster in Training

Yes, that's an option, but while you are developing Python applications where you have to process multiple videos, I don't think ffmpeg is scalable enough. Thanks for your feedback r though :)

usmanmalik57 12 Junior Poster in Training

A video is a series of images, or frames, shown in rapid succession. Its frame rate, measured in frames per second (FPS), dictates the display speed. For instance, a 30 FPS video shows 30 frames each second. The frame count and frame rate determine a video's detail, smoothness, file size, and the processing power needed for playback or editing.

Higher frame rates and more frames result in finer detail and smoother motion but at the cost of larger file sizes and greater processing requirements. Conversely, lower frame rates and fewer frames reduce detail and smoothness but save on storage and processing needs.

In this article, you will see how to reduce the frame rate per second for a video, and total number of frames in a video using the Python programming language.

But before that, let's see why you would want to reduce the number of frames and frame rate of a video.

Why Reduce the Number of Frames and the Frame Rate of a Video?

Reducing the number of frames and frame rate of a video can be beneficial for several reasons:

Storage Efficiency: Videos with fewer frames and lower frame rates take up less disk space, which is helpful when storage capacity is limited or for easier online sharing.

Bandwidth Conservation: Such videos use less network bandwidth, making them suitable for streaming over slow or unstable internet connections.

Performance Optimization: They require fewer computational resources, ideal for low-end devices or resource-intensive processes like deep learning algorithms.

Let's now …

usmanmalik57 12 Junior Poster in Training
Introduction

Loss functions are the driving force behind all machine learning algorithms. They quantify how well our models are performing by calculating the difference between the predicted and actual outcomes. The goal of every machine learning algorithm is to minimize this loss function, thereby improving the model’s accuracy.

Various libraries, such as PyTorch, TensorFlow, and Keras, provide a plethora of built-in loss functions like Mean Squared Error (MSE), Cross-Entropy, and many more. These built-in functions cover a wide range of tasks and are sufficient for many standard machine learning problems.

However, there are scenarios where these built-in loss functions may not suffice. This could be due to the unique nature of the problem at hand, or the need for a specific optimization strategy. In such cases, we need to design our own custom loss functions.

This article will guide you through the process of creating custom loss functions in PyTorch. So, Let’s get started!

Understanding Loss Functions

A loss function, alternatively referred to as a cost function, measures the degree of deviation between predicted outcomes and actual results. It serves as a metric to assess the effectiveness of an algorithm in modeling a given dataset. When predictions significantly diverge from actual values, the loss function yields a higher value. Conversely, a lower value is produced when predictions are relatively accurate.

In machine learning, the ultimate goal is to minimize this loss function. This process is known as optimization. By minimizing the loss, we are essentially fine-tuning our model to …

usmanmalik57 12 Junior Poster in Training

As a researcher, I have often found myself buried under a mountain of research articles, each promising insights and breakthroughs crucial for my work. The sheer volume of information is overwhelming, and the time it takes to extract the relevant data can be daunting.

However, extracting meaningful information from research papers has become increasingly easier with the advent of large language models. Nevertheless, interacting with large language models, particularly for querying custom data, can be tricky since it requires intricate code.

Fortunately, with the introduction of the Python Langchain module, you can query complex language models such as OpenAI's GPT-4 in just a few lines of code, offering a lifeline to those of us who need to sift through extensive research quickly and efficiently.

This article will explore how the Python Langchain module can be leveraged to extract information from research papers, saving precious time and allowing us to focus on innovation and analysis. You can employ the process explained in this article to extract information from any other PDF document.

Downloading and Importing Required Libraries

Before diving into automated information extraction, we must set up our environment with the necessary tools. Langchain, OpenAI, PyPDF2, faiss-cpu, and rich are the libraries that will form the backbone of our extraction process. Each serves a unique purpose:

  • Langchain: Facilitates the access and chaining of language models and vector space models to perform complex tasks.

  • OpenAI: Provides access to OpenAI’s powerful language models.

  • PyPDF2: A library …

fileformatcom commented: Great job, love you article +0
usmanmalik57 12 Junior Poster in Training

Stock price prediction is a challenging task that requires analyzing historical trends, market sentiments, economic indicators, and company performance. One of the popular methods for stock price prediction is using deep learning models, such as convolutional neural networks (CNNs).

CNNs are a type of neural network that can extract features from sequential and spatial data, such as images, audio, or time series. CNNs consist of multiple layers of convolutional filters that apply a sliding window operation to capture sequential information in the input data.

In this article, we will use a one-dimensional (1D) CNN to predict the stock price of Google (GOOG) based on its historical closing prices. We will use the Python yfinance library to retrieve the historical data from Yahoo Finance. Next, we will use the TensorFlow Keras library to build and train the 1D CNN model. We will also use the Python Scikit learn library for data preprocessing and evaluation.

Importing Required Libraries and Datasets

First, we must import the required libraries and modules for our project.

We will use the following code to import the libraries and modules:


import yfinance as yf
import datetime
import seaborn as sns
import matplotlib.pyplot as plt
from sklearn.model_selection import train_test_split
from sklearn.preprocessing import MinMaxScaler
import numpy as np

import tensorflow as tf
from tensorflow.keras.models import Model
from tensorflow.keras.layers import Input, Conv1D, MaxPooling1D, Flatten, Dense, Dropout
from tensorflow.keras.callbacks import EarlyStopping
from sklearn.metrics import mean_squared_error, mean_absolute_error

Next, we need to define the ticker symbol for the stock price we want …

pmofidi commented: For the second dense layer, why you used flatten instead of dens_1 ? +0
usmanmalik57 12 Junior Poster in Training

Chatbots are software applications that can interact with humans using natural language. They can be used for various purposes, such as customer service, entertainment, education, and more. Chatbots can be built using different techniques like rule-based systems, machine learning, or deep learning. In this article, I will focus on the latter approach and show you how to build a chatbot using transformers in the TensorFlow Keras library.

Transformers are a type of neural network architecture that can handle sequential data, such as text, speech, or images. They are based on the concept of attention, which allows them to focus on the most relevant parts of the input and output sequences. Transformers lie at the foundation of many state-of-the-art natural language applications such as Chat-GPT, Bard, Bing, etc.

In this article, we will use a transformer model to create a question-answering chatbot. This article's code is inspired by the Keras official tutorial on neural machine translation. However, you can modify this code for any other sequence-to-sequence task such as chatbot development, as you will see in this article,

We will use a dataset of 3,725 conversations from Kaggle, which contains questions and answers on various topics.

So, let's begin without ado.

Importing Required Libraries

Before we start, we need to import some libraries that we will use throughout the article.


import pandas as pd
import random
import string
import re
import numpy as np
import tensorflow as tf
import keras
from keras import layers
from keras.layers import TextVectorization …
Fabrizio_4 commented: Hello. +0
usmanmalik57 12 Junior Poster in Training

Facial emotion detection, as the name suggests, involves detecting emotions from faces in images or videos.

Recently, I was working on a facial emotion detection task and came across the DeepFace library that implements various state-of-the-art facial emotion detection models. However, in my experience, the performance of the DeepFace library is not up to the mark, particularly on low-resolution datasets.

As an alternative, I fine-tuned the vision transformer for facial emotion detection in PyTorch. The results showed that the vision transformer model performed much better than DeepFace.

In this article, I will explain the process of facial emotion detection using both DeepFace and vision transformers and compare their results for facial emotion detection.

So, let's begin without an ado.

Download and Importing the Dataset

We will use the FER2013 dataset, which contains 35,887 images of faces with seven emotions: angry, disgust, fear, happy, sad, surprise, and neutral. The images are grayscale and have a resolution of 48x48 pixels. The dataset is divided into two subsets: train and test.

You can download the dataset from this link and unzip it in your working directory. The directory structure for the dataset looks like this. Each sub-folder in the test and train directories contains images with corresponding emotions.
For example, the "angry" folder contains facial images depicting angry emotion.

image_1.png

Next, we will create a Pandas DataFrame from the images and their labels. Before that, let's install and import the required libraries.

! pip install deepface

import os
import pandas …
usmanmalik57 12 Junior Poster in Training

Language modeling is the cornerstone of advanced natural language processing, forming the backbone for cutting-edge technologies like ChatGPT. At its core, it involves predicting words based on context, a fundamental principle underlying modern large language Models (LLMs). There are various techniques for language modeling, with attention mechanisms emerging as the latest innovation. To comprehend attention, understanding Recurrent Neural Networks (RNNs) is crucial.

In this article, you will implement a language model in Keras using a Long Short-Term Memory (LSTM) network, a specialized type of recurrent neural network. We will focus on training our model with text data from Wikipedia. After training, the model will be able to predict the next word accurately based on input text.

So let's begin without ado.

Importing Wikipedia Data

We will use the content from Wikipedia's page on "Artificial Intelligence" to train our next word predictor model.

You can import the Wikipedia data using the Python Wikipedia library. You can download the library using the following script:

! pip install wikipedia

Let's search some Wikipedia pages using a keyword. You can use the wikipedia.search() function to do so.

import wikipedia
pages = wikipedia.search("Artificial Intelligence")
pages

The search() method returns the following pages based on the keyword' Artificial Intelligence'.

Output:

['Artificial intelligence',
 'Generative artificial intelligence',
 'Artificial general intelligence',
 'A.I. Artificial Intelligence',
 'Applications of artificial intelligence',
 'Hallucination (artificial intelligence)',
 'Ethics of artificial intelligence',
 'History of artificial intelligence',
 'Swarm intelligence',
 'Friendly artificial intelligence']

You can limit the number of results using the results parameter. The following …

usmanmalik57 12 Junior Poster in Training

In this tutorial, you will learn to fine-tune a Hugging Face Transformers model for video classification in PyTorch. The Hugging Face documentation provides an example of performing video classification using the Hugging Face Trainer with one of Hugging Face's built-in datasets. However, the process of fine-tuning a video transformer on a custom dataset in PyTorch is not explained. I will cover this gap in this article and show you how to fine-tune a Hugging Face video transformer on your custom dataset in PyTorch. So, let's begin without further ado.

Installing and Importing Required Libraries

As always, we will first install and import the libraries required to run the scripts in this tutorial:

The following script installs the required libraries:

!pip install -q pytorchvideo datasets transformers[sentencepiece] evaluate
!pip install accelerate -U

And the script below imports the libraries we will use to run codes in this tutorial:


import av
import datasets
from datasets import load_dataset, DatasetDict,  Audio
import pandas as pd
import os
import glob
import io
import numpy as np
from sklearn.model_selection import train_test_split
from sklearn.metrics import f1_score, classification_report, accuracy_score
from transformers import AutoImageProcessor, VideoMAEModel,  AdamW
import torch
import torch.nn as nn
import torch.utils.data
from torch.utils.data import Dataset, DataLoader
from datasets import load_dataset
from sklearn.metrics import f1_score, classification_report, accuracy_score
from sklearn.preprocessing import LabelEncoder
from sklearn.model_selection import train_test_split
Downloading and Importing the Dataset

You can download the dataset for this tutorial using the following command:

!wget -q https://git.io/JGc31 -O ucf101_top5.tar.gz
!tar xf ucf101_top5.tar.gz

The above command …

usmanmalik57 12 Junior Poster in Training

Understanding facial expressions is crucial for various tasks, from recognizing emotions to enhancing security measures. While extracting faces from pictures is easy, doing the same in videos is tricky. Imagine creating videos with only highlighted facial expressions, offering a unique perspective on human interactions.

Various tools are available for face detection, but deepface stands out as the best choice due to its implementation of state-of-the-art deep-learning algorithms. Additionally, deepface is open-source, allowing you to modify it according to your specific use case.

In this tutorial, you will use the deepface library to detect faces from videos. By the end of this tutorial, you will be able to extract faces from videos and create new videos containing only facial expressions from the original videos. So let's begin without ado.

Installing and Importing Required Libraries

The following pip command installs the deepface and moviepy libraries. We will use the deepface library to extract frames containing faces from the input video. The moviepy library will be used to stitch facial frames to recreate the video containing only faces.

! pip install deepface
! pip install moviepy

The following script imports the library required to execute scripts in this article.

import cv2
from matplotlib import pyplot as plt
from deepface import DeepFace
import numpy as np
from moviepy.editor import *
import math
Extracting Faces from Images

This is relatively straightforward. Let's see an example.
We have the following input image, and we want to detect and crop the face from this image.

usmanmalik57 12 Junior Poster in Training
Introduction

In a previous article, I explained how to fine-tune the vision transformer model for image classification in PyTorch. In this article, I will explain how to fine-tune the pre-trained OpenAI Whisper model for audio classification in PyTorch.

Audio classification is an important task that can be applied in various scenarios, such as speech dialogue detection, sentiment analysis, music genre recognition, environmental sound identification, etc.

OpenAI Whisper is an excellent model for audio classification that achieved state-of-the-art results on several benchmarks. It is based on the transformer architecture and uses self-attention to process audio inputs. OpenAI Whisper can recognize speech and audio from different languages, accents, and domains with high accuracy and robustness.

In this article, you will see how to classify various sounds by fine-tuning the OpenAI Whisper model from Hugging Face in the PyTorch deep learning library. You will learn how to load the pre-trained model, prepare a custom audio dataset, train the model on the dataset, and evaluate the model performance. Let’s get started!

Note: All the scripts in this article are executed in a Google Colab notebook.

Importing Required Libraries

To execute the scripts in this article, you must install the Hugging Face Transformers library.

! pip install accelerate -U
! pip install datasets transformers[sentencepiece]

The following script imports the necessary Python libraries and modules you need to execute the Python codes in this article.

import datasets
from datasets import load_dataset, DatasetDict,  Audio
import pandas as pd
import os
import glob
import librosa …
usmanmalik57 12 Junior Poster in Training
Introduction

In the realm of computer vision, Vision Transformers (ViTs) revolutionized image processing by employing self-attention mechanisms, allowing for a non-sequential analysis of images. ViTs are instrumental in capturing intricate patterns and long-range dependencies, making them invaluable for tasks like image recognition and object detection.

Hugging Face, a hub for cutting-edge machine learning models, offers Vision Transformer models that can be easily downloaded and implemented. However, while Hugging Face documentation provides insight into obtaining image representations using Vision Transformers, it lacks detailed instructions on fine-tuning these models for specific tasks. This gap in information poses a challenge for practitioners eager to utilize ViTs for image classification.

In this article, we bridge this knowledge gap. I will guide you step-by-step through the process of fine-tuning a Vision Transformer model from Hugging Face for image classification in PyTorch. By the end of this guide, you will have a comprehensive understanding of how to harness the full potential of Vision Transformers in your PyTorch-based image classification projects.

Note: All the scripts in this article are executed in a Google Colab notebook.

Installing and Importing Required Libraries

You will need to install the Hugging Face Transformers library to run scripts in this article.

! pip install accelerate -U
! pip install datasets transformers[sentencepiece]

The following script imports the Python libraries and modules required to execute Python codes in this article.


from transformers import ViTModel, ViTFeatureExtractor, ViTModel, AdamW
import torch
import torch.nn as nn
from torch.utils.data import Dataset, DataLoader
from …
usmanmalik57 12 Junior Poster in Training

In a previous article, I showed you how to analyze sentiments using Chat-GPT and data augmentation techniques. Following that, some readers reached out, asking for a breakdown of fine-tuning a Chat-GPT model.

In this article, I will guide you through fine-tuning your Chat-GPT model using your own data. First, I'll walk you through converting data from your CSV files into the required JSON format for fine-tuning. Once your data is prepared, I'll explain the Chat-GPT fine-tuning process using these formatted JSON files.

To illustrate, I'll be fine-tuning a text classification model for toxic comment classification, which involves categorizing comments into multiple labels. Let's dive right in and explore the world of fine-tuning text classification models with Chat-GPT.

Why Fine Tune Chat-GPT?

Fine-tuning Chat-GPT amplifies its capabilities for several compelling reasons:

Precision: Fine-tuning provides more accurate and contextually relevant responses than prompts alone.

Expanded Training: It allows training on a larger dataset, enhancing the model's adaptability to diverse tasks.

Efficiency: Shorter prompts save tokens, ensuring streamlined communication and efficient interactions.

Speed: Fine-tuned models respond swiftly, crucial for real-time applications, enhancing user experience significantly.

In essence, fine-tuning optimizes Chat-GPT's performance, delivering precise, efficient, and rapid results.

How to Fine-Tune a Chat-GPT Model

As per OpenAI’s official documentation, fine-tuning an OpenAI model (including Chat-GPT) involves the following three steps:

  • Prepare and upload training data
  • Train a new fine-tuned model
  • Use your fine-tuned model

Let’s see each of these three steps in detail with the help of a real-world example.

usmanmalik57 12 Junior Poster in Training

In one of my research projects, I needed to extract text from video files and create a CSV file that included sentiments expressed in the text. Manual extraction was time-consuming and costly. So, I explored Automatic Speech Recognition (ASR) systems and discovered OpenAI Whisper, known for its high accuracy in converting spoken words to text. Using the Whisper model, I efficiently extracted text from videos and generated a CSV file.

In this article, I'll guide you through the code I developed to seamlessly connect my Python script with the OpenAI API for video text extraction. By the end of this article, you'll be ready to use OpenAI Whisper for your video text extraction projects.

Setting Up OpenAI Whisper Model

To connect your Python script with OpenAI API, you need an OpenAI API key. You will need to sign up with OpenAI to retrieve your Key.

Next, you need to install the OpenAI Python library.

pip install openai

To connect with OpenAI API in your code, import the openai module and set your OpenAI API key using the api_key attribute of the openai module.

Next, open the audio file you want to transcribe using the open() method and pass the file object to the Audio.transcribe() method of the openai module.

The first argument to the transcribe() method is the whisper model name (whisper-1), and the second argument is the audio file object.

The transcribe() method returns a dictionary in which you can access the transcribed …

usmanmalik57 12 Junior Poster in Training

Sentiment analysis, a subfield of Natural Language Processing (NLP), aims to discern and classify the underlying sentiment or emotion expressed in textual data. Whether it is understanding customers' opinions about a product, analyzing social media posts, or gauging public sentiment towards a political event, sentiment analysis plays a vital role in unlocking valuable insights from vast amounts of textual data.

However, training an accurate sentiment classification model often demands a substantial volume of annotated data, which may not always be readily available or time-consuming to acquire. This limitation has led researchers and practitioners to explore innovative techniques, such as data augmentation, to generate synthetic data and augment the training set.

In this article, we will delve into the world of data augmentation, specifically using ChatGPT, a powerful language model developed by OpenAI, to generate additional training samples and bolster the performance of sentiment classification models. By leveraging the capabilities of ChatGPT, we can efficiently create diverse and realistic data, opening new possibilities for sentiment analysis in scenarios where limited annotated data would otherwise be an obstacle.

Sentiment Classification without Data Augmentation

To train the sentiment classification model, we will use the IMDB dataset, which contains movie reviews labeled with sentiments. We'll then train a Random Forest model using TF-IDF (Term Frequency-Inverse Document Frequency) features, which allow us to represent the text data numerically. By dividing the dataset into training and testing sets, we can evaluate the model's performance on unseen data. The accuracy score will be used …

usmanmalik57 12 Junior Poster in Training

Data annotation for text classification is time-consuming and expensive. In the case of smaller training datasets, pre-trained ChatGPT models might achieve higher classification accuracy on test sets than training classifiers from scratch or fine-tuning existing models. Additionally, ChatGPT can aid in annotating data for fine-tuning text classification models.

In this article, I demonstrate two experiments. First, I make predictions on text data using ChatGPT and compare the results with the test set. Next, I annotate text data using ChatGPT and utilize the annotated data to train a machine learning model. The findings reveal that directly predicting text labels using ChatGPT outperforms data annotation followed by model training. These experiments highlight the practical benefits of using ChatGPT in data annotation and text classification tasks.

Text Classification Using Base Machine Learning Model

To start, I will use a basic machine-learning model to classify text. This will give us a starting point to compare the results later. In the next part of the experiment, we will use ChatGPT to annotate the data and see how it performs compared to the baseline. This way, we can find out if ChatGPT helps improve the classification results.

We'll use the IMDB dataset with labeled movie reviews to train a text classification model. The dataset consists of positive and negative movie reviews. Employing a Random Forest model and TF-IDF features, we'll convert the text data into numerical representations. By splitting the dataset into training and testing sets, we can assess the model's performance using the accuracy score …

usmanmalik57 12 Junior Poster in Training

Integrating language models like ChatGPT into third-party applications has become increasingly popular due to their ability to comprehend and generate human-like text. However, it's crucial to acknowledge the limitations of ChatGPT, such as its knowledge cut-off date in September 2021 and its inability to access external sources like Wikipedia or Python directly.

Recognizing this challenge, Harrison Chase, the co-founder, and CEO of LangChain, came up with an innovative solution. He developed the Python LangChain module, which empowers developers to integrate third-party applications with large language models seamlessly. This breakthrough opens up a world of possibilities, allowing developers to harness the power of language models while effectively processing information from external sources.

In this article, we will explore the fascinating concept of using ChatGPT to interact with third-party applications using the Python LangChain module. By the end, you will have a deeper understanding of how to leverage this integration and create even more sophisticated and efficient applications.

Importing ChatGPT from LangChain

The first step is to install the Python LangChain module which you can do with the following pip command.

pip install langchain

Next, you need to import the ChatOpenAI class from the langchain.chat_models module. The ChatOpenAI class allows you to create an instance of ChatGPT. To do so, pass gpt-3.5-turbo model to the model_name attribute of the ChatOpenAI class. The OpenAI’s gpt-3.5turbo model powers ChatGPT. You also need to pass your OpenAI API key to the open_api_key attribute.

from langchain.chat_models import ChatOpenAI
import os

api_key = os.getenv('OPENAI_KEY2') …
usmanmalik57 12 Junior Poster in Training
Introduction

This tutorial explains how to perform multiple-label text classification using the Hugging Face transformers library. Hugging Face library implements advanced transformer architectures, proven to be state-of-the-art for various natural language processing tasks, including text classification.

Hugging Face library provides trainable transformer models in three flavors:

  1. Via the Trainer Class API
  2. Via PyTorch Models
  3. Via TensorFlow Models

The HuggingFace documentation for Trainer Class API is very clear and easy to use. However, I wanted to train my text classification model in TensorFlow. After some research, I found that the Hugginface API lacks documentation on fine-tuning transformers models for multilabel text classification in TensorFlow.

In this tutorial, I will explain how I fine-tuned a Hugging Face transformers model for multilabel text classification in TensorFlow.

Dataset

I will use the Toxic Comment Dataset From Kaggle to fine-tune my transformer model. Download the dataset's CSV file and import it into your Python script using the Pandas dataframe, as shown in the following script:

import pandas as pd

dataset = pd.read_csv('/content/fake-and-real-news-dataset/train.csv')
print(dataset.shape)
dataset.head()

Output:

image_1.JPG

The above output shows that the dataset contains more than 159k records. The dataset consists of 8 columns. The text comment_text column contains user comments. A comment can be categorized into one or more categories: toxic, severe toxic, obscene, threat, insult, or identity hate. A one is added in a column if a comment belongs to the column category, else a zero is added.

Several comments in the dataset …

usmanmalik57 12 Junior Poster in Training
Introduction

In this tutorial, you will see how to convert the text in CSV file columns to other languages using the DeepL API in the Python programing language.

DeepL is one of the most popular and accurate text translation platforms. DeepL, as the name suggests, incorporates advanced deep learning algorithms for training text translation models.

In addition to raw text strings, DeepL supports translating documents in PDF, MS Word, and PowerPoint formats. However, I wanted to translate text in CSV file columns, which DeepL does not support.

In this tutorial, I will explain how I achieved translating text in CSV columns using the DeepL API. The resultant CSV will have new columns containing translated text.

Translating Text with DeepL in Python

I chose Python language for translating text in CSV files since DeepL has an official Python client that you can exploit for text translation in your code.

The official GitHub repository explains installing the DeepL API along with sample scripts.

Here I will provide a simple example for your reference. The following are the steps:

Create an Object of the Translator class and pass it your DeepL authorization key.
Pass the text you want to translate to the translate_text() method of the Translator class. You must also pass the ISO 639-1 standard language code to the target_lang attribute of the translate_text() method.
To get the translated text, access the text attribute of the object returned by the translate_text() function.

Here is an example:

henry0024 commented: Thank you for sharing this information +0
usmanmalik57 12 Junior Poster in Training
Introduction

I was working on a problem where I had to scrape tweets related to the T20 Cricket World Cup 2022, which is currently taking place in Australia.

I wanted tweets containing location names (cities) and the keyword “T20”. In the response, I want the user names of tweet authors, tweet texts, creation time, and the location keyword used to search the tweet. Finally, I wanted to create a Python Pandas Dataframe that contains these values in columns.

In this article, I will explain how you can return scrape tweets containing location information and how to store these tweets in a Pandas Dataframe.

Developers can scrape tweets from Twitter using the Twitter REST API. In most cases, the Twitter API returns tweet-type objects that contain various attributes for extracting tweet information. However, by default, the Twitter API doesn't return a Pandas Dataframe.

Simple Example of Scraping Tweets

You must sign up with Twitter Developer Account and create your API Key and Token to access the Twitter REST API. The official documentation explains signing up for the Twitter Developer Account.

I will use the Python Tweepy library for accessing the Twitter API. Tweepy is an unofficial Python client for accessing the Twitter API.

The following script demonstrates a basic example of Twitter scraping with the Python Tweepy library.

I use the search_all_tweets() function to search 100 English language tweets containing keywords Sydney and T20. I set a filter for removing retweets.

import …
usmanmalik57 12 Junior Poster in Training
Introduction

I was recently working on a project that required me to extract location information from the OpenStreetMap, an open license map database of the world. The OpenStreetMap database allows you to extract location data along with the location meta information in the form of tags. My task was to extract locations along with all their associated tags.

This article will explain how I extracted customized location information from the OpenStreetMap in Python.

Before I explain the code I wrote, it is essential to understand the organization of locations in the OpenStreetMap database. At a high level, the OpenStreetMap database categorizes locations into the following categories:

  1. Nodes: data points on maps, primarily representing a single entity, e.g., a bench, a chair, a telephone booth, etc.
  2. Ways: an ordered list of nodes, for example, a street or road.
  3. Relations: an ordered list of nodes, ways, or other relations, for example, an intersection, a public park, etc.
The Problem

I needed to accomplish the task of extracting information (tags) from all the nodes, ways, and relations within a geographical location, where at least one of the tags is a name tag. In other words, I wanted to extract information about named nodes, ways, and relations within a specific geographical location.

As an example, in this article, I will extract location information from all nodes, ways, and relations from the Baker street in London.

I will use the Python Overpass library to extract information from …

usmanmalik57 12 Junior Poster in Training

In my previous articles, I explained how you could apply heuristic and statistical approaches for finding inter-annotator agreement between multiple annotators.

However, while applying those approaches, I found that finding inter-annotator agreement in the case of multi-label ranked data is a difficult task, and traditional inter-annotator agreement techniques will almost return a lack of agreement or only slight agreement between annotators. Therefore, we need to post-process multi-label ranked annotators to find a more flexible degree of agreement between annotators.

After some research, I found a paper that proposes a simple yet intuitive postprocessing technique for multi-label ranked annotations. The paper can be found at this link.

I will not delve into the details of the paper. Instead, I will implement the proposed technique in Python. You can use the code in this article to post-process multilabel ranked annotations.

The Dataset

I will not go into the details of the dataset used as a sample in this article since
it has already been explained in my previous article on Finding Inter Annotator Agreement between three Annotators in Python.

At a high level, the dataset looks like this. Each row contains multilabel ranked annotations for a tweet.

  1. Rank 1 for the most likely emotion,
  2. Rank 2 the second most likely emotion,
  3. Rank 3 the third most likely emotion).

image_1.PNG

Post-processing Multilable Annotations
Finding Degree of Presence of Ranks

The post-processing technique is mathematically explained in section 3.1 of the

usmanmalik57 12 Junior Poster in Training

In my previous tutorial, I explained how I implemented heuristic approaches for finding inter-annotator agreement between three annotators.

Heuristic approaches are excellent for understanding the degree of agreement between multiple annotators. However, you should back your analysis with statistical evidence. This is where statistical techniques for inter-annotator agreement come into play.

In this tutorial, I will explain statistical approaches to find the inter-annotator agreement in Python using Pandas dataframes as annotation datasets.

The Dataset

I have already explained the dataset details in my previous tutorial. The dataset consists of 9 columns. Each column contains an emotion rank (1, 2, or 3). Three annotators annotate each dataset. The data is stored in Pandas dataframes which look like the one in the following screenshot:

image1.PNG

We need to find statistical measures of agreement between the three annotators.

Various statistical approaches exist for finding inter-annotator agreement between more than two annotators, e.g., Fleiss' kappa and Krippendorff's alpha.

Several Python libraries implement the aforementioned statistical approaches. These libraries allow you to find the agreement between individual lists and NumPy arrays. However, I could not find a library that would enable finding inter-annotator agreements for all the corresponding columns of multiple Pandas dataframes.

Therefore, I wrote Python functions that allow finding Fleiss’ Kappa and Krippendorff's Alpha values for corresponding columns in multiple Pandas dataframe. The functions also return mean values for the agreement between all the columns.

Finding Fleiss’ Kappa for Pandas Dataframe Columns

The …

usmanmalik57 12 Junior Poster in Training

I recently worked on a research project where I had to find the inter-annotator agreement for tweets annotated by three annotators.

Inter annotator agreement refers to the degree of agreement between multiple annotators. The quality of annotated (also called labeled) data is crucial to developing a robust statistical model. Therefore, I wanted to find the agreement between multiple annotators for tweets.

The Dataset

The data set consists of 50 tweets. The annotator’s task was to assign three emotions from a total of 9 emotions to each of the tweets. The annotators have to rank the tweets according to what they think is the most likely, the second most likely, and the third most likely emotion.

The final dataset consists of 50 rows with nine columns. The cell values can be:

  • 1 for the most likely emotion,
  • 2 for the second most likely emotion,
  • 3 for the third most likely emotion).

Here is what the dataset looks like. The column headers contain emotion names in French.

image_1.PNG

Evaluation Approach for Inter Annotator Agreement

Some statistical metrics exist for evaluating inter-annotator understanding, e.g., Kendal tao distance, Fleiss kappa, etc.

However, I was initially interested in more simplistic metrics such as finding:

  • The number of annotations where there is a complete agreement between the three annotators for any emotion rank.
  • The number of annotations where all annotators agree on a particular emotion rank
  • The number of annotations where all annotators assign at least one rank …