On February 21, 2024, Google released Gemma, a family of state-of-the-art open-source large language models (LLMs). As per initial results, its 7b (seven billion parameter) version is known to perform better than Meta's Llama 2, the previous state-of-the-art open-source LLM.
As always, my first test with any new open-source LLM is the text classification task. In this tutorial, I will show you how you can fine-tune the Google Gemma LLM for text classification tasks in Python. So, let's begin without ado.
Installing and Importing Required Libraries
The following script installs libraries required to run scripts in this article.
!pip3 install -q -U bitsandbytes==0.42.0
!pip3 install -q -U peft==0.8.2
!pip3 install -q -U trl==0.7.10
!pip3 install -q -U accelerate==0.27.1
!pip3 install -q -U datasets==2.17.0
!pip3 install -q -U transformers==4.38.0
!pip3 install -q -U datasets
!pip install huggingface-hub
The script below imports the required libraries into your Python application.
import os
import transformers
import torch
from google.colab import userdata
from datasets import load_dataset
from trl import SFTTrainer
from peft import LoraConfig
from transformers import AutoTokenizer, AutoModelForCausalLM
from transformers import BitsAndBytesConfig, GemmaTokenizer
import pandas as pd
from datasets import Dataset
Finally, you must run the following script and enter your Hugging Face user access token.
!huggingface-cli loginGoogle Gemma is a new model, and you must agree to its terms of use before importing it from Hugging Face. You can agree to its terms of use on the Hugging Face Gemma model card.
Testing Google Gemma Model for Casual LM Tasks
Let's first test the default Gemma 2b model without fine-tuning it for the text classification task.
Gemma is a huge model requiring a lot of resources and time to run. We can reduce the model weight sizes using bits and bytes configuration. The following script sets model weight sizes to 4 bits.
bnb_config = BitsAndBytesConfig(
    load_in_4bit=True,
    bnb_4bit_quant_type="nf4",
    bnb_4bit_compute_dtype=torch.bfloat16
)
The script below imports the Gemma 2b tokenizer and model. You can also try Gemma 7b version if you want, but it will require more resources and time to run.
model_id = "google/gemma-2b"
tokenizer = AutoTokenizer.from_pretrained(model_id)
model = AutoModelForCausalLM.from_pretrained(model_id,
                                             quantization_config=bnb_config,
                                             device_map={"":0})
Finally, we pass some text to the Gemma model and see what we get.
text = "Jack of all"
device = "cuda:0"
inputs = tokenizer(text, return_tensors="pt").to(device)

outputs = model.generate(**inputs, max_new_tokens=10)
print(tokenizer.decode(outputs[0], skip_special_tokens=True))
Output:
Jack of all trades, master of none.

That’s
The about output shows that the Gemma model correctly predicts the text that follows the input text. It also outputs some additional text since we tell it to predict ten tokens.
Fine Tuning Google Gemma Model
Let's now fine-tune our Gemma model for a text classification task.
Importing and Preprocessing the Dataset
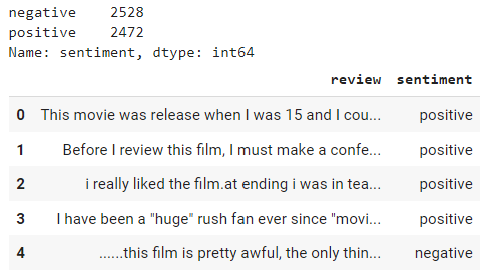
We will use the IMDB movie review dataset that contains around 50k positive and negative movie reviews.
The following script imports the CSV file into a Pandas dataframe. We randomly shuffled the dataset and took only 5000 records for fine-tuning. You can fine-tune on any number of records.
dataset = pd.read_csv(r"/content/IMDB Dataset.csv")
dataset = dataset.sample(frac=1).reset_index(drop=True)
dataset = dataset.head(5000)
print(dataset['sentiment'].value_counts())
dataset.head()
Output:
The script below converts our Pandas dataframe to a Hugging Face dataset. The script divides the dataset into 80% training and 20% test set.
dataset = Dataset.from_pandas(dataset)
final_dataset = dataset.train_test_split(test_size=0.2)
Next, we define a formatting function that converts the dataset into a format that we can use to fine-tune our Gemma model. The format converts reviews and sentiments into key-value pairs.
def formatting_func(example):
    text = f"Review: {example['review'][0]}\nSentiment: {example['sentiment'][0]}"
    return [text]

formatting_func(final_dataset['train'])
Output:
['Review: i was very impressed with this production on likely all levels; from production to plot and character development.<br /><br />this definitely fall under the "realism" genre, since there is nothing going on here that ...\nSentiment: positive']
From the above output, you can see that the formatted record consists of a list that starts with the word Review: followed by the text review. At the end of the review, we insert a new line and add the text Sentiment: followed by the review sentiment.
Fine Tuning Gemma Model
Finally, we are ready to fine-tune our Gemma model.
We will use the LoRA (Low-Rank Adaptation) approach to fine-tune only some of the weights of our Gemma model. Fine-tuning the complete Gemma model can take hours. LoRa is a common approach for fine-tuning very large language models.
The following script sets the LoRa configuration for fine-tuning.
lora_config = LoraConfig(
    r = 8,
    target_modules = ["q_proj", "o_proj", "k_proj", "v_proj",
                      "gate_proj", "up_proj", "down_proj"],
    task_type = "CAUSAL_LM",
)
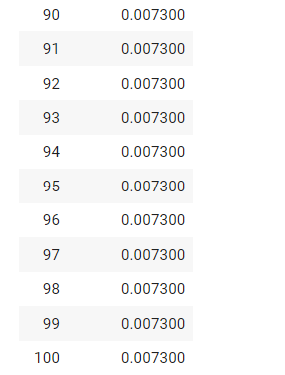
Finally, you can create an object of the SFTTrainer class and pass the Gemma model object, the training data, and various training arguments. Next, you can call the train() method to train the Gemma model. The model will be trained for 100 steps.
trainer = SFTTrainer(
    model=model,
    train_dataset=final_dataset["train"],
    args=transformers.TrainingArguments(
        per_device_train_batch_size=1,
        gradient_accumulation_steps=4,
        warmup_steps=2,
        max_steps=100,
        learning_rate=2e-4,
        fp16=True,
        logging_steps=1,
        output_dir="outputs",
        optim="paged_adamw_8bit"
    ),
    peft_config=lora_config,
    formatting_func=formatting_func,
)

trainer.train()
Output:
Let's now try to make a prediction using our fine-tuned model. To do so, we will take a single example and convert it to the same format as used for fine-tuning the Gemma model.
text = f"Review: {final_dataset['test'][2]['review']}\nSentiment: "
print(text)
Output:
Review: If you know anything about the Manhattan Project, you will find "Fat Man and Little Boy" at least an interesting depiction of the events surrounding that story. The film is in all ways a very realistic portrayal of these events, and in many ways it is almost too real.... something to think about.<br /><br />*** out of ****
Sentiment:
The above output shows the text that we will pass to the model. The model will predict the word after the sentiment, i.e., positive or negative.
The following script generates the Gemma model output for the above text. We set the max_new_tokens size to 1 since we want a single word in the output. Finally, we decode the output and print the last generated word.
device = "cuda:0"
inputs = tokenizer(text, return_tensors="pt").to(device)

outputs = model.generate(**inputs, max_new_tokens=1)
prediction = tokenizer.decode(outputs[0], skip_special_tokens=True)
prediction.split(" ")[-1]
Output:
positive
You can see that the model assigned a positive sentiment to the input text review.
Evaluating Fine-tuned Model Performance on Test Set
To test the model on the complete dataset, we define the predict_sentiment() function that accepts a text review, formats it, and predicts its sentiment using our fine-tuned Gemma model.
def predict_sentiment(review):
  text = f"Review: {review}\nSentiment: "
  inputs = tokenizer(text, return_tensors="pt").to(device)
  outputs = model.generate(**inputs, max_new_tokens=1)
  prediction = tokenizer.decode(outputs[0], skip_special_tokens=True)
  sentiment = prediction.split(" ")[-1]
  return sentiment
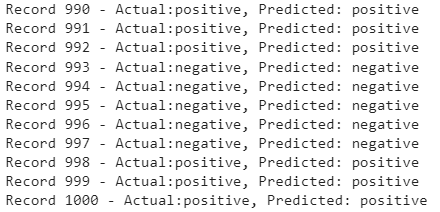
Next, we loop through all the reviews in the test set, pass each review to the predict_sentiment() method, and store the response in the predictions list. The model may sometimes predict words other than positive or negative, which we discard.
targets = []
predictions = []

for i in range(len(final_dataset['test'])):

  review = final_dataset['test'][i]['review']
  target_sentiment = final_dataset['test'][i]['sentiment']
  predicted_sentiment = predict_sentiment(review)

  if predicted_sentiment in ["positive", "negative"]:
    targets.append(target_sentiment)
    predictions.append(predicted_sentiment)
    print(f"Record {i+1} - Actual:{target_sentiment}, Predicted: {predicted_sentiment}")
Output:
Finally, we can compare the actual and predicted reviews to calculate model accuracy on the test set.
accuracy = accuracy_score(targets, predictions)
print(f'Accuracy: {accuracy:.2f}')

report = classification_report(targets, predictions)
print('Classification Report:\n', report)
Output:
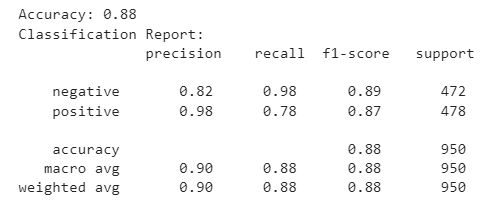
The above output shows that the model achieved an accuracy of around 88% on the test set. You can fine-tune the Gemma 2b model on a larger dataset or use the Gemma 7b model to get better results.