Introduction
In Android development, Intents are used to request an action from an app component. There are two types of Intents: explicit and implicit.
Explicit Intents are used when you know the exact package name of the component you need started. Implicit Intents, however, do not need a specific component, and depend on the Android system to find all Applications that can handle the Intent.
In this tutorial, we will learn how to create an implicit Intent.
Goals
At the end of the tutorial, you would have learned:
- How to create implicit Intents.
Tools Required
- Android Studio. The version used in this tutorial is Arctic Fox 2020.3.1 Patch 3.
Prerequisite Knowledge
- Basic Android.
Project Setup
To follow along with the tutorial, perform the steps below:
- Create a new Android project with the default Empty Activity.
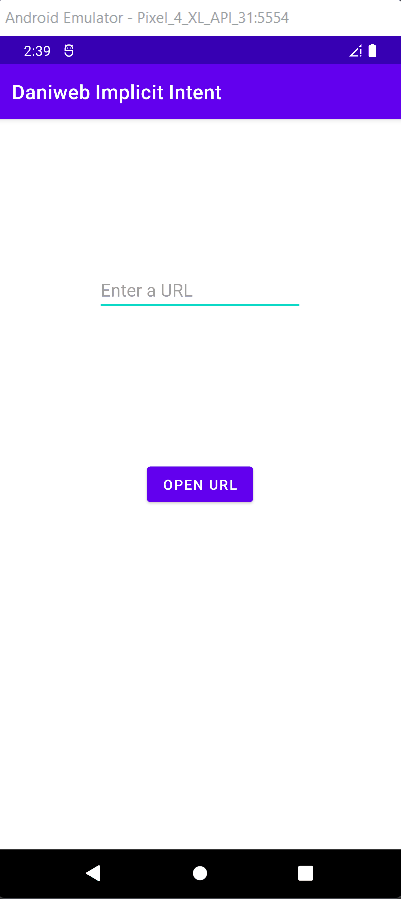
- Delete the “Hello World!” TextView from
activity_main.xml. - Add a new Button to
activity_main.xml. - Constraint the Button to all 4 sides of the ConstraintLayout.
- Extract the hard-coded
android:textattribute of Button to a String resource and also change the value to “Open URL” - Add a new EditText element from the Palette > Text > Plain Text.
- Constraint the top, left, and right sides of the EditText element to the top, left and right sides of ConstraintLayout, respectively.
- Constraint the bottom of the EditText element to the top of the Button.
- Change
android:inputTypeof EditText totextUri. - Remove the
android:textattribute from EditText. - Change the
idof the EditText element to “editText_url”. - Add a new
android:hintattribute to EditText and then extract the hard-coded String to a String resource; for the resource name, you can use “edit_text_hint”. Also change the hint value to “Enter a URL”.
Your activity_main.xml file should like the code below.
<?xml version="1.0" encoding="utf-8"?>
<androidx.constraintlayout.widget.ConstraintLayout xmlns:android="http://schemas.android.com/apk/res/android"
   xmlns:app="http://schemas.android.com/apk/res-auto"
   xmlns:tools="http://schemas.android.com/tools"
   android:layout_width="match_parent"
   android:layout_height="match_parent"
   tools:context=".MainActivity">

   <Button
       android:id="@+id/button"
       android:layout_width="wrap_content"
       android:layout_height="wrap_content"
       android:text="@string/button"
       app:layout_constraintBottom_toBottomOf="parent"
       app:layout_constraintEnd_toEndOf="parent"
       app:layout_constraintStart_toStartOf="parent"
       app:layout_constraintTop_toTopOf="parent" />

   <EditText
       android:id="@+id/editText_url"
       android:layout_width="wrap_content"
       android:layout_height="wrap_content"
       android:ems="10"
       android:hint="@string/edit_text_hint"
       android:inputType="textUri"
       app:layout_constraintBottom_toTopOf="@+id/button"
       app:layout_constraintEnd_toEndOf="parent"
       app:layout_constraintStart_toStartOf="parent"
       app:layout_constraintTop_toTopOf="parent" />
</androidx.constraintlayout.widget.ConstraintLayout>
And the content of your strings.xml so far should be similar to the code below.
<resources>
   <string name="app_name">Daniweb Implicit Intent</string>
   <string name="button">Open URL</string>
   <string name="edit_text_hint">Enter a URL</string>
</resources>
Intent Overview
An Intent is an actual Java class called android.content.Intent. It can be thought of simply as a data container, which the Android system will read to understand the action that your App wants to perform.
To create an Intent object, you simply use one of the many Intent constructors, though using the empty constructor and then setting values with setters might improve readability.
Intent Anatomy
There are six primary components of an Intent:
- Action: describes the action that your app wants to take. Pre-made actions can be found in the
ACTION.*constants from the Intent class. - Data: the URI link to the data that needs to be acted upon.
- Component: The name of the component that we want to start. Implicit intents do not need a component name.
- Category: extra information about the type of component that should handle the Intent. Only certain actions require a Category.
- Extras: key-value pairs that contain extra information. Only certain actions require extra data.
- Flags: metadata for the intent which may influence how Android launches an action to handle the Intent.
Combining Button and TextEdit
Currently, our app works, but the Button and the TextEdit fields do nothing. For this tutorial, our applications needs to perform the actions below:
-
The user inputs a URL into TextEdit.
-
The user presses the button “Open URL”, which will trigger the application to create an Intent that includes the URL in the EditText element.
-
The application tries to open the URL with an implicit Intent, so Android will display a list of applications for the user to choose.
-
To bind an empty action to the Button press(we will add the action later), create a
bindUrlButton()function inMainActivity.ktfrom the code below.private fun bindUrlButton(){ val urlTextInput = findViewById<EditText>(R.id.editText_url) //get TextEdit object val button = findViewById<Button>(R.id.button) //get Button object button.setOnClickListener { } } -
And then call it from
onCreate().override fun onCreate(savedInstanceState: Bundle?) { super.onCreate(savedInstanceState) setContentView(R.layout.activity_main) bindUrlButton() }
Creating the Intent
The last step that we need to do is to create an Intent. The official documentation includes an example of loading a web URL here. The only two components that are required for loading the URL in a web browser are the Intent.ACTION_VIEW constant and the Data URI with the “http/https” scheme. To create such an Intent, update the bindUrlButton() function with the code snippet below.
private fun bindUrlButton(){
val urlTextInput = findViewById<EditText>(R.id.editText_url) //get TextEdit object
val button = findViewById<Button>(R.id.button) //get Button object
//Not including data field because url data must be updated on each button press.
val urlIntent = Intent().apply {
action = Intent.ACTION_VIEW
}
button.setOnClickListener {
urlIntent.data = Uri.parse(urlTextInput.text.toString()) //Updates the text data.
startActivity(urlIntent)
}
}As you can see, we have used the empty Intent() constructor and then the Kotlin scope function apply() to set the parameters. Also, because TextEdit's text content can change depending on user input, we will need to update it every time the Button is pressed.
Launch the App
We can now launch the app, input a web URL with the correct data scheme (http/https), press the “Open URL” Button, and Android will open the URL in a web browser for us.
Most emulators only come with Chrome, so naturally Android will use Chrome to load the URL.
Solution Code
activity_main.xml
<?xml version="1.0" encoding="utf-8"?>
<androidx.constraintlayout.widget.ConstraintLayout xmlns:android="http://schemas.android.com/apk/res/android"
xmlns:app="http://schemas.android.com/apk/res-auto"
xmlns:tools="http://schemas.android.com/tools"
android:layout_width="match_parent"
android:layout_height="match_parent"
tools:context=".MainActivity">
<Button
android:id="@+id/button"
android:layout_width="wrap_content"
android:layout_height="wrap_content"
android:text="@string/button"
app:layout_constraintBottom_toBottomOf="parent"
app:layout_constraintEnd_toEndOf="parent"
app:layout_constraintStart_toStartOf="parent"
app:layout_constraintTop_toTopOf="parent" />
<EditText
android:id="@+id/editText_url"
android:layout_width="wrap_content"
android:layout_height="wrap_content"
android:ems="10"
android:hint="@string/edit_text_hint"
android:inputType="textUri"
app:layout_constraintBottom_toTopOf="@+id/button"
app:layout_constraintEnd_toEndOf="parent"
app:layout_constraintStart_toStartOf="parent"
app:layout_constraintTop_toTopOf="parent" />
</androidx.constraintlayout.widget.ConstraintLayout>MainActivity.kt
package com.example.daniwebimplicitintent
import android.content.Intent
import android.net.Uri
import androidx.appcompat.app.AppCompatActivity
import android.os.Bundle
import android.widget.Button
import android.widget.EditText
class MainActivity : AppCompatActivity() {
 override fun onCreate(savedInstanceState: Bundle?) {
    super.onCreate(savedInstanceState)
    setContentView(R.layout.activity_main)
    bindUrlButton()
 }
private fun bindUrlButton(){
   val urlTextInput = findViewById<EditText>(R.id.editText_url) //get TextEdit object
   val button = findViewById<Button>(R.id.button) //get Button object

   //Not including data field because url data must be updated on each button press.
   val urlIntent = Intent().apply {
       action = Intent.ACTION_VIEW
   }

   button.setOnClickListener {
       urlIntent.data = Uri.parse(urlTextInput.text.toString()) //Updates the text data.
       startActivity(urlIntent)
   }
}
}strings.xml
<resources>
   <string name="app_name">Daniweb Implicit Intent</string>
   <string name="button">Open URL</string>
   <string name="edit_text_hint">Enter a URL</string>
</resources>
Summary
Congratulations! We have learned how to load a URL with an implicit Intent.
Please note that the URL text handling logic used in this tutorial is very basic. Your app will crash if the Data URI is not prefixed with “http/https”, such as “www.daniweb.com” or “daniweb.com”, so you will need extra logic to handle cases like these. There is also the TextInputLayout class from the Material Android library that supports the prefix scheme, which might be more convenient to use.
The full project code can be found here https://github.com/dmitrilc/DaniwebImplicitIntent.