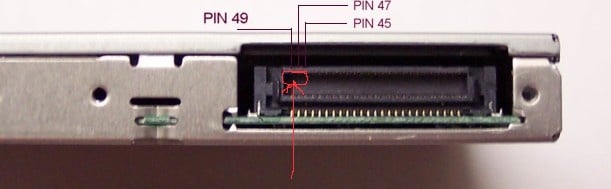
I have Toshiba Satellite A40 with Toshiba SD-R2412 CD-RW/DVD-ROM Optical drive. I have to change my optical drive due to lens failure and I bought TEAC DW-224E as per recommendation in Toshiba Notebook Manual provided to me.

When I insert and turn on laptop, I get IDE #1 error message and I don't get any optical drive in device manager.

I understand from other thread that joining Pin 45 and 47 using aluminum foil will solve the problem.

Could anyone hep me in giving step by step in how to do it if possible with screen shots?

Most important this is how to locate exact Pins 45 and 47 in my TEAC drive?

Folks, kindly help me to solve this issue for me.

Thanks in advance.

Dani AI

Generated

A concise, practical addendum for (and anyone swapping a slimline ATAPI drive into a Toshiba Satellite A-series): the common cause of the IDE #1 POST halt after a replacement is a master/slave (Cable‑Select) mismatch. The TEAC DW‑224E is a slimline ATAPI unit that uses the JAE 50‑pin connector; on ATAPI‑50 the device‑config (CSEL) contact is present on the connector and must be interpreted by the laptop BIOS. If CSEL is left “open” the drive often presents as Slave; grounding CSEL forces Master. (manualowl.com)

How to find the right contacts (safe, verifiable method): the DW‑224E’s PCB has the JAE KX15‑50 style connector at the rear; ATAPI‑50 maps show pin 47 = Device Config (CSEL) and pin 45 = ground. With the tray extended and the drive back (connector) facing up, the last three contacts on the top row are typically 49, 47, 45 (counting odd pins); a multimeter continuity check between candidate contacts and the metal chassis will confirm ground before any work. If no silkscreen is visible, count from the printed pin markers or compare to the ATAPI‑50 diagram. (manualowl.com)

A safer workflow (reversible test first): power the notebook off, remove battery/AC, then use a temporary jumper or—preferable—a 1 kΩ–10 kΩ resistor from the CSEL pad to chassis ground to test. Boot to BIOS; if the drive becomes recognized as the drive the system expects, a permanent solder bridge or tiny wire loop can be fitted. Avoid using loose foil as a permanent fix (it can short adjacent pins, including +5 V pins). Confirm with a meter that the chosen pin is not a power rail before bridging. The resistor/current test and measured currents reported by others shows this is low‑risk when done carefully. (dschen.de)

Notes tied back to forum posts: ’s success by bridging the small pads matches the ATAPI‑50 mapping above; correctly points out that some vendor tools can reconfigure drive mode without soldering when available. Modifying the connector will generally void warranty and should be attempted only with proper tools, magnification and steady hands; if uncertain, the drive can be tested on a desktop slimline adapter or by a repair shop before committing. (dschen.de)

Recommended Answers

All 3 Replies

53 Views but no one to help. I thought this forum would help me out. Perhaps I am wrong...

http://www.daniweb.com/forums/thread1615.html&highlight=toshiba+1800+ide+1+error+

in the thread above there are pictures in post #1 of the back of the drive showing 3 or 4 different ones . mine was the first one ,pick yours and have a close look at the pins ,i read and looked and plucked the 45,47 pins with a small very small screwdriver ,used needle nose pliers to bend and cross the 2 pins ,crossed the 47x45 pins so they touch each other and plugged drive in and it worked ,i didn't solder it yet and may not do so!might flash its firmware ,may not


note: pins count from side to side ,therefor the last 3 pins on the first picture are! from left to right along the top of the plug, 49,47,45.

post a picture here of you drives plug if you wish

I bought an Sony Optiarc AD-7593A for my Satellite A50 (this drive seams to be identical with NEC and Samsung AD-7593A). I had the same Error message. Fortunatly I didn't have to solder, because Sony has a master/slave tool for the AD-7593A. You can download it here:
http://www.sony-optiarc.eu/
(not on http://www.sony-optiarc.com)

After I had switched the drive to master mode, the drive could be recognised by the BIOS and by WindowsXP. But first I had to find a fried, who's notebook accepted drives running on CSEL mode.

Be a part of the DaniWeb community

We're a friendly, industry-focused community of developers, IT pros, digital marketers, and technology enthusiasts meeting, networking, learning, and sharing knowledge.