USING THE ACER ASPIRE 1410 LAPTOP AS AN HD MEDIA CENTER PC: A STEP-BY-STEP ILLUSTRATED TUTORIAL
This tutorial is not intended to be a full review of the Acer Aspire 1410 ultraportable laptop PC. It assumes that you already familiar with the machine and are looking to learn how to exploit its full capabilities for use as an HD media center PC in your home theater.
Keep in mind that the Aspire 1410 isn't the only laptop than can be used as a media center PC. While I feel the Aspire is the best choice for this purpose, the information in this guide is applicable to any laptop that's fast enough to decode HD video and that has HDMI and S/PDIF digital audio out ports.
BACKGROUND AND OVERVIEW
Why, you may ask, would anyone want to use their ultraportable laptop as a media center PC? Why not just get a dedicated desktop or "nettop" PC or, better yet, some sort of home media appliance with network capability like the Western Digital WD TV, Apple TV, or even a Blu Ray player with MPEG-4 and YouTube support?
Even if you're already sold on the advantages of using a laptop as a media center replacement, you might wonder how a machine with relatively modest hardware specs like a Celeron processor and integrated Intel video could possibly handle the myriad demands of a media center PC, like multi-display support and the ability to smoothly decode 1080p video.
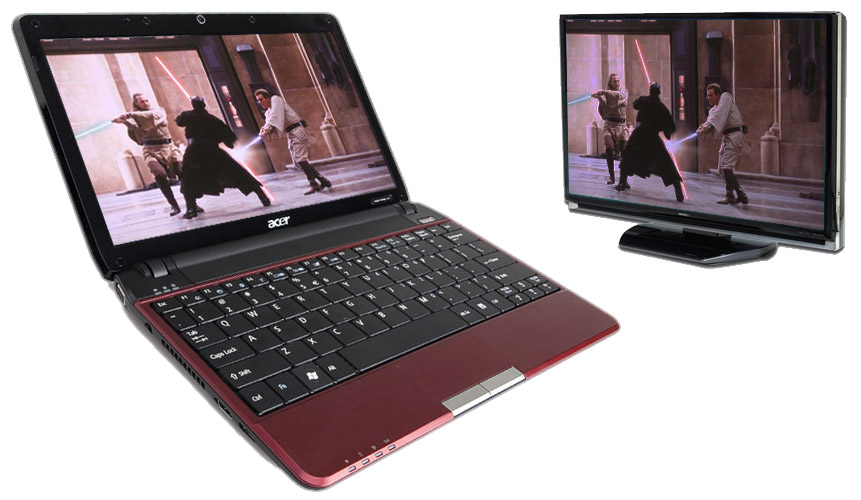
Here's a brief summary that demonstrates both the need for and ability of an ultraportable laptop like the Aspire 1410 (pictured below) to serve as a media center PC: The Aspire 1410 ultraportable laptop can serve as a versatile media center PC for your home theater
THE NEED
• If you have multiple TVs or home theaters in the house, a desktop or nettop PC can't easily be moved from one room to another, whereas the Aspire 1410 barely weighs three pounds and can be moved around without even being powered off.
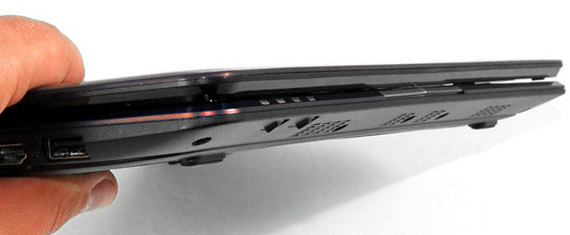
• In terms of small footprint, low noise, and minimal power consumption, the Aspire 1410 is head and shoulders above the rest of even the slimmest, quietest, and "green-est" nettops: it uses as little as 7 watts when running on battery, is only 1.2 inches thick, and is virtually silent even when running at full throttle. The photos below give you a better idea of just how thin the Aspire is. You'll hear a pin drop in an empty concert hall before you hear so much as a peep out of the Aspire. At just 3.2 pounds light and 1.2 inches thin, the Aspire 1410 takes up little space in your home theater setup and can easily be carried around from room to room
• Being a laptop, the Aspire 1410 has its own 11.6-inch LED-backlit display that can be used simultaneously in a multi-display environment while connected to your HDTV. If you've ever strained your eyes while squinting at the small text on a 1080p HDTV serving as a computer monitor, you'll understand the need for a dedicated display that's integrated into your media center.
• While home media appliances such as the Apple TV and Blu Ray players address some of the limitations of desktop and nettop PCs--they're more compact, portable, quiet, and green--they still suffer from lack of integrated display and limited software. For example, the Web browsers installed on Blu Ray players can't handle the streaming video in most Flash-dependent Web sites, so you're out of luck when it comes to ESPN360.com, hulu.com, and similar destinations. And keep in mind that most media appliances don't have the capability of wirelessly connecting to the file shares on your home network and accessing media stored on other machines.
THE ABILITY
• Keep in mind that the Aspire 1410 is not a netbook--it's an ultraportable laptop, which means that its hardware specs are more robust than what you'll find on netbooks. The Aspire 1410 is available in different sub-models, each with a unique processor. The model used in this tutorial is the Aspire 1410-2936, which uses the new ULV (ultra low-voltage) dual-core Intel Celeron SU2300. Even though the clock speed of each CPU core is lower than that on the Atom netbook processor (1.2 Ghz versus 1.6 Ghz), benchmarks show that the SU2300's performance is more than double the Atom's, even though the power consumption is about the same.
• Most netbook displays max out at 10.1 inches and a 1024x600 resolution, whereas the Aspire 1410's display is 11.6 inches and runs at an HD-capable 1366x768 resolution.
• While not as high-end as the discrete nVidia Ion GPU found in competitors, the integrated Intel GMA 4500M video found in the Aspire is more than capable of handling media center needs. When running the latest version of the Intel GMA driver, along with the new version 2.0 of the CoreAVC video codec, the Aspire can seamlessly decode 1080p video from an H264 (AVC)-encoded MKV video file streamed over a WiFi network with 80 to 90 percent CPU usage, or 720p video with about 50 to 60 percent CPU usage under similar circumstances.
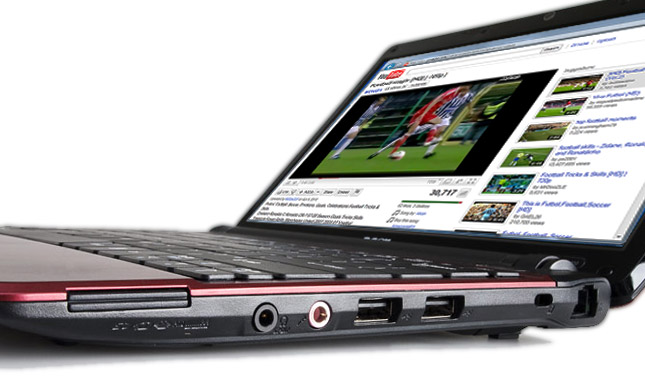
• The Aspire 1410 offers a unique perk among other machines in its class: a standard headphone jack that doubles as a digital S/PDIF audio out jack. (In the photo below, the jack we're referring to is the black-bordered circular one to the left of the pink-bordered one.) When used with a special adapter described below, you can connect the Aspire 1410 to a digital home audio receiver using an inexpensive, readily available Toslink fiber-optic audio cable. The circular jack with the black border isn't just a headphone jack -- it's also a digital S/PDIF digital audio jack than can be connected to your home audio receiver!
GETTING STARTED
To use the Aspire 1410 as a media center PC, you'll need the following:
General hardware:
• The Aspire 1410 machine with Windows XP, Vista, or 7 in either 32-bit or 64-bit versions (the machine used in this guide has the Windows 7 Home Premium 64-bit that came pre-installed, but any edition of these operating systems will work--you do not need the Media Center Edition)
• An HDTV with an available HDMI port
• An audio receiver with an available Toslink optical in jack and built-in Dolby Digital / DTS decoding capability (coaxial audio connections will not work with the Aspire 1410--I learned this the hard way!)
Software (some free, some not):
• The KMPlayer media player software (available for free download at http://kmplayer.en.softonic.com/ )
• The CoreAVC video playback codec (currently on sale for $12.95 per license at www.coreavc.com )
(There are free codec packs out there but none are as capable as CoreAVC)
Cables, wires, and adapters (all available at nominal cost on Monoprice.com or eBay):
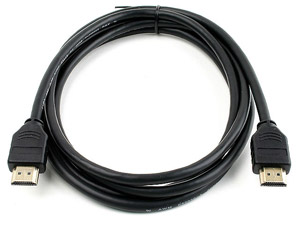
• An HDMI cable (pictured below) that will be long enough to extend from the Aspire to the HDMI port on your TV (available for as little as $5 shipped on eBay at http://shop.ebay.com/i.html?_nkw=hdmi+cable&_armrs=1&_from=&_ipg= ) You'll need an HDMI cable to connect the Aspire 1410 to your HDTV. You'll probably want one that's longer than the typical 6 feet
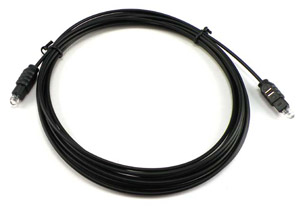
• At least one, and preferably two or more, optical Toslink audio cables (pictured below; must also be long enough to reach the jacks on your audio receiver; available for as little as $4 shipped on eBay at http://shop.ebay.com/i.html?_nkw=toslink+cable&_sacat=0&_trksid=p3286.m270.l1313&_odkw=hdmi+cable&_osacat=0 ) You'll need a Toslink optical audio cable to connect the Aspire 1410 to your home audio receiver. The once pictured above is only 6 feet long; you'll probably want a longer one.
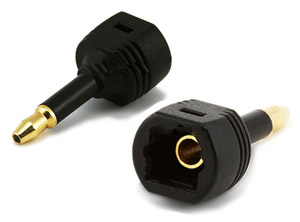
• A Toslink-to-1/8'' adapter (pictured below) that will allow you to connect the Toslink cable to the Aspire's special headphone jack that doubles as a digital audio out jack (available for as little as $4 shipped on eBay at http://shop.ebay.com/i.html?_nkw=toslink+adapter&_armrs=1&_from=&_ipg= ) The adapter shown above allows you to connect a Toslink optical audio cable to the S/PDIF digital headphone jack on the Aspire 1410. The gold-tipped plug connects to the headphone jack, while the gold-bordered jack at the other end is where the Toslink cable connects.
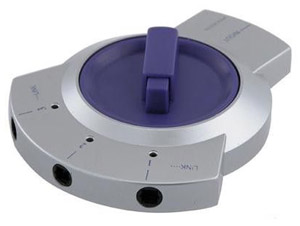
• In case your audio receiver's optical jacks are all already in use by other devices like TV receivers, video game consoles, and Blu Ray players, you'll also want to get a multiple-port Toslink switch (pictured below) that allows you to switch optical audio sources instantly just by rotating a dial. The switch doesn't require an external power source and is fairly compact, about the size of a donut. Just like with all the other accessories you'll need, you can find the switch at nominal cost--as little as $15--on eBay at http://shop.ebay.com/i.html?_nkw=toslink+switch&_armrs=1&_from=&_ipg= ) This Toslink audio switch allows you to share multiple audio sources among a single digital audio jack on a receiver. The different sources connect to each of the numbered jacks on the switch; the purple dial can be rotated to switch between sources.
TIP: On eBay you might end up having to purchase the above items from a number of sellers. If you are looking for a single source to get all of the above cables and adapters check out www.monoprice.com - the prices there are super reasonable and the product quality is very good.
CONFIGURING AND CONNECTING
Before we get started, we'll operate under the following assumptions:
• You already have the Aspire 1410 (or similar notebook PC) ready to go, with full battery charge or an AC power source. We'll also assume that Windows and your Internet connection are already installed and properly configured, and that you've already downloaded and installed the KMPlayer and CoreAVC programs mentioned above
• If your media is located on a USB mass storage device like an external hard drive or flash memory stick, we'll assume it's already connected to and recognized by the Aspire
• If you want to access media on other PCs in your home network, we'll assume you've already configured Windows File Sharing and your network shares are online
• Since decoding HD video is so CPU-intensive, you'll want to make sure you don't have any major applications running in the background, especially resource hogs like Norton Antivirus or Google Desktop (your best bet would be to uninstall these programs altogether)
• The 2 GB of memory that comes standard with the Aspire should be more than enough for our purposes, but if your machine hasn't been tuned up recently or is experiencing performance issues, you may want to consider a memory upgrade
Part 1: Configuring KMPlayer and CoreAVC
By default, KMPlayer is set to use its own internal decoder to play back MPEG-4 videos. However, this built-in codec isn't very CPU efficient and has known issues playing back 1080p video, even on high-end machines.
This is where CoreAVC comes in. CoreAVC is a modern, efficient video codec that's designed to take advantage of the latest hardware features, such as 64-bit processing, multiple CPU cores, and hardware-accelerated video decoding. It supports most second-generation MPEG-4 variants (AVC1, H264, X264, and others), including the codec used in most Blu Ray videos as well as the one used in newer-generation HD camcorders.
We need to configure KMPlayer so that it uses CoreAVC, rather than its built-in decoder, to decode HD videos. To do so, just follow these illustrated steps (the screenshots are taken directly from KMPlayer):
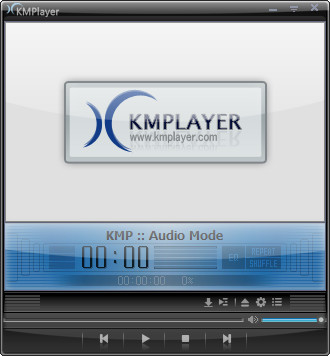
1. Start the KMPlayer program by double-clicking on its desktop icon or selecting it from the Quick Launch bar or start menu. You should get the standard player window with control buttons (back, play, stop, and forward) at the bottom, as shown below:
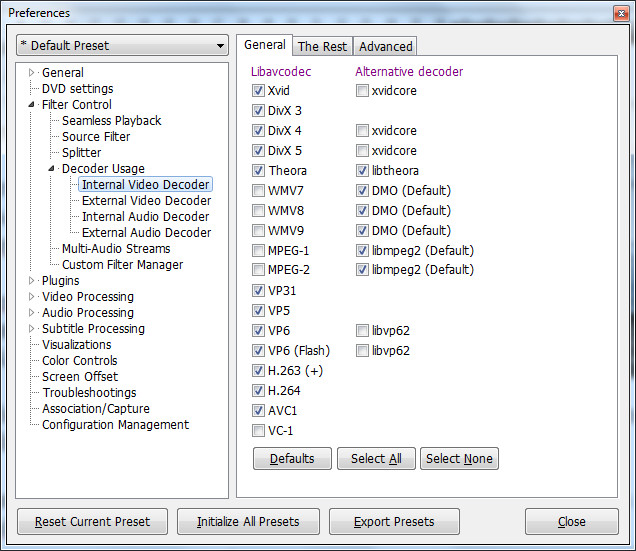
2. Right-click anywhere in the player window and select 'Options', then 'Preferences' in the context menu. You should get the KMPlayer's preferences dialog, as shown below:
3. In the left-hand pane of the dialog, select 'Filter Control', then 'Decoder Usage', then 'Internal Video Decoder'. You should get the dialog down below:
4. In the right-hand pane, under the General tab, uncheck the checkboxes labeled 'H.263 (+)', 'H.264', and 'AVC1'.
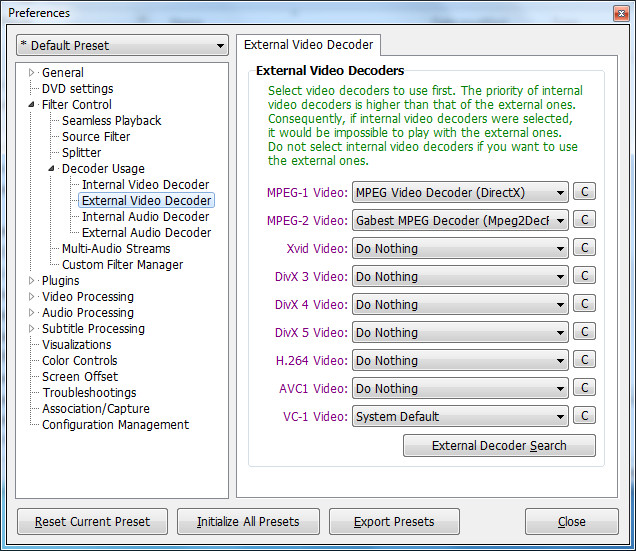
5. Now, back in the left-hand pane, select 'External Video Decoder' under 'Decoder Usage'. You should get the dialog shown below:
6. Click on the button at the bottom of the right-hand pane that reads 'External Decoder Search'. You should get a dialog entitled 'External Decoder / Filter Management', as shown below:
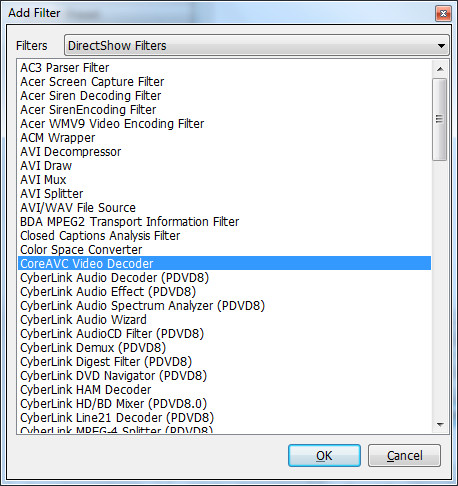
7. Click on the button toward the bottom left that reads 'Add System Codec'. You should get the 'Add Filter' dialog shown below:
8. Scroll down the list box until you see the entry named 'CoreAVC Video Decoder', then double-click it.
9. Back in the Filter Management dialog, you should see 'CoreAVC Video Decoder' added to the previously empty list with the white background, as shown below. Now, in the right pane, check the checkboxes labeled 'H264' and 'AVC1', then click the 'OK' button at the bottom right to return to the 'External Video Decoder' dialog.
10. Back in the 'External Video Decoder' dialog, find the drop-down list labeled 'H.264 Video'. The drop-down field should currently read 'Do Nothing'. If you click on the drop-down arrow for this field, you'll see a list of entries, one of which reads, '* CoreAVC Video Decoder'. Click on this entry, as shown below:
11. Repeat the procedure in step 10 above for the drop-down list labeled 'AVC1 video', then click on the 'Close' button at the bottom right of the dialog. KMPlayer is now configured to use the CoreAVC codec when playing MPEG-4 videos!Part 2: Connecting the Aspire to your home theater
If you have the necessary cables and accessories described above, connecting the Aspire to your home theater is a cinch. Simply run the HDMI cable from the port on the left side of the laptop to the port on your TV.
Before you connect the Toslink audio cable to the Aspire, you'll have to connect one end of it to the headphone jack adapter described above. Once you've done so, just connect the adapter to the headphone jack on the right side of the Aspire, and the other end of the cable to the optical in jack on your audio receiver.
Part 3: Configuring multi-display
The bundled Intel display software is fairly user-friendly and intelligent; as soon as you connect the Aspire to your TV via HDMI, the Aspire should immediately recognize the TV as a second display and show the laptop's output on it, while shutting off the laptop's own screen. Once you disconnect the HDMI cable, the display should revert back to the laptop screen.
This may or may not be the ideal setup for you. For example, if you want to surf the Web or check your e-mail on the laptop's display while watching a full-screen video on your TV, you would want both screens -- the laptop's and the HDTV -- to be on simultaneously. In addition, you may want to configure the display software to show different output on the two screens, with each one set to its own resolution and the ability to drag windows back and forth between the two screens. The following steps show you how to do just that:
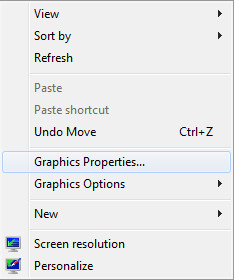
1. Right-click anywhere on the desktop to bring up the context menu and select 'Graphic Properties', as shown below:
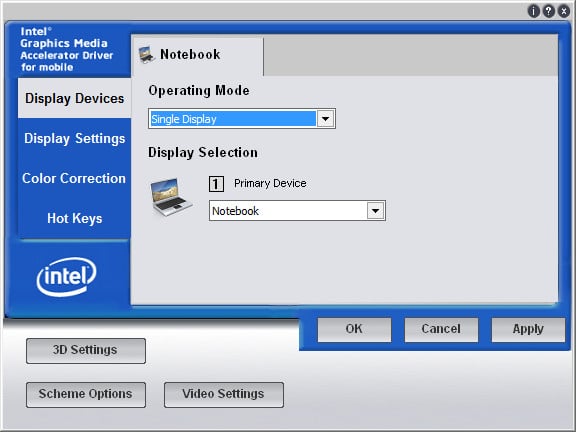
2. In the graphics properties dialog, look for the drop-down list labeled 'Operating Mode'. The entry in the list should be 'Single Display', as shown below:
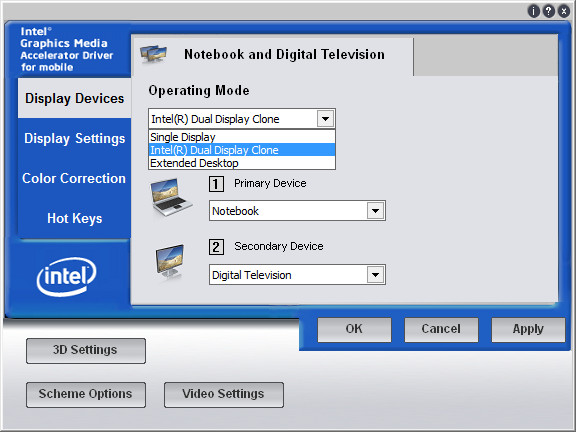
3. Click on the drop-down arrow, select 'Extended Desktop' from the list, and click on the OK button at the bottom of the dialog, as shown below: Your Aspire should now show output on both its own screen and the HDTV.Part 4: Playing back media
In our demo here, our media is stored on an external Western Digital hard drive, which is connected to the Aspire via USB. You can just as easily access media from a USB flash memory drive, memory card reader, network share, or even a Blu Ray disc if you have an external BD-ROM drive connected to the laptop.
The media we'll use in this demo are HD videos encoded in H264, also known as MPEG4-AVC, format, at a resolution of either 1280x720 (i.e., 720p) or 1920x1080 (i.e., 1080p). The audio tracks are encoded in either Dolby Digital 5.1 (also known as AC3 audio) or DTS Digital format, which are both supported by most home theaters these days. The video files are in the increasingly popular MKV (Matroska Video) container format, with the '.mkv' file extension.
Keep in mind that you can play back any kind of media on the Aspire as long as you have the right audio / video codecs and filters installed. There's nothing stopping you from using the Aspire to play back Quicktime videos download from iTunes or videos recorded on your cell phone camera. I'm just using the HD MKV videos as an example in this guide.